how to share wifi from laptop windows 8

Title: How to Connect to WiFi on Windows 8
Channel: HOWTECH
How to Connect to WiFi on Windows 8 by HOWTECH
Unlock Your WiFi: Windows 8 Hotspot Hack (Easy!)
Share Your Internet: Turn Your Windows 8 PC into a WiFi Hotspot (No Sweat!)
Let's face it, internet access is a modern necessity. You might find yourself in a tricky situation. Perhaps your primary router is down. Maybe you have multiple devices that crave connectivity. You could also need to share your internet with a guest. Regardless, there's a clever trick leveraging your Windows 8 computer. It lets you broadcast a WiFi signal. Ready to learn how? This guide will walk you through it, step by step.
The Magic of a Software-Defined Hotspot
Forget complicated hardware installations. Forget spending extra money. Windows 8 has a hidden feature. This feature lets your computer become a WiFi hotspot. Think of it as a miniature wireless router, built right into your PC. Essentially, your computer shares its internet connection. It's like giving everyone a piece of the pie. This is incredibly useful in many scenarios. You can, for instance, connect multiple devices to the internet. These include your phone, tablet, or even another computer.
Setting the Stage: Prerequisites and Preparations
Before we dive in, let's ensure you're all set. You’ll need the essentials first. Firstly, you need a Windows 8 computer. Next, verify you have an active internet connection. This can be Ethernet, or even a 3G/4G connection. Finally, ensure your computer has a wireless network adapter. Most laptops already have this built-in. Ensure your network adapter is enabled. These are the core elements.
Step-by-Step: Creating Your Windows 8 Hotspot
Now comes the fun part. Follow these simple steps to unleash your inner network guru.
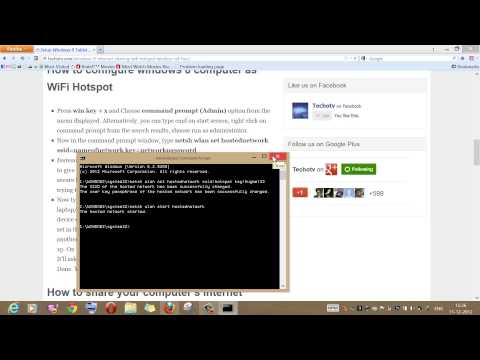
Open the Command Prompt as Administrator: Search for "cmd" in the Windows search bar. Right-click on "Command Prompt" and select "Run as administrator". This step is crucial. It provides the necessary permissions.
Set Up the Hosted Network: In the command prompt, type the following command and press enter:
netsh wlan set hostednetwork mode=allow ssid="Your Hotspot Name" key="YourPassword". Replace “Your Hotspot Name” with your desired network name. Choose a strong, secure password where it states “YourPassword”. This command creates the virtual interface for your hotspot.Start the Hosted Network: Next, type this command and press enter:
netsh wlan start hostednetwork. This command activates the hotspot you just created. You are one step closer to wireless freedom!Sharing the Internet Connection: This step is very important. Open the “Network and Sharing Center”. You can find this by right-clicking on the network icon in your system tray. Click “Change adapter settings”. Select the internet connection you're currently using. Right-click and choose "Properties". Go to the "Sharing" tab. Check the box that says, "Allow other network users to connect through this computer's internet connection". From the dropdown menu, select the "Microsoft Hosted Network Virtual Adapter". Click "OK". This shares your existing internet connection.
Connecting Your Devices: Now, search for available WiFi networks on your devices. Your new hotspot should be visible. Select it and enter the password you set earlier. That’s it! Your devices are now connected.
Troubleshooting Common Hotspot Hurdles
Sometimes, things don't go as planned. Don't worry, though. Here are some common issues and their fixes.
- The "Hosted Network Supported" Error: This error typically means your network adapter doesn't support hosted networks. Ensure your drivers are completely up to date. You can often find updated drivers on your computer manufacturer's website.
- Can’t Connect to the Internet: Double-check your internet connection. Also, verify that you shared the correct connection in the "Sharing" settings. Furthermore, restarting your computer can often resolve minor glitches.
- Hotspot Disconnecting Frequently: The signal strength could be weak. Try moving your computer closer to your devices. Also, check if other devices are interfering with the WiFi signal.
Staying Secure: Protecting Your Hotspot
Security is paramount. You’re sharing your internet, so protect it.
- Strong Password: Use a strong, unique password. It should be at least 12 characters long. Combine uppercase and lowercase letters, numbers, and symbols.
- WPA2 Encryption: Ensure your hotspot uses WPA2 encryption. This is the most secure option.
- Monitor Connected Devices: Keep an eye on the devices connected to your hotspot. If you see any unknown devices, promptly disconnect them.
Beyond the Basics: Advanced Customization (Optional)
If you're feeling adventurous, you can customize your hotspot. You can use commands to view the status of your hosted network. You can also change the SSID and password on the go. Experiment with commands in the command prompt. However, keep in mind the potential for complications.
Embrace the Wireless World
Creating a WiFi hotspot in Windows 8 is easier than you might think. It brings numerous benefits. It's a simple solution for sharing your internet connection. You can share with friends, family, or guests. It can also be a lifeline when your primary router fails. Remember to follow these steps. Also, prioritize security. Now, go forth and share your internet. You're set to be an internet-sharing champion. So, enjoy your newfound wireless freedom!
Laptop WiFi: The SHOCKING Secret to Blazing-Fast Speeds!Unlock Your WiFi: Windows 8 Hotspot Hack (Easy!)
Hey everyone! Ever been stuck in a hotel room, a coffee shop, or even just your own house with a dodgy internet connection? Or maybe you have multiple devices and only one Wi-Fi source? We've all been there. The frustration of limited connectivity can feel like being adrift at sea with no map. But fear not, because today, we're diving into a super simple trick that can turn your Windows 8 laptop into a Wi-Fi hotspot, effectively acting as a personal internet hub. Think of it as your own little Wi-Fi fortress! Let's unlock your digital freedom!
1. Why Bother Creating a Windows 8 Hotspot?
Before we jump into the how-to, let's discuss why this is such a fantastic idea. Imagine you're traveling for business and need to connect your laptop, tablet, and phone. Or perhaps you have a desktop PC without Wi-Fi, and you want to use your laptop's internet connection to access the web. A Windows 8 hotspot allows you to share your internet connection with multiple devices at the same time, turning one Wi-Fi source into many. This way, you can escape the tyranny of spotty Wi-Fi!
2. The Built-In Magic: Windows 8's Hidden Gem
Believe it or not, Windows 8 itself has the tools we need. It's like owning a secret superhero power, just waiting to be unleashed. You don't need to download any sketchy third-party software, which is a massive win for your device's security and performance. This method is safe, reliable, and, best of all, easy. Just a few clicks, and you're practically a Wi-Fi wizard!
3. Unveiling the Command Prompt: Our Secret Weapon
Now, we're going to delve into the slightly more technical side of things, but don't worry, it's not rocket science. We'll be using the Command Prompt, the unsung hero of many Windows functions. Think of it as the engine that drives the Wi-Fi hotspot functionality.
Here's how to access it:
- Option 1 (Quickest): Press the Windows key + R, type "cmd" in the Run box, and hit Enter.
- Option 2 (More Formal): Search for "cmd" in your Windows search bar and click "Command Prompt."
4. Setting Up Your Virtualized Network: The First Command
Inside the Command Prompt, we're going to input a few crucial commands. The first one sets up the virtualized network, essentially telling Windows to act as a hotspot. Type the following and press Enter:
netsh wlan set hostednetwork mode=allow ssid="YourHotspotName" key="YourPassword"
Important Notes:
- Replace "YourHotspotName" with whatever you want to name your Wi-Fi hotspot (e.g., "MyTravelHotspot," "TechieWifi").
- Replace "YourPassword" with a strong password you'll use to secure your Wi-Fi network (at least eight characters, ideally a mix of letters, numbers, and symbols). Imagine it as the lock to your Wi-Fi fortress.
- Make a note of these names and passwords so you can remember them later.
5. Activating the Virtual Adapter: The Second Command
Now, we need to activate the virtual network adapter we just created. This is where the magic really starts to happen. In the Command Prompt, type the following and hit Enter:
netsh wlan start hostednetwork
This command tells Windows, "Alright, we're ready to broadcast Wi-Fi!"
6. Sharing Your Internet Connection: The Crucial Step
We're almost there! This is the final, and most important, step. Now, we need to tell Windows to share your existing internet connection via the newly created hotspot.
Here's how:
- Press the Windows key + X, then click "Network Connections."
- Locate your main internet connection (e.g., "Wi-Fi" or "Ethernet").
- Right-click on your main connection and select "Properties."
- Go to the "Sharing" tab.
- Check the box that says "Allow other network users to connect through this computer's Internet connection."
- In the "Home networking connection" dropdown menu, select the network adapter listed for your hosted network (it'll likely be called "Microsoft Hosted Network Virtual Adapter").
- Click "OK."
7. Troubleshooting Common Hiccups
Sometimes, things don't go perfectly the first time. Don't worry! Here are a few common problems and how to fix them:
- "The hosted network couldn't be started": This can happen if the required drivers aren't enabled. Make sure your wireless adapter is active, and try running the commands in the Command Prompt again. Try rebooting your Laptop.
- "Unable to connect to the hotspot": Double-check that you've entered the correct password on your connecting device. Make sure your main internet connection is active and stable.
- Slow internet speed: The speed of your hotspot is limited by the speed of your main internet connection. Avoid heavy downloads on multiple devices simultaneously.
8. Checking Your Hotspot Status: Is It Alive?
You can check the status of your hosted network by typing this command in the Command Prompt and pressing Enter:
netsh wlan show hostednetwork
This will show you if the hosted network is running, the SSID (your hotspot name), the number of connected devices, and other useful information.
9. Starting, Stopping, and Restarting Your Hotspot: Control at Your Fingertips
- To start your hotspot: Open the Command Prompt and type
netsh wlan start hostednetwork. - To stop your hotspot: Open the Command Prompt and type
netsh wlan stop hostednetwork. - To restart your hotspot: First, stop the hotspot (as above). Then, start it again (as above).
10. Security First: Keeping Your Data Safe
Always use a strong password for your hotspot. This is crucial to prevent unauthorized access to your shared internet connection and protect your personal data. Also, be mindful of what you're browsing on shared Wi-Fi. Using a VPN (Virtual Private Network) is an excellent way to further encrypt your internet traffic and enhance your online privacy, especially on public Wi-Fi.
11. Beyond Windows 8: The Universal Hotspot Recipe
While this guide focuses on Windows 8, the core principles are very similar for Windows 7, 10, and even 11. The user interface might look a little different, but the underlying commands and the concept of sharing your internet connection remain the same. It's a timeless trick!
12. Enhancing Your Experience: Practical Applications
Think of the possibilities! You can share your laptop's internet with your phone, tablet, or even another laptop. This is perfect for:
- Traveling: Staying connected on the go.
- Home: Extending your Wi-Fi coverage to dead zones.
- Troubleshooting: Testing internet connections on multiple devices.
13. Customizing and Personalizing Your Hotspot
Experiment with different names and passwords to personalize your hotspot. Choose a name that's easy to remember or reflects your personality. The possibilities are endless!
14. When to Say Goodbye: Disabling Your Hotspot
When you're finished using your hotspot, remember to turn it off. This conserves battery life, improves your laptop's performance, and prevents accidental connections. Simply use the netsh wlan stop hostednetwork command.
15. The Power of Sharing: A Digital Superpower
Knowing how to create a Windows 8 hotspot is like wielding a digital superpower. You control your connectivity, transforming your laptop into a versatile hub of internet access. Embrace the freedom, the convenience, and the knowledge you now possess!
Conclusion: You've Got This!
There you have it! You've unlocked the secrets of creating a Wi-Fi hotspot on your Windows 8 laptop. It's a simple process that opens up a world of connectivity possibilities. Now go forth, share your internet, and conquer the digital world! Remember to be safe, be smart, and enjoy your newly found Wi-Fi freedom!
Principal Keywords: Windows 8 Hotspot Hack
SEO Headline: Windows 8 Hotspot Hack: Unleash Your WiFi (Easy Guide!)
Pathway: Windows 8 Hotspot
Meta Summary: Turn your Windows 8 laptop into a Wi-Fi hotspot! This easy guide shows you how to share your internet connection. Unlock your digital freedom!
Image Alt Text: A laptop displaying the command prompt, demonstrating the Windows 8 hotspot hack.
FAQs
1. Can I use this hotspot method to share my internet connection if I'm using a cellular data plan?
Yes, absolutely! As long as your Windows 8 laptop has an active internet connection (either Wi-Fi or a data plan through an adapter), you can share it as a hotspot.
2. Will this drain my laptop's battery quickly?
Yes, creating a hotspot will consume more battery power. It's recommended to keep your
Toshiba Satellite WiFi: The SHOCKINGLY Easy On/Off Switch!Turn Windows 8 Laptop into WiFi HotSpot How To

By TechEmpty Turn Windows 8 Laptop into WiFi HotSpot How To by TechEmpty
Make a Wi fi Hotspot Using your Windows 8 Laptop

By Syed Shah Zahurullah Hussaini Make a Wi fi Hotspot Using your Windows 8 Laptop by Syed Shah Zahurullah Hussaini
How to Share Internet Connection in Windows 8

By HOWTECH How to Share Internet Connection in Windows 8 by HOWTECH
Title: Share internet via WiFi on Windows 8 without router with other computer or devices
Channel: Techotv
Share internet via WiFi on Windows 8 without router with other computer or devices by Techotv
Wifi On Laptop
Unlock Your WiFi: Windows 8 Hotspot Hack (Easy!)
Are you tired of tethering your mobile device to your laptop to access the internet? Do you have a device that doesn't readily support WiFi? Windows 8, even in its legacy form, offers a surprisingly simple and robust solution: the hosted network feature, allowing you to transform your Windows 8 machine into a fully functional WiFi hotspot. Forget complex software installations and convoluted configurations! We, at [Your Company Name], are here to guide you through the straightforward process of creating your own wireless access point directly from your Windows 8 system. Prepare to unlock a world of wireless connectivity, all within a few easy steps.
Setting the Stage: Preparing Your Windows 8 Machine
Before we embark on this WiFi adventure, ensure your Windows 8 system is ready to transform into a hotspot. The first and most fundamental requirement is a wireless network adapter. Most laptops and many desktop computers come equipped with one, so this is typically a non-issue. Verify your adapter's presence by navigating to Control Panel > Network and Internet > Network and Sharing Center. On the left-hand side, click "Change adapter settings". If you see "Wireless Network Connection" listed, you're golden! If not, you might need to install the drivers for your card. If your computer has an older version of Windows 8, ensure that you have the latest driver for your wireless network adapter. This will guarantee the best possible performance and compatibility. Another area to explore is ensuring you have an active internet connection. This is the source your hosted network will share, so make sure your Ethernet cable is plugged in or your existing WiFi is connected and functioning flawlessly.
The Command Center: Configuring the Hosted Network
Now, it's time to unlock the true potential of your Windows 8 system, utilizing the command prompt to configure the hosted network. Do not fret about the appearance of the command prompt; the commands used are simple and easy to comprehend.
Open the Command Prompt as Administrator: Search for "cmd" in the Windows search bar. Right-click on "Command Prompt" and select "Run as administrator." This elevates your privileges and allows you to make the necessary network changes.
The Cornerstone Command: Enabling the Hosted Network: Type the following command and press Enter:
netsh wlan set hostednetwork mode=allow ssid="YourWiFiName" key="YourWiFiPassword"netsh wlan: This calls on the Windows WLAN (Wireless Local Area Network) utility.set hostednetwork: This commands the creation of a hosted network.mode=allow: We are granting permissions and setting up the mode to allow.ssid="YourWiFiName": Replace"YourWiFiName"with the desired name for your WiFi network. Choose a name that is easily recognizable, but avoid overly sensitive personal information.key="YourWiFiPassword": Replace"YourWiFiPassword"with a strong, secure password for your network. It is critical to choose a strong password to secure your network from unauthorized access. Aim for a password that is at least 12 characters long, including a mix of uppercase and lowercase letters, numbers, and symbols.
Initiating the Hosted Network: Once the above command has been executed, you have to start the hosted network; for this, type and execute the following command:
netsh wlan start hostednetworkYou should see a confirmation message indicating that the hosted network has started successfully.
The Gateway: Sharing Your Internet Connection
The next stage involves connecting your newly created hosted network to your existing internet connection.
Access Network Connections: Return to Control Panel > Network and Internet > Network and Sharing Center and "Change adapter settings".
Configure the Sharing Settings: Identify the connection you are currently using to access the internet (e.g., Ethernet, your primary WiFi connection). Right-click on it and select "Properties".
Enable Internet Connection Sharing: Navigate to the "Sharing" tab. Check the box that says "Allow other network users to connect through this computer's Internet connection".
Select Your Hosted Network: In the "Home networking connection" dropdown, select the name of your hosted network. (This is the network adapter that corresponds to the hosted network you created.)
Confirm the Changes: Click "OK" to save your settings.
Troubleshooting the Wireless Gateway
While the process is typically straightforward, occasionally, issues may arise.
"The hosted network couldn't be started" Errors: This can stem from several causes. First, ensure your wireless adapter supports hosted network mode. Some older adapters might not. Second, try updating your wireless adapter drivers. Third, verify that you have not exceeded any maximum network connections allowed by your Internet service provider.
Intermittent Connectivity: If devices connect but experience frequent disconnections, ensure that your drivers are up to date. Also, consider the distance between the device and the Windows 8 machine – WiFi signal strength weakens over distance.
Slow Internet Speeds: Hosted network speed is dependent on your original internet connection. If your internet is slow, the hotspot will also be slow. Additionally, the number of devices connected to the hotspot can impact speed, as bandwidth is shared among those devices.
Fine-Tuning for Optimal Performance
While the fundamental setup is complete, consider these optimizations for a more seamless experience:
- Channel Selection: Windows 8 usually selects a WiFi channel automatically. If you experience interference, consider manually selecting a channel in your wireless adapter settings. Avoid channels that overlap other nearby WiFi networks.
- Security Protocol: The default security protocol is WPA2-PSK, which is generally secure. However, always keep your password strong.
- Power Management: To avoid the hosted network shutting down to save power, go to Device Manager in Windows 8 and find your wireless network adapter. Right-click on it, select "Properties", and go to the "Power Management" tab. Uncheck the box that says "Allow the computer to turn off this device to save power". Consider setting the power plan to "High Performance" in Power Options to reduce the chances of the hosted network closing.
- Automatic Startup: When you start your computer, the hosted network will not start automatically. You can set up a scheduled task to start the hosted network every time your computer boots. In Task Scheduler, create a new task, set the trigger to At startup and the action to
netsh wlan start hostednetwork.
Beyond the Basics: Advanced Customization
For those seeking a more customized experience, there are advanced options to explore:
Third-Party Utilities: While Windows 8's built-in feature is generally sufficient, third-party utilities can add additional features like bandwidth limiting, usage monitoring, and more refined WiFi management. However, always download these from a reputable source.
Firewall Considerations: If you have a third-party firewall, ensure that it permits the hosted network connection. You might have to add an exception to allow the connection.
Static IP Address: In certain scenarios, assigning a static IP address to your hosted network adapter can improve stability. However, this is usually not necessary for basic hotspot functionality.
The Benefits of Your New Hosted Network
You've successfully transformed your Windows 8 machine into a WiFi hotspot! Now, bask in the benefits:
Connectivity on the Go: Share your internet connection with phones, tablets, and other devices, whether away from home or in areas with spotty WiFi coverage.
Cost Savings: Eliminate the need for separate mobile hotspots or data plans.
Simplified Sharing: Easily share your internet connection with guests or across a small group of devices.
Convenience: Avoid the hassle of constantly connecting and disconnecting from shared WiFi networks.
Conclusion: Unleashing Your Wireless Freedom
The process of setting up a WiFi hotspot on Windows 8 is not just a technical exercise, but an act of liberation. By carefully following these steps, you are not only providing a solution to internet connectivity issues, but also turning your computer into a powerful tool. This functionality, once activated, allows you to share your existing internet connection with all your devices. Whether you are traveling, working remotely, or simply seeking a more convenient way to connect, this Windows 8 hosted network feature is a powerful tool to have at your disposal. So, go forth, unleash your wireless freedom, and enjoy the seamless connectivity that awaits you.
