how to boost laptop wifi receiver

Title: How I Boosted My Wi-Fi Range by 3x with 3 Simple Tweaks
Channel: Behfor
How I Boosted My Wi-Fi Range by 3x with 3 Simple Tweaks by Behfor
how to boost laptop wifi signal, how to boost laptop wifi antenna, how to strengthen laptop wifi signal, how to improve laptop wifi signal strength, how to increase laptop wifi signal, how to increase my laptop wifi signal strength
Laptop WiFi Nightmare? This ONE Trick Boosts Your Signal Instantly!
Laptop WiFi Woes Vanquished: Unleash Your Ultimate Signal Strength with This Secret Weapon!
Do you wrestle with a perpetually weak WiFi signal on your laptop? Does buffering become your unwelcome houseguest? Are you tired of those infuriating connection dropouts at the worst possible moments? Well, fret no more! It's time to reclaim your digital freedom. This isn't just a fix; it's a revolution! Prepare to experience a WiFi transformation unlike any you've encountered.
The WiFi Signal Struggle: A Common Digital Dilemma
We've all been there. You're in the middle of an important video call. Suddenly, the screen freezes, and the audio cuts out. Or perhaps, you’re trying to stream your favorite show. Alas, the dreaded buffering wheel appears. These WiFi signal struggles are frustrating, to be sure. They can often disrupt our work, our entertainment, and our connections. Many factors can contribute to this challenge. Things like distance from the router come into play. Obstacles within your home also matter. Walls, metal objects, and even appliances can create interference. But, fear not! A beacon of hope shines through the digital darkness. There's a simple, yet potent solution that's often overlooked.
Unveiling the Signal Strength Secret: The Router's Best Friend
The secret weapon to boost your laptop's WiFi signal is surprisingly simple. It is a practice often neglected in many households. Are you ready for this revelation? Position your router strategically. Now, I know what you're thinking. "Duh!" But, seriously, think about it. Most people just shove their router in a corner. They then hide it behind a desk. This is often a recipe for disaster. Before you start, consider this: your router broadcasts its signal outwards. It’s important to ensure it's doing so effectively.
Strategic Router Placement: Maximizing Your Wireless Coverage
So, where should your router reside? The central location is paramount. Place it in an open space, if possible. This allows the signal to spread evenly throughout your home. Elevate it, maybe? Raising it a few feet off the ground can also help. This can help it clear any potential obstacles. Avoid enclosed spaces like closets or cabinets. These spaces can significantly restrict your WiFi range. Furthermore, keep your router away from other electronic devices. Microwaves, cordless phones, and even Bluetooth devices can cause interference. Instead, try positioning your router away from these potential culprits.
Beyond Placement: Fine-Tuning Your WiFi for Peak Performance
Placing your router is just the beginning. You can take further steps to optimize its performance. First, ensure your router's firmware is updated. Manufacturers regularly release updates to improve performance and security. You can often update it via your router's admin panel. Furthermore, secure your WiFi network with a strong password. This protects your network from unauthorized access. Consequently, it’s beneficial for all users.
Troubleshooting Common WiFi Issues: The DIY Approach
Even with optimal placement, sometimes issues can arise. Here are a few troubleshooting tips to keep in mind. Restarting your router is typically the first course of action. It's the digital equivalent of "turning it off and on again." Check your internet connection as well. Is your internet service provider experiencing an outage? Contact them to verify. If not, inspect the cables connecting your router to your modem. Ensure they're securely plugged in. If any of these do not work, you might need to consider other options.
Beyond the Basics: Exploring Advanced WiFi Optimization Techniques
Ready to go above and beyond? Consider these advanced techniques. Explore WiFi channel optimization. Routers operate on different channels. Some channels might be less congested than others. Your router's settings can help you find the best channel. Furthermore, if you have a large home, consider a WiFi extender. This device amplifies your existing signal. Therefore, it increases your overall coverage area. Remember that external antennas can also provide a boost. These antennas can enhance signal strength.
The Transformative Power of a Strong WiFi Signal: Why It Matters
Ultimately, a strong WiFi signal transforms more than just your internet speed. It changes your entire digital life. Consider all the benefits! Seamless streaming, lag-free video calls, and faster downloads. All are achievable. It improves your productivity and enhances your overall user experience. With a reliable connection, you can work remotely without interruption. You can also stay connected with loved ones without frustration. This simple trick can greatly impact your daily life.
Final Thoughts: Embrace the WiFi Revolution and Wave Goodbye to Lag!
So, there you have it! The seemingly simple, yet profoundly effective secret to boosting your laptop's WiFi signal. By strategically placing your router, you're taking a proactive step. You are then enhancing your digital experience. Embrace these techniques. Bid farewell to buffering and dropouts. Start enjoying the freedom of a strong, reliable WiFi connection today. Don't delay! Implement these tips, and prepare to be amazed. Your digital life will thank you!
Mini Laptop WITHOUT Wifi? SHOCKING Truth Revealed!Laptop WiFi Nightmare? This ONE Trick Boosts Your Signal Instantly!
Ah, the dreaded WiFi signal. It's the bane of our digital existence, isn't it? One minute you're happily streaming your favorite show, the next, you're staring at a spinning wheel of doom, cursing the internet gods. We’ve all been there. I know I have! Remember last week when I was trying to video call my family, and the connection kept cutting out? Talk about frustrating! But guess what? I stumbled upon a super simple trick that has revolutionized my laptop’s WiFi performance, and I'm here to share it with you. Prepare to be amazed!
The WiFi Struggle is Real: Why is My Signal So Weak?
Let's be honest, weak WiFi is a first-world problem, but it's a problem nonetheless. We rely on it for work, entertainment, communication—everything! But why does it seem like our laptops are constantly battling for a good signal? Well, there are several culprits lurking in the shadows.
- Distance from the Router: This is the most obvious, but it’s worth mentioning. The further away you are from your router, the weaker the signal. Think of it like yelling: the further you yell, the fainter your voice becomes.
- Obstacles: Walls, furniture, even other electronic devices can interfere with your WiFi signal. It's like trying to see through a dense fog.
- Router Placement: Where you place your router is crucial. Hidden away in a closet or the basement? Not ideal.
- Interference: Other devices emitting radio waves (microwaves, Bluetooth devices, etc.) can clog up the airwaves. It's like a radio station's signal being overwhelmed by a powerful competitor.
- Outdated Router: Older routers might not be able to handle the demands of modern internet usage. Think of it like trying to run a marathon in a pair of flip-flops.
Introducing the Game Changer: The Secret to a Stronger Signal
Okay, enough with the doom and gloom! Time for the good news. The one trick that can instantly boost your laptop’s WiFi signal? It's changing your DNS server.
Now, I know what you might be thinking: "DNS server? What's that, and why should I care?" Don't worry; I'll break it down. Think of a DNS server as the phonebook of the internet. When you type a website address (like google.com) into your browser, your computer needs to translate that into a numerical IP address (like 172.217.160.142) so it can actually find the website. The DNS server does this translation for you, like a helpful librarian.
The default DNS servers your internet service provider (ISP) assigns you might not be the fastest or most reliable. This is where changing them comes in.
Choosing the Right DNS: Picking Your Digital Superheroes
There are several excellent public DNS servers out there, and choosing one can significantly improve your browsing speed and signal strength. Think of them as superheroes ready to swoop in and save the day. Here are two of the top contenders:
- Google Public DNS (8.8.8.8 and 8.8.4.4): Google’s DNS servers are known for their speed and reliability. They're like the Flash of the internet, zipping you to your destination.
- Cloudflare DNS (1.1.1.1 and 1.0.0.1): Cloudflare offers another fast and secure option, with an emphasis on privacy. They're like the stealthy ninjas of the internet, protecting your data.
It’s like choosing between Batman and Superman; both are great choices!
Step-by-Step Guide: How to Change Your DNS Settings on Your Laptop
Don't worry; changing your DNS settings is surprisingly easy. Here's a step-by-step guide, tailored for both Windows and macOS.
For Windows Users:
- Open Network Connections: Right-click on the WiFi icon in your system tray (usually in the bottom right corner of your screen) and select "Open Network & Internet settings."
- Change Adapter Options: Click on "Change adapter options." This will open a new window showing your network adapters.
- Find Your WiFi Adapter: Right-click on your WiFi adapter (it will likely say "Wi-Fi" followed by your network name) and select "Properties."
- Select Internet Protocol Version 4 (TCP/IPv4): In the properties window, find "Internet Protocol Version 4 (TCP/IPv4)" and double-click it or select it and click "Properties."
- Use the Following DNS Server Addresses: Check the option "Use the following DNS server addresses."
- Enter the DNS Addresses: In the "Preferred DNS server" field, enter either 8.8.8.8 (for Google) or 1.1.1.1 (for Cloudflare). In the "Alternate DNS server" field, enter either 8.8.4.4 (for Google) or 1.0.0.1 (for Cloudflare).
- Click OK: Click "OK" on all the windows to save your changes.
- Restart Your Computer (Optional): While not always necessary, restarting your computer can help the changes take effect.
For macOS Users:
- Open System Preferences: Click the Apple icon in the top left corner of your screen and select "System Preferences" (or "System Settings" in newer versions of macOS).
- Select Network: Click on "Network."
- Choose Your WiFi Connection: Select your WiFi connection in the left-hand pane.
- Click Advanced: Click the "Advanced" button.
- Select the DNS Tab: Click on the "DNS" tab.
- Add a DNS Server: Click the "+" button at the bottom of the "DNS Servers" list and enter either 8.8.8.8 (for Google) or 1.1.1.1 (for Cloudflare). You can add the alternate DNS servers (8.8.4.4 or 1.0.0.1) as well, by clicking the "+" button again.
- Click OK: Click "OK."
- Click Apply: Click "Apply" at the bottom of the Network window.
- Restart Your Computer (Optional): Similar to Windows, restarting might help the changes take effect.
See the Difference: The Instant Impact of a DNS Change
Once you’ve changed your DNS settings, you should notice an immediate improvement. Websites should load faster, videos should stream without buffering, and online games should feel less laggy. It's like upgrading from a dial-up connection to fiber optic!
Try it! I promise, the difference is night and day. I did it, and suddenly my Wi-Fi went from a frustrating torture to a smooth stream.
Troubleshooting Tips: What If It Doesn't Work?
Okay, let's say you've followed the steps, but you're still experiencing WiFi woes. Don't panic! Here are some troubleshooting tips:
- Double-Check Your Settings: Make sure you entered the DNS addresses correctly. A simple typo can cause problems.
- Restart Your Router: Sometimes, a simple router restart can work wonders. Unplug it, wait 30 seconds, and plug it back in.
- Clear Your Browser Cache: Your browser might be holding onto cached data that's causing issues. Clear your browser's cache and cookies.
- Try a Different DNS Server: Experiment with the other DNS servers (Google vs. Cloudflare), or even look for other options.
- Contact Your ISP: If all else fails, contact your internet service provider. They might be experiencing issues on their end.
Beyond DNS: Other Ways to Boost Your WiFi Signal
While changing your DNS server is the star of the show, it's not the only trick in the book. Here are some other ways to optimize your WiFi performance:
- Router Placement Matters (Again!): Place your router in a central location, away from walls, appliances, and other electronic devices.
- Update Your Router's Firmware: Router manufacturers regularly release firmware updates that can improve performance and security.
- Use a WiFi Analyzer App: These apps can help you identify areas of interference and find the best channel for your WiFi.
- Consider a WiFi Extender: If you have a large house or a weak signal in certain areas, a WiFi extender can help. It's like adding an extra relay station to your signal.
- Invest in a Newer Router: If your current router is old, consider upgrading to a newer model that supports the latest WiFi standards (like Wi-Fi 6 or Wi-Fi 6E).
The Power of a Strong Signal: Why It Matters
So, why should you bother with all this? Why does a stronger WiFi signal even matter? Well, think about all the things we do online. We work, we learn, we connect with loved ones, we entertain ourselves—all thanks to the internet. A strong, reliable WiFi signal is essential for a smooth and enjoyable online experience. It means:
- Faster Browsing: Websites load quickly, and you can
How to Improve Wi-Fi Signals in Windows Laptop Speedup Wi-Fi

By MJ Tube How to Improve Wi-Fi Signals in Windows Laptop Speedup Wi-Fi by MJ Tube
Make Your Laptop's Wifi Signal Faster On Windows 1087 Tutorial

By MDTechVideos Make Your Laptop's Wifi Signal Faster On Windows 1087 Tutorial by MDTechVideos
Convert LNB to a very powerful antenna to receive remote WiFi networks
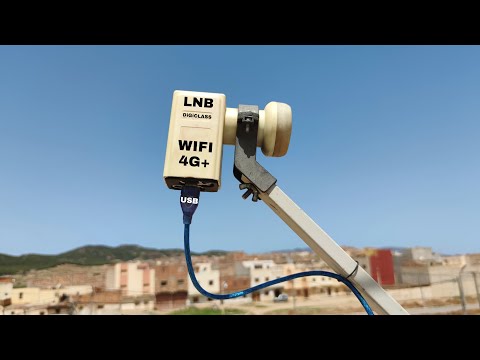
By Digital Sat Pro Convert LNB to a very powerful antenna to receive remote WiFi networks by Digital Sat Pro

Title: Increase WiFi Speed on Laptop & PC Wifi Speed Kaise Fast Kare Boost WiFi Signal Strength
Channel: Techno Uplift
Increase WiFi Speed on Laptop & PC Wifi Speed Kaise Fast Kare Boost WiFi Signal Strength by Techno Uplift
My Laptop Work
Laptop WiFi Nightmare? This ONE Trick Boosts Your Signal Instantly!
Do you feel the sting of intermittent internet service? Do frustrating lag spikes plague your online endeavors, disrupting your workflow and leisure? Across the digital landscape, countless individuals grapple with the common adversary: a weak WiFi signal on their laptops. The modern laptop, a symbol of connectivity, is often hamstrung by its own internal architecture, hindering its ability to receive and transmit a robust WiFi signal. But what if we told you there's a simple, often overlooked solution—a single technique that can dramatically elevate your laptop's WiFi performance, transforming your browsing experience from a sluggish crawl to a lightning-fast sprint?
The Culprit: Internal Antennas and Their Limitations
The core reason for the WiFi woes experienced by laptop users lies in the design itself. Unlike desktop computers, laptops are inherently compact. Space is at a premium, and every component is carefully engineered to fit within a confined area. The WiFi antenna, responsible for receiving and transmitting radio waves, is often a victim of this tight space. Embedded within the laptop's chassis, typically near the screen or along the edges, these antennas are far from ideal.
The antennas, being inside a metal and plastic shell, are shielded, which inherently attenuates the signal strength. The physical layout of the laptop, its internal components, and environmental factors such as walls, furniture, and even other electronic devices further impede the signal's ability to penetrate and reach your laptop. This results in poor signal strength, dropped connections, and frustratingly slow speeds. Understanding this inherent design flaw opens the door to the solution.
The One Trick: External Antenna Augmentation
The single, transformative technique that can revolutionize your laptop's WiFi reception involves augmenting its internal capabilities with an external antenna. Now, many people envision complex setups, requiring technical expertise and significant investment. However, we are going to focus on the most accessible and effective method here.
The core principle is this: by providing your laptop with a superior external antenna, you bypass the limitations of the internal system, allowing it to better capture and transmit WiFi signals. This boost in signal strength often translates to faster speeds, a more stable connection, and a significantly improved online experience.
Unveiling the Method: The USB WiFi Adapter with External Antenna
The most accessible and readily available method for implementing this technique is to utilize a USB WiFi adapter equipped with an external antenna. These devices are designed to plug directly into your laptop's USB port, effectively adding a dedicated WiFi receiver and transmitter.
The key to unlocking the performance gains lies in selecting the right USB WiFi adapter. You will want to look for a device that features:
- External Antenna: This is the cornerstone of our solution. Aim for an adapter with a detachable or adjustable antenna, allowing you to optimize its position for maximum signal reception.
- Dual-Band Support (2.4 GHz and 5 GHz): Modern WiFi routers broadcast on two frequency bands. The 2.4 GHz band offers longer range but is often congested. The 5 GHz band provides faster speeds but has a shorter range. A dual-band adapter allows you to choose the best band for your environment.
- 802.11ac or 802.11ax Standard: These are the latest WiFi standards, offering significantly faster speeds and improved performance compared to older standards. Invest in a device that supports the highest standard your router allows for.
- High Gain Antenna: Check the dBi (decibel isotropic) rating of the antenna. A higher dBi rating indicates a stronger antenna, which generally translates to better performance. Aim for an adapter with an antenna offering at least 5 dBi, or even higher if possible.
Step-by-Step Guide to Implementation:
Implementing this technique is remarkably straightforward:
- Acquire the Adapter: Purchase a reputable USB WiFi adapter with an external antenna, adhering to the specifications outlined above. Popular brands include TP-Link, Netgear, and ASUS.
- Install the Driver: The adapter will likely come with a driver, either on a disc or available for download from the manufacturer's website. Install the driver on your laptop to ensure proper functionality. This is usually a simple process that the device will initiate on its own.
- Plug and Play: Once the driver is installed, plug the USB WiFi adapter into an available USB port on your laptop. The adapter should automatically detect your WiFi networks, much like your laptop's internal WiFi adapter. If the device does not begin automatically scanning for wifi networks, check the device's companion software to see if manual scanning is required.
- Connect to Your Network: Select your desired WiFi network from the list and enter your password, just as you would with your laptop's built-in WiFi.
- Position the Antenna: This is where the magic happens. Experiment with the position of the external antenna. You can rotate it, angle it, or place it on an elevated surface. The optimal position will vary depending on your environment. The goal is to find the position that provides the strongest signal strength. The stronger the signal, the more consistent the connection will be.
- Test Your Speed: Perform a speed test to measure your internet speed. You should see a noticeable improvement in both download and upload speeds. If the tests do not indicate an improvement, try changing the antenna's position.
Troubleshooting Common Issues:
While the USB WiFi adapter method is usually plug-and-play, a few issues might arise:
- Driver Issues: If the adapter isn't working, ensure the correct driver is installed and that it is up to date.
- Interference: Like any radio wave, WiFi signals can be affected by interference from other devices. Position the antenna away from other electronic devices that might be causing interference.
- Router Distance: The farther away you are from your router, the weaker the signal. If you are far from your router, consider using a WiFi extender along with the adapter to boost the range.
- USB Port: Try a different USB port. Some USB ports may not deliver enough power for maximum performance. Ensure you are using a USB 3.0 port for optimal speeds.
Beyond the Adapter: Further Optimizations
While a USB WiFi adapter with an external antenna is the primary solution, there are other factors to consider.
- Router Placement: Your router’s position in your home or office plays a significant role. Position your router in a central, elevated location, away from walls and obstructions.
- Channel Selection: WiFi routers broadcast on different channels. Some channels are more congested than others. Use a WiFi analyzer app on your smartphone or laptop to identify the least congested channel and configure your router accordingly.
- Router Upgrades: If your router is old, it might be time for an upgrade. Newer routers offer faster speeds, improved range, and support for the latest WiFi standards.
- Check your laptop's internal WiFi card: Sometimes, the internal WiFi card could be faulty. If the card is damaged, it can affect your ability to connect to networks.
The Transformative Impact
By implementing this single "trick"—the strategic use of a USB WiFi adapter with an external antenna—you can shatter the limitations that plague your laptop's WiFi connection. You will experience faster download speeds, reduced lag, and a more stable, enjoyable online experience. From video calls to streaming movies to online gaming, the enhancement in your WiFi performance will significantly improve your productivity, relaxation, and overall digital life. This seemingly minor change can transform your relationship with your laptop and the internet, eliminating the frustrating WiFi nightmares that many experience and finally allowing you to connect with confidence and ease.
