how to connect tigersecu dvr to laptop wifi
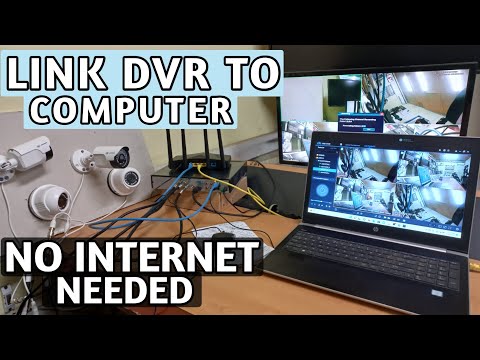
Title: How to link AHD CCTV Cameras to Computers without using internet.
Channel: Tech Inside Out
How to link AHD CCTV Cameras to Computers without using internet. by Tech Inside Out
Unlock Your Tigersecu DVR: Laptop WiFi Connection Secrets Revealed!
Tigersecu DVR Tango: Master the Laptop WiFi Connection!
Ever felt like your Tigersecu DVR was a silent guardian, shrouded in digital mystery? You're not alone. Many users find the prospect of connecting their DVR to a laptop via WiFi, a daunting task. But hold on. This isn’t just about surveillance; it’s about empowerment. Therefore, let's unravel the secrets, and bring that security footage directly to your fingertips.
Decoding the Digital Maze: Before You Begin
First things first, let’s lay the groundwork. Before you even think about a WiFi connection, ensure your Tigersecu DVR has WiFi capabilities. Check the device specifications or user manual. If your DVR model lacks built-in WiFi, you'll need a compatible USB WiFi adapter. Additionally, you require a laptop with WiFi capability, obviously. Now, isn’t that common knowledge?
The WiFi Adapter's Whispers: Hooking Up the Hardware
Assuming your DVR supports WiFi, it’s time to introduce the hardware. If using a USB adapter, carefully insert it into the designated port on your DVR. Next, power up the DVR. Some models automatically detect and configure the WiFi adapter. However, if not, you might need to navigate the DVR's menu settings.
Navigating the DVR's Brain: Finding the WiFi Settings
Accessing the DVR menu is usually done via the mouse or remote control. Look for options like "Network," "WiFi," or "Wireless Settings." The specific terminology fluctuates between models. However, the core functionality remains similar. Once located, select the WiFi configuration menu.
Scanning the Airwaves: Discovering Your Network
You should now see a list of available WiFi networks. The DVR scans for nearby signals. These are the signals emitted by your router. Find your home WiFi network. Then, select it.
The Password Puzzle: Typing in the Key
After selecting your network, the DVR will prompt you for the WiFi password. This is the same password you use to connect your laptop or smartphone to your home WiFi. Be precise, and enter it carefully. Moreover, capitalization and punctuation matter.
Establishing the Connection: Testing the Waters
Once you’ve entered the password, the DVR attempts to establish a connection. The DVR should display a connection status. It might say "Connected," "Online," or similarly positive. If the connection fails, double-check your password and network settings. In this case, there might be an issue with your network.
IP Address Intricacies: Finding the DVR's Digital Identity
Now, delve a bit deeper. You'll need the DVR’s IP address. It’s like the DVR’s digital home address. Locate the “Network Information” or “Status” section within the DVR’s settings. There, you'll find the IP address. Write it down.
Laptop's Perspective: Fine-Tuning the Configuration
Next, maneuver your laptop. Make sure it is connected to the same WiFi network as your DVR. Open your web browser. In other words, prepare to enter the DVR's IP address.
The Browser's Gateway: Entering the IP Address
In your laptop’s web browser address bar, type the DVR's IP address. Then, press Enter. The DVR’s login page should load.
The Login Ritual: Access Granted?
Enter your DVR's username and password. These are the credentials you use to access your DVR's interface. If you've forgotten these details, you may need to reset your DVR. However, you can always refer to the user manual for default information.
Mobile App Maven: Exploring Remote Access
Many Tigersecu DVRs are compatible with mobile apps. These apps allow you to remotely view your surveillance footage. They are usually available in the app store.
Port Forwarding Primer: Beyond the Local Network
For remote access outside your home network, you may need to configure port forwarding on your router. Port forwarding allows external devices to access the DVR. The DVR user manual provides information on the necessary ports. Configure them in your router's settings.
Troubleshooting Titans: When Things Go Awry
If the WiFi connection fails, don’t panic. Here are some troubleshooting steps. Firstly, check the obvious. Confirm your network connection on both the DVR and laptop. Verify the WiFi password. Ensure the DVR's IP address is correct. Restart both the DVR and your router. Moreover, consult the Tigersecu DVR user manual.
Final Thoughts: Embracing the Digital Freedom
Connecting your Tigersecu DVR to your laptop via WiFi expands possibilities. You can monitor your property remotely. In addition, you can access recorded footage easily. It might seem complex at first. But with patience and the right approach, consider it a rewarding experience. Enjoy your newfound peace of mind.
Boost Your Laptop's Wi-Fi: Insane Speed Hacks!Unlock Your Tigersecu DVR: Laptop WiFi Connection Secrets Revealed!
Hey there, fellow security enthusiasts! Ever felt the frustration of staring blankly at your Tigersecu DVR, wishing you could access those precious security feeds from your laptop? We've all been there! It's like having a treasure chest, but the key's hidden somewhere in a labyrinth. That's where we come in. We're not just going to hand you the key; we're going to arm you with the knowledge to build your own! Prepare to unravel the mysteries of connecting your Tigersecu DVR to your laptop via WiFi. Let's get started!
1. Why Connect Your Tigersecu DVR to Your Laptop? The Obvious (and Not-So-Obvious) Benefits
Why bother, right? Isn't it easier just to check the feed on the monitor connected directly to the DVR? Well, consider these perks. We're talking about convenience, remote access, and a whole lot more. Imagine being able to monitor your home or business from anywhere with an internet connection. That’s freedom! It's like having a superhero's utility belt full of surveillance gadgets, right at your fingertips.
- Enhanced Accessibility: Check your feeds from anywhere. Vacationing in the Maldives? Still keeping an eye on things back home!
- Data Backup and Management: Easily download recordings and manage your footage directly onto your laptop. No more fumbling with USB drives!
- Increased Security: Monitor your system for unusual activities and receive instant alerts, enhancing overall security. Think of it as having eyes in the back of your head.
- Flexibility: Use your laptop's large screen for better detail and analysis.
2. Understanding Your Tigersecu DVR's WiFi Capabilities (or Lack Thereof!)
Before we charge ahead, let's clear up a crucial point. Does your Tigersecu DVR even have built-in WiFi? Some models do, some don't. It's vital to know what you’re working with. If your DVR has a built-in WiFi antenna or a network port (usually an RJ45 port), you’re in luck! You will be able to connect. If not, don't despair. We'll talk about alternative solutions in a bit. Check the user manual or the product specs to confirm. It's like checking the recipe before you bake a cake; crucial for success!
3. The Hardware You'll Need: A Quick Checklist
Let's gather our gear. Here's what you’ll typically need:
- Your Tigersecu DVR: Obviously!
- Your Laptop: Running a modern operating system like Windows or MacOS.
- A Wireless Router: Your home network's gateway.
- An Ethernet Cable (Optional, but Recommended): For the initial setup, a direct connection is often smoother.
- Your DVR's Power Adapter: Don't forget this little guy!
- Your Router's Password: Make sure you know your WiFi password.
4. Setting Up Your Network: The Foundation of Your Connection
Okay, foundation time! This is like building the walls of your house. First, connect your router to the internet. Then, ensure your laptop is connected to your home WiFi network – the same one you intend to connect the DVR to. This sets the stage. Think of it as establishing a shared language between your laptop and your DVR.
5. Connecting Your DVR to Your Network: Wired or Wireless?
Here’s where it gets interesting. If your DVR is wireless, you’ll probably use the DVR's setup menu to connect to your WiFi network. If there's an Ethernet port, we highly recommend using a wired connection initially. A wired connection is generally more stable and faster. It's like using a direct line rather than a long-distance call.
- Wired Connection via Ethernet: Plug an Ethernet cable from the DVR's network port to a LAN port on your router. Then go into your DVR settings to configure the network settings (usually including the IP address and gateway).
- Wireless Connection via WiFi: Access the DVR's network settings. The menu will have an option for wireless or WiFi settings. Scan for available networks and enter your WiFi password.
6. Finding Your DVR's IP Address: Your DVR's Digital Address
Every device on your network needs an IP address, like a digital street address. You'll need to find your DVR's IP address to access it from your laptop.
- Check Your DVR's Network Settings: This is usually somewhere in the DVR's setup menu. Look for "Network Information," "IP Settings," or something similar.
- Check Your Router’s Admin Panel: Log in to your router's settings (usually through your web browser using an IP address like 192.168.1.1 or 192.168.0.1 – check your router's manual). Look for a list of connected devices, which will include your DVR. The IP address will be listed there.
7. Port Forwarding: Opening the Gateway to Your DVR
This is a vital step and can be compared to leaving the door open for a delivery person. Your router acts as a firewall, preventing external access to your devices. Port forwarding tells the router to allow traffic from a specific port (usually port 8000 or 8001) to reach your DVR.
- Access Your Router's Admin Panel: Use the IP address and credentials you used in step 6.
- Locate Port Forwarding Settings: This section is usually labeled “Port Forwarding,” “Virtual Servers,” or similar.
- Create a New Rule: Specify the following:
- Service Name: Give it a descriptive name (e.g., TigercuDVR).
- Port Range: Enter the ports your DVR uses (usually 8000 or 8001 – check your manual).
- Internal IP Address: Enter your DVR's IP address.
- Protocol: Choose TCP (most common).
- Save Your Settings: Restart your router if prompted.
8. Installing the Right Software: The Bridge to Your Video Feeds
Now, onto the software. You’ll likely need a specific piece of software provided by Tigersecu or a compatible third-party app to view the feeds on your laptop.
- Check Your DVR's Manual: The manual will tell you the recommended software.
- Download and Install the Software: Follow the installation instructions.
- Configure the Software: You'll need to enter your DVR's IP address, port number, username, and password in the software settings.
9. Accessing Your DVR from Your Laptop: The Moment of Truth!
With everything set up, it's time to see if it works! Open your software on your laptop, and try connecting to your DVR using the IP address, port, username, and password you configured. If all goes well, you'll see those precious feeds! It's like turning on the TV and finally getting a clear picture.
10. Troubleshooting Common Connection Issues: When Things Go Wrong
Don't worry if it doesn't work perfectly the first time. Troubleshooting is part of the process! Here's some of the most common issues:
- Incorrect IP Address: Double-check the IP address you entered in the software.
- Incorrect Port Number: Make sure the port number is correct.
- Firewall Problems: Ensure your laptop's firewall isn't blocking the connection.
- Router Issues: Restart your router and DVR.
- Username/Password Incorrect: Verify your username and password
11. Securing Your DVR: Protecting Your Valuable Footage
Security is paramount! Here's how to maximize your recording safety:
- Change the Default Password: The default password is a security risk. Change it immediately to something strong and unique.
- Update the Firmware: Keep your DVR’s firmware updated to patch security vulnerabilities.
- Enable Encryption: If your DVR supports it, enable encryption to encrypt your footage.
- Regularly Back up Your Data: Back up your recordings to protect them from loss.
12. Remote Access from Anywhere: Going Beyond Your Home Network
Want to access that feed when you're not near your house?
- Dynamic DNS (DDNS): Since your IP address may change, using DDNS allows you to connect via a domain name.
- Mobile Apps: Tigersecu often has its own app for smartphones and tablets, enabling access from anywhere.
- VPN: Set up a VPN on your router for added security.
13. Optimizing Your WiFi Connection: Speed and Stability Matters
A slow or unstable WiFi connection can ruin your experience.
- Positioning: Place your router centrally for optimal coverage.
- Bandwidth: Ensure your WiFi network is using the 2.4 GHz or 5 GHz networks for optimal performance.
- Interference: Minimize interference from other devices.
14. Alternative Solutions: When WiFi Isn't an Option
If your DVR lacks WiFi or your WiFi signal is weak, these options can work:
- WiFi Adapter: Connect a USB WiFi adapter to your
Customize your TIGERSECU DVR system - Main Menu

By TigerSecu.Inc Customize your TIGERSECU DVR system - Main Menu by TigerSecu.Inc
Must-Watch Guide Before Installation of TIGERSECU DVR

By TigerSecu.Inc Must-Watch Guide Before Installation of TIGERSECU DVR by TigerSecu.Inc
HOW TO CONNECT DVRNVR TO LAPTOP OR PC 2024
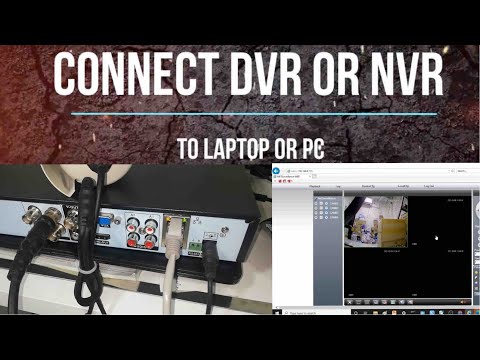
By FIXtastic Contents HOW TO CONNECT DVRNVR TO LAPTOP OR PC 2024 by FIXtastic Contents

Title: How to view TIGERSECU DVR remotely via TIGERSECU HD Viewer iPhone
Channel: TigerSecu.Inc
How to view TIGERSECU DVR remotely via TIGERSECU HD Viewer iPhone by TigerSecu.Inc
Wifi On Laptop
Unlock Your Tigersecu DVR: Laptop WiFi Connection Secrets Revealed!
Navigating the complexities of connecting your Tigersecu DVR to your laptop via WiFi can feel like deciphering an ancient code. However, we're here to demystify the process, providing you with a clear, comprehensive guide that eliminates the guesswork. Forget blurry instructions and frustrating troubleshooting. We'll arm you with the knowledge and techniques necessary to seamlessly access your surveillance footage from anywhere within your network, transforming your laptop into a powerful surveillance hub.
Understanding Your Tigersecu DVR's WiFi Capabilities
Before jumping into the connection process, it's crucial to understand your specific Tigersecu DVR model. Not all models come equipped with built-in WiFi capabilities. You might need to use a compatible USB WiFi adapter. Inspect the rear panel of your DVR. Look for the presence of a Wi-Fi antenna connector (often a small, thin antenna) or a USB port labeled "WiFi" or "Wireless." Consult your DVR's user manual, specifically the section detailing network settings and wireless connectivity. The manual will tell you if your DVR supports WiFi and if it requires specific adapters.
Prerequisites for a Successful WiFi Connection
Success hinges on several essential prerequisites. First, you need a functional and reliable wireless router or access point. Your laptop and the DVR must be within range of the WiFi signal. Weak signals translate to interrupted connections. Consider positioning your router for optimal coverage. Second, ensure your laptop has a working WiFi card and the appropriate drivers installed. Verify your laptop's WiFi is enabled. Third, you'll need to know your WiFi network's SSID (network name) and password. Fourth, your DVR and laptop should share a common network subnet, a range of IP addresses. Lastly, you ideally need the DVR's IP address, which is often found in the network settings.
Step-by-Step: Connecting Your Tigersecu DVR to WiFi
Let's delve into the step-by-step process for integrating your Tigersecu DVR into your WiFi network and accessing it through your laptop.
1. Setting Up Your DVR's Network Settings
First, power on your Tigersecu DVR and connect it to a monitor and a mouse. Access the DVR's main menu. This is typically done by right-clicking on the live view screen or using a menu button on the remote control. Navigate to the "Network" settings, often found within the "System" or "Configuration" menus. Locate the "WiFi" or "Wireless" settings. If your DVR has a built-in WiFi, select your WiFi network (SSID) from the list of available networks. Enter your WiFi network's password. If your DVR requires a USB WiFi adapter, plug it in. The DVR should automatically recognize the adapter. Within the Network settings, ensure your DVR is set to obtain an IP address automatically (DHCP). However, if this option is unavailable, you might need to set a static IP address. Choose an IP address within your network's range and ensure it doesn't conflict with other devices. Note down the IP address for future access.
2. Configuring Your Laptop’s Network Settings
Your laptop’s network settings play a vital role. Ensure your laptop is also connected to the same WiFi network as the DVR. Verify that your laptop can access the internet. To access the DVR from your laptop, you’ll typically use a web browser or specialized client software. In your web browser, type the DVR's IP address into the address bar (e.g., 192.168.1.100). The default port number will vary depending on your DVR model. Common ports include 80, 8000, or 34567. If prompted, enter your DVR's username and password. The default credentials are often "admin" for both username and password but change these values immediately for security.
3. Utilizing Web Browsers for DVR Access
Web browser access is the most common method. After entering the DVR's IP address and port in the browser, you’ll likely face login credentials. After successfully logging in, you'll be able to view the live camera feeds. The browser may also prompt you to install a necessary plugin or ActiveX control to view the video properly. Follow the prompts and install the required software. This is often essential for proper functionality. Once installed and the browser is refreshed, you should see your camera feeds. You'll have basic control options, such as playback and camera selection.
4. Downloading and Installing Dedicated Client Software
Tigersecu often provides dedicated client software for accessing your DVR remotely. Visit the Tigersecu website or your product's documentation to determine the appropriate software for your DVR model. Download the software and install it on your laptop. After installation, open the client software. You'll be prompted to add a device. Provide the DVR's IP address, port number, username, and password. Save the device configuration. You can now connect to your DVR via the client software, gaining more advanced features such as remote playback, PTZ control (if your cameras support it), and configuration settings. Consider ensuring your client software is up to date.
5. Troubleshooting Common Connection Issues
Despite following these steps, you might encounter issues. First, check the physical connections, including the power supply for both the DVR and the router. Make sure all cables are securely connected. Double-check your WiFi network's SSID and password within the DVR’s settings. Ensure you've entered them correctly. If you are using a static IP address, verify that the IP address, subnet mask, default gateway, and DNS server are correct. Check your router's settings. Some routers have firewalls or security settings that might block the DVR's connection. Temporarily disable the firewall or create a port forwarding rule for your DVR’s port. Ensure your laptop’s firewall isn’t blocking the connection. Add the browser or client software as an allowed application. Restart both your DVR and your laptop. A simple restart often resolves minor glitches. Consult your DVR’s and your router's manuals for model-specific troubleshooting steps.
6. Securing Your Tigersecu DVR for Remote Access
Protect your DVR from unauthorized access. First, change the default username and password on your DVR immediately after setup. Use strong, unique passwords that include a combination of letters, numbers, and symbols. Consider enabling two-factor authentication if the option is available within your DVR's settings. Keep your DVR's firmware up to date. Firmware updates often include security patches and bug fixes. Enable encryption for your network traffic to protect against eavesdropping. Limit the number of users who have access to the DVR. Regularly review and audit user accounts. Implement a strong, secure WiFi network using WPA2 or WPA3 encryption.
7. Advanced Configuration: Port Forwarding and Dynamic DNS
For remote access from outside your local network, you might need to configure port forwarding on your router. This allows external devices to connect to your DVR. Log into your router's administration panel. Locate the port forwarding section, often under “Advanced Settings” or “Firewall.” Create a rule to forward your DVR's port (e.g., 80, 8000) to the DVR's internal IP address. The router’s manual should help with specific steps. If your internet service provider assigns you a dynamic IP address (meaning it changes periodically), you'll need to use a Dynamic DNS (DDNS) service. Sign up for a DDNS service (e.g., DynDNS, No-IP). Configure your router with your DDNS credentials. This allows you to access your DVR using a domain name rather than a changing IP address.
8. Optimizing Your Surveillance Experience
Consider upgrading your DVR's firmware for improved performance and features. Regularly backup your surveillance footage. Choose a reliable storage solution for your recordings. Optimize your camera settings for the best image quality and recording performance. Experiment with different resolution and frame rate settings. Configure motion detection to receive alerts and save storage space. Configure the camera's image quality to a higher setting. Explore remote access apps for mobile devices. Search for Tigersecu specific apps for your mobile device.
9. Troubleshooting Specific Router and Network Issues
Some routers come with features that may interfere with DVR connectivity. For instance, the "UPnP" (Universal Plug and Play) settings in your router may need to be enabled to allow the DVR to open necessary ports automatically. Consult your router’s documentation to configure UPnP correctly. If your network uses VLANs, ensure your DVR is assigned to the same VLAN as your laptop and other devices. If you're using a VPN, verify the VPN settings aren't disrupting the communication. Double-check your ISP's firewall settings.
10. Legal Considerations and Privacy Concerns
Understand the legal regulations regarding video surveillance in your area. Comply with all local laws and regulations regarding the use of surveillance equipment. Respect the privacy of others when using your surveillance system. Make sure you are within legal parameters. Inform people that are recorded. Store your surveillance footage securely. Protect your recordings from unauthorized access and misuse.
