laptop wifi ip conflict
Title: CARA SETTING IP ADDRESS PADA WIFI LAPTOP WINDOWS 10
Channel: IT Newbie
CARA SETTING IP ADDRESS PADA WIFI LAPTOP WINDOWS 10 by IT Newbie
Laptop WiFi IP Conflict? This SHOCKING Trick Fixes It INSTANTLY!
Laptop WiFi Headaches? Conquer IP Conflicts in a Flash!
Ever been utterly marooned by a laptop that refuses to connect to Wi-Fi? A frustrating experience, isn't it? You stare, helpless, as the bars on your connection icon remain stubbornly low. You might even see the dreaded "limited connectivity" message, or perhaps a cryptic error about IP address conflicts. Well, breathe easy. You're not alone. And more importantly, there's a solution that’s closer than you think. We can banish those connection woes, and bring your digital life back online, instantly.
The Mysterious World of IP Addresses: A Quick Primer
First things first, let’s illuminate what an IP address is. Think of it as your laptop's unique digital postcode. It's how every device on your network communicates. Your router issues these addresses. It makes sure data goes the right place. But sometimes, things go awry. Issues arise. Specifically, IP address conflicts can occur. This is where two devices inadvertently try to use the same "postcode." Consequently, your laptop becomes a digital ghost. It renders it unable to reach the internet.
Spotting the Culprit: Identifying the IP Conflict
So, how do you know if an IP conflict is the villain in your digital drama? In truth, the symptoms are pretty clear. You might experience intermittent internet access. Access drops happen, and come back. You could be getting error messages. These messages may be obscure. You might also experience painfully slow browsing speeds. The connection might time out completely. Any of these can be indicators of an IP collision. Thankfully, it’s relatively easy to find the source.
The Shocking Trick: Unleashing the Power of Release and Renew
Now, the moment you’ve been waiting for: the shockingly simple fix. It's a procedure that involves a few simple commands. They can often solve the problem. It's a maneuver that can refresh your network connection. Here's what you need to do. First, go to your search bar. You will type "cmd" or "command prompt". This will open a black window. This is where the magic begins.
Next, you’ll type the following command: ipconfig /release. Press enter. This will prompt your laptop to release its current IP address. It's like severing ties with the old. Your laptop is now disconnected.
Then, type the next command: ipconfig /renew. Press enter again. This tells your laptop to request a new IP address from your router. It's like getting a fresh start. Your laptop will now try to register.
Finally, take a moment. Allow the process to complete. Usually, it takes only a few seconds. Afterward, try connecting to your Wi-Fi again. You should be browsing the web in no time.
Beyond the Basics: Troubleshooting for Stubborn Conflicts
Sometimes, the "release and renew" trick does not work immediately. It may require a bit of further investigation. But rest assured, the solution is usually within reach. Indeed, consider these additional troubleshooting steps:
- Restart Your Router: A simple reboot can often work miracles. Turn off your router. Unplug it. Wait for about a minute. Then plug it back in and turn it on. Allow it to fully boot up before retrying.
- Check for Static IPs: Perhaps a device on your network has a manually assigned (static) IP address. It can create conflict. Access your router's settings. Then, verify that all devices are obtaining IP addresses automatically via DHCP (Dynamic Host Configuration Protocol).
- Flush Your DNS Cache: It can also help to clear your DNS cache. In the command prompt, type
ipconfig /flushdns. This refresh will clear your DNS. It will help your device resolve web addresses correctly. - Consider the Hardware: While rare, sometimes the issue is with the network adapter. Update your network adapter drivers. Open the device manager. You can also consider using an external USB Wi-Fi adapter.
Preventative Measures: Keeping Conflicts at Bay
Now that you've vanquished the IP conflict, you likely want to prevent it from ever happening again. Here's how:
- Allocate Fixed IP Addresses: For devices you use frequently. You can assign a static IP address. Make sure it's outside of the DHCP range your router uses.
- Limit Connected Devices: The more devices you have. The greater the chances of collisions. Try to keep the number of connected devices manageable.
- Regular Router Maintenance: Restart your router. Or rather, do it regularly. This will help keep it operating smoothly.
Conclusion: Back to the Digital Frontier
Network issues can be disruptive. But it is no reason to worry. IP conflicts are no match for a little bit of technical know-how. By following these steps, you can quickly resolve common Wi-Fi problems. You can get back online. You are ready for whatever the digital world throws your way. Now go forth, connect, and explore the vast expanse of the internet!
Turn Your Windows 7 Laptop into a WiFi Hotspot! (Easiest Trick Ever!)Laptop WiFi IP Conflict? This SHOCKING Trick Fixes It INSTANTLY!
Hey everyone! Ever slammed your laptop shut in frustration, ready to throw it out the window (or at least, seriously consider it) because your Wi-Fi just wouldn't work? That feeling of utter helplessness when your laptop keeps telling you there’s an IP address conflict? Yeah, we've all been there. Picture this: you're trying to finish a crucial presentation, stream a movie, or just generally exist online, and suddenly… bam! The dreaded “IP address conflict” message rears its ugly head. It’s like your digital world has ground to a screeching halt. But guess what? We’re here to tell you that there's a surprisingly simple, almost magical trick that can banish those Wi-Fi woes and get you back online faster than you can say "router reboot." Consider this article your digital life raft in the stormy sea of IP conflicts.
1. The Digital Headache: Understanding the IP Address Conflict Mystery
Before we dive into the shocking solution, let's get down to brass tacks. What is an IP address conflict, anyway? Think of your home network like a neighborhood. Each device – your laptop, your phone, your smart fridge (yes, even those are now on Wi-Fi!) – needs its own unique address to get mail, or, in this case, data packets. The IP address is that unique identifier. An IP address conflict happens when two or more devices think they have the same address. It's like two houses trying to use the same street number. The result? Chaos. The network doesn’t know where to send the data, and everyone gets blocked.
2. Why Does This Digital Kerfuffle Actually Happen?
So, how does this digital mess even happen? It's a bit of a tech gremlin, but the usual suspects are:
- Static vs. Dynamic IP Addresses: Most home networks use DHCP, a service that dynamically assigns IP addresses. But if you manually set a static IP address in the past (maybe you were troubleshooting something else), you could have accidentally set the same address as another device, leading to a conflict.
- Router Glitches: Sometimes, the router itself gets confused. It might assign the same IP address twice, or have temporary issues distributing them.
- Multiple Devices: A lot of smart devices and laptops plugged into your network? The more devices, the higher the chance of address overlap, especially with larger homes or offices.
- Device Issues: A device that is not properly releasing its old IP address before requesting a new one, may cause a conflict.
- Network Bugs: If someone is trying to attack your network, they also may attempt to conflict IP addresses so as to cause problems with your connectivity.
3. The Symptoms: How to Spot an IP Address Conflict
Knowing what to look for can save you tons of frustration. Here are some of the telltale signs:
- "Limited Connectivity" or "No Internet Access" Messages: This is the most common clue.
- Slow Internet Speeds: Even if you can connect, the connection might be painfully slow and you may suffer from intermittent network dropouts.
- Inability to Access Certain Websites: Some websites might load, while others refuse to cooperate.
- Constant Disconnections: Your laptop might connect, then disconnect, then connect again in a loop.
- Error Messages: You may see specific error messages stating there is an IP conflict.
- Intermittently Working: The computer may work then stop, then work, again, and this could repeat.
4. The Shocking Secret: The Instant Fix You Need!
Alright, brace yourselves. Are you ready for the big reveal? Here’s the surprisingly simple trick to fixing most IP address conflicts instantly:
Restart Your Router and Laptop!
Yep, it's that simple. I know, I know, it seems too easy, like the digital equivalent of "Have you tried turning it off and on again?" But trust us, it works most of the time. Why? Because restarting the router and laptop forces them to re-establish their network connections. The router reallocates IP addresses, and your laptop requests a fresh one. It’s like a digital reset button!
5. Step-by-Step Guide: How to Restart Everything Properly
Now, doing it right is key. Here's how to perform this magic trick:
- Step 1: Power Down the Router: Unplug your router from the power outlet. Wait for a full minute. This allows any temporary glitches or cached IP assignments to clear out.
- Step 2: Restart the Laptop: While the router is off, fully shut down your laptop. Don't just put it to sleep; do a complete shutdown.
- Step 3: Power Up the Router: Plug the router back in and wait for it to fully boot up. This usually takes a couple of minutes. The lights on the router will be blinking or solid.
- Step 4: Boot Up the Laptop: Once the router is back online, turn your laptop back on.
- Step 5: Reconnect to Wi-Fi: Your laptop should automatically connect to your Wi-Fi network. If it doesn’t, enter your Wi-Fi password.
6. What if This Doesn't Work? Troubleshooting Further
Sometimes, the simple trick isn't enough. Don't panic! Here’s a deeper dive into other solutions:
7. Revamping Settings: Renewing Your IP Address
If the restart didn’t work, try renewing your IP address. Here's how:
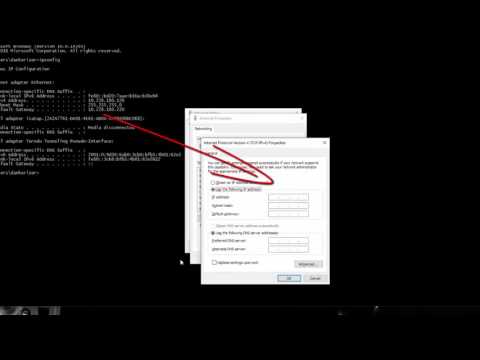
Windows: Open the Command Prompt (search for "cmd" in the Start menu), Type
ipconfig /releaseand press Enter. Then, typeipconfig /renewand press Enter. This forces your laptop to release its current IP and request a new one.Mac: Open System Preferences, Click Network, Select your Wi-Fi connection, and then click “Advanced.” In the TCP/IP tab, click "Renew DHCP Lease".
8. Manually Configuring Your IP Address (Use with Caution!)
This is like the advanced course. If you’re comfortable with tech, you can try manually assigning a static IP address to your laptop. But be careful! Doing this incorrectly can create more problems. Google the steps for your operating system, making sure you understand them before you mess with settings. And always back up the existing settings.
9. Diving into the Router's Configuration
Your router's settings can play a role. Log into your router's configuration page (usually by typing an IP address like 192.168.1.1 into your browser). Look for these settings:
- DHCP Range: Make sure the DHCP server is enabled and has a sufficient IP address range.
- Connected Devices: Check for any unusual devices or duplicates on the list of connected devices.
- Firmware Updates: Ensure your router’s firmware is up-to-date.
10. The Importance of a Strong Wi-Fi Signal
Sometimes, the problem isn't the IP address; it's the Wi-Fi signal itself. Ensure that your device has a stable and strong Wi-Fi connection. Consider repositioning your router for better signal strength.
11. Is Your Network Secure? Avoiding Hacker Interference
Unfortunately, IP address conflicts can sometimes be because of network security breaches. Consider changing your network password.
12. The Nuclear Option: Resetting Your Router
If all else fails, you can reset your router to its factory settings. Important: This will wipe out your custom settings, including your Wi-Fi password. You'll need to reconfigure your Wi-Fi settings after the reset. Look for a "reset" button on your router (often recessed, requiring a paperclip to press).
13. Preventing Future Problems: Best Practices
Want to avoid this headache in the future? Here are a few tips:
- Use DHCP: Let your router automatically assign IP addresses to your devices.
- Avoid Static IP unless Necessary: Only use static IPs if you absolutely need them.
- Regular Router Reboots: Reboot your router periodically (once a month or so) to keep things running smoothly.
- Check for Updates: Keep your router's firmware and your laptop's operating system updated.
14. When to Call for Backup: Professional Help
Sometimes, the problem is more complex. Don't hesitate to call your internet service provider (ISP) or a tech-savvy friend for help if you're stuck.
15. Take Control of Your Digital Destiny!
So, there you have it! A comprehensive guide to conquering those pesky IP address conflicts. Armed with this knowledge, you now have the power to troubleshoot and fix these problems. Now, go forth and conquer your Wi-Fi woes! We hope you have enjoyed this and that it solves your problems.
Closing:
We hope this guide has been as helpful for you as it would be for our friend, "Joe", who calls us with so many technical questions. Remember, a little preventative care and a few simple troubleshooting steps can make all the difference. Don't let IP conflicts ruin your day! Now go tackle the internet
Laptop WiFi Nightmare? Solved!How to remove Duplicate IPv4 Address which causes IP Address conflict on Windows

By troubleshooterrors How to remove Duplicate IPv4 Address which causes IP Address conflict on Windows by troubleshooterrors
Cara Setting IP Address Komputer agar Dapat Terhubung dengan Internet

By DSID Cara Setting IP Address Komputer agar Dapat Terhubung dengan Internet by DSID
Windows has detected an IP address conflict windows network configuration problem same IP address

By Learning Earning Fun Windows has detected an IP address conflict windows network configuration problem same IP address by Learning Earning Fun
Title: Cara Mengatasi Ip Conflict
Channel: Hadie Danker
Cara Mengatasi Ip Conflict by Hadie Danker
Laptop Wifi Hotspot
Laptop WiFi IP Conflict? This SHOCKING Trick Fixes It INSTANTLY!
Have you ever been locked out of your own digital world? Picture this: You're eager to dive into an important project, connect with loved ones, or stream your favorite show, only to be met with the dreaded "Limited Connectivity" message. Your laptop, typically a portal to endless possibilities, is now seemingly frozen, its WiFi signal a cruel tease. The culprit? An IP address conflict. But don't despair! This isn't a technological abyss; it's a solvable puzzle, and we are here to provide you with the most effective way to resolve it. No more frustration, just instant access.
Understanding the Invisible Foe: What is an IP Address Conflict?
Before diving into the solution, let's briefly illuminate the problem. Your laptop, like every device connecting to a network, needs a unique identifier: an IP (Internet Protocol) address. Think of it as the digital equivalent of your home address. When multiple devices on the same network try to use the same IP, a clash ensues – an IP address conflict. Your laptop becomes confused, unable to determine which device the data is intended for. The result? Intermittent connectivity, slow browsing speeds, and that infuriating "Limited Connectivity" status. This can happen for several reasons, with the most common being a static IP address improperly configured or a router that's accidentally assigning the same IP to multiple devices. It is like two people living in the same house, both claiming the same address: chaos!
The SHOCKING Power of a Simple Reboot: Step-by-Step Guide
Now, for the main act: the instant fix. Forget intricate technical maneuvers for a moment. The simplest solution often proves the most effective. In most instances, a quick reboot of both your laptop and your router will resolve the IP address conflict. This effectively clears the channels and allows your devices to request fresh IP addresses from the network. Here's how to perform this "shocking trick":
- The Laptop Shutdown: Start by fully shutting down your laptop. Do not simply put it to sleep; fully power it off. This ensures all connections are severed and the memory is refreshed.
- The Router Restart: Locate your router, the usually unassuming box emitting WiFi signals. Unplug it from its power source. Wait for a full 60 seconds. This gives the router enough time to completely reset its internal settings and flush out any lingering IP address assignments.
- Powering up the Router: Plug the router back into the power outlet. Allow it to fully boot up and re-establish its connection to the internet. This typically takes a minute or two. Watch for the status lights on the router; they will usually indicate when it is ready.
- The Laptop Wake-Up: Once the router is back online, power on your laptop.
- Reconnection: Your laptop should automatically connect to the WiFi network. If not, select your network from the list of available networks and enter your password if prompted.
This simple sequence often works because it resets the IP address assignment process. The router, on reboot, assigns new, unique IP addresses to all connected devices, resolving the conflict. You should be back online in a matter of minutes.
When the Reboot Doesn't Cut It: Diving Deeper into Advanced Troubleshooting
If the simple reboot doesn't do the trick, don't worry. We have additional strategies to get you back online. We'll delve into more advanced troubleshooting techniques. These involve adjusting network settings on your laptop directly.
Releasing and Renewing your IP Address: The DHCP Dance
One of the most effective advanced methods is to release and renew your laptop’s IP address. This forces your laptop to request a new IP address from the router, potentially bypassing the conflict. Here's the process:
Windows
- Open Command Prompt: Search for "cmd" in the Windows search bar and open the Command Prompt application. Alternatively, you can press the Windows key + R, type "cmd", and press Enter.
- Release the IP: Type
ipconfig /releaseand press Enter. This command releases the current IP address assigned to your network adapter. You might see a message indicating the IP address has been released. - Renew the IP: Type
ipconfig /renewand press Enter. This command instructs your laptop to request a new IP address from the router. - Check Configuration: Type
ipconfig /alland press Enter to see your new IP address. Ensure that this IP is within the correct range set by your router and that you are now connected and able to access the Internet.
MacOS
- Open System Preferences: Click the Apple Menu and select "System Preferences."
- Network Settings: Click "Network."
- Select Your Connection: Select your WiFi network connection from the left-hand sidebar.
- Advanced Settings: Click the "Advanced" button in the lower-right corner.
- Renew DHCP Lease: Go to the "TCP/IP" tab. Click "Renew DHCP Lease". Mac will automatically obtain a new IP address from your router.
- Apply: Click "OK," then "Apply" to save the changes.
This method forces your laptop to negotiate a new IP address, effectively sidestepping the conflict.
Manually Setting a Static IP Address (Use with Caution!)
In some cases, you might want to manually assign your laptop a static IP address. This can be helpful if you need a consistent IP address for specific network activities. However, proceed with caution! Incorrect configuration can worsen the problem. Carefully follow these steps:
Windows
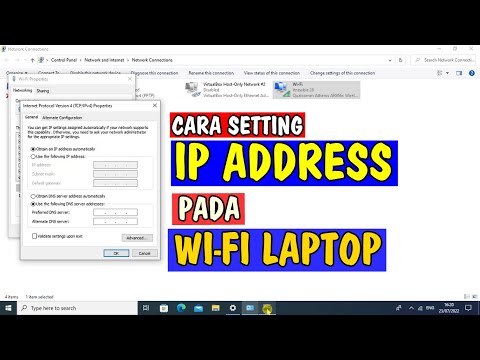
- Open Network Connections: Search for "Network Connections" in the Windows search bar and open it.
- Select Your WiFi Adapter: Right-click on your WiFi adapter (usually named "Wi-Fi" and has the name of your connection) and select "Properties."
- Select the IP Protocol: In the Properties window, select "Internet Protocol Version 4 (TCP/IPv4)" and click "Properties."
- Use a Static IP: Select "Use the following IP address."
- Enter the IP Address: Enter an IP address that is within the range assigned by your router. You can find the router's range by inspecting the DHCP settings of your router. For example, your router might assign addresses between 192.168.1.2 and 192.168.1.254. Choose an IP address that is not already in use (e.g., 192.168.1.100).
- Enter the Subnet Mask: The subnet mask is usually 255.255.255.0.
- Enter the Default Gateway: The default gateway is usually the IP address of your router (e.g., 192.168.1.1).
- Enter the DNS Servers: Enter the DNS server addresses provided by your Internet Service Provider (ISP). You can also use public DNS servers, such as Google's (8.8.8.8 and 8.8.4.4).
- Save the Settings: Click "OK" on all the windows to save the settings.
- Test the Connection: Restart your laptop and check if you can access the internet.
MacOS
- Open System Preferences: Click the Apple Menu and select "System Preferences."
- Network Settings: Click "Network."
- Select Your Connection: Select your WiFi connection in the sidebar.
- Configure IPv4: Click "Advanced" and then select the "TCP/IP" tab.
- Configure Manually: From the "Configure IPv4" dropdown, select "Manually."
- Enter the IP Address: Enter a static IP address within the same range as your router's DHCP scope, but preferably outside of it. (e.g., if your router assigns addresses between 192.168.1.2 and 192.168.1.254, you might choose 192.168.1.250)
- Enter the Subnet Mask: The subnet mask is usually 255.255.255.0.
- Enter the Router Address: Enter the IP address of your router (e.g., 192.168.1.1) in the "Router" field.
- DNS Servers: Go to the "DNS" tab and add your DNS server addresses (e.g., 8.8.8.8 and 8.8.4.4).
- Apply the Settings: Click "OK," and then "Apply."
- Test the Connection: Restart your laptop and check if you can access the internet.
Important Note: Before manually setting a static IP address, it is crucial to understand your router's IP address range. Incorrect settings could create even more problems. If you are not comfortable with this, stick to the DHCP options. Always consult your router’s documentation or a technical expert if unsure.
Checking your Router's DHCP Settings
Sometimes, the conflict originates within the router's configuration itself. Let's examine how to check your router's DHCP (Dynamic Host
