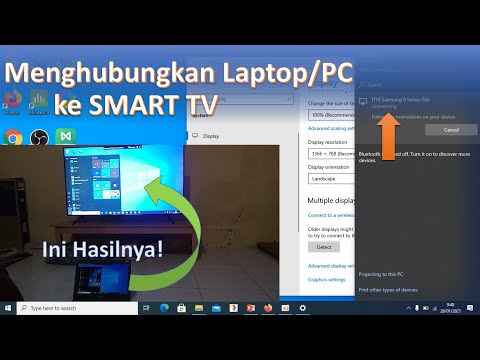
conectar laptop a smart tv por wifi

Title: Tutorial Cara Menghubungkan Laptop ke Smart TV Tanpa Kabel & Wifi
Channel: anto gibran
Tutorial Cara Menghubungkan Laptop ke Smart TV Tanpa Kabel & Wifi by anto gibran
conectar laptop a smart tv por wifi, conectar notebook a smart tv por wifi, como conectar laptop a smart tv por wifi, conectar mi notebook a mi smart tv por wifi, como conectar mi laptop a mi smart tv por wifi, como conectar mi laptop a mi smart tv samsung por wifi, conectar notebook a smart tv samsung por wifi, conectar notebook a smart tv lg por wifi
Laptop to Smart TV Wireless: The Easiest Way EVER!
Seamless Streaming: Connecting Your Laptop to Your Smart TV Wirelessly
Let's be honest; sometimes, a laptop screen just isn't enough. You crave the expansive view of your living room's Smart TV. Luckily, the setup process is surprisingly simple. You can transform your entertainment experience in mere minutes. Modern technology provides elegant solutions for wireless connectivity. Forget messy cables and complicated installations.
Unlocking the Wireless World: Your Laptop-to-TV Gateway
Imagine effortlessly sharing your screen. You want to showcase vacation photos or stream your favorite shows. Luckily, connecting your laptop to your Smart TV wirelessly is easier than you think. The beauty of this setup lies in its simplicity. It eliminates the tangle of wires. Plus, it offers unmatched flexibility and convenience. You should embrace a seamless streaming experience. Your entertainment options expand exponentially when you do.
The Magic of Miracast: A Simple Connection
Many modern Smart TVs and laptops support Miracast. This technology allows for direct wireless screen mirroring. It's often a built-in feature, eliminating the need for extra hardware. To get started, ensure both your laptop and TV support Miracast. The process usually involves a few simple steps. First, navigate to your TV's settings and enable screen mirroring. Then, on your laptop, find the "Connect" option. This is usually found in the notification center. Your TV should appear in the list of available devices. Select it, and voila! Your laptop's screen instantly appears on your television. It truly is that easy.
Chromecast: Casting Your Content with Ease
Another widely utilized method is Google Chromecast. It's a small, affordable device that connects to your TV's HDMI port. It's also a fantastic alternative to Miracast. Chromecast allows you to "cast" content directly from your laptop. It's particularly useful if you're using the Chrome browser. First, plug the Chromecast into your TV. Next, connect it to your Wi-Fi network. Then, install the Google Cast extension in your Chrome browser. Finally, click the three vertical dots in the upper right corner of Chrome. Select "Cast," and you’ll see your Chromecast device listed. Choose your Chromecast, and your browser tab will be displayed on your TV.
Apple Ecosystem: Leveraging AirPlay for Seamless Streaming
If you're an Apple aficionado, you're already familiar with AirPlay. This technology is designed for effortless screen sharing between Apple devices. If you own an Apple device, such as a Macbook, the process is incredibly straightforward. Ensure your Smart TV supports AirPlay. Many newer models do. Click the AirPlay icon in the menu. Select your TV from the list. Your screen will be mirrored instantly. AirPlay's intuitive design makes it incredibly user-friendly.
Troubleshooting Common Wireless Connection Issues
Sometimes, things don't go as planned. The good news is, most problems are easily resolved. If you're experiencing connection issues, there are a few things to try. First, ensure both your laptop and your TV are connected to the same Wi-Fi network. Second, restart both devices. This often clears up minor glitches. Third, check for software updates on both your TV and laptop. Outdated software can cause compatibility problems. Finally, consider the distance between your laptop and your TV. A weak Wi-Fi signal can disrupt the connection. If necessary, experiment with moving closer to your router. These steps often resolve most common connectivity problems.
Enhancing Your Streaming Experience: Tips and Tricks
Once you've successfully connected your laptop to your TV, consider these tips. They can further enhance your viewing experience. Adjust your TV's picture settings. Optimize your color settings to achieve the perfect image quality. Also, close unnecessary applications on your laptop. This ensures the best possible performance. Furthermore, consider using an external speaker system for superior audio. Finally, relax and enjoy the expanded screen size. Your entertainment possibilities are now boundless.
Beyond Streaming: Exploring Other Uses
The applications of this wireless connection extend far beyond streaming movies and TV shows. Use your TV as a secondary display for your laptop. Work on spreadsheets, and presentations. Display photos and slideshows. Share online gaming sessions. The possibilities are only limited by your imagination. It truly transforms the way you interact with technology. Beyond merely streaming, it elevates your entire computing experience.
In Conclusion: Embrace the Wireless Revolution
Connecting your laptop to your Smart TV wirelessly is a game-changer. It’s an easy and accessible way to enjoy your content on a larger screen. Embrace the convenience and flexibility of wireless connectivity. Follow the steps outlined above. With few simple adjustments, you can revolutionize your entertainment setup. You can begin exploring these exciting possibilities today! Now go forth and stream!
HP Laptop WiFi Nightmare? FIX It NOW!Laptop to Smart TV Wireless: The Easiest Way EVER!
Hey everyone! Let’s be real, there's nothing quite as frustrating as huddling around a tiny laptop screen trying to share that hilarious video or binge-watching your favorite show. The glare, the cramped view… it’s practically a cinematic sin! But here’s the good news: casting your laptop to your Smart TV wirelessly is, without a doubt, the absolute easiest way to transform your viewing experience. And believe me, we've all wrestled with tangled HDMI cables and finicky adapters in the past, but those days are OVER. This guide will walk you through the simple steps, making this process as smooth as butter on warm toast.
1. Ditching the Wires: Why Wireless is the Only Way
Let’s be honest, wires are relics of a bygone era. They’re like that old rotary phone – functional, sure, but clunky and outdated. Wireless casting is the sleek, modern upgrade we all deserve. Think of it like this: you're trading in a horse-drawn carriage for a Tesla. You're free to move around, your TV becomes the ultimate screen, and the entire experience is just… easier. It’s about convenience, flexibility, and ultimately, enjoying your content without the tech-induced headaches.
2. First Things First: What You'll Need (Spoiler Alert: Not Much!)
The beauty of this whole setup is its simplicity. You probably already have everything you need! Here’s a quick rundown:
- A Laptop: This is your source, the star of the show. (Windows or macOS, we'll cover both!).
- A Smart TV: This is your destination, the big, beautiful screen you want to cast to. Make sure it is a Smart TV; otherwise, you'll need a streaming device (more on that later).
- A Wi-Fi Network: This is the invisible highway connecting your laptop and TV. A stable connection is key!
3. Windows Warriors: Casting from Your Windows Laptop
Okay, Windows users, this is for you! Let's get casting, shall we? We'll use the built-in "Connect" feature.
- Step 1: Make Sure Your TV is Ready: Turn on your Smart TV and ensure it's connected to the same Wi-Fi network as your laptop.
- Step 2: Access the Action Center: Click the notification icon (the speech bubble) in the bottom-right corner of your screen.
- Step 3: Click “Connect”: If you don't see it, you might need to click "Expand" to reveal more options.
- Step 4: Select Your TV: Your Smart TV should appear in the list. Click on it.
- Step 5: Choose Your Viewing Mode: You'll usually be given options like "Duplicate" (mirroring your laptop screen), "Extend" (using your TV as a second display), or "Project to this PC" (less common but relevant for some setups). Choose the one that best suits your needs.
- Step 6: Enjoy Your Big Screen Experience! Your laptop screen is now magically appearing on your TV.
Easy peasy, right? This is often the BEST and simplest way.
4. macOS Mavericks & Beyond: Casting from Your Apple Laptop
Apple users, fear not! The process is just as straightforward. We will be using the 'AirPlay' function.
- Step 1: Check Connectivity: Ensure both your MacBook and your Smart TV are connected to the same Wi-Fi network.
- Step 2: Look for the AirPlay Icon: On your MacBook, you'll typically find the AirPlay icon (looks like a rectangle with a triangle at the bottom) in the menu bar (the top right corner of your screen). If you don't see it, you might need to enable it in your System Preferences > Displays.
- Step 3: Select Your TV: Click the AirPlay icon and choose your Smart TV from the list of available devices.
- Step 4: Input the Display Code: Your TV might display a code that you'll need to enter on your MacBook to pair the two devices.
- Step 5: Mirror or Extend: As with Windows, you'll have the option to mirror your display (show exactly what's on your MacBook) or extend it (use your TV as a second screen for more desktop space). Choose the option that feels most comfortable.
- Step 6: Revel in the Big Screen Bliss! Now sit back, relax, and enjoy the view.
Apple's integration is typically seamless.
5. What If I Don't Have a Smart TV? Streaming Devices to the Rescue!
No Smart TV? No problem! Streaming devices like Chromecast, Roku, or Fire TV Stick are your best friends. They’re like little magic wands that instantly transform any TV into a Smart TV. They are pretty easy to set up, generally just plugging into your TV’s HDMI port.
- How They Work: These devices connect to your Wi-Fi network, letting you stream content from various apps (Netflix, Hulu, YouTube, etc.). They also allow you to cast from your laptop.
- Casting with Chromecast: In Chrome, you can simply click the three dots in the top-right corner, select "Cast," and then choose your Chromecast device.
- Casting with Roku/Fire TV: Both Roku and Fire TV devices usually have built-in mirroring features or dedicated apps to facilitate screen casting. Consult the device's specific instructions.
Think of streaming devices as your gateway to a world of wireless entertainment.
6. Troubleshooting Troubles: When Things Don't Go Smoothly
Sometimes, technology can be a bit… temperamental. Here are a few common troubleshooting tips:
- Check Your Wi-Fi: A weak or unstable Wi-Fi connection is the culprit in many issues. Make sure both your laptop and TV are connected to a strong signal. A simple restart of your router can sometimes work miracles.
- Update Your Software: Outdated software on either your laptop or TV can cause problems. Make sure both are running the latest updates. This is often the answer!
- Restart Everything: Seriously. Rebooting your laptop, your TV, and your router can often solve mysterious glitches.
- Check the Settings: Double-check your TV's settings to ensure screen mirroring or casting is enabled.
- Consider the Distance: The further your laptop and TV are from your router, the weaker the signal.
If you're still running into snags, a quick search online for your specific TV model and laptop operating system will usually unearth helpful advice.
7. Optimizing Your Casting Experience: Tips and Tricks
Want to make your casting experience even better? Here are a few pro tips:
- Choose the Right Content: Not all content is created equal! Streaming services offer different video qualities, and some content will look much better on a large screen than others.
- Adjust Your TV Settings: Optimize your TV's picture and sound settings for the best possible viewing experience.
- Close Unnecessary Tabs: When you're casting, close extra tabs and applications on your laptop to free up processing power and prevent lag.
- Consider a Wired Ethernet Connection: If possible, connect your TV to your router using an Ethernet cable. This provides a more stable and faster connection than Wi-Fi.
8. The Joy of Shared Viewing: Why This Matters
Let's not forget why we do this in the first place: to share experiences! Casting allows you to laugh together at funny videos, enjoy movie nights with friends and family, or even collaborate on a project in a more engaging way. It turns your living room into a shared, immersive space – and that's pretty darn special.
9. Beyond the Basics: Casting Different Types of Content.
You can cast pretty much anything that appears on your laptop screen. We're talking more than just movies and shows.
- Web Browsing: Browse your favorite websites on the big screen.
- Gaming: Play casual games (or stream more demanding ones with a compatible setup) on a larger display.
- Presentations: Deliver presentations from your laptop to a larger audience.
- Photo Albums: Share your photos and videos with ease!
10. The Future is Now: Wireless Technology Advancements
Wireless technology is constantly improving! We anticipate even better speeds, further distances, and more seamless integrations in the years to come. Expect even easier setups and greater compatibility across all devices. We're headed towards a world where wireless is the standard, and wires are relegated to the historical trash heap.
11. Security Considerations: Keeping Your Connection Safe
While wireless casting is convenient, it's important to think about security.
- Use a Strong Wi-Fi Password: This is the first line of defense against unauthorized access to your network.
- Keep Your Router Firmware Updated: Updates often include security patches.
- Be Mindful of Public Wi-Fi: Avoid casting sensitive information over public Wi-Fi networks, which are often less secure.
- Check Your TV's Settings: Your Smart TV likely has security settings you can adjust. Familiarize yourself with them.
12. Comparing Casting Methods: Built-in vs. Streaming Devices
We
Laptop WiFi Dropping? Tablet's Fine? The SHOCKING Reason Why!Cara Menghubungkan LaptopPC ke SMART TV dengan WiFi
By Eko Zulkaryanto Cara Menghubungkan LaptopPC ke SMART TV dengan WiFi by Eko Zulkaryanto
Transmitir Pantalla de la Computadora al Televisor por RED LAN o WIFI, Sin usar Programas

By SERVITEC URIBE Transmitir Pantalla de la Computadora al Televisor por RED LAN o WIFI, Sin usar Programas by SERVITEC URIBE
Cara Menghubungkan Dekstop PC ke TV Nirkabel, Gratis, Tanpa WIFI, Tanpa HDMI Langkah demi Langkah 2022

By rizisuper Cara Menghubungkan Dekstop PC ke TV Nirkabel, Gratis, Tanpa WIFI, Tanpa HDMI Langkah demi Langkah 2022 by rizisuper

Title: COMO COMPARTIR LA PANTALLA DE TU PC EN LA TV POR WIFI
Channel: Franco Rivero
COMO COMPARTIR LA PANTALLA DE TU PC EN LA TV POR WIFI by Franco Rivero
Wifi On Laptop
Laptop to Smart TV Wireless: The Easiest Way EVER!
Streaming content from your laptop directly to your smart TV has evolved from a complicated process to a seamless experience. Gone are the days of tangled HDMI cables and awkward screen mirroring setups. Today, we'll explore the most straightforward methods to wirelessly project your laptop screen onto your television, ensuring a hassle-free entertainment experience.
Understanding the Wireless Landscape: Technologies at Play
The world of wireless connectivity can feel overwhelming, but understanding the fundamental technologies involved simplifies the process. Several key players facilitate the laptop-to-TV connection.
Wi-Fi: This ubiquitous technology forms the backbone of most wireless connections. Your laptop and smart TV both utilize Wi-Fi to communicate and transfer data. The strength and stability of your Wi-Fi network are crucial for a smooth streaming experience. Ensure both devices are connected to the same network for optimal performance.
Miracast: Miracast is a wireless display standard that allows for direct screen mirroring between devices. It's like a wireless HDMI cable, transmitting your laptop's screen in real-time. Many modern smart TVs, as well as laptops running Windows, support Miracast natively.
Chromecast: Developed by Google, Chromecast is a media streaming device that plugs into your TV's HDMI port. It receives content from your laptop (via the Chrome browser) or other devices, allowing you to cast videos, photos, and more. Chromecast relies on your Wi-Fi network to stream content.
Apple AirPlay: AirPlay is Apple's wireless technology, primarily used with Apple devices. However, some smart TVs now support AirPlay, enabling seamless streaming for MacBooks and other Apple products to your television.
DLNA (Digital Living Network Alliance): While less common now, DLNA allows for the streaming of media files between devices on a home network. Certain smart TVs still support DLNA, enabling access to files stored on your laptop's hard drive.
Each of these technologies offers a unique approach to connecting your laptop to your television. The best option depends on your specific devices and preferences.
The Easiest Methods: Step-by-Step Guides
Let's delve into the easiest and most effective methods for wirelessly connecting your laptop to your smart TV.
Method 1: Using Miracast (For Windows Laptops & Compatible TVs)
This method is often the most straightforward, leveraging the native capabilities of your devices.
Check for Miracast Compatibility:
- Laptop: Most Windows laptops running Windows 10 or 11 support Miracast. To confirm, go to Settings > System > Projecting to this PC. If a message indicates your PC is ready for Miracast, you're good to go.
- Smart TV: Refer to your TV's specifications or user manual to verify Miracast support. Look for terms like "Screen Mirroring," "Wireless Display," or "Miracast."
Connect to Your TV:
- On your laptop, press the Windows key + P. This will open the "Project" panel.
- Select "Connect to a wireless display." Your laptop will scan for available Miracast-enabled devices.
- Choose your smart TV from the list of available devices.
- Your laptop screen should now be mirrored on your TV.
Fine-tuning the Experience:
- Resolution: Adjust your laptop's display settings (Settings > System > Display) to optimize resolution for your TV. Experiment with different resolutions to find the sharpest image.
- Sound: Sound should automatically play through your TV. If not, check your sound settings (right-click the speaker icon in the system tray) and select your TV as the output device.
- Disconnecting: To disconnect, press the Windows key + P again and select "Disconnect."
Method 2: Utilizing Chromecast (For All Laptops & TVs with HDMI)
Chromecast offers a flexible solution, especially if your TV doesn't support Miracast.
Set Up Your Chromecast:
- Plug your Chromecast device into an HDMI port on your TV and connect it to a power source.
- Download the Google Home app on your laptop, tablet, or smartphone.
- Follow the on-screen instructions within the Google Home app to connect your Chromecast to your Wi-Fi network.
Casting from Your Laptop (Using Chrome Browser):
- Open the Google Chrome browser on your laptop.
- Click the three vertical dots (menu) in the top-right corner of the browser window.
- Select "Cast…".
- Choose your Chromecast device from the list.
- You can choose to cast your entire desktop or just a specific tab.
- To stop casting, click the Cast icon again and select "Stop casting."
Casting from Other Applications:
- Many applications, such as Netflix, YouTube, and Spotify, have a built-in "Cast" button. Simply click the Cast icon within the application to stream content to your TV.
Method 3: Leveraging Apple AirPlay (For MacBooks & Compatible TVs)
If you own a MacBook and your smart TV supports AirPlay, this method is highly convenient.
Confirm AirPlay Compatibility:
- Check your TV's specifications or user manual to confirm AirPlay support.
Connecting Your MacBook to Your TV:
- Ensure your MacBook and your TV are connected to the same Wi-Fi network.
- Click the AirPlay icon in your Mac's menu bar (it looks like a rectangle with a triangle at the bottom). If you don't see it, go to System Preferences > Display and check the box that says "Show mirroring options in the menu bar when available."
- Select your TV from the list of available devices.
- You may be prompted to enter a code displayed on your TV screen.
Mirroring or Extending Your Display:
- You can mirror your MacBook's display on your TV, or you can extend your display, treating your TV as a secondary screen.
- To adjust these settings, click the AirPlay icon again and select "Use as a separate display" or "Mirror Built-in Display."
Method 4: Streaming with DLNA (If Your TV Supports It)
While less common now, DLNA offers a direct way to play media files stored on your laptop.
Enable Media Streaming on Your Laptop:
- In Windows, ensure that media streaming is enabled. Go to Control Panel > Network and Internet > Network and Sharing Center > Change advanced sharing settings.
- Under "Media streaming options," ensure that "Media streaming is enabled" is selected. You can also customize which media files are shared.
Access Your Laptop's Media Library from Your TV:
- Consult your TV's user manual to learn how to access DLNA servers. This usually involves navigating through your TV's menus to find a "Media Server" or "DLNA" option.
- Select your laptop from the list of available media servers.
- Browse your media files and play them directly on your TV.
Troubleshooting Common Issues
Even with the easiest methods, you might encounter some hiccups. Here's how to address common problems.
Connectivity Issues:
- Check your Wi-Fi: Ensure both your laptop and TV are connected to the same Wi-Fi network.
- Restart devices: Try restarting your laptop, TV, and Wi-Fi router.
- Distance: Move your laptop and TV closer to your Wi-Fi router to improve signal strength.
- Interference: Minimize potential interference from other electronic devices.
Screen Mirroring Problems:
- Update drivers: Ensure your laptop's graphics drivers are up-to-date.
- Power saving: Disable power-saving modes on your laptop that might be interfering with the connection.
- Check TV Settings: Explore your TV's settings (especially network and input settings) to see if any options are causing problems.
Sound Problems:
- Check sound settings: Ensure your TV is selected as the audio output device in your laptop's sound settings.
- Volume: Increase the volume on both your laptop and TV.
- Mute: Make sure neither your laptop nor your TV is muted.
By following these steps, you can transform your entertainment experience. Enjoy the freedom of streaming your laptop's content on your big screen without the constraints of wires.
