how to make laptop as a wifi router windows 7
Title: Tutorial - How to make your laptop as a wireless router.. Windows 7 and Vista
Channel: q8ieng
Tutorial - How to make your laptop as a wireless router.. Windows 7 and Vista by q8ieng
how to make laptop as wifi hotspot windows 7, how to make laptop as wifi router
Turn Your Windows 7 Laptop into a WiFi Hotspot! (Easiest Trick Ever!)
Unleash Your Inner WiFi Wizard: Transform Your Win7 Laptop into a Hotspot!
Remember those days of tethering your phone, desperately searching for a decent connection? Those frustrations are happily in the past. Now you can liberate your internet, courtesy of your trusty Windows 7 laptop. You can even create your own personal WiFi hotspot. It’s a trick that feels almost magical. You’ll probably wonder why you didn't know about it sooner.
Waving the Magic Wand: The Simple Setup
Forget complex configurations, because this is remarkably straightforward. Believe me, you don’t need a degree in computer science. First, you must ensure your laptop has a working network adapter. Then, find a reliable internet connection source, whether it’s Ethernet or another WiFi network. Since you've got the basics, you can move on to the next step.
Setting the Stage: Accessing the Command Prompt
Now, let's get down to the real business. We’ll be using the command prompt. You can find the command prompt by searching in the start menu. Alternatively, you can press the Windows key plus the "R" key. Subsequently, type "cmd" and hit enter. You'll see a small black window. This is where the magic truly happens.
The Enchanting Incantations: Entering the Commands
Once the command prompt window opens, type the following command. Netsh wlan set hostednetwork mode=allow ssid=YourHotspotName key=YourPassword. Replace “YourHotspotName” with your desired network name. Then, exchange "YourPassword" for a secure password. Make sure you choose a strong password! After entering this command, press enter. You’ll notice a message confirming the command’s success. Because of this, you are well on your way.
Activating the Spell: Starting the Hosted Network
Next, you need to initiate the network. Type another command in the command prompt. Enter netsh wlan start hostednetwork. Press enter again. Immediately, the hosted network should start. You have almost completed the process now.
Sharing the Spoils: Enabling Internet Connection Sharing
This is the final step. You need to share your internet connection. Otherwise, your hotspot will be useless. Open the network and sharing center. Click on "Change adapter settings". Identify the adapter connected to the internet. Right-click on it. Select "Properties". Then, go to the "Sharing" tab. Check the box that says "Allow other network users to connect through this computer's Internet connection". Choose your hosted network from the drop-down menu. Finally, click "OK".
Troubleshooting the Tantrums: Fixing Common Issues
Sometimes the process isn't perfect. Therefore, it's essential to have some troubleshooting tips. First, make sure you've entered the commands correctly. Double-check for typos. Moreover, ensure your network adapter is enabled. If you continue to struggle, try restarting your laptop. Also, you may need to update your network drivers. As a result, these steps should resolve most problems.
Why It Works: Understanding the Underlying Mechanics
At its core, this method uses Windows 7’s built-in hosted network feature. It essentially transforms your laptop into a virtual router. The command prompt provides the instructions, guiding the system. Afterward, the connection sharing function distributes the internet. The procedure is remarkably efficient and intuitive.
Beyond the Basics: Fine-Tuning Your Hotspot
You can customize your hotspot further. Consider extending the network's range with additional software. Be wary of third-party apps. Moreover, regularly change your password to maintain security. Because of this, you can ensure a safe, reliable connection.
The Benefits of Your Newfound Power
Think about the advantages! Share your internet with multiple devices. Connect your tablet, phone, and other gadgets. This is helpful for remote work, travel, or entertainment. Ultimately, it's a practical solution for various scenarios.
Beyond the WiFi: Other Cool Uses
The possibilities extend beyond simple internet sharing. You can use it for file sharing. Create a local network for gaming. Also, it can be handy for testing network configurations. This versatility makes it incredibly valuable.
The Grand Finale: Embracing Your WiFi Freedom
Congratulations, you are now a WiFi hotspot master! You've successfully transformed your Windows 7 laptop. You can enjoy internet access. So, embrace your power and enjoy the freedom. Now is the time to start sharing that WiFi! You are now ready to share the internet with the world.
Laptop WiFi Nightmare? This One Trick BOOSTS Your Signal INSTANTLY!Turn Your Windows 7 Laptop into a WiFi Hotspot! (Easiest Trick Ever!)
Hey tech enthusiasts, ever been in a pickle where you desperately needed internet access, but your laptop was the only device with a connection? Maybe you're on a road trip with a data-hungry tablet or sharing your precious Wi-Fi with a friend stranded in the digital wilderness. Well, fret no more! Today, we're diving headfirst into a super simple trick to transform your trusty Windows 7 laptop into a personal Wi-Fi hotspot. This isn't some complex IT ordeal; it's so easy, even my grandma (who thinks a mouse is still a literal rodent) could do it!
1. Why Turn Your Windows 7 Laptop into a Hotspot? The Perks!
Before we get our hands dirty (virtually, of course!), let's talk about the "why." Why would you even want to turn your Windows 7 laptop into a hotspot? Think of it as a superhero power, instantly transforming your laptop into a Wi-Fi provider! Here's a taste of the benefits:
- Share the Love: Share your internet connection with your phone, tablet, another laptop, or even that ancient Nintendo DS.
- On the Go Freedom: Perfect for travel. No more hunting for Wi-Fi cafes!
- Emergency Lifeline: When your home Wi-Fi goes AWOL, your laptop can be a temporary savior.
- Cost Savings: Potentially save on buying a separate mobile hotspot device.
2. The Myth of Complexity: Debunking the Techie Jargon!
You might be thinking, "Oh, this sounds complicated. I'm not a tech guru!" Relax! This isn't rocket science. We're not talking about coding or advanced network configurations. We're talking about a few simple steps, a bit like assembling LEGOs, but for Wi-Fi. We are going to make it ridiculously easy so that everyone understands it.
3. The Magic Formula: What You'll Need
Before we get started, ensure you have these basic ingredients:
- A Windows 7 Laptop: (Duh!)
- An Active Internet Connection: This could be through Ethernet, or existing Wi-Fi. Your laptop needs to receive internet to share it.
- A Little Patience: Just a pinch! This process is quick, but sometimes things take a little longer.
4. The Easiest Trick Ever: Creating the Hotspot!
Alright, buckle up! This is where the magic happens. We are going to turn your laptop into a Wi-Fi hotspot in a few clicks:
Step 1: Open the Command Prompt (Run as Administrator) Click the Start button, type “cmd” in the search box, right-click on Command Prompt, and choose "Run as administrator." This is key!
Step 2: The Secret Code (Don't worry, it's not complicated!) Type the following commands, pressing Enter after each:
netsh wlan set hostednetwork mode=allow ssid=MyHotspot key=YourPassword(Replace "MyHotspot" with the name you want for your Wi-Fi network. And replace "YourPassword" with a strong password.) I strongly urge you to choose a strong password. Think of it as the lock on your front door.netsh wlan start hostednetwork
Step 3: Sharing the Internet Connection: Now, open the Network and Sharing Center (search for it in the Start menu). Click on "Change adapter settings." Find the connection you are using to access the internet (e.g., your Ethernet connection or your Wi-Fi adapter). Right-click on it, select "Properties," then go to the "Sharing" tab. Check the box that says "Allow other network users to connect through this computer's Internet connection." In the "Home networking connection" dropdown menu, select the "Microsoft Hosted Network Virtual Adapter" that was created earlier. Click "Ok."
Step 4: Connect Your Devices! Grab your phone, tablet, or any other device and search for Wi-Fi networks. You should see the name you gave your hotspot (MyHotspot, in our example). Enter your password and voila! You're connected!
5. Troubleshooting the Wi-Fi Woes: Things That Might go Wrong
Okay, tech problems can happen. Don’t fret! Here are common hiccups and how to fix them:
- "Network Not Found": Double-check the spelling of the network name (SSID) on your connecting device.
- "Can't Connect to This Network": Make sure you entered the correct password. And, try restarting your laptop and the connecting device.
- Slow Speeds: Your internet connection is like a highway; if it's busy, things can slow down. Try disconnecting other devices, and if your Wi-Fi signal is weak, move your laptop closer to the device you are connecting to.
6. Customizing Your Hotspot: Name and Security Settings
You don't have to live with the default settings! You can change the name of your hotspot and the password whenever you want. Just repeat the commands in Step 2, modifying the ssid and key values. It's like redecorating your digital living room.
7. Stopping the Hotspot: Turning It Off When You're Done
When you're finished sharing, stopping the hotspot is a breeze:
- Open Command Prompt (Run as Administrator once again).
- Type the command:
netsh wlan stop hostednetworkand hit Enter.
That's it! Your laptop is no longer broadcasting the Wi-Fi signal.
8. Beyond the Basics: Advanced Hotspot Tips and Tricks
Feeling adventurous? Here are a few extra tips:
- Create a Batch File: Save the commands from step 2 (setting up and starting the hosted network) in a
.batfile to run the process faster. - Monitor Usage: Check your internet usage to avoid going over your data cap.
9. Windows 7’s Sunset and Hotspot Longevity: What Does This Mean?
Windows 7 is no longer supported by Microsoft. Does this mean it’s a useless old relic? Absolutely not! It just means that there are security risks involved. So, use the method we taught you with proper security measures, and you should be fine.
10. The Importance of Strong Passwords: Protecting Your Network
Think of your Wi-Fi password as a lock on your house. A weak password is like leaving the key under the doormat. Make it strong! Use a combination of uppercase and lowercase letters, numbers, and symbols.
11. Security Best Practices: Keeping Your Hotspot Safe
Beyond a strong password, here are a few more security tips:
- Use WPA2-PSK Encryption (or the highest available): This is the strongest encryption supported by Windows 7.
- Keep Your Windows 7 Updated: Install any available security updates even after support has ended.
- Be Careful About Public Wi-Fi: When connecting to public Wi-Fi hotspots, be extra cautious about the websites you visit and the information you share.
12. The Power of Persistence: What If It Doesn't Work At First?
Don't give up if you don't get it right the first time! Technology can be finicky. Double-check your steps, and maybe even restart your laptop. We’ve all been there, staring blankly at a screen with a malfunctioning connection.
13. Testing Your Hotspot: Ensuring Connectivity
After setting everything up, test your hotspot by connecting a different device and browsing the internet. If all is well, you are on the fast track to Wi-Fi-enabled devices!
14. Advantages Versus Disadvantages: Weighing the Pros And Cons
Like anything, using your laptop as a hotspot has pros and cons:
- Pros: Convenient, cost-effective, and easy to set up.
- Cons: Drains your laptop's battery, can slow down your internet speed, and relies on your original internet connection.
15. Recap: Summing Up The Simplicity
We've navigated the seas of tech jargon and emerged victorious! Armed with this knowledge, you can now transform your Windows 7 laptop into a Wi-Fi hotspot with ease. Keep the steps simple, and don’t forget your password! Share the internet, save the day, and have fun!
Closing Section:
So, there you have it, folks! Turning your Windows 7 laptop into a Wi-Fi hotspot is a walk in the park. We hope this guide has de-mystified the process for you. Now go out there and share the Wi-Fi love. You are now a Wi-Fi wizard!
FAQs:
1. Will this drain my laptop's battery?
Yes, running a Wi-Fi hotspot will consume more battery power. It's like running two devices at once! Keep your laptop plugged in whenever possible, especially for extended usage.
2. Does this work with all Windows 7 laptops?
Generally, yes. However, some older or specialized laptops might have limitations. Make sure your Wi-Fi adapter is enabled and capable of supporting a hosted network.
**3
Unlock Your Toshiba's WiFi NOW! (Windows 8 Secret Trick)Create a laptop WiFi hotspot in under 30 seconds Windows 7
By jacobspeeds Create a laptop WiFi hotspot in under 30 seconds Windows 7 by jacobspeeds
How to make your Windows 7 PC, a Wi-Fi hotspot
By Tech Raj How to make your Windows 7 PC, a Wi-Fi hotspot by Tech Raj
Turn a Windows 7 PC in to a WiFi HotSpot Router for FREE
By Let's Build Turn a Windows 7 PC in to a WiFi HotSpot Router for FREE by Let's Build

Title: How to turn your Windows 7810 Laptop or PC into a WiFi Hotspot UpdatedHD
Channel: iTech
How to turn your Windows 7810 Laptop or PC into a WiFi Hotspot UpdatedHD by iTech
Working With Laptop
Turn Your Windows 7 Laptop into a WiFi Hotspot! (Easiest Trick Ever!)
We've all been there. You're on the go, perhaps at a coffee shop with notoriously unreliable WiFi, or maybe stuck in a hotel room with a connection that barely limps along. You want to connect your smartphone, tablet, or another device to the internet, but the available networks are either spotty, require payment, or are frustratingly slow. What if you could leverage the power of your Windows 7 laptop to create your own personal WiFi hotspot? The good news is, you absolutely can. This isn't some complex, tech-heavy operation. We're talking about a nearly instantaneous process, so intuitive that you will be up and running in a matter of mere moments. Forget complicated software installations and bewildering configuration menus. Prepare to transform your laptop into a portable internet hub, providing your devices with a strong, reliable connection wherever you are. Let's get started!
Understanding the Underlying Technology: Virtual Hosted Network
The magic behind turning your Windows 7 laptop into a WiFi hotspot lies in the "Virtual Hosted Network" feature. This ingenious functionality, intrinsic to Windows 7, allows your laptop's built-in wireless adapter to simultaneously act as a receiver and a transmitter. In essence, your laptop receives an internet connection, be it from a wired Ethernet cable or another WiFi network, and then re-broadcasts that connection wirelessly to other devices. This process is all handled behind the scenes, requiring minimal input from you, the user. The virtual adapter emulates a physical wireless network card, creating a separate virtual network interface that can then be configured to share your internet connection. This is significantly different from simply connecting to an existing WiFi network and then trying to share it, which is often a function of the device’s built-in capabilities rather than a core feature of the operating system. The Virtual Hosted Network provides a direct and efficient method of creating a dedicated hotspot without the need for third-party applications.
Step-by-Step Guide: Creating Your WiFi Hotspot
The process is remarkably streamlined. Follow these simple steps:
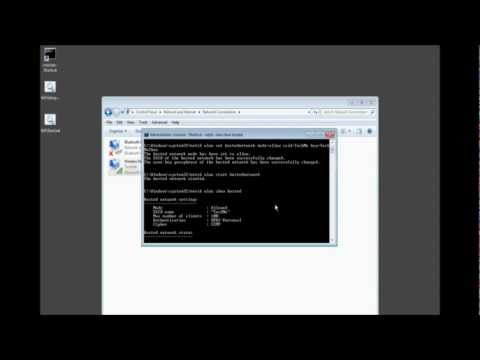
Open the Command Prompt as Administrator: This is the cornerstone of the entire operation. Navigate to the Start menu and type "cmd" in the search bar, then right-click on "Command Prompt" and select "Run as administrator." This step grants the necessary permissions to execute the commands that will configure your virtual network adapter. Without administrative privileges, the process will fail.
Enable and Configure the Virtual Hosted Network: In the Command Prompt window, type the following command and press Enter:
netsh wlan set hostednetwork mode=allow ssid="YourHotspotName" key="YourPassword"Replace
YourHotspotNamewith the name you wish to give your hotspot (i.e., "MyLaptopWiFi", "TravelHotspot"). Avoid spaces, special characters, and long names for optimal compatibility. Then, substituteYourPasswordwith a strong, secure password for your network. We recommend using a combination of upper and lowercase letters, numbers, and symbols. This password is critical in protecting your network from unauthorized access. This single command enables the hosted network feature, sets the Service Set Identifier (SSID), which is the name of your hotspot, and sets the security key, or password. Be mindful of the password you use; it must be at least eight characters long.Start the Hosted Network: After successfully configuring the network with the first command, begin the hosted network by typing the following command at the Command Prompt and pressing Enter:
netsh wlan start hostednetworkThis command activates the virtual network adapter, allowing it to begin broadcasting the network you just configured. At this point, the virtual adapter is "on," but it isn't yet sharing the internet connection.
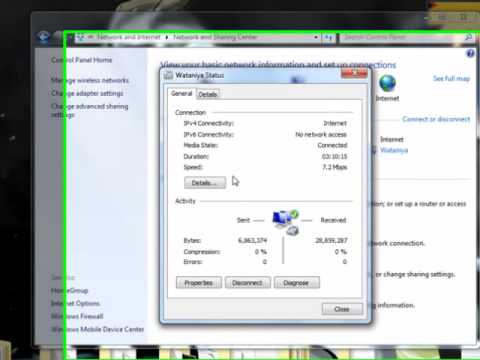
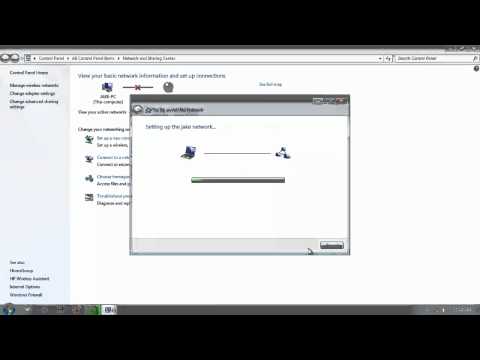
Configure Internet Connection Sharing: Navigate to the Network and Sharing Center, which you can find by right-clicking the network icon in your system tray (typically located near the clock).
- Click on "Change adapter settings." This will open the Network Connections window, displaying all of your network adapters.
- Identify the adapter that is currently connected to the internet. This will likely be your Ethernet connection or your existing WiFi connection if you are connected to another network.
- Right-click on the adapter that has the internet connection and select "Properties."
- In the Properties window, go to the "Sharing" tab.
- Check the box that says "Allow other network users to connect through this computer's Internet connection."
- From the dropdown menu, select "Microsoft Hosted Network Virtual Adapter." This is crucial; this is the virtual wireless adapter that was created when you enabled the hosted network. If it is not in the drop-down menu, ensure you have completed all the previous steps in the correct order.
- Click "OK" to save the changes. This final step configures Windows to share the internet connection from your main adapter to the newly created virtual wireless adapter.
Connect Your Devices: With your hotspot now active, your other devices (smartphones, tablets, etc.) should be able to detect the new WiFi network you created. Simply select the network name (SSID) you chose earlier, enter the password, and connect. That’s it! You are now ready to browse the internet on your devices, utilizing the connection shared by your Windows 7 laptop.
Troubleshooting Common Issues
While the process is usually seamless, a few common hurdles can sometimes arise. Here's a breakdown of solutions for the most frequent problems:
"The hosted network couldn't be started" error: This often points to a driver issue or the virtual adapter not being properly enabled. Ensure your wireless network adapter drivers are up-to-date. First, refresh your adapter drivers by going to the Device Manager (search for Device Manager in the Start menu). Expand "Network adapters," right-click on your wireless adapter and select "Update driver." If this doesn't resolve the issue, consider restarting your laptop. If the problem persists, your wireless card might not support hosted network features. Check your adapter's specifications for compatibility.
Devices can connect to the network, but there's no internet access: This usually means there’s an issue with Internet Connection Sharing. Double-check the settings in the Network Connections window. Make certain that the "Allow other network users to connect through this computer's Internet connection" box is checked on the correct adapter (the one with the internet connection), and that the "Home networking connection" is correctly set to the "Microsoft Hosted Network Virtual Adapter." Also, ensure your firewall isn't blocking the connection. Temporarily disabling the firewall (for testing, ideally) can rule this out.
The hotspot keeps disconnecting, or the connection is unstable: This could be caused by several factors. First, ensure your laptop is close enough to your other devices. Consider positioning your laptop in a centralized location to maximize coverage. Interference from other electronic devices (microwaves, Bluetooth devices) can also disrupt the signal. Finally, check the power settings on your laptop. The power settings might be set to turn off the wireless adapter to save power. Ensure your laptop's power plan is set to "High performance" while using the hotspot.
Maximizing Your Hotspot's Performance and Security
Beyond the core functionality, there are steps to elevate your hotspot experience:
Choose a strong password: We cannot stress this enough. A robust password protects your network from unauthorized access, securing your connection from potential eavesdropping or misuse. Make it long, complex, and unique.
Monitor data usage: Be conscious of your data limits. Streaming video, downloading large files, and online gaming can quickly consume your data allowance, especially if you’re tethering from a mobile data plan.
Keep your Windows 7 laptop updated: Regularly update your operating system and drivers to resolve any security vulnerabilities and maintain optimal performance.
Consider a wired connection: If possible, connect your laptop to the internet using a wired Ethernet connection, not an existing WiFi connection. Wired connections tend to be more stable and offer faster speeds than WiFi.
Adjust the channel: The wireless channel your hotspot uses can experience interference from neighboring networks. Experimenting with different channels within your router's settings (if you have access) can sometimes improve performance.
Alternative Solutions for Windows 7 Hotspot Creation
If, for any reason, the methods outlined above do not work or are not ideal, consider these alternatives, although they are less efficient than the process outlined above:
Third-party software: Various third-party applications provide similar functionality. These tools often offer a more user-friendly interface and additional features, like monitoring data usage. However, installation of such software comes with its own downsides, and you should be careful to choose reputable, well-reviewed programs to avoid potential security risks or performance issues.
Mobile Hotspot: If your smartphone has hotspot capabilities, you can use it as a WiFi access point for other devices. This is a convenient option, especially when you are on the road. Note that this may consume your mobile data.
USB Tethering: Connect your phone to your laptop via USB and use the phone’s hotspot feature. This is typically a more stable connection than WiFi tethering, and it often conserves your phone's battery life.
Conclusion: Your On-the-Go Internet Solution
Turning your Windows 7 laptop into a WiFi hotspot is a powerful and surprisingly easy way to stay connected, whether you
