how to check wifi usage on laptop windows 7

Title: check internet use on windows7
Channel: Thaiload ITClip
check internet use on windows7 by Thaiload ITClip
Unlock Your WiFi Secrets: See EXACTLY What's Draining Your Windows 7 Laptop's Bandwidth!
Unmasking Your WiFi's Hidden Culprits: A Bandwidth Bandit Busting Guide for Windows 7
Ever felt your Windows 7 laptop’s WiFi crawl like a snail in molasses? It’s frustrating, isn't it? You're likely experiencing bandwidth bottlenecks. But don't despair! Uncovering the culprits secretly guzzling your precious WiFi is easier than you think. I'm here to guide you. So, let's embark on a digital detective journey.
Decoding the Bandwidth Bandit's Trail
First, you need to understand where the bandwidth is going. Windows 7, thankfully, provides some tools. However, they aren't always obvious. Often, invisible processes consume bandwidth. Consequently, you need to find them. To do so, we'll use a combination of built-in utilities and a few clever tricks.
Pinpointing the Bandwidth Hog: The Resource Monitor Detective
One of your most helpful tools is the Resource Monitor. It’s your primary investigative asset. You can access it through the Task Manager. To open Task Manager, press Ctrl + Shift + Esc simultaneously. Once open, you'll see a list of running processes. Look for the “Performance” tab, then click "Open Resource Monitor" at the bottom.
Here, you'll find several tabs. The “Network” tab is your focus. It displays all the processes using your network connection in real-time. You'll see data usage, sending, and receiving speeds. Therefore, you can see which applications devour the most bandwidth. Notice anything suspicious? That could be your bandwidth thief.
Unveiling the Culprits: Identify and Eliminate
Once you've identified the resource-guzzling applications, consider their necessity. Do you actually need all of them running? Some may be essential, especially if they are system processes. Others might be optional. Sometimes, background programs silently update, consuming bandwidth. These updates often run without your direct involvement.
Then, explore alternative solutions. For example, check the application's settings. Many applications allow you to disable auto-updates. Disabling auto-updates can significantly reduce bandwidth usage. Also, temporarily suspend or uninstall resource intensive applications. If you don't need it, consider removing it completely.
WiFi Interference and Other Sneaky Saboteurs
Bandwidth issues are not just about software alone. In contrast, external factors can also impact bandwidth. Interference from other electronic devices is also a common problem. Bluetooth devices, microwaves, and other WiFi networks nearby can cause disruption.
So, reposition your router. Experiment with different router channel settings. Changing the channel can sometimes reduce interference. Furthermore, ensure that your router's firmware is up-to-date. Older firmware may have performance issues.
Bandwidth Management Strategies: A Proactive Approach
Preventative measures can help safeguard your WiFi. First, regularly review your installed software. Eliminate any unnecessary applications that might be running. Keeping your system lean and clean helps.
Next, consider implementing Quality of Service (QoS) settings. Your router may offer this. QoS prioritizes specific types of network traffic. This ensures that important applications get the bandwidth they require.
The Final Inspection: A Holistic Analysis
Finally, conduct an overall check of your network. This includes things like your internet speed. Run a speed test periodically. This helps you track your actual speeds.
Also, monitor your bandwidth usage over time. Many routers provide usage statistics. Therefore, you can identify any trends. Ultimately, this will reveal when and how your bandwidth is being used.
Conclusion: Reclaiming Your WiFi Freedom!
Solving the puzzle of your slow WiFi requires some detective work. However, with the right tools and a little patience, you can reclaim fast internet. Remember, finding the causes is essential. Then, you can take the steps to eliminate these bandwidth bandits. Now, go forth, and liberate your Windows 7's WiFi!
Toshiba WiFi Nightmare? Solved! (Easy Setup Guide)Unlock Your WiFi Secrets: See EXACTLY What's Draining Your Windows 7 Laptop's Bandwidth!
Hey there, fellow Windows 7 laptop users! Ever feel like your Wi-Fi is running at dial-up speeds even though you're paying for a lightning-fast connection? We've all been there! You're trying to stream your favorite show, work on a video project, or even just browse the web, and BAM! Buffering, lag, and general internet frustration. But what if you could actually see what's hogging all that precious bandwidth? What if you could pinpoint the culprits and reclaim your digital life? Well, buckle up, because we're about to dive deep into the world of Wi-Fi diagnostics, specifically within the realm of your trusty Windows 7 laptop.
1. The Bandwidth Bandit: Understanding the Bandwidth Basics
Before we start wielding our digital magnifying glasses, let's get on the same page about bandwidth. Think of bandwidth like a highway: the wider the road, the more cars (data) can travel at once. Your internet plan dictates the width of your highway. When you're experiencing slow speeds, it's often because too many "cars" are on the road at the same time, or maybe some vehicles are just… well, taking up way more space than they should. This is where those bandwidth-draining apps and processes come into play.
2. Why Windows 7? Still Relevant in Today's Tech Landscape
Now, before you start thinking, "Windows 7? Really?" remember that a significant number of people still use this classic operating system. And hey, there's a reason for its enduring popularity: it's stable, relatively lightweight, and, let's be honest, many of us are creatures of habit! So, while Windows 10 and 11 have their bells and whistles, we're catering to a specific, and still very valid, user base. Plus, the core concepts of bandwidth monitoring are the same, regardless of your OS. We're all trying to get the most out of our internet!
3. The Sneaky Suspects: Common Bandwidth Hogs
The first step in solving any mystery is identifying the suspects. Let's look at some common culprits that can silently drain your laptop's bandwidth:
- Streaming Services: Netflix, YouTube, Spotify – they're all hungry beasts! They devour bandwidth to deliver high-quality video and audio.
- Background Updates: Windows Updates, software updates, app updates… they often run in the background, without you even knowing.
- Online Games: Multiplayer games are notorious bandwidth consumers, especially with their constant data exchanges.
- Cloud Services: Services like Dropbox, OneDrive, and Google Drive continuously sync files, using bandwidth to upload and download.
- Torrenting: Let’s just say, downloading large files this way can put a huge strain on your connection.
- Unnecessary Apps: Those programs you don't even use anymore could still be silently running, leeching bandwidth.
4. The Detective's Toolkit: Essential Tools for Bandwidth Monitoring
Okay, now for the fun part: equipping ourselves with the tools we need to investigate. Luckily, Windows 7, while older, still provides some built-in features and, of course, there are some excellent free third-party solutions.
Resource Monitor: This is your primary investigation tool. You can access it by searching for "Resource Monitor" in the Start menu. Within Resource Monitor, navigate to the "Network" tab. Here, you'll see a breakdown of network activity, including which processes are using the most bandwidth. It's like having a live feed of who's eating up your data.
Task Manager: While less detailed than Resource Monitor, the Task Manager (accessed by pressing Ctrl+Shift+Esc) provides a quick overview of apps and processes and their network usage. It’s a good starting point for identifying immediate bandwidth hogs.
Third-Party Monitoring Software: Consider tools like NetBalancer or GlassWire. These programs often offer more user-friendly interfaces, detailed historical data, and the ability to set bandwidth limits on specific applications. They provide data visualization and can give you a better understanding of which applications are truly consuming your internet speed.
5. Unmasking the Culprit: Using Resource Monitor to Find the Drain
Let’s get hands-on! Open Resource Monitor (search for it in your Start Menu). In the "Network" tab, you'll see a list of all the processes currently using network resources. Pay close attention to the "Send (B/sec)" and "Receive (B/sec)" columns. These columns show the bandwidth being used by each process. Sort the list by these metrics to find the top bandwidth users.
Now, look at the "Image" column. This will tell you which application or program is responsible. Is it your web browser? A streaming service? A background update? The mystery is usually revealed pretty quick!
6. The Art of the Stealth Kill: Stopping Bandwidth-Hungry Processes
Once you've identified the culprit, it's time to take action. Here's how to stop bandwidth-hungry processes:
- Close Unnecessary Applications: This is the easiest step. Close any programs you're not currently using, especially streaming services, online games, and cloud services.
- Disable Background Updates: Configure Windows Update to download updates at a time that doesn't interfere with your usage: go to Control Panel > System and Security > Windows Update. Set the update settings to either automatically notify, or just set a schedule during off-peak hours.
- Limit Bandwidth Usage (for Updates): Many applications, including Windows Update, allow you to limit the bandwidth they use. Check the settings of the applications you use regularly and see if bandwidth usage settings are available.
- Pause Cloud Syncing: If you're using a cloud service, pause the syncing process when you need to prioritize other tasks.
- Consider a Bandwidth Limiter: Software like NetBalancer or GlassWire can let you set hard limits on bandwidth usage for specific applications.
7. Optimizing Your Browser: The Silent Bandwidth Thief
Your web browser can be a major bandwidth consumer, especially if you have a lot of tabs open or are running resource-heavy extensions.
- Close Unused Tabs: Every open tab consumes bandwidth, even if you're not actively using it.
- Disable Unnecessary Extensions: Extensions can slow down your browser and use bandwidth. Disable any extensions you don’t need.
- Use a Lightweight Browser: Some browsers are more efficient than others. Consider using a lighter browser if you have persistent bandwidth issues.
- Clear Your Cache and Cookies: A cluttered cache can slow down your browsing and use more data.
8. Wireless Woes? Troubleshooting Your Wi-Fi Connection
Sometimes, the problem isn't your laptop, but your Wi-Fi connection itself.
- Restart Your Router: This is the digital equivalent of "turning it off and on again." It often solves the problem.
- Check Your Wi-Fi Signal Strength: A weak signal can drastically reduce your bandwidth. Move closer to your router, or consider a Wi-Fi extender.
- Reduce Interference: Other devices, Bluetooth gadgets, microwaves, cordless phones, can interfere with your Wi-Fi signal. Try to move these sources away from your router.
- Update Your Router's Firmware: Outdated firmware can cause performance issues. Check your router's manufacturer’s website for updates.
9. Router Roulette: Why Other Devices Matter
Your laptop isn't the only device on your Wi-Fi network. Other devices – smartphones, tablets, smart TVs – can all consume bandwidth and impact your laptop's performance.
- Monitor Other Devices: Use your router's settings to see which devices are connected to your network and how much bandwidth they're using.
- Prioritize Your Laptop: Many routers offer Quality of Service (QoS) settings that allow you to prioritize your laptop's traffic.
- Limit Usage on Other Devices: Encourage others in your household to minimize their bandwidth usage during peak times, for example, streaming on their devices.
10. The Speed Test: Confirming Your Internet's True Potential
After streamlining and optimizing, it's time to test your connection speed to ensure it's running as it should. Go to a website like Speedtest.net or Fast.com to measure your download and upload speeds. This will give you a baseline to compare your performance to what you're paying for.
11. Beyond the Basics: Advanced Techniques for Bandwidth Control
For true bandwidth ninjas, there are more advanced techniques:
- Set Data Usage Limits: Consider setting data usage limits in your Wi-Fi connection settings. This can help you see how much data your laptop is consuming over a period of time and even prevent exceeding data caps.
- Traffic Shaping (QoS): As mentioned earlier, Quality of Service (QoS) can prioritize certain types of traffic. If you rely on video calls, you might prioritize that above other traffic.
- MAC Address Filtering: This can help to restrict access to your Wi-Fi network, preventing unauthorized devices from using your bandwidth.
12. Regular Maintenance: Staying Ahead of the Bandwidth Game
Bandwidth management isn't a one-time fix. It requires ongoing maintenance and
Download Dell Laptop WiFi Drivers (Windows 10) - INSTANT FIX!How to check or monitor wifi-data in Windows 7,8,10 PC

By Hack With Me How to check or monitor wifi-data in Windows 7,8,10 PC by Hack With Me
How to View Current Internet Data Usage in Windows 7

By Sagar Gone How to View Current Internet Data Usage in Windows 7 by Sagar Gone
How to Monitor Internet Data Usage on windows xp7 and 8
By Computer Traning School How to Monitor Internet Data Usage on windows xp7 and 8 by Computer Traning School

Title: How to Stop High Internet Data Usage On Windows 10 Stop Background Data Consumption In Laptop & PC
Channel: Being Selftech
How to Stop High Internet Data Usage On Windows 10 Stop Background Data Consumption In Laptop & PC by Being Selftech
Laptop Wifi Connect
Unlock Your WiFi Secrets: Diagnose the Bandwidth Vampires on Your Windows 7 Laptop
Do you feel like your internet connection is constantly crawling on your Windows 7 laptop? Are you paying for a blazing-fast speed that seems to vanish the moment you try to stream a video, download a file, or even browse the web? If so, you’re in the right place. We’re going to delve deep into the hidden world of your laptop’s bandwidth usage, revealing the exact culprits that might be silently devouring your precious internet speed. Forget generic advice; we’ll equip you with the precise tools and understanding you need to identify and eliminate those bandwidth-hogging processes. Prepare to reclaim your internet speed!
Understanding the Bandwidth Battlefield: What's at Stake?
Before we dive into the specifics, it’s crucial to understand what’s happening behind the scenes. Your WiFi connection is a finite resource. Every device connected to your network, including your Windows 7 laptop, is vying for a share of that bandwidth. Think of it like a busy highway: the more cars (data) traveling on it simultaneously, the slower everyone goes. Your laptop, like any other device, has its own internal traffic, and some programs and processes are far more demanding than others. Unidentified bandwidth hogs can lead to frustrating lag in online games, buffering videos, slow downloads, and a general sense of internet sluggishness. Identifying these hidden culprits is the first and most crucial step in optimizing your internet experience.
Arming Yourself: Essential Tools for Bandwidth Detection
We won’t be relying on guesswork or generic troubleshooting steps. Instead, we'll leverage specific tools that provide granular insight into your Windows 7 laptop's bandwidth usage. These tools will act as your eyes and ears, allowing you to pinpoint the exact processes consuming the most bandwidth.
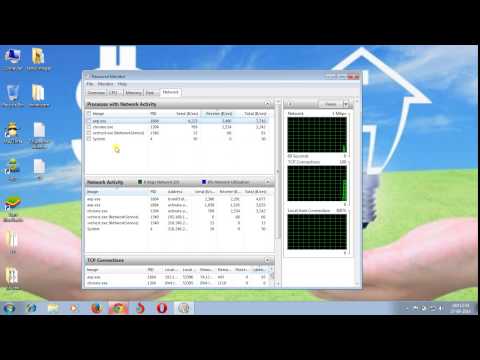
1. The Resource Monitor (Your Internal Spyglass)
Built directly into Windows 7, the Resource Monitor is a powerful, often-overlooked utility. It provides a real-time overview of system resources, including CPU, memory, disk, and – most importantly for our purposes – network activity.
- Accessing the Resource Monitor: Click the Start button, type "Resource Monitor" in the search box, and press Enter. Alternatively, navigate to the Performance Monitor (Control Panel > System and Security > Administrative Tools > Performance Monitor), and click on “Resource Monitor.”
- Focusing on the Network Tab: Within the Resource Monitor, click the "Network" tab. Here, you'll find a wealth of information. Look at the "Processes with Network Activity" section. This is where you'll see a list of running processes, and the corresponding bytes sent and received over the network. This provides a clear, real-time picture of your bandwidth consumption.
- Sorting by Usage: Click the "Total (B/sec)" column header to sort the processes by their bandwidth usage. This will instantly reveal the top bandwidth consumers. You will be able to observe which processes are currently sending or receiving the most data.
2. Network Monitoring Software (External Intelligence)
While the Resource Monitor provides crucial insights, dedicated network monitoring software often offers more advanced features and more detailed analytics. Several excellent free options are available, which enhance the understanding of your network.
- Wireshark: This is a free and open-source network protocol analyzer. It's a powerful tool for capturing and analyzing network traffic in real-time, used by network professionals to troubleshoot applications.
- Using Wireshark: Installation and Basic Use: Download Wireshark (from a reputable source). During installation, install WinPCap or Npcap (a packet capture library). After installation, run Wireshark. Choose the network interface associated with your WiFi connection. Wireshark captures all network traffic over this interface. You can then filter the traffic by protocols, IP addresses, or specific processes to analyze the different data paths.
Identifying the Bandwidth Vampires: A Step-by-Step Investigation
Now, let's put our tools to work. This is a methodical process; we’ll systematically identify the processes draining your bandwidth.
1. Initial Observation: Immediate Culprits
- Open the Resource Monitor’s Network Tab (as described above). Immediately observe the processes listed in the "Processes with Network Activity" section. Any process displaying a high "Total (B/sec)" value is a potential bandwidth hog.
- Note the Process Names: Write down the names and parent processes of the processes that appear to be consuming the most bandwidth. A common example is the “svchost.exe” process, which can host multiple services. Investigate these services.
- Cross-Reference with Online Resources: Use online search engines (Google, DuckDuckGo, etc.) to research the process names. Search for the process names to find out what services they are associated with from reputable sources like Microsoft documentation or trusted IT forums. This will aid you in determining the nature of the process. For instance, if you see “Windows Update," high bandwidth usage is expected when downloading updates.
2. Deep Dive into the Processes
- Investigating "svchost.exe": As mentioned earlier, "svchost.exe" often hosts multiple Windows services. High bandwidth from this process warrants further investigation.
- Right-click on “svchost.exe” in the Resource Monitor and select “Go to Service(s).” This will reveal the specific services running under that instance of "svchost.exe."
- Observe Service Activity: Pay close attention to the services listed. Common culprits include Windows Update (especially if configured to download updates automatically), Background Intelligent Transfer Service (BITS), and Windows Defender updates.
- Adjusting Update Settings: If Windows Update is the primary culprit, consider adjusting its settings. You can choose to download updates manually or schedule them for off-peak hours.
3. Leveraging Advanced Network Analysis with Wireshark
- Capturing Network Traffic: Open Wireshark and start a new capture session. Select your WiFi network interface. You can filter the traffic using appropriate filters based on your observation in Resource Monitor to isolate each process.
- Identifying Chatty Applications: Observe the network traffic captured by Wireshark. Analyze the protocols and IP addresses involved. This allows you to see which applications are communicating with external servers. For example, if you notice excessive traffic to a specific IP address, you can investigate the host server.
- Pinpointing Excessive Data Transfers: Wireshark will show you exactly which servers and files are being accessed, if any, which helps you determine the source. The deep packet inspection can reveal which applications are sending the most data and from where.
4. System Services, and Background Processes
- Background Processes: Take a look at task manager, checking processes using network resources. Sort by the "Network" column to view the processes’ network activity in detail. Disable system background processes to free more internet bandwidth.
- Disable Unnecessary Services: Evaluate the Windows services running on your laptop. Many background services consume some bandwidth. If you have services you don't use, consider stopping them to free up bandwidth. Services include: Remote Registry, Windows Search, and Superfetch.
Taking Action: Reclaiming Your Bandwidth
Once you’ve identified the bandwidth vampires, it's time to take decisive action. The specific remedies will vary depending on the culprit.
1. Managing Windows Updates:
- Configure Update Settings:
- Go to Control Panel > System and Security > Windows Update.
- Click "Change settings."
- Choose “Check for updates but let me choose whether to download and install them.” This allows you more control over when updates are downloaded and installed. This is the most effective solution.
- If you want to proceed with the automation, then set up updates to be scheduled during off-peak hours.
- Consider Manual Updates: For maximum control, consider downloading and installing updates manually. This gives you greater control over when and how updates are applied.
2. Controlling Application Bandwidth:
- Application-Specific Settings: Many applications have their own bandwidth usage controls.
- Streaming Services: Check your streaming services’ (Netflix, YouTube, etc.) settings. Reduce the video streaming quality if your internet connection is struggling. Select “High Definition” or “Ultra HD” depending on your connection.
- Download Managers: Use a download manager's settings to limit the number of simultaneous downloads if you are doing several downloads.
- Cloud Storage Applications: Pause or limit the synchronization speed of cloud storage services like OneDrive or Dropbox if they are consuming excessive bandwidth.
- Disable Unnecessary Startup Programs: Open the Windows Task Manager, go to the "Startup" tab, and disable applications that automatically start when your laptop boots.
3. Network Optimization Techniques
- Check WiFi Signal Strength:
- Move closer to your WiFi router to improve the signal strength. Wireless signals can be affected by walls and other obstacles.
- Upgrade your router to the latest WiFi standards (802.11ac/ax).
- Optimize Your Router:
- Choose a less congested WiFi channel. Use a WiFi analyzer app on your smartphone to see which channels are least crowded.
- Update your router's firmware.
- Limit Background Data Usage:
- Restrict the background data consumed by the operating system and applications.
Prevention: Staying Ahead of the Bandwidth Game
Cons
