how to setup windows 7 laptop as wifi hotspot

Title: How to Create a WiFi Hotspot with Windows 7
Channel: 1stepatatime
How to Create a WiFi Hotspot with Windows 7 by 1stepatatime
**Turn Your Windows 7 Laptop into a WiFi Hotspot in 60 Seconds!**
Unleash the Wireless: Transform Your Windows 7 Laptop into a WiFi Powerhouse!
Ever wished you could share your internet connection, extending its reach to other devices? Perhaps you're tethered to a single Ethernet cable, dreaming of untethered browsing. Well, ditch those wired woes! You can turn your Windows 7 laptop into a WiFi hotspot, creating a personal wireless network. It's easier than you think. Prepare to experience freedom within your home or workspace.
Unveiling the Magic: The Software-Based Solution
Forget expensive routers. We're diving into a built-in Windows 7 feature. This nifty trick uses the laptop’s wireless adapter. Moreover, it allows it to broadcast your internet. It’s remarkably simple, yet incredibly effective. The result? You create a WiFi hotspot. Think of it as your own mini-router. And best of all, you control it. No special software is needed. It’s already present on your laptop. This method is quick and efficient. So, get ready to share your internet connection effortlessly. The whole process takes only a few steps.
Step-by-Step Guide: Your 60-Second Wireless Transformation
First, locate your network connections. This is usually found at the bottom right of your screen. It's the icon depicting a computer screen with signal bars. Click it. Now, right-click on your current internet connection. Next, select "Open Network and Sharing Center." You are on the right path.
Next, look for "Set up a new connection or network." Click that link. You are now embarking on a new journey. Choose "Set up a wireless ad hoc network." Click "Next." You’re almost there.
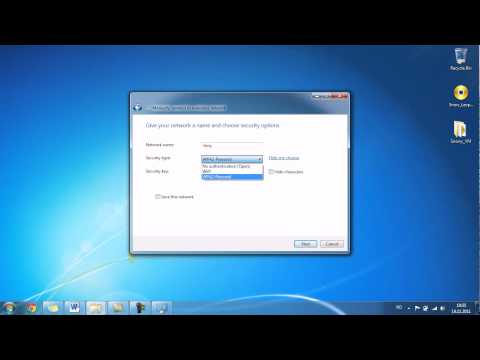
A window will then appear. You'll need to complete some settings. Start by giving your hotspot a descriptive name. Think of it like naming your own personal network. Next, select the security type. WPA2-Personal is generally considered the most secure. Choose a strong password. This prevents unauthorized access. Make sure nobody can jump on your network without permission.
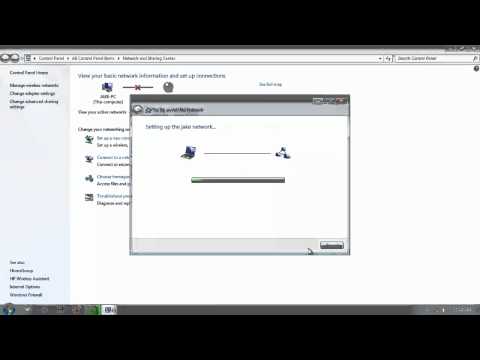
After that, click "Next." Windows will then configure the hotspot. This may take a few moments. Consequently, a success message will appear. Your laptop is now acting as a WiFi hotspot. Congrats! However, there’s one final crucial step.
Bridging the Gap: Sharing Your Internet Connection
Your hotspot is active, but it's not yet sharing the internet. So, you need to enable internet connection sharing. Go back to "Network and Sharing Center". Click "Change adapter settings" on the left pane. Your network adapters will display.
Locate your primary internet connection adapter. This is usually the one connected to your router. Then, right-click on this adapter, and select "Properties". This opens a new window with several tabs.
Look for the "Sharing" tab. Click it. It presents connection sharing options. Check the box that says, "Allow other network users to connect through this computer's Internet connection." In the dropdown menu, select the newly created wireless network.
Finally, click "OK" to save your settings. You've now successfully shared your internet. Restart your laptop. Therefore, other devices can now connect. Your laptop is now broadcasting a WiFi signal.
Troubleshooting Tips: Smooth Sailing Ahead
Sometimes, the process won't be perfect. For instance, you may encounter some snags. Here's how to navigate any issues you might face. First, ensure your laptop’s wireless adapter is enabled. Double-check the physical switch. Then, verify if the drivers are updated. Outdated drivers often cause problems.
Next, be sure to check your firewall settings. Your firewall might be blocking connections. Allow the hotspot. Also, if you're still having problems, restart your laptop. This often resolves minor glitches. For persistent difficulties, consider consulting Windows 7's help documentation. Your computer is not broken.
Beyond the Basics: Optimizing Your Hotspot Experience
You have built a WiFi hotspot. Why not optimize it?. Start by choosing a strong password. It prevents unauthorized access. Additionally, consider the location of your laptop. Place it in a central location. This enhances signal range.
Furthermore, manage the number of connected devices. Too many devices can slow down your internet. Moreover, monitor data usage. Some internet plans have data caps. Finally, update your Windows 7. Security updates are essential.
The Benefits Abound: Embracing Wireless Freedom
The advantages of this simple setup are numerous. First, you can connect multiple devices. Your smartphone, tablet, and other laptops can all share an internet connection. Second, you can share your internet when traveling. It's especially useful in hotels or other places without free WiFi. Third, it enhances productivity. You can work from anywhere in your home. This is helpful for students and professionals. You will be happy.
Conclusion: Wireless Empowerment at Your Fingertips
So, there you have it! Transform your Windows 7 laptop into a WiFi hotspot swiftly. This is a practical and user-friendly solution. It enhances your digital life. You can share your internet connection. Unlock the full potential of your devices. Follow these easy steps and start enjoying the benefits of wireless freedom. Prepare to experience a faster, more connected world.
Asus Laptop WiFi Connected, No Internet? This SHOCKING Fix Works!Turn Your Windows 7 Laptop into a WiFi Hotspot in 60 Seconds!
Hey everyone! Ever been in a situation where you desperately needed internet access, but the Wi-Fi signal was weaker than a kitten's purr? Or maybe you're traveling, and your phone's data plan is about to explode? Well, we’ve all been there. The good news is, if you've got a Windows 7 laptop, you hold the key to internet freedom! And no, we're not talking about calling the IT guy; we're talking about turning your laptop into your own personal, portable Wi-Fi hotspot in, wait for it…about a minute! Sounds too good to be true? Trust us, it’s not!
1. The Wi-Fi Woes: A Universal Struggle
Let's be honest; we live in a connected world. From streaming our favorite shows to sending that crucial work email, a reliable internet connection is practically a basic human right (at least, that's how it feels sometimes!). Public Wi-Fi? Often slow, unreliable, and let’s be honest, a bit sketchy. Relying solely on your phone's data? Well, that quickly becomes a financial black hole. It's a digital dilemma we all face sooner or later. Remember that time you were stranded at the airport, desperately trying to connect to something strong enough to FaceTime your family? Yeah, we feel your pain!
2. Why Windows 7 Still Matters (And Why This Matters to You)
Okay, okay, we know Windows 7 is a bit of a legacy darling. But let's not dismiss it so quickly! There are still plenty of us out there rocking a Windows 7 laptop – maybe it's your trusty old workhorse, or perhaps you're just not quite ready to upgrade. Whatever the reason, the good news is that setting up a Wi-Fi hotspot on Windows 7 is a snap, and it can come in super handy. Plus, understanding a little bit about this process can give you some serious tech cred with those less tech-savvy friends.
3. The Secret Weapon: The Hosted Network
So, how does this magic happen? Windows 7 actually has a built-in feature called a "Hosted Network". Think of it like this: your laptop acts as a miniature Wi-Fi router, broadcasting a signal that other devices can connect to. It's like being the cool kid on the block, sharing your Wi-Fi wealth! The best part? It's easier than baking a frozen pizza!
4. Step-by-Step: Your 60-Second Guide to Hotspot Nirvana
Alright, let's get down to brass tacks. Here’s the step-by-step guide to turning your Windows 7 laptop into a Wi-Fi hotspot faster than you can say "wireless internet":
Step 1: Open the Command Prompt (Like a Secret Agent)
Click the Start button, type "cmd" in the search bar, and then right-click "Command Prompt" and select "Run as administrator". This is crucial! Think of it as unlocking the secret lair.
Step 2: The Magic Command (Don't Worry, It's Simple!)
In the Command Prompt window, type the following command exactly as shown (copy-paste is your friend!):
netsh wlan set hostednetwork mode=allow ssid="YourHotspotName" key="YourPassword"Replace "YourHotspotName" with the name you want for your hotspot (like "MyLaptopWiFi" or "AwesomeInternet"). Replace "YourPassword" with your desired password (make it strong!). Press Enter.
Step 3: Start the Hosted Network (Ready, Set, Connect!)
Now, type the following command and press Enter:
netsh wlan start hostednetworkStep 4: Share Your Internet Connection (The Grand Finale!)
Go to the Network and Sharing Center (you can find this by clicking the network icon in your system tray, then clicking "Open Network and Sharing Center"). Click on "Change adapter settings". Find your primary internet connection (the one you're already using – like your Ethernet or Wi-Fi). Right-click on it, select "Properties," and then click the "Sharing" tab. Check the box that says "Allow other network users to connect through this computer's internet connection." In the "Home network connection" dropdown menu, select the "Microsoft Hosted Network Virtual Adapter" and click "OK."
5. Troubleshooting: Because Tech Isn't Always Perfect
Sometimes, even with the best instructions, things can go a little sideways. Don't worry; it's normal! Here are a few common hiccups and how to fix them:
The "Hosted Network could not be started" Error:
- Make sure you ran the Command Prompt as an administrator.
- Check your Wi-Fi adapter drivers. They might need updating.
- Try restarting your laptop. Seriously, sometimes it's the simplest solution!
Devices Can't Connect:
- Double-check your hotspot name and password.
- Ensure your devices are within range of your laptop's Wi-Fi signal.
- Restart the hosted network with the command:
netsh wlan stop hostednetworkthennetsh wlan start hostednetwork.
6. Beyond the Basics: Customizing Your Hotspot
Once you've mastered the basics, you might want to tweak things.
- Changing Your Hotspot Name and Password: Simply rerun the
netsh wlan set hostednetworkcommand with your new details. - Monitoring Connected Devices: You can't easily see who's connected directly through the built-in Windows tools, but some third-party hotspot software can offer this functionality.
7. Security First: Keeping Your Hotspot Safe
Protecting your Wi-Fi hotspot is crucial! After all, you don't want someone piggybacking on your internet and racking up your data bill.
- Use a Strong Password: Don't use "password" or "123456." Choose a unique, complex password.
- Keep Your Windows 7 Updated: Security patches help protect your system.
- Consider Encryption: WPA2 is the most secure encryption method (this is usually enabled by default).
8. The Versatility Factor: When a Hotspot Saves the Day
Think about the possibilities! Your Wi-Fi hotspot can be a lifesaver in numerous situations.
- Traveling: Stay connected in hotels or public places with weak Wi-Fi.
- Sharing with Friends: Share your internet with friends and family.
- Troubleshooting: Test your Wi-Fi connectivity on different devices.
9. Comparing Options: Hotspot Software vs. Built-in Feature
While Windows 7’s built-in feature is great, there’s also third-party hotspot software available.
- Pros of Built-in: Free, readily available, and easy to use.
- Cons of Built-in: Limited customization options, more basic monitoring capabilities.
- Pros of Software: More features, advanced monitoring, and sometimes easier setup.
- Cons of Software: May require payment and could introduce potential security risks.
10. The Speed Test: Is It Fast Enough?
The speed of your Wi-Fi hotspot depends on your primary internet connection. Run a speed test (like on speedtest.net) to see how your connection measures up. It's usually a good idea to connect to your hotspot on your phone or tablet to see the actual speed others will get.
11. Battery life Implications: Power Consumption Considerations
Running a Wi-Fi hotspot does consume battery power. If you're relying on your laptop for hours, it's best to plug it in. This will help to extend the battery life of your hotspot.
12. Legal Tidbits: Be Aware of Bandwidth Caps
Some internet service providers (ISPs) have data caps, meaning they might limit the amount of data you can use in a month. Using your hotspot to connect multiple devices can quickly eat into your allowance. Be mindful of your usage and check your ISP's terms.
13. Windows 7 Support: What if Microsoft Drops It?
Microsoft ended mainstream support for Windows 7 in 2015 and extended support in 2020. While your hotspot functionality likely won’t be dramatically affected in the short term, eventually, security vulnerabilities could emerge. Consider upgrading to a newer version of Windows if you're heavily reliant on internet security for security and reliability.
14. Real-World Examples: Hotspot Success Stories
We've all had moments when a Wi-Fi hotspot saved the day! Imagine this: you're on a road trip, and your kids are going stir-crazy. You create a hotspot, and suddenly, everyone is happily streaming their favorite shows! Or, you're at a coffee shop with terrible Wi-Fi, but your laptop’s hotspot provides a stable connection for your important work. Priceless!
15. The Future of Hotspots: Beyond Windows 7
Although we focused on Windows 7, the concept of creating a Wi-Fi hotspot remains relevant. From smartphones to newer Windows versions, the ability to share your internet connection is a valuable feature in a connected world. Look into how to
Laptop as WiFi Hotspot? This SHOCKING Trick Works!how to create a wifi hotspot on windows 7 Professional
By iTon how to create a wifi hotspot on windows 7 Professional by iTon
Create a laptop WiFi hotspot in under 30 seconds Windows 7
By jacobspeeds Create a laptop WiFi hotspot in under 30 seconds Windows 7 by jacobspeeds
Cara Mengaktifkan Hotspot Wifi Laptop Windows 7

By LAPTOP TUTORIAL Cara Mengaktifkan Hotspot Wifi Laptop Windows 7 by LAPTOP TUTORIAL

Title: Cara Download & Install Driver WIFI & ETHERNET Manual untuk Windows 781011
Channel: inprez id
Cara Download & Install Driver WIFI & ETHERNET Manual untuk Windows 781011 by inprez id
My Laptop Work
Turn Your Windows 7 Laptop into a WiFi Hotspot in 60 Seconds!
Have you ever found yourself in a situation where you desperately needed internet access, but a readily available Wi-Fi network was nowhere to be found? Perhaps you're traveling and your hotel's Wi-Fi is unreliable, or maybe you're in a remote location without a fixed internet connection. Fortunately, if you have a Windows 7 laptop with a working internet connection, you have the power to transform it into a personal Wi-Fi hotspot, granting your other devices – your phone, your tablet, even another laptop – access to the web within seconds. We're not talking about complicated configurations or technical jargon; this is about harnessing the inherent capabilities of your Windows 7 operating system to create a portable, shareable internet connection. This detailed guide, crafted with precision and clarity, will walk you through the process, ensuring a smooth, swift setup, empowering you to share your internet with ease.
Understanding the Underlying Principle: The Power of Hosted Networks
The magic behind this capability lies in what's known as a "hosted network." Windows 7, even in its original form, can utilize the wireless card to simultaneously connect to an existing internet source – perhaps via a wired Ethernet connection or a mobile broadband dongle – and broadcast a new Wi-Fi signal. This effectively turns your laptop into a miniature router, relaying the internet connection to any device within range. The beauty of this approach is its simplicity. Unlike some third-party software solutions, Windows 7's built-in hosted network feature is readily available, requiring no downloads or installations. We'll explore the command line to activate this feature, providing an immediate solution to your connectivity needs.
Step-by-Step Guide: Activating Your Windows 7 Hotspot
The core of the process involves using the Command Prompt, a powerful tool that lets you directly interact with your operating system at its core. Don't let the name intimidate you; the commands are straightforward and easy to execute. Follow these steps to transform your laptop into a Wi-Fi hotspot in under a minute:
Open the Command Prompt as Administrator: Click the ‘Start' button (the Windows logo in the lower-left corner), in the ‘Search programs and files’ box, type "cmd". Right-click on "cmd.exe" in the search results (usually at the top) and select "Run as administrator." This is crucial; the changes you're about to make require administrative privileges.
Enable the Hosted Network: In the Command Prompt window, type the following command and press Enter:
netsh wlan set hostednetwork mode=allow ssid="YourHotspotName" key="YourPassword"netsh wlan: This initiates the Wireless Local Area Network (WLAN) configuration utility.set hostednetwork mode=allow: This enables the hosted network functionality.ssid="YourHotspotName": Replace "YourHotspotName" with the desired name for your Wi-Fi hotspot. This is the name that will appear to other devices when they're searching for available Wi-Fi networks. Use something memorable but not too sensitive.key="YourPassword": Replace "YourPassword" with a strong password for your Wi-Fi hotspot. This password keeps unauthorized users off your network. Use a combination of uppercase and lowercase letters, numbers, and symbols. Make it at least eight characters long.
Start the Hosted Network: After successfully setting the hosted network parameters, type the following command and press Enter:
netsh wlan start hostednetworkThis command starts your newly configured Wi-Fi hotspot. At this stage, your Windows 7 laptop is actively broadcasting a Wi-Fi signal, but it is not yet sharing your internet.
Share Your Internet Connection: This is the final, crucial step. You need to tell Windows 7 to share the internet connection it's already using.
- Open the Network and Sharing Center. You can do this by clicking the network icon, typically found in your system tray (bottom-right corner of the screen) and selecting "Open Network and Sharing Center." Alternatively, you can find it in the Control Panel.
- Click "Change adapter settings" on the left panel. This will open a window showing your active network connections.
- Identify the adapter representing your active internet connection – the one your laptop uses to access the internet. It could be labeled "Ethernet" (if you're using a wired connection) or "Wireless Network Connection" (if you're connecting via Wi-Fi).
- Right-click on this adapter and select "Properties."
- Click the "Sharing" tab.
- Check the box that says "Allow other network users to connect through this computer's Internet connection."
- In the "Home networking connection" dropdown menu, select the "Microsoft Hosted Network Virtual Adapter" or the wireless adapter that appears. It may be a virtual adapter specifically created for the hotspot.
- Click "OK."
Test the Connection: Grab your phone, tablet, or another Wi-Fi-enabled device. Search for available Wi-Fi networks, you should see the "YourHotspotName" (or whatever name you chose) listed. Connect, enter your password, and if everything is configured correctly, you should have access to the internet.
Troubleshooting Common Issues
While the process is usually straightforward, some issues might arise. Don't worry; these are generally easy to resolve.
"The hosted network couldn't be started": This error could mean that your wireless network driver is outdated. Update your wireless network adapter driver through Device Manager (search for "Device Manager" in the Start menu). Right-click on your wireless adapter and select "Update driver software…" Choose "Search automatically for updated driver software."
The hotspot doesn't appear: Make sure your wireless adapter is enabled. In the Network and Sharing Center, click "Change adapter settings," then ensure your "wireless network connection" is enabled (if it's disabled, right-click and select "Enable").
Devices connect, but there's no internet: Double-check the "Sharing" settings (as detailed above in step 4). Ensure the correct network adapter providing the internet connection is selected for sharing. If the problem persists, try restarting both your laptop and the device trying to connect.
Password Incorrect: Retype or reset your password. Verify the password capitalization.
Firewall Interference: In rare instances, your firewall might be blocking the shared internet connection. You might need to adjust your firewall settings to allow the appropriate traffic to pass through. Consult your operating system's or firewall manufacturer's documentation for specifics on how to do this.
Beyond the Basics: Fine-Tuning Your Hotspot
While the setup is remarkably simple, know that you can refine your hotspot's performance.
Changing the SSID and Password: If you wish to change the hotspot name (SSID) or password later, or both, you simply repeat the first two steps in this guide, using different details. Open the command prompt as administrator. Issue the following commands in order.
netsh wlan stop hostednetworknetsh wlan set hostednetwork mode=allow ssid="NewHotspotName" key="NewPassword"netsh wlan start hostednetworkAutomatic Activation on Startup: If you use your hotspot frequently, you can create a batch file to automatically start the hosted network when your Windows 7 laptop boots up. Open Notepad, and paste the following lines:
netsh wlan start hostednetworkSave the file as a ".bat" file (e.g., "start_hotspot.bat") and place this file in the "Startup" folder. To locate the startup folder, type
%appdata%\Microsoft\Windows\Start Menu\Programs\Startupin the File Explorer address bar. The next time you start your laptop, your hotspot will automatically enable.Monitoring Connected Devices: While not providing full control, the Windows 7 Resource Monitor (accessible through the Performance Monitor, found in the Administrative Tools) provides insights into network activity, allowing you to see which devices are connected and the amount of data they're using. In the Resource Monitor, look under the "Network" tab.
Bandwidth Management: Windows 7 does not offer native bandwidth capping. If your internet plan limits the amount of data you can use per month, or you have a very slow connection, consider using third-party software specifically designed to manage bandwidth allocation. Search online for “bandwidth management software for Windows 7” to find free and paid options.
Security Considerations: Keeping Your Hotspot Secure
While this is a straightforward process, you should still be aware of security best practices. Always choose a strong, unique password for your hotspot; this prevents unauthorized users from accessing your internet connection and potentially compromising your privacy. Regularly change your password, especially if you're using your hotspot in public places. Periodically review the list of connected devices to ensure that no unrecognized devices are connected. Also, be mindful of what you’re sharing over a public network. Avoid accessing sensitive information such as personal finances or online banking pages on an untrusted network.
Conclusion: Your Portable Internet Savior
With the steps outlined above, your Windows 7 laptop will be transformed into a powerful Wi-Fi hotspot, offering internet sharing capabilities in mere seconds. Master these steps, and
