convert laptop into wifi hotspot windows vista
Title: Turn your windows vista into wifi hotpsot
Channel: Ankit bhatia
Turn your windows vista into wifi hotpsot by Ankit bhatia
Vista Hotspot Hack: Turn Your Laptop into WiFi in SECONDS!
Unleash Wi-Fi Freedom: Transform Your Laptop into a Hotspot in a Blink!
Imagine this: You’re stranded without internet. Perhaps you're in a hotel, a park, or a relative's home. You desperately need a connection. Your phone is running low on data. Frustration mounts, because you need the internet. Fortunately, your laptop can be your savior. Forget fumbling with complicated setups. This guide will show you how. It presents a straightforward method to create a Wi-Fi hotspot. You can do this within seconds.
The Laptop’s Hidden Power: Your Personal Wi-Fi Hub
Did you realize your laptop is a potent Wi-Fi transmitter? Indeed, it's more than just a screen and keyboard. Your laptop is also a gateway. It can share its internet connection. This is particularly useful, is it not? This feature is often overlooked. However, it is incredibly beneficial. We’ll explore the steps to make your laptop a Wi-Fi hotspot.
Prepping Your Arsenal: What You'll Need
Before diving in, gather your resources. Firstly, you will need a Windows-based laptop. Secondly, you need an active internet connection. This might be through an Ethernet cable. Alternatively, it could be through a mobile broadband dongle. You’ll also need a bit of patience. But trust me, it’s worth it. The entire process is surprisingly simple.
Step-by-Step Guide: Creating Your Instant Hotspot
Alright, ready to unlock the magic? Let's begin.
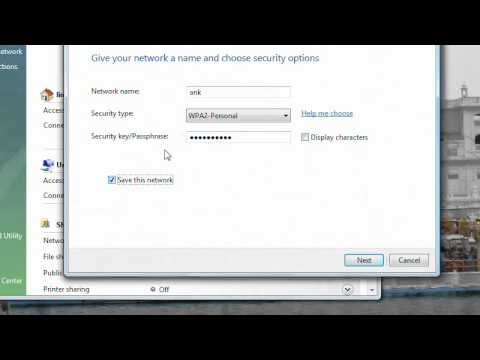
- Accessing Network Settings: First, locate your network settings. You can usually find this in the system tray. It resides in the bottom-right corner of your screen. Click the Wi-Fi icon. Then, select "Open Network & Internet settings." This should open a new window.
- Mobile Hotspot: Your Gateway: Within this window, you’ll see "Mobile hotspot." Click it. This section is key. Here, you'll configure your hotspot. This will ensure everything functions smoothly.
- Sharing Your Connection: Under "Share my Internet connection from," choose your internet source. This could be Ethernet, Wi-Fi, or mobile data. Select the appropriate option. This depends on how your laptop presently obtains internet access.
- The Secret Network Details: Now, select "Edit". Here, you'll configure your hotspot's name and password. Choose something memorable. Also, select a strong password. This will secure your network. Remember this information, because you'll need to provide it.
- Activating the Hotspot: Toggle the "Share my Internet connection with other devices" button to "On." Congratulations! Your hotspot is now active. Your laptop is acting as a Wi-Fi router. You did this in mere moments, didn't you?
Connecting Devices: The Final Step
With your hotspot active, its time to connect your other devices. Take your phone, tablet, or another laptop. Navigate to your device's Wi-Fi settings. Then, select your newly created hotspot. Enter the password you established earlier. Presto! Your device is now connected. You've now extended your internet reach. You've done it with ease.
Troubleshooting Common Roadblocks
Sometimes, things don't go as planned. Don’t worry. It happens. Let’s address some potential issues. Firstly, verify your internet connection. Ensure your laptop actually has active internet access. Secondly, double-check your password. Input it accurately to avoid connection errors. Thirdly, consider your firewall settings. Occasionally, these settings can impede hotspot functionality. Make sure your firewall isn't blocking your hotspot. Finally, reboot your laptop. Sometimes, a simple restart solves the problem.
Beyond the Basics: Customizing Your Hotspot
Once you master the basics, experiment with advanced settings. Consider adjusting your hotspot's bandwidth. This can enhance performance. Furthermore, explore security protocols. These can provide enhanced protection. Customize your hotspot to suit your specific requirements. There are other aspects to investigate. Consider the number of devices that can connect.
Embracing the Freedom of Wi-Fi On-Demand
There you have it. You've transformed your laptop into a Wi-Fi hotspot in seconds. You are now empowered. You can connect your devices, wherever you are. This is a valuable capability in today's interconnected world. It's also surprisingly easy to accomplish. This knowledge provides you with options. So go forth and browse freely. Enjoy your newfound Wi-Fi autonomy!
HP Laptop WiFi: The Easiest Setup Guide EVER!Vista Hotspot Hack: Turn Your Laptop into WiFi in SECONDS!
Hey everyone, ever been in a bind where you desperately needed Wi-Fi but had none? We’ve all been there, right? Stranded on a train, stuck in a boring coffee shop, or maybe even just out in the wilderness (okay, maybe not the wilderness, but you get the idea!). Today, we're diving deep into a super cool trick that turns your trusty old Vista laptop into a Wi-Fi hotspot in, you guessed it, seconds! Forget scouring the internet for complicated software or paying for expensive mobile hotspots. This Vista hotspot hack is like having a secret weapon, ready to deploy at a moment's notice. We're talking about sharing your internet connection with your phone, tablet, or even another laptop without breaking a sweat. Let's dive in!
The Vista Hotspot Conundrum: Why Bother?
First things first, why even bother with a Vista hotspot hack? Well, think about it. You may have a perfectly good internet connection on your laptop, maybe through a wired Ethernet cable or a 3G/4G dongle. But what about your phone? Or your other devices? Instead of juggling multiple connections or relying on iffy public Wi-Fi, you can create your own private, secure hotspot right from your Vista machine. It's freedom! Think of it like this: your laptop is the generous friend at a party, ready to share their Wi-Fi goodies with everyone. Plus, you get to control who has access!
Unveiling the Secret: The Built-In Vista Hotspot Feature
Believe it or not, Windows Vista actually has a built-in feature that allows you to create a Wi-Fi hotspot. It’s a little hidden, a bit like finding a secret passage in a castle, but once you know where to look, it's super easy to use. This means no third-party software cluttering up your system. It’s all native, baby! Trust me, it’s simpler than figuring out how to fold a fitted sheet.
Step-by-Step Guide: Your Vista Hotspot Genesis
Ready to unleash the power? Let's walk through the process, step by step. Don't worry, it's way less complicated than assembling IKEA furniture.
Step 1: Open the Command Prompt as Administrator. This is the gateway. You can find it by typing "cmd" in the search bar (the little magnifying glass icon) in the Start Menu. Then, RIGHT-CLICK the Command Prompt icon and select "Run as administrator." This is crucial, think of it like needing a special key to unlock the treasure chest.
Step 2: The Magic Command. In the Command Prompt, type (or, better yet, copy and paste!) the following command and press Enter:
netsh wlan set hostednetwork mode=allow ssid=[YourHotspotName] key=[YourPassword]- Replace
[YourHotspotName]with the name you want to give your hotspot (e.g., "MyAwesomeWiFi," "VistaLovesWiFi"). Make it catchy, but remember you can change it later. - Replace
[YourPassword]with the password you want to use. Choose a strong password, like a combination of letters, numbers, and symbols, to keep your connection safe. Trust me, you don't want your neighbor piggybacking on your internet!
- Replace
Step 3: Start the Hosted Network. Back in the Command Prompt, type this command and press Enter:
netsh wlan start hostednetwork- This command activates the hotspot. If you see the message "The hosted network started," congratulations, you've done it! If you get an error, double-check that you ran the Command Prompt as an administrator and that you typed the command correctly.
Step 4: Share Your Internet Connection. This is the final piece of the puzzle.
- Go to the Network and Sharing Center (right-click the network icon in your system tray – the little computer screen – and select "Open Network and Sharing Center").
- Click on "Change adapter settings" in the left pane.
- You'll see a list of your network connections. Find the one that’s currently connected to the internet (it will likely say "Connected"). Right-click on it and select "Properties."
- Go to the "Sharing" tab.
- Check the box that says "Allow other network users to connect through this computer's Internet connection."
- In the "Home networking connection" dropdown menu, select the network adapter that represents your hosted network (it might have a name like "Microsoft Hosted Network Virtual Adapter").
- Click "OK" to save the settings.
Troubleshooting Time: Common Vista Hotspot Hiccups
Sometimes, things don't go as planned. Don't worry, it's normal! Here are some common issues and how to fix them:
"The hosted network couldn't be started." This usually means there's a driver issue or the network adapter doesn't support hosted networks. Try updating your network adapter drivers (search for them on the manufacturer's website) or seeing if other network adapters are available.
Devices Can't Connect: Ensure your devices are correctly entering the password you set. Also, check the signal strength on your Vista laptop. If the signal is weak, move your laptop closer to where you want to use the Wi-Fi.
Slow Internet: The speed might be affected since your Vista laptop is sharing the connection. Try closing any unnecessary applications and limiting the number of devices connected to your hotspot.
Fine-Tuning Your Vista Hotspot: Customization Options
Want to tweak things a bit? You can change your hotspot name and password or monitor the connected devices within the Network and Sharing Center, but directly manipulating what is shared can be complex. It is more recommended to utilize third party software or utilize the features within your device that connect to the hotspot.
Security First: Keeping Your Vista Hotspot Safe
Security is crucial. Remember that strong password? It’s your first line of defense. Here are some extra tips:
- Use a strong password: We've said it before, but it's worth repeating!
- Monitor connected devices: Regularly check who's connected to your hotspot to spot any suspicious activity.
- Turn it off when not in use: Conserve battery and reduce the risk of unauthorized access by disabling your hotspot when you don't need it.
Beyond the Basics: Advanced Vista Hotspot Configurations
If you're feeling adventurous, you can dig deeper, but it’s not necessary for the basic setup. You can create batch files to automate the start and stop process, modify the network adapter settings, and explore advanced features. However, for most users, the steps we've covered are sufficient.
Comparing Vista to Modern Hotspot Solutions
Compared to modern solutions, the Vista hotspot hack might seem a bit retro. But hey, it works! Modern operating systems often have more user-friendly interfaces for hotspot creation. However, the Vista method is perfect for a quick fix, especially if you're in a pinch and need a simple, no-frills solution.
The Future of Hotspots: What's Next?
The world of Wi-Fi is constantly evolving. We're seeing faster speeds, better security protocols, and more integrated hotspot solutions across all devices. However, the core principle remains the same: sharing an internet connection. And the Vista hotspot hack, though a bit old-school, still provides a practical way to achieve that.
The Vista Hotspot Hack Advantage: Convenience and Control
The beauty of the Vista hotspot hack lies in its simplicity and control. Unlike public Wi-Fi hotspots, you control who can connect, and you know the security measures in place. You're in absolute control, like the captain of your own Wi-Fi ship!
Living Life Without the Shackles of Wi-Fi Dependency.
Imagine no longer having to hunt for Wi-Fi! With the Vista hotspot hack, you become the provider! You're free to connect your devices anytime, anywhere (as long as you have an internet connection on your Vista laptop, of course!). We're talking about eliminating those moments of Wi-Fi desperation forever.
Closing Thoughts: Unleash Your Inner Network Guru!
So there you have it! The Vista hotspot hack – a simple, yet powerful way to turn your laptop into a Wi-Fi powerhouse. It's a skill that will serve you well, whether you're traveling, working remotely, or just want to share your internet connection with friends and family. Now go forth and conquer the Wi-Fi wilderness!
Remember, learning these tricks is empowering. It's like learning a new secret language; it can also be applied on newer operating systems. Start experimenting, and don't be afraid to get your hands dirty (figuratively speaking, of course!).
FAQs
Q: Will this work on other versions of Windows?
A: Similar methods work on other versions of Windows, though the interface and specific commands might differ slightly. The core concept of creating a hosted network remains the same.
Q: Does this affect my laptop's performance?
A: Yes, slightly. Sharing your internet connection uses system resources, primarily processing power and battery life. You might notice a slight decrease in performance, especially with multiple devices connected or during heavy internet usage, like streaming videos.
Q: Does this work if I have a wired internet connection?
Laptop WiFi Adapter: The Ultimate Guide to Blazing-Fast Internetvista Laptop As wifi hotspot

By deadlyheart4u vista Laptop As wifi hotspot by deadlyheart4u
Hot Spot Windows 7 & Vista Convert your WiFi enabled Laptop into a Wireless Router

By AbdulSalamAFF Hot Spot Windows 7 & Vista Convert your WiFi enabled Laptop into a Wireless Router by AbdulSalamAFF
How to turn your laptop into a Wi-Fi Hotspot using cmd For windows vistaXp788.110

By Bibek KC How to turn your laptop into a Wi-Fi Hotspot using cmd For windows vistaXp788.110 by Bibek KC

Title: Create a WI-FI Hotspot in Windows Vista788.1
Channel: Ss Fckycy
Create a WI-FI Hotspot in Windows Vista788.1 by Ss Fckycy
Laptop Wifi Hotspot
Vista Hotspot Hack: Unleash Your Laptop's WiFi Capabilities Instantly
We've all been there: craving a stable internet connection on the go, a lifeline when the familiar WiFi network isn't accessible. Maybe you’re stranded in a hotel with exorbitant rates, waiting in a crowded airport, or simply need to share your internet with a colleague whose hotspot connection has become unstable. The frustration is palpable. Fortunately, for those still wielding the power of Windows Vista (yes, you!), a clever trick exists to transform your laptop into a fully functioning WiFi hotspot in a matter of seconds, bypassing the need for clunky software and complicated configurations. This isn't magic; it's a deeply embedded, often overlooked feature within the operating system itself. Forget complex software installations and confusing technical manuals. The solution lies within, waiting to be unlocked.
Unveiling the Vista "Hosted Network" Feature
The key to this instant hotspot magic lies in Vista's "Hosted Network" feature. Microsoft, in its evolving wisdom (and perhaps a touch of foresight), included this functionality as a built-in component. Think of it as a hidden command, a gateway to effortlessly sharing your internet connection. This feature uses the command prompt, the core of the operating system. The advantage? It's direct, fast, and doesn't rely on third-party applications that might slow down your system or introduce security vulnerabilities.
Prerequisites: Ensuring Your Laptop is Ready
Before we dive in, ensuring your laptop is primed for this transformation is essential. Several key elements must be in place for this method to work flawlessly.
Ensure your laptop has a compatible WiFi adapter. Most modern laptops manufactured during the Vista era, and even beyond, should have a wireless adapter. While it's rare, some less-equipped models may not feature this functionality. If you are unsure, locate your laptop's manufacturer and model number. Then, search online for your computer's specifications or consult your device's manual for confirmation.
Make sure you have a working internet connection. This could be a wired Ethernet connection, an existing WiFi network that you are using to connect to the internet, or a mobile broadband connection (if your laptop has a SIM card slot). The Vista Hosted Network will share whatever internet connectivity the laptop is currently using.
Confirm administrative privileges. You must have administrative rights on your Vista machine to execute the necessary commands in the command prompt. If you're using a user account without administrator privileges, you will either need to log in with an administrative account or obtain the necessary credentials.
The Step-by-Step Vista Hotspot Hack Guide
Now, let's unlock the secret to turning your Vista laptop into a WiFi hotspot. Follow these straightforward steps precisely.
Open the Command Prompt as Administrator: This is the critical first step. Search for "cmd" in the Start menu search bar. Right-click on "cmd" (Command Prompt) and select "Run as administrator." This ensures that you have the necessary permissions to make changes to the network configuration. A window, usually with a black background, will appear.
Enable the Hosted Network Using Netsh: The
netsh WLANcommand is your key. Inside the command prompt, type the following command exactly as it appears, and press Enter:netsh wlan set hostednetwork mode=allow ssid="YourHotspotName" key="YourPassword"Replace
"YourHotspotName"with the name you wish to assign to your WiFi hotspot. This is the name that will appear to other devices when they search for available WiFi networks. Then, replace"YourPassword"with a secure password of at least eight characters. Create a strong, unique password to protect your hotspot from unauthorized access. Ensure that your password is a combination of upper and lowercase letters, numbers, and symbols.For example:
netsh wlan set hostednetwork mode=allow ssid="MyVistaHotspot" key="SecureWiFi2024!"Once you've typed the command correctly, press Enter. If the command is successful, you'll receive confirmation messages in the command prompt, confirming the changes to the network.
Start The Hosted Network: Now that you’ve configured it, you need to start it. In the command prompt, type the following command and press Enter:
netsh wlan start hostednetworkThis command activates your newly created hotspot. Again, successful execution will be confirmed with a message.
Share Your Internet Connection: The final step is to share your existing internet connection over the newly created hosted network. This requires access to your network connections settings.
Open the "Network and Sharing Center." You can access this by clicking on the network icon in your system tray notifications area, right-clicking it, and selecting "Open Network and Sharing Center." Alternatively, you can find it in the Control Panel under "Network and Internet."
In the Network and Sharing Center, click on "Change adapter settings" located on the left-hand side. This will open the Network Connections window, showing your network adapters.
Identify the network adapter that is currently providing your internet connection (e.g., your Ethernet connection or your connected WiFi adapter). Right-click on that connection and select "Properties."
In the Properties window, go to the "Sharing" tab. Check the box that says "Allow other network users to connect through this computer's Internet connection."
In the dropdown menu below, select the "Microsoft Hosted Network Virtual Adapter" that was created when you enabled the hosted network.
Click "OK" to save your changes.
Connecting Devices: Your laptop is now broadcasting a WiFi signal! On other devices (phones, tablets, other laptops), search for available WiFi networks. You should see your hotspot name (the one you specified in the first command) listed. Select it, enter your password, and your devices should connect to the internet through your Vista laptop.
Troubleshooting Common Issues
Even with a straightforward process, occasional roadblocks may arise. Here's a breakdown of common issues and their solutions.
"The hosted network could not be started" Error: This typically means the wireless adapter driver is outdated or incompatible. Ensure your wireless adapter drivers are up to date. You can usually do this by accessing the Device Manager (search for "Device Manager" in the Start menu). Expand "Network adapters," right-click on your wireless adapter, and select "Update driver software." You may also need to restart your computer after updating the driver.
"The Wireless AutoConfig Service is not running" Error: The Hosted Network relies on the Wireless AutoConfig service. To ensure this service is running, search for "Services" in the Start menu. Scroll down to "WLAN AutoConfig" (or "Wireless Auto Configuration"). Ensure the service is running and set to start automatically. Right-click on the service, select “Properties” and ensure the “Startup type” is set to “Automatic”. If the service isn't running, start it by right-clicking and selecting "Start."
No Internet Access on Connected Devices: This usually points to a problem with internet connection sharing. Double-check the steps in the "Share Your Internet Connection" section. Make sure you've selected the correct adapter and that you've enabled sharing. Sometimes, restarting your laptop can also resolve this issue. Ensure you have the latest device drivers installed.
Password Issues: Double-check your password. Remember it's case-sensitive and must be at least eight characters long.
Security Best Practices for Your Vista Hotspot
While this Vista hotspot hack is a convenient tool, security should always be a priority.
Use a Strong Password: As mentioned, choose a password that is long, complex, and unique to your hotspot. Avoid easily guessable passwords, such as birthdays, pet names, or common words.
Monitor Connected Devices: Periodically check which devices are connected to your hotspot. If you spot any unfamiliar devices, disconnect them immediately. This can be done from the Network and Sharing Center, in the "Change adapter settings."
Keep Vista Updated: Though Vista is an older operating system, keeping it updated is still essential. This includes security patches that can help protect your system from vulnerabilities.
Consider a Firewall: Ensure your Windows Firewall is enabled and configured to block unauthorized access.
Beyond the Basics: Advanced Customization
Those who want more granular control over their hotspot can explore additional netsh wlan commands. For example:
Changing the Hotspot Name and Password: You can modify your hotspot's name and password at any time by re-running the
netsh wlan set hostednetworkcommand with the new SSID and key.Stopping the Hosted Network: To disable the hotspot, use the following command in the command prompt:
netsh wlan stop hostednetworkTo disable the Hosted Network completely, run the command:netsh wlan set hostednetwork mode=disallow
Conclusion: Unleashing the Power of Your Vista Laptop
The Vista hotspot hack is a testament to the often-overlooked capabilities hidden within older operating systems. By leveraging the built-in "Hosted Network" feature, you can instantly transform your Vista laptop into a portable WiFi hotspot, creating a bridge of connectivity wherever you go. It is reliable, fast, and requires no third-party software, which simplifies the configuration and maintains your system's speed. Whether you're
