how to set laptop as wifi hotspot windows 8

Title: Turn Windows 8 Laptop into WiFi HotSpot How To
Channel:
Turn Windows 8 Laptop into WiFi HotSpot How To by
Turn Your Windows 8 Laptop into a WiFi Hotspot in 60 Seconds!
Unleash Your Inner WiFi Wizard: Turn Your Windows 8 Laptop into a Portable Hotspot!
Ever been stranded with a dead-zone dilemma? You know, that frustrating moment when your tablet or phone is gasping for data, but Wi-Fi seems lightyears away. Well, fret no more! Because, surprisingly, your trusty Windows 8 laptop holds the key to instant online connectivity. Today, we're diving deep into the unbelievably simple method of transforming that laptop into a powerful, portable WiFi hotspot. Therefore, you will effortlessly connect all your devices. Consequently, goodbye to Wi-Fi woes!
Creating Your Own Personal Wireless Haven
The best part? This process is so quick it practically defies the definition of leisurely. Indeed, you can be up and running in mere seconds. Moreover, it's incredibly user-friendly, requiring absolutely no technical wizardry. First things first, imagine having a personal WiFi beacon. Then, you will be the envy of everyone. Subsequently, let's unlock this hidden potential.
The Magic Formula: A Step-by-Step Guide
Ready to roll up your sleeves and get started? Great! Because this is where the real fun begins.
Access the Network and Sharing Center: You must locate the Network and Sharing Center. Now, right-click the network icon in your system tray. Typically, this is found in the bottom right corner of your screen. Then, select "Open Network and Sharing Center."
Unveiling the Hidden Truth: Change Adapter Settings: This part is equally crucial, so pay close attention. Therefore, be sure to check this section carefully. Here, click on "Change adapter settings" on the left-hand side. In addition, this window unveils all your network connections.
Embrace the Power of Sharing: Select the network connection you currently use to access the internet. Generally, this will be your Ethernet or WiFi connection. Then, right-click it and select "Properties." Remember to be very careful in this setting.
The Crucial Sharing Tab: Look for the "Sharing" tab and click it. Here's where the magic truly unfolds. Now, check the box that says, "Allow other network users to connect through this computer's Internet connection." In addition, it will be a lifesaver.
Selecting Your Gateway: Choose Your New Network: Typically, drop down, choose your hotspot network name. Now, in the drop-down menu under "Home networking connection," select the "Microsoft Hosted Network Virtual Adapter." In other words, it acts as the bridge.
Securing Your Fortress: Encryption and Protection: Before you go, there is an important note. Click "OK" to save your changes. Next, you need to set up your password. But, we are not there yet.
The Command Prompt Enigma: So, search for "cmd" in the Windows search bar. Now, right-click "Command Prompt" and chose to "Run as administrator." Then, this ensures you have the necessary permissions.
The Secret Code: Magical Command Sequence: Now, type the following commands, one at a time, pressing Enter after each. You can copy and paste if it helps.
netsh wlan set hostednetwork mode=allow ssid=YOUR_HOTSPOT_NAME key=YOUR_PASSWORDReplace
YOUR_HOTSPOT_NAMEwith the name you want for your hotspot.Replace
YOUR_PASSWORDwith a strong password (at least eight characters). Remember this password.netsh wlan start hostednetwork
Activating Your New Network: The last command starts your hotspot. Thus, you are now broadcasting a WiFi signal! As a result, your friends will now have access to the internet. Check on it to confirm.
Troubleshooting and Fine-Tuning Your Connection
Oh no! Not everything is working? Do not worry. Because, it is a common glitch. Sometimes the connection does not appear. Therefore, try these tricks for a successful start and use of the Hotspot.
Verify Your Connections: Double-check that both your internet connection and your hotspot are enabled. You can do this in the Network and Sharing Center.
Firewall Fiasco: Your firewall might be blocking the connection. Check your firewall settings and allow the hotspot connection.
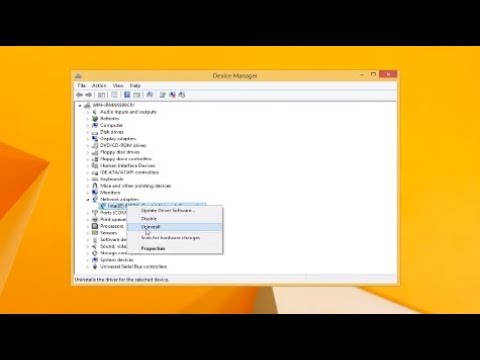
Driver Drama: Outdated network drivers can cause problems. Update your network adapter drivers through Device Manager.
Restart for Redemption: Sometimes, a simple restart of your laptop can work wonders.
Re-Enter Credentials: Just in case, re-enter the password and name, checking for typos.
Beyond the Basics: Maximizing Your Hotspot Experience
You have activated your hotspot, but let's make it even better. Hence, here are a few extra tips.
Optimize your Power Plan: Configure your laptop's power plan to prevent the hotspot from shutting down automatically.
Monitor Data Usage: Be mindful of your data usage, especially if you have a limited data plan.
Experiment with Settings: Play around with the settings to customize your hotspot experience.
Regular Check-ins: Check your Wi-Fi for an update. You may have to perform this regularly.
Final Thoughts: Embrace the Freedom of Connectivity
With these simple steps, your Windows 8 laptop is no longer just a computer. Also, it is a powerful WiFi hotspot, ready to serve up internet access whenever and wherever you need it. Therefore, you will have the power. In conclusion, embrace the freedom of instant connectivity. Furthermore, you can now share the gift of internet access.
Laptop to Printer Wireless: The SHOCKINGLY Easy Fix!Turn Your Windows 8 Laptop into a WiFi Hotspot in 60 Seconds!
Hello tech enthusiasts! Ever been stuck in a bind, desperately needing internet access but miles away from a Wi-Fi connection? We’ve all been there, right? Picture this: stranded at a coffee shop with flaky public Wi-Fi, or perhaps you’re road-tripping with a car full of kids, all clamoring for Netflix. Fear not, because today, we’re going to unlock a superpower: turning your trusty Windows 8 laptop into a personal Wi-Fi hotspot, and we're going to do it faster than you can microwave a burrito! This isn't just a tech tip; it's a lifeline, a digital safety net, and a surefire way to impress your friends.
Why Turn Your Windows 8 Laptop into a Hotspot? The Perks Explained
Before we dive in, let's address the 'why.' Think of your laptop as a digital Swiss Army knife. It does so much more than just browse Facebook and send emails. With the magic of a Wi-Fi hotspot, you can:
- Share your internet connection: Perfect for when you have a wired connection (like at a hotel) and want to share it with your phone or tablet.
- Connect multiple devices: Got a family trip planned? Let everyone stream their favorite shows on the go.
- Troubleshoot connectivity issues: Sometimes, a simple reboot for your devices is all it takes. Easily test your connection with various devices.
- Stay connected on the go: Imagine having your own private network wherever you roam. Endless possibilities!
Preparing Your Windows 8 Laptop for Takeoff: The Pre-Flight Checklist
Before we launch into the hotspot setup, let's make sure our digital aircraft is ready for flight. This is super simple:
- Ensure You Have an Internet Connection: Crucially, your laptop needs to be connected to the internet already. This can be through an Ethernet cable, a cellular connection (if your laptop has one), or existing Wi-Fi. If you're not connected, this whole operation is a no-go.
- Check Your Windows 8 Version: While we’re focusing specifically on Windows 8, these steps usually work fine on Windows 8.1 versions as well.
- Charge Your Battery: This might seem obvious, but a drained battery and a non-functioning hotspot are a recipe for frustration. Imagine trying to read a book with a dead flashlight!
The Express Lane: Turning Your Hotspot On - The Easy Method
Now for the fun part! We're going to create a hotspot using the quickest method:
- Open the Settings Charm: Swipe from the right edge of your screen to bring up the Charms bar. If you're using a mouse, move your cursor to the bottom-right corner and then up. Click on "Settings".
- Go to Network Settings: In the Settings panel, click on the network icon (looks like a little antenna).
- Enable "Mobile Hotspot": This is the magic button! You might need to click on "Wi-Fi" or "Wired" depending on how you're connected to the internet. You should see an option for "Mobile Hotspot". Click it.
- Set up your hotspot: You will see the "Share my Internet connection with other devices". If you wish, click Edit and provide a network name (SSID) and a password.
- Turn it on! Turn on the "Share my Internet connection with other devices" option.
And that's it! You've just created a Wi-Fi hotspot. Go ahead and check.
A Deeper Dive: Using Command Prompt for Hotspot Mastery
If you're feeling adventurous, or the previous method doesn't work perfectly, we can try setting up a Wi-Fi hotspot via the Command Prompt. This method is a bit more technical, but it gives you greater control and can be useful if the Settings method fails.
Open Command Prompt as Administrator: Right-click the Start button (or press the Windows key + X) and select "Command Prompt (Admin)".
Type the Following Commands: After that, type these commands one by one, pressing Enter after each. We'll be using some basic command line magic:
netsh wlan set hostednetwork mode=allow ssid=YourHotspotName key=YourPassword netsh wlan start hostednetwork- Replace "YourHotspotName" with the name you want for your Wi-Fi network. Choose something memorable!
- Replace "YourPassword" with a strong password to secure your hotspot. Think of it as the lock on your digital treasure chest.
Share Your Internet Connection: Open your Network Connections settings (search for "Network Connections" in the Start Menu). Right-click on your active internet connection (e.g., Ethernet or Wi-Fi) and choose "Properties". Go to the "Sharing" tab and tick the box that says "Allow other network users to connect through this computer's Internet connection". In the "Home network connection" dropdown, select the Hosted Network adapter you just created.
Connect Your Devices: Now, you can connect your other devices to your new Wi-Fi hotspot using the network name and password you set.
Troubleshooting: When Things Don't Go as Planned
Sometimes, even the best-laid plans go awry. If you're running into problems:
- Check Your Existing Internet Connection: Make sure your laptop is, in fact, connected to the internet. This is the most common culprit.
- Firewall Issues: Your firewall might be blocking the hotspot. Temporarily disable your firewall (if you're comfortable doing so) or create an exception for the hotspot.
- Driver Problems: Outdated network drivers can cause headaches. Visit the manufacturer's website for your network adapter to download the latest driver and install it.
- Conflicting Software: Occasionally, other software on your laptop might interfere with the hotspot's functionality. Try closing other programs.
- Restart Your Laptop: This might sound too simple, but a restart can often fix unexpected glitches.
Security First: Protecting Your New Wi-Fi Hotspot
Your Wi-Fi hotspot can be a portal, but it can also be a target. Protect yourself with these simple steps:
- Use a Strong Password: Avoid obvious passwords like "password" or your birthday. Aim for a complex combination of letters, numbers, and symbols.
- Choose WPA2 or WPA3 Encryption: These are the most secure encryption methods.
- Monitor Connected Devices: Keep an eye on who's connected to your hotspot. If you see unfamiliar devices, kick them off.
The Beauty of Simplicity: A Side-by-Side Comparison of the Methods
| Feature | Settings Method | Command Prompt Method | | ---------------- | ---------------------------------------------------- | -------------------------------------------------------- | | Ease of Use | Extremely easy, user-friendly. | A bit more technical, requires command line knowledge. | | Customization | Limited. | More control over settings, advanced options. | | Troubleshooting | Easier to troubleshoot due to the visual interface. | Requires understanding of command-line errors. | | Adaptability | Good for most users. | Useful for more complex scenarios or if the Settings method fails. |
Beyond the Basics: Advanced Hotspot Tweaks and Considerations
Are you a tech enthusiast? Here are some advanced tips:
- Bandwidth Management: Depending on your internet connection's speed, limit the bandwidth usage of connected devices.
- MAC Address Filtering: You can restrict access to your hotspot by allowing only specific devices to connect.
- Optimize Performance: Experiment with different Wi-Fi channels, if your router interface allows you to do so.
Comparing Windows 8 Hotspot with Modern Alternatives
While Windows 8 might be a bit dated, the core functionality of creating a hotspot remains consistent across newer versions of Windows, like Windows 10 and Windows 11. The primary difference lies in the user interface and the location of the settings. Modern versions tend to have a more refined and intuitive approach to hotspot setup.
The Future of Personal Hotspots: What to Expect
As technology continues to evolve, we can anticipate even easier and more secure methods for creating personal hotspots. Expect more seamless integration with mobile devices and advanced security features.
Real-World Scenarios: When Your Hotspot Saves the Day
Imagine this: you are hiking in a remote area, desperately needing to check on the latest weather updates. Boom! You can create a hotspot using your friend's laptop and surf the web with confidence. Or, think of the times when public Wi-Fi networks falter. Well, now you've got an alternate, secure route.
Wrapping Up: You're Now a Hotspot Master!
Congratulations! You've successfully navigated the world of Windows 8 hotspots and learned how to create your own personal Wi-Fi network. You're now equipped to solve connectivity crises, share your internet, and impress your friends and family. Remember, it's all about staying connected in the digital age. So, go forth and conquer!
**FAQs
My Acer Laptop REFUSES to Connect to WiFi! (Solved!)Ubah Laptop Windows 8 menjadi HotSpot WiFi Cara

By TechEmpty Ubah Laptop Windows 8 menjadi HotSpot WiFi Cara by TechEmpty
Membuat Hotspot Wi fi Menggunakan Laptop Windows 8 Anda

By Syed Shah Zahurullah Hussaini Membuat Hotspot Wi fi Menggunakan Laptop Windows 8 Anda by Syed Shah Zahurullah Hussaini
Windows 8.1 - Tidak Tersedia Koneksi Internet
By MDTechVideos Windows 8.1 - Tidak Tersedia Koneksi Internet by MDTechVideos

Title: Cara Membuat Hotspot Wifi di Windows 10 Tutorial
Channel: MDTechVideos
Cara Membuat Hotspot Wifi di Windows 10 Tutorial by MDTechVideos
Laptop Wifi Hotspot
Turn Your Windows 8 Laptop into a WiFi Hotspot in 60 Seconds!
The modern world demands connectivity. Whether you're a student juggling assignments, a professional on the go, or simply someone who enjoys the freedom of mobile internet, a reliable WiFi connection is paramount. But what if you're in a location without readily available WiFi, or your only access point is strained by numerous users? The solution lies in your hands – or, more accurately, your Windows 8 laptop. Transforming your laptop into a WiFi hotspot is not only remarkably simple but also incredibly efficient, allowing you to share your internet connection with multiple devices effortlessly. This comprehensive guide will walk you through the process step-by-step, ensuring you can set up your own personal, portable WiFi hotspot in less than a minute.
Understanding the Power of a Windows 8 Hotspot
Before we delve into the practicalities, let's appreciate the benefits of this often-overlooked feature. Creating a WiFi hotspot with your Windows 8 laptop essentially turns your laptop into a miniature router. It broadcasts an internet signal that other devices – smartphones, tablets, other laptops – can then connect to. This is particularly useful in several scenarios:
- Travel: Hotel WiFi can be notoriously unreliable, expensive, or simply nonexistent in certain areas. Your laptop can become your personal WiFi hub, enabling all your devices to connect simultaneously.
- Conferences and Events: Large venues often struggle to provide robust WiFi coverage. Your laptop can provide a dependable internet connection for yourself and a few colleagues.
- Limited Internet Access: If you have a limited data plan on your smartphone, using your laptop as a hotspot can allow you to conserve your data while still accessing the internet on other devices.
- Emergency Situations: In the event of a power outage affecting your home router, your laptop, with its internet connection (via Ethernet or a mobile broadband modem), can serve as a temporary lifeline for your other devices.
The beauty of this method lies in its simplicity. No specialized hardware is required; everything you need is already built into your Windows 8 operating system.
Step-by-Step Guide: Creating Your Instant WiFi Hotspot
Setting up your WiFi hotspot on a Windows 8 laptop is a straightforward process. Follow these steps precisely, and you’ll be up and running in under a minute.
Access the Network and Sharing Center: Navigate to the Windows 8 desktop. From there, locate the network icon in the system tray (usually located in the bottom right-hand corner). It resembles a small computer screen with a signal strength indicator. Right-click on this network icon. This action will bring up several options. Select “Open Network and Sharing Center" from the menu. Windows 8 users can also access this menu from the Control Panel. Type “Control Panel” into the search bar, and click on the application. Once the Control Panel window opens, select “Network and Internet,” then click “Network and Sharing Center.”
Change Adapter Settings: Inside the Network and Sharing Center, you'll see various settings and options related to your network connections. On the left-hand side of the window, click on the option labeled "Change adapter settings”. This will open a new window displaying your network adapters. These adapters represent your different network connection options (Ethernet, WiFi, Bluetooth, etc.).
Locate and Configure Your Internet Connection: Identify the network adapter that's currently connected to the internet. This will usually be either a WiFi adapter if you’re connected to a wireless network, or an Ethernet adapter if you’re connected via a wired connection. Right-click on the adapter and select “Properties.” This will open a properties window.
Enable Internet Connection Sharing: In the properties window of your internet connection, select the “Sharing” tab. Within this tab, you'll see the crucial settings for creating your hotspot. Check the box that says "Allow other network users to connect through this computer's Internet connection." This is the key to sharing your internet.
Designate Your Hotspot Connection: Directly below the "Allow other network users to connect" checkbox, you'll see a dropdown menu labeled "Home networking connection." This is where you specify the network adapter that will be used for your hotspot. Select “Microsoft Virtual Wifi Miniport Adapter” if it is available. If this option is not shown, restart your Windows 8 laptop. The list will likely include your WiFi adapter, and possibly other virtual adapters. Choose the appropriate one.
Name and Secure Your Hotspot: In the Properties window, locate the "Networking" tab. Open the "Wireless Network Connection Properties" window. Under the "Networking" tab, you’ll see options for customizing your wireless network. Click on the "Configure" button in the "Wireless Connection Properties" section. In the newly opened panel, navigate to the "Security" tab. This is where you will set the security type and a password for your hotspot. Select the appropriate security type (WPA2-Personal is recommended for the best balance of security and compatibility). Enter a strong, unique, and easy-to-remember password in the "Network key" or “Security key” field. Make sure to check the boxes to activate your settings.
Start the Hotspot: After completing these steps, your hotspot is configured and ready to go. You can enable it using the Connectify.me application. Alternatively, you can download a command that will enable the hotspot from the Command Prompt. Open the Command Prompt by typing “cmd” into your search bar and selecting it. Now, copy and paste the following commands one by one into the command prompt and press “Enter” after each one:
netsh wlan set hostednetwork mode=allow ssid="YourHotspotName" key="YourPassword"(Replace "YourHotspotName" and "YourPassword" with your desired hotspot name and password).netsh wlan start hostednetwork
Connect Your Devices: With your hotspot activated, search for available WiFi networks on your smartphones, tablets, and other devices. Locate the hotspot name you created in the settings. Enter the password when prompted, and connect. Your other devices should now be able to access the internet through your Windows 8 laptop.
Troubleshooting Common Issues
While the process is generally seamless, a few common issues might arise. Here’s how to address them:
- Hotspot Not Showing Up: Ensure the hotspot is enabled. Double-check your configuration in the Network and Sharing Center, making sure the "Allow other network users to connect" box is checked. Verify that the name of your hotspot is exactly as you set it.
- Connection Problems: Make sure the network key or password on your connecting devices matches the one you configured. Test the internet connection on your laptop itself. If the laptop isn’t connected to the internet, the hotspot won't work.
- Slow Speeds: The speed of your hotspot is ultimately limited by the speed of your laptop's internet connection. Ensure you have a strong internet signal on your laptop. The number of devices connected can also impact speed.
- “The hosted network couldn’t be started”: This error message typically means that your network card doesn't support the hosted network feature, or your drivers may be outdated. Ensure that your network card drivers are up to date.
- Internet Connection Sharing is Grayed Out: Ensure that the network adapter that you have chosen to share the internet connection through, is in fact the one that is actively connected to the internet.
Maximizing Your Hotspot Experience
To get the most out of your Windows 8 hotspot, consider the following tips:
- Battery Life: Using your laptop as a hotspot will drain its battery faster. Plug your laptop in whenever possible, especially if you intend to use the hotspot for an extended period.
- Security: Always use a strong password on your hotspot to prevent unauthorized access to your internet connection. Change your password regularly.
- Monitor Usage: Keep an eye on your data usage, especially if you have a limited data plan. You can usually monitor data usage through the Control Panel.
- Placement: Position your laptop in a central location to maximize the range of your hotspot. Avoid placing it near metal objects or walls, which can interfere with the WiFi signal.
- Update Drivers: Keep your network adapter drivers up-to-date for optimal performance and compatibility. You can usually do this through the Device Manager in Windows 8, or by visiting the manufacturer's website.
Conclusion: Your Portable WiFi Powerhouse
Creating a WiFi hotspot with your Windows 8 laptop is a quick, easy, and incredibly useful skill. It empowers you to stay connected wherever you go, giving you the flexibility to work, learn, and entertain yourself without the limitations of public WiFi or the hassle of mobile data plans. With a few simple steps, you can transform your laptop into a personal WiFi hub and experience the freedom of uninterrupted internet access on all your devices. Embrace the power of your Windows 8 laptop, and enjoy the benefits of instant, portable WiFi. Enjoy the freedom of always being connected, and never again worry about finding a reliable internet connection. You've got the power in the palm of your hand.
