how to connect wifi in dell laptop windows 8

Title: How to Connect to WiFi on Windows 8
Channel: HOWTECH
How to Connect to WiFi on Windows 8 by HOWTECH
how to connect wifi in dell laptop windows 8, how to connect wifi in windows 8.1 dell laptop, how do i connect my wifi to my dell laptop
Dell WiFi Nightmare? Solved! (Windows 8 Fix Inside)
Dell WiFi Woes Vanquished: Your Windows 8 Connection Conquered!
The flashing Wi-Fi icon. The dreaded "limited connectivity" message. The sheer, unadulterated frustration! Sound familiar? If you've ever wrestled with a Dell laptop and its capricious connection to the wireless world, you're not alone. So many users face this issue. However, take heart, because the days of Wi-Fi woes are numbered! Indeed, we're diving deep into the heart of this common problem.
Unmasking the Dell WiFi Gremlin: What’s Really Happening?
Let’s be honest: pinpointing the exact culprit behind Dell WiFi troubles feels like navigating a labyrinth. Still, several factors often conspire to bring your internet to its knees. First, driver compatibility issues can wreak havoc. Older or corrupted drivers are notorious saboteurs. Consequently, your Dell might be speaking an outdated language. Second, Windows 8, despite its advancements, sometimes presents its own unique challenges. Moreover, network settings can get twisted in the process. In addition, the operating system may not play nicely with your Dell's internal WiFi adapter from time to time. Finally, hardware glitches occasionally rear their ugly heads. So, let's get to the heart of the matter.
Step-by-Step: Conquering Your Dell WiFi Crisis
Fortunately, you can often resolve these issues. In fact, we've pinpointed a surefire solution. Get ready to reclaim your digital life!
1. Driver Detective Time:
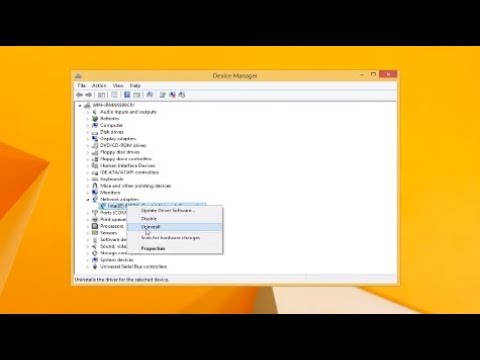
First things first: let's ensure your WiFi adapter has the latest driver. Search for "Device Manager" in the Windows 8 start menu. Then, expand the "Network adapters" section. Locate your WiFi adapter (it might be labeled something like "Dell Wireless" or "Intel Wireless"). Right-click on it. Next, select "Update driver software". Choose "Search automatically for updated driver software". Windows will hunt for the newest driver version. If found, install it. If not, don't panic!
2. Unleashing the Power of the Network Troubleshooter:
Windows 8 actually has a built-in troubleshooter. It's a lifesaver! Right-click the Wi-Fi icon in your system tray (the one near the clock). Select "Troubleshoot problems." Windows will then diagnose the problem. Furthermore, it will suggest potential fixes. Let it work its magic. Consequently, you might find your connection restored with a single click!
3. The Flight Mode Fiasco and Other Connection Considerations:
Sometimes, the simplest solutions are the most effective. Check and make sure Flight Mode is disabled. Additionally, verify that your Wi-Fi switch (often found on the side of the laptop, or a function key combination) is turned on. Also, check your router. Rebooting your router is a classic solution. Often, it solves unexplained outages. Also, make sure you put the devices closer or move the router position, too.
4. Digging Deeper: Advanced Network Settings Tweaks
If the above steps don't work, let's get our hands a little dirtier. You may need to reset your network configuration. So go to “Network and Sharing Center” in the Windows Control Panel. Click “Change adapter settings.” Right-click on your WiFi adapter, select "Properties." Then locate "Internet Protocol Version 4 (TCP/IPv4)" in the list and double-click on it. Ensure that “Obtain an IP address automatically” and “Obtain DNS server address automatically” are checked.
5. Reinstalling the Driver if needed
It's time to get a bit more hands-on with driver management. Go back to Device Manager. Right-click on your WiFi adapter. Select "Uninstall." Confirm the uninstallation. Restart your Dell. Windows will reinstall the driver automatically. This fresh start sometimes works wonders.
6. Dell's Support and Beyond
If you’ve tried everything, don’t hesitate to contact Dell support. They might offer further specific troubleshooting steps. Furthermore, they may offer hardware warranty solutions. Additionally, browse the Dell support forums. You could find other users reporting similar issues. Often, you'll find valuable insights there.
Rejoice: You're Back Online!
Ultimately, conquering Dell WiFi issues is often achievable. Follow these steps, and you'll be surfing the web in no time. So take a deep breath, embrace the troubleshooting journey, and get ready to bid farewell to connection frustrations. Therefore, happy browsing!
Laptop WiFi MIA? Fix This NOW!Dell WiFi Nightmare? Solved! (Windows 8 Fix Inside)
Hey everyone, it's your tech-loving buddy back again! If you're reading this, chances are you've wrestled with the dreaded Dell WiFi gremlin. The one that taunts you with dropped connections, agonizingly slow browsing speeds, and the sheer frustration of wanting to fling your laptop across the room. Trust me, we all know the feeling. I've been there. My own Dell machine once turned into a beautiful, but utterly useless, paperweight because of a persistent WiFi glitch. But fear not, fellow sufferers! Today, we're diving headfirst into the solution. We're going to exorcise those demons and get your Dell back online, especially focusing on a fix that's a lifesaver for Windows 8 users.
1. The WiFi Woes: A Shared Dell Dilemma
Let's be honest, Dell laptops, particularly those from a few years back, aren't always known for their flawless WiFi performance. It's often a lottery – you might get a rock-solid connection, or you might spend an entire afternoon troubleshooting. It's like a box of chocolates; you never know what you're gonna get. But the good news is that the problems are often fixable! The issue could be anything from a rogue driver to a conflict between your network card and the router. But don't worry, even if you're not tech-savvy, we can unravel this together.
2. Diagnosing the Disaster: What's Really Going On?
Before we dive into fixes, we need to figure out what's actually causing your WiFi headaches. Is it a complete dropout? Are you connecting, but the speeds are glacial? Here's a simple checklist to get you started:
- Weak Signal Strength: Are you far from your router? Walls, furniture, and even other electronic devices can weaken the signal.
- Driver Issues: Outdated or corrupted drivers are a common culprit. Think of them as the software that tells your network card how to behave. If they're not up-to-date, trouble ensues!
- Router Problems: Sometimes, the issue isn't your Dell at all. Try restarting your router. It's the equivalent of rebooting your brain when you've had a long day.
- Interference: Are there other devices (microwaves, cordless phones, etc.) near your laptop that could be interfering with the WiFi signal?
- Power Saving Mode: Could your Dell be trying to conserve battery life at the expense of your connection?
We'll be addressing these issues as we move forward.
3. The Windows 8 Wildcard: Why This Fix Matters
Now, let's specifically address those of you rocking a Windows 8 Dell. This operating system, while now a bit older, can sometimes throw up some unique WiFi roadblocks. Some of the default settings in Windows 8 can lead to connection problems. Think of it like this: Your Dell's WiFi is like a car engine; Windows 8 is the driver. If the driver doesn't know how to handle the roads, the engine can't operate efficiently.
4. The Magic Bullet: A Simple Driver Update
One of the first things everyone should try is updating their network adapter drivers. It's a bit like giving your car an oil change; it's vital for smooth operation. Here’s how:
- Open Device Manager: Search for "Device Manager" in the Windows search bar and open it.
- Expand "Network Adapters": You should see a list of your network adapters (e.g., Intel Wireless-AC, Broadcom, etc.)
- Update the Driver: Right-click on your WiFi adapter and select "Update driver." Choose the "Search automatically for updated driver software" option. Windows will then try to find and install the latest drivers.
- Restart Your Dell: After the update is complete, restart your laptop to ensure the new drivers are properly implemented.
Simple, right? This alone solves the problem for many.
5. Wrestling with Power Management Settings
Windows 8 sometimes has a power-saving feature on network adapters that can severely hamper WiFi performance. It's designed to conserve battery life, but it can sometimes be a curse. Let's disable it:
- Go Back to Device Manager (See Step 4): Locate your WiFi adapter again.
- Open Properties: Right-click on the adapter and select "Properties."
- Go to the "Power Management" Tab: You may need to wiggle the scroll bar a little to find it.
- Uncheck "Allow the computer to turn off this device to save power": This is the critical part.
- Click "OK" and restart your Dell.
You're essentially telling your Dell to prioritize a strong connection over conserving battery life.
6. Channel Surfing: The Router Revelation
Sometimes, the problem isn't your Dell, but your router. Routers broadcast WiFi signals on different channels. These channels can get congested, especially in areas with many WiFi networks. Think of it like a busy highway – the more traffic, the slower things move.
- Access Your Router's Settings: You'll need to log in to your router's configuration page. Usually, this involves typing something like
192.168.1.1or192.168.0.1into your web browser (check your router's manual if you don't know the address). - Find the Wireless Settings: Look for a section related to "Wireless," "WiFi," or "WLAN."
- Change the Channel: Experiment with different WiFi channels (1, 6, and 11 are usually recommended as they are less likely to overlap). Some routers have an "auto" setting that can select the best channel for you.
- Save Changes and Restart Your Router: This is critical to implement your changes.
This might be a game-changer.
7. The Hidden SSID: Is Your Network Hiding?
Have you ever wondered if your network's name (SSID) is hidden? It might be, which can cause connection issues on some devices. Try making your SSID visible for a while, just to see if it improves the connection. If it does, you know you're on the right track; however, be sure you are not changing your network security.
8. Firewall Follies: Are You Blocking Yourself?
Your firewall, whether it’s the Windows Firewall or a third-party security program, can sometimes block your Dell from connecting to the internet. Make sure your firewall isn't mistakenly blocking network traffic. You can temporarily disable your firewall to test, but make sure to re-enable it or at least set "exceptions" if that fixes the issue.
9. Network Troubleshooter: When All Else Fails
Windows 8 (and all modern Windows versions) comes with a built-in network troubleshooter. It's like having a helpful technician at your disposal!
- Right-click on the WiFi icon in your system tray (the little bars in the bottom-right corner).
- Select "Troubleshoot problems."
- Follow the on-screen prompts.
The troubleshooter will detect and attempt to fix any problems it finds. This may sound simple, but it frequently uncovers and resolves the most common problems.
10. Physical Inspection: A Hardware Checkup
While less common, a loose or damaged network adapter can also cause problems.
- (Carefully) Open up Your Dell: Be careful! Only do this if you are comfortable working with electronics. Disconnect the power and remove the battery first. Examine the network adapter to ensure it is properly seated (snapped into its slot).
- Look for Damage: Check the wires to ensure they aren't damaged. If you are not familiar or comfortable carrying out these steps, please consult an expert.
11. The Reset Button (Almost): Network Reset
Windows offers a reset option that basically rolls back all network settings, which can be helpful if software is the issue.
- Open Settings: Press Win + I or search for "Settings" in the Windows search bar.
- Go to "Network & Internet."
- Click on "Network reset" (usually near the bottom), and follow the prompts.
This is a powerful step, but it's generally safe, as it merely renews communication pathways.
12. Factory Reset: The Nuclear Option
This is a last resort but a useful step. A factory reset wipes everything and restores the system to its original state – but back up your important files!
- Open Settings: (See Step 11).
- Go to "Update & Security."
- Choose "Recovery."
- Select "Reset this PC". Be careful!
This can fix deep rooted issues.
13. External WiFi Adapters: A Workaround
If all else fails, a simple external WiFi adapter can often be a solution.
- Plug and Play: These adapters plug into a USB port and act as a new network card.
- Easy to Install: Usually, they're plug-
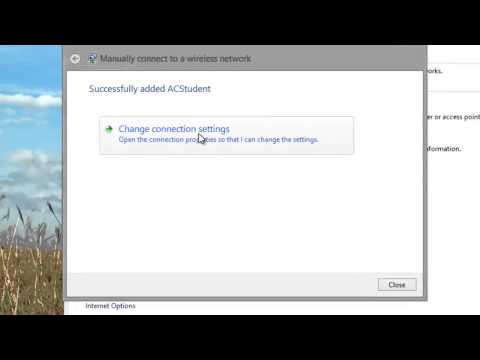
Connecting Manually to a Wireless Network in Windows 8 HP Computers HP Support

By HP Support Connecting Manually to a Wireless Network in Windows 8 HP Computers HP Support by HP Support
Connecting to Wifi Windows 8
By Academic Algonquin Connecting to Wifi Windows 8 by Academic Algonquin
Windows 8 - How to turn on WiFi

By HowTo Windows 8 - How to turn on WiFi by HowTo
Title: Windows 8.1 - No Internet Connection Available
Channel: MDTechVideos
Windows 8.1 - No Internet Connection Available by MDTechVideos
Laptop Wifi Hotspot
Dell WiFi Nightmare? Solved! (Windows 8 Edition)
We've all been there. The ubiquitous WiFi symbol, stubbornly refusing to cooperate. You’re staring at your Dell, a device meant to connect you to the world, only to be met with the dreaded “no internet access” error. For Dell users, particularly those navigating the often-challenging terrain of Windows 8, the problem can seem particularly insidious. But fear not! We're here to illuminate the path to reliable, consistent WiFi connectivity, banishing those frustrating connection drops and sluggish browsing speeds. This guide provides a detailed roadmap through troubleshooting, specific solutions, and preventative measures tailored to optimize your Dell’s WiFi performance, making that "nightmare" a distant memory.
Diagnosing the Dell WiFi Dilemma
Before diving into fixes, a clear understanding of the root cause is paramount. We must first establish the nature of the beast. The first step is to assess the problem. Is the entire network down, or just your Dell? Try connecting other devices: a smartphone, another laptop, etc. If they’re experiencing the same issue, the problem lies with your internet service provider or your router, not your Dell. If, however, only your Dell is struggling, the issue is more localized.
Secondly, scrutinize the symptoms. Are you experiencing intermittent disconnects, sluggish loading times, or a complete inability to connect? Intermittent problems are often a consequence of driver conflicts, signal interference, or power-saving settings. Complete connectivity failures, meanwhile, frequently indicate an issue with the network adapter itself, incorrect network settings, or a problem with the router's security settings.
Thirdly, understand the operating environment. Windows 8, while possessing its own set of challenges, also boasts powerful diagnostic tools. Utilizing the Windows Network Troubleshooter is often the first and easiest step. Run it, and pay careful attention to the error messages it displays. They provide vital clues. Consider the physical environment. Are there objects that may be causing interference? Thick walls, microwaves, and even other wireless devices operating on the same channel can disrupt the signal.
Unlocking the WiFi Potential: Essential Windows 8 Solutions
Now comes the crucial part – applying solutions. We’ll explore the most effective fixes for Dell WiFi woes within the Windows 8 framework.
Driver Renewal: The Cornerstone of Connection
Outdated, corrupted, or mismatched network adapter drivers are a frequent source of WiFi problems. Windows 8, like all operating systems, relies on drivers to communicate with hardware. Outdated drivers can and will cause incompatibility issues. The good news is that updating them is a relatively straightforward process.
Accessing the Device Manager: Press the
Windows Key + Xto open the Quick Access menu, and select “Device Manager.” You can also search for "Device Manager" in the Start screen.Locating the Network Adapter: In Device Manager, expand the “Network adapters” section. You should see your WiFi adapter listed here. Often, it will be named something like "Dell Wireless," "Intel Wireless," or something similar.
Initiating the Update: Right-click on the network adapter and choose "Update driver software."
Automatic or Manual Search: You can choose to "Search automatically for updated driver software." Windows will attempt to find and install the latest drivers. Alternatively, if you have pre-downloaded a driver from the Dell support website (recommended), select "Browse my computer for driver software" and navigate to the saved driver file. Always download drivers from the Dell support website, or the specific manufacturer's website. Other sources may contain malware.
Restart and Evaluate: After the driver update is complete, restart your Dell. Test the WiFi connection. If the issue persists, consider rolling back to an earlier driver version (accessed via the Driver tab in the Device Manager). Test each newly installed driver.
Power Management Adjustments: Balancing Performance and Efficiency
Windows 8, by default, can implement power-saving settings to optimize the use of battery life (particularly on laptops). However, these settings can sometimes interfere with the proper functioning of your WiFi adapter, leading to connection drops. We want to make sure everything is working when the computer is plugged in.
Access the Device Manager (as shown above)
Navigate to the Network Adapter: Locate your WiFi adapter.
Access Properties: Right-click and select “Properties.”
Uncheck Power Saving: In the Properties window, navigate to the “Power Management” tab. Uncheck the box that says "Allow the computer to turn off this device to save power."
Apply and Test: Click "OK" and restart your Dell. This setting prevents Windows from disabling the WiFi adapter to conserve power when it is not in use. Test the WiFi connection thoroughly.
Network Settings Configuration: Tailoring for Optimal Performance
Incorrect network settings can also impede WiFi performance. These settings, frequently residing within the network adapter's properties, can be adjusted to optimize your connection. This requires care and attention.
Access Device Manager, as before.
Select the Network Adapter, right-click and select "Properties."
Access the Advanced tab.
Important Settings: Within the “Advanced” tab, you’ll find a range of settings specific to your WiFi adapter. These settings vary, but common options to consider are:
- 802.11n Channel Width: This setting determines the bandwidth used by your WiFi adapter. Experimenting with this setting can sometimes resolve connectivity issues. Try setting it to "Auto" or manually selecting a specific setting (e.g., 20 MHz only).
- Roaming Aggressiveness: This setting affects how aggressively your Dell searches for new access points. Experimenting with this setting can positively impact your WiFi reception.
- Wireless Mode: Ensure that the wireless mode is set to the highest supported standard (e.g. 802.11n or 802.11ac, depending on your adapter and router). This ensures that your Dell is using the most advanced wireless technology.
- Transmit Power: Adjusting the transmit power can enhance the range of your WiFi adapter. We suggest setting this to the highest available option.
- Preferred Band: If your router supports both 2.4 GHz and 5 GHz frequencies, you may be able to specify which frequency your Dell prefers. 5GHz often offers faster speeds but a shorter range; 2.4 GHz offers greater range but potentially lower speeds. Experiment to find the best option.
Apply, Test, and Repeat: After changing a setting, click "OK" and restart your Dell. Test the WiFi connection. If performance doesn't improve, revert the changes and try a different combination of settings.
IP Configuration Refresh: Addressing Network Conflicts
Sometimes, issues arise from conflicts in your IP configuration. This can involve the router assigning incorrect IP addresses. Renewing your IP address can resolve these issues.
Open the Command Prompt: Search for "cmd" in the Start screen and open the Command Prompt.
Run the commands: Type the following commands, one at a time, pressing Enter after each:
ipconfig /releaseipconfig /renew
Restart: Close the Command Prompt and restart your Dell. The
ipconfig /releasecommand releases your current IP address, and theipconfig /renewcommand requests a new one from your router.
Router Configuration: External Factors in the Equation
While your Dell is often the source of the problem, the router itself plays a crucial role. Problems within the router can affect your Dell's WiFi capabilities.
Router Firmware: Staying Updated for Optimum Performance
Outdated router firmware can create compatibility issues, security vulnerabilities, and general performance degradation. Regularly updating your router's firmware is essential.
Access the Router's Interface: Typically, you access your router's settings by typing its IP address into your web browser (e.g., 192.168.1.1 or 192.168.0.1). Consult your router’s manual to determine the correct IP address and login credentials.
Locate the Firmware Update: Within the router’s interface, there should be a section dedicated to firmware. The location varies depending on the router model.
Follow Instructions: Follow the on-screen instructions to download and install the latest firmware. This process often involves downloading a file and then uploading it to the router. Never interrupt the firmware update process. Disconnecting the router during this process can render it unusable.
Restart the Router: After the firmware update is complete, the router will restart automatically.
Channel Selection: Avoiding Interference
WiFi routers operate on various channels. Some channels overlap, leading to interference, especially in crowded areas. Switching to a less congested WiFi channel can dramatically enhance your Dell's connection.
Utilize a WiFi Analyzer: Download and install a WiFi analyzer app (such as "WiFi Analyzer" for Android) on a smartphone or tablet. This app will scan the surrounding WiFi networks and identify the channels with the least traffic.
Access Your Router's Interface: As detailed above.
Change the channel: Within the router’s WiFi settings, find the channel selection option. Select a channel that is deemed less congested by your WiFi
