how to connect laptop to hidden wifi windows 7

Title: How To Connect To Hidden WiFi in Windows 7
Channel: Pennicles
How To Connect To Hidden WiFi in Windows 7 by Pennicles
how to connect hidden wifi in laptop windows 7, why is my windows 7 laptop not connecting to wifi
Unlock Your Hidden WiFi: Connect Your Laptop to ANY Network (Windows 7)
Unveiling the Digital Key: Seamlessly Connecting to Any WiFi (Windows 7)
Alright, let's dive into a little digital wizardry, shall we? Ever found yourself staring longingly at a locked WiFi network, wishing you could just… connect? Well, hold onto your hats, because we’re about to unlock a secret door. This isn't about hacking; rather, it's about finding clever ways to utilize your laptop’s potential. Especially if you're still rocking Windows 7 -- we've got you covered!
The Phantom WiFi: A Realm of Possibilities
Think of the hidden networks as secret passages. They are usually there, but require a special map to find them. Often, these networks aren't broadcasting their names. They're intentionally cloaked, lurking just beyond the reach of a casual scan. But do not worry, we can find them. We're not breaking any rules by seeking them out. It's about tapping into your laptop's ability to engage in more than meets the immediate eye.
Preparing Your Digital Arsenal: The Prerequisites
Before we push the proverbial 'connect' button, some preliminary steps are essential. First, ensure your Windows 7 laptop has a functional wireless network adapter. This might seem obvious, but never hurts to double-check! Second, you'll need to know the network's name (SSID) and security type. If you happen to possess the password, you're already halfway there! Also, you are well-advised to safeguard your device using a reliable firewall, just in case.
Demystifying the Connection: Step-by-Step Guidance
Here's where the real fun begins. We're going to manually configure the network connection. Follow these steps closely. This is where your digital adventure begins!
Step 1: Summon the Network Control Panel
The control panel is our central command center. Start by clicking on the 'Start' button. Then, select 'Control Panel' from the menu. Afterward, navigate to 'Network and Internet.'
Step 2: Unveiling the Network and Sharing Center
Within 'Network and Internet', click on 'Network and Sharing Center.' This section is critical. Here, you'll see the main hub for all network activity.
Step 3: Orchestrating a New Wireless Connection
In the 'Network and Sharing Center', locate the option that says "Set up a new connection or network". Click that icon, and you’ll begin the configuration process.
Step 4: Choosing Your Weapon: Manual Configuration
A new window will appear. Choose the option 'Manually connect to a wireless network'. This prompts the setup wizard to configure your connection.
Step 5: Entering the Secret Code: Network Details
Here's where you enter the network's details. You'll fill in the SSID (network name). Input the Security Type, which is often WPA2-Personal or WEP. Lastly, input the security key (password).
Step 6: Fine-Tuning the Settings (Optional, but Recommended)
Click on "change connection settings". In the security settings, ensure you have "remember this network" checked. You can also configure things like "start this connection automatically".
Step 7: Let the Magic Happen: Connecting!
After entering all network details, click 'OK'. Windows 7 will then attempt to connect to the network. You may see "attempting to connect" for a few seconds.
Step 8: Troubleshooting: Addressing Potential Hiccups
What if it doesn't connect? First, ensure the SSID is correct; even a single typo can stymie the process. Double-check the security key. Also, make certain the network is available and broadcasting. Maybe the network is out of range.
Beyond the Basics: Advanced Connection Strategies
So, you're connected – fantastic! But what if you want to go beyond the basics? Well, you might consider experimenting with static IP configurations. You can access these in the network adapter settings in the Control Panel. However, these configurations need more in-depth knowledge.
Ethical Considerations: Navigating the Digital Landscape
It’s essential to remember that this method is about connecting, not exploiting. Always respect network owners' rights. Refrain from accessing private information without explicit permission. Use this knowledge responsibly; that is essential.
Embrace the Freedom: Your Digital Frontier Awaits
There you have it. You've unlocked a powerful skill. You can now connect to hidden WiFi networks. You're no longer constrained by the visible "list." Go forth and explore the digital realm. Enjoy the freedom. Embrace the possibilities.
Steal Your Laptop's WiFi Password: The Secret Method!Unlock Your Hidden WiFi: Connect Your Laptop to ANY Network (Windows 7)
Hey there, tech adventurers! Ever felt like a detective, peering through the digital fog, desperately trying to latch onto a Wi-Fi signal when the official one is just… out of reach? We've all been there. Remember that time I was stuck in an airport with a dying phone, and I needed to check that email? (Okay, maybe several emails). That's when the magic of hidden Wi-Fi networks, and knowing how to connect to them on your trusty Windows 7 laptop, becomes absolutely essential.
The Elusive Network: Why Hidden Wi-Fi Exists
Let's start by asking the big question: why even have a hidden Wi-Fi network? It's a bit like a secret clubhouse, isn't it? The idea is to add an extra layer of security. By not broadcasting its name (the SSID, or Service Set Identifier), the network becomes less of a target for casual snoopers. Think of it as having a secret password – only those who know the name and the password can join the party.
Unmasking the Invisible: Understanding SSID and Security
Alright, time for a quick tech refresher. A Wi-Fi network, at its core, is like a radio station. It broadcasts a signal with a specific name (the SSID) and a specific password. To connect, your laptop needs to “tune in” to the right “frequency” (the SSID) and then prove it has the password (the security key). Windows 7, despite its "vintage" status, is more than capable of handling this.
Your Windows 7 Arsenal: Preparing for the Connection
Before we dive into the “how-to,” let's make sure we’re ready for action. This is like gathering your tools before starting a project.
- Your Laptop: Pretty self-explanatory, right? Make sure it's charged and ready to go. (We've all suffered the dreaded low battery alarm, trust me…)
- Windows 7: This is your command center. Ensure it’s updated (as much as possible for Windows 7), although it's reached its end of life.
- Network Information: This is the gold. You'll need the SSID of the hidden network and the security key (password). Without these, we're stuck. This information might be given to you by a friend, a workplace, or whatever the situation.
Step-by-Step: Connecting to a Hidden Wi-Fi Network
Now for the main event! Don your metaphorical superhero cape. Connecting to a Hidden Wi-Fi network is much easier than you would imagine. Think of it like entering a secret code.
- Open the Network and Sharing Center: Click the Wi-Fi icon in your system tray (that little antenna icon in the bottom right corner), then click “Open Network and Sharing Center.”
- Set Up a New Connection or Network: On the left, click "Set up a new connection or network."
- Manually Connect to a Wireless Network: Select "Manually connect to a wireless network" and click "Next."
- Enter the Network Details: This is where the magic happens:
- Network Name: Type in the exact SSID of the hidden network. Be meticulous; capitalization matters. Think of it like typing a secret password.
- Security Type: Choose the type that the network uses. This often includes options like WPA2-Personal, WPA-Personal, or WEP. If you're not sure, try WPA2-Personal first.
- Security Key: Type in the password for the hidden network. Again, capitalization is crucial. Triple-check your spelling!
- Start this connection automatically: If you want your laptop to connect automatically whenever it's within range, check this box.
- Connect even if the network is not broadcasting: Check this. It allows you to connect to a hidden network.
- Click "Next". Windows 7 will attempt to connect to the network.
- Successful Connection! You should get a message confirming your connection. If not, double-check the SSID and security key. A typo is the most common culprit.
- Troubleshooting: If things don't work (it happens!), double-check:
- The Correct SSID and Password: The most common error.
- Security settings. Make sure the security type matches the network settings. It can be frustrating to get this wrong.
- Firewall Issues: Rarely, your firewall might be blocking the connection. Temporarily disable it (but remember to turn it back on afterward!)
Security First: Best Practices for Wi-Fi Security
Connecting to any Wi-Fi network, visible or hidden, requires caution. Think of your data as your most prized possession.
- Use a Strong Password: For your own Wi-Fi networks, choose a password that's long, complex, and unique to that network.
- Keep Your Software Updated: Even though Windows 7 is no longer officially supported, keep any security software updated.
- Use a VPN: A Virtual Private Network encrypts your internet traffic, adding an extra layer of security, especially on public Wi-Fi. Think of it as a digital shield.
- Be Aware of Phishing: Don't click on suspicious links or enter your password on untrusted websites.
Hidden Wi-Fi: Advantages and Disadvantages
Like any tech trick, connecting to hidden Wi-Fi has its ups and downs.
- Advantages: Increased security (in theory), less clutter in your list of available networks.
- Disadvantages: Can be a hassle to connect initially, requires specific network information, more complex network configuration.
Beyond the Basics: Advanced Troubleshooting Tips
Sometimes, the connection process can be a bit more complicated. Let’s dive deeper.
- Check Your Wireless Adapter: Make sure your Wi-Fi adapter is enabled and working correctly. You can check this in Device Manager.
- Restart Your Router: The old “turn it off, then on again” trick often works wonders.
- Update Your Wireless Adapter Drivers: Outdated drivers can cause connection issues. Head to the manufacturer's website (or use auto-update tools) to get the latest drivers.
- Verify Wireless Radio: Ensure that the wireless radio is enabled on your laptop. This is often a physical switch or a function key (like Fn + F2).
Windows 7 and Beyond: What About Other Operating Systems?
While this guide is specifically for Windows 7, the core principles apply to newer operating systems like Windows 10 and 11, as well as macOS, though the interface may look different. The process is generally similar: you'll manually enter the SSID and security key.
Hidden SSID? Let's Dispel the Myths
Let's call out some common misconceptions around hidden SSIDs.
- Myth: Hidden SSIDs offer impenetrable security.
- Truth: They only provide a small layer of protection. A determined hacker can still find the network.
- Myth: Hiding your SSID makes your network unfindable.
- Truth: While not displayed, the network is still transmitting, making it possible to be found.
- Myth: Hidden networks are always more secure than broadcast networks.
- Truth: Strong passwords and overall network security are important, regardless of whether the SSID is hidden.
Personal Experiences: My Hidden Wi-Fi Adventures
I've had my share of hidden Wi-Fi adventures. I remember once, I desperately needed to print a presentation and was struggling to connect to a hidden network at a conference. After some trial and error, I finally cracked it (thanks to some patient IT support in the end). It gave me a sense of accomplishment, like cracking a digital puzzle.
Conclusion: Conquer the Digital Frontier
So there you have it! We've journeyed through the world of hidden Wi-Fi networks, from understanding their purpose to connecting your Windows 7 laptop. Remember, knowledge is power, and now you have the power to connect to those elusive networks. Go forth, explore, and stay connected!
FAQs: Your Burning Questions Answered
1. Why can't I see the hidden network in the list of available networks?
That's because it's hidden! You need to manually enter the SSID and security key, as outlined above.
2. What if I forget the network password?
If you're the owner of the network, you may be able to find the password in your router's settings (usually accessible through a web browser). Otherwise, you'll need to contact the network administrator (if it's a workplace or public network) or the person who set it up.
3. Is it safe to connect to a hidden Wi-Fi network?
As long as you trust the network and have the correct security key, it's generally safe. However, always be aware of the risks of using public Wi-Fi (even if hidden) and take appropriate security precautions, like using a VPN.
4. How do I make my own Wi-Fi network hidden?
This depends on your router. Generally, you'll access your router's configuration page (usually by typing its IP address into a web browser), find the wireless settings, and look for
Is Your WiFi Speed Killing You? This Laptop Trick Will SHOCK You!Windows was unable to connect wifi windows 7 Laptop and Desktop

By IT Magics Windows was unable to connect wifi windows 7 Laptop and Desktop by IT Magics
Cara Konek WIFI Yang Di HiddenDisembunyikan Menggunakan PCLaptop
By diy ALC Cara Konek WIFI Yang Di HiddenDisembunyikan Menggunakan PCLaptop by diy ALC
How to ConnectJoin to a hidden Wifi Network Connect to hidden wifi in windows 788.110

By PGM Tutorials How to ConnectJoin to a hidden Wifi Network Connect to hidden wifi in windows 788.110 by PGM Tutorials

Title: how to connect hidden wifi network in Windows 788.110 Connect Hidden Wifi with software
Channel: Tech Guru Academy by Piyush
how to connect hidden wifi network in Windows 788.110 Connect Hidden Wifi with software by Tech Guru Academy by Piyush
Change Wifi Settings
Unlock Your Hidden WiFi: Seamlessly Connect Your Laptop to ANY Network (Windows 7)
Navigating the digital landscape often demands a reliable internet connection. Whether collaborating on a critical project, downloading essential files, or simply staying connected with loved ones, a stable WiFi connection is no longer a luxury, but a necessity. This comprehensive guide aims to empower you with the knowledge and techniques needed to effortlessly connect your Windows 7 laptop to virtually any available WiFi network, even those that might initially appear "hidden" or inaccessible. We will delve into the specific steps, strategies, and settings required, ensuring you understand the process from start to finish.
Understanding Hidden Networks: The Veil Unveiled
Hidden WiFi networks, also known as "stealth networks," are configured not to broadcast their Service Set Identifier (SSID). This means that the network name doesn't automatically appear in the list of available networks on your laptop. While this approach adds a layer of obscurity, it does not, by any means, equate to impenetrable security. The purpose is usually to reduce clutter in the displayed network list and to make casual discovery more difficult, not to make the network fundamentally secure. Connecting to a hidden network is typically straightforward once you have the necessary information.
Gathering Crucial Intel: Pre-Connection Reconnaissance
Before attempting to connect, you need to gather essential information about the hidden network. This includes the network's SSID (the name of the network) and the security type, such as WPA2-PSK, WPA-PSK, or WEP. Furthermore, you'll require the network's security key or passphrase. Obtaining this information may involve contacting the network administrator or someone with privileged access to the network settings. Without this data, connection is impossible. Keep this information secure and confidential.
The Tried-and-True Method: Connecting Through the Network and Sharing Center
The Network and Sharing Center in Windows 7 is your primary hub for managing network connections, including those that are hidden. This section will guide you through the process of adding a hidden network to your list of accessible connections.
Accessing the Network and Sharing Center: Click the Start button, go to the Control Panel, and then select “Network and Internet.” Finally, click on “Network and Sharing Center.” This will open the main interface for managing network settings.
Initiating the Connection Setup: In the Network and Sharing Center, locate the "Set up a new connection or network" option and click on it. A new window will appear, presenting various connection setup choices.
Choosing the Wireless Option: From the available options, select "Manually connect to a wireless network" and click "Next." This option allows you to manually enter the details about the hidden network.
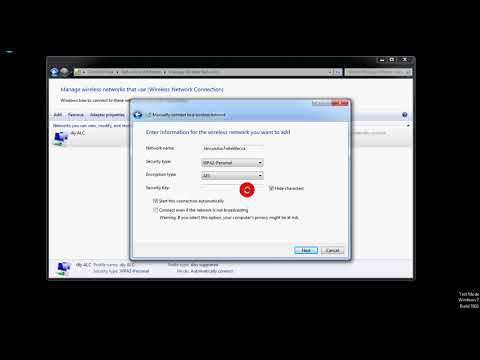
Inputting Network Details: The "Manually connect to a wireless network" window will then prompt you to enter the necessary details. Fill it out as follows:
Network name: Enter the exact SSID of the hidden network. Be incredibly precise; capitalization and spacing matter.
Security type: Select the security type that the network uses from the dropdown menu (e.g., WPA2-PSK, WPA-PSK, or WEP). If you are unsure, consult the network administrator.
Security key: Input the network’s security key or passphrase. This is the password that protects the network. Make sure you have the correct key, and that the "Show characters" box is unchecked for security reasons.
Start this connection automatically: Check this box if you want your laptop to connect to this network every time it is within range.
Connect even if the network is not broadcasting: Check this box for hidden networks.
Finalizing the Setup: After entering all the information, click "Next." Windows 7 will attempt to connect to the hidden network. If the credentials are correct, you should see a confirmation message indicating successful connection. If the connection fails, double-check the details you entered, particularly the SSID and security key.
Troubleshooting: If the connection fails despite correct credentials, consider the following:
- Distance: Ensure you are within range of the wireless router. The signal strength indicator on your laptop can provide a rough idea.
- Router Issues: Sometimes, the router itself might have issues. You could try restarting the router or consulting the router’s documentation.
- Firewall Interference: Your firewall might be blocking certain connections. Temporarily disabling your firewall (and then re-enabling it after testing) can help determine if it’s the cause.
Alternative Approach: Using the Command Prompt for Advanced Connectivity
For those comfortable with the command line, the Command Prompt offers an alternative method for connecting to hidden networks, providing more granular control and troubleshooting capabilities. This method can be particularly useful if the Graphical User Interface (GUI) method encounters any errors.
Opening the Command Prompt: Click the Start button, type "cmd" in the search box, and press Enter. This will open the Command Prompt window. Run it as an administrator by right-clicking on the "cmd" result and selecting "Run as administrator."
Initiating the Connection Profile: Enter the following command, replacing the bracketed placeholders with the actual network details:
netsh wlan add profile filename="<profile name>.xml" interface="Wi-Fi"\
.xml: This is the name of the XML file where the network settings will be stored. Choose a descriptive and recognizable name.interface = Wi-Fi: This assumes your wireless network card is called "Wi-Fi". You can verify via "netsh wlan show interface."
Press Enter to proceed.
Modifying the XML File (Crucial Step): It is essential to manually create and edit an XML file containing the network configuration data. This can be accomplished using a text editor like Notepad. Create a new file named
<profile name>.xml. Paste the following XML template into the file and replace the bracketed placeholders with the appropriate information:<?xml version="1.0"?> <WLANProfile xmlns="http://www.microsoft.com/networking/WLAN/profile/v1"> <name><Network Name (SSID)> </name> <SSIDConfig> <SSID> <name><Network Name (SSID)></name> </SSID> <hidden>true</hidden> </SSIDConfig> <connectionType>ESS</connectionType> <connectionMode>manual</connectionMode> <MSM> <security> <authEncryption> <authentication><Authentication Method></authentication> <encryption><Encryption Method></encryption> <sharedKey> <keyType>passPhrase</keyType> <protected>false</protected> <keyMaterial><Security Key/Passphrase></keyMaterial> </sharedKey> <keyIndex>1</keyIndex> </authEncryption> </security> </MSM> </WLANProfile>- \
: Replace this with the exact SSID of the hidden network. : Replace this with the authentication method being used, such as WPA2PSK, WPAPSK, or open.: Replace this with the encryption method being used, such as AES or TKIP.: Replace this with the actual security key.
Save the XML file. This is the configuration file that Windows will use.
- \
Importing and Connecting Using the Command Prompt: Now that you have created the necessary profile, return to the Command Prompt. Using the command line:
Enter the following command, replacing the bracketed placeholder with the actual XML file name:
netsh wlan add profile filename="<profile name>.xml" interface="Wi-Fi"- \
.xml: This is the name of the XML file the configurations came from. Replace the placeholder with the name of the XML for your particular network.
Press Enter.
- \
Activating the Profile: Once the profile is added, connect using the command:
netsh wlan connect name="<Network Name (SSID)>" ssid="<Network Name (SSID)>" interface="Wi-Fi"- \
: Replace this with the SSID of the hidden network.
This will attempt to connect to the hidden network.
- \
Monitoring Connection Status: You can use the following command to view the connection status:
netsh wlan show interfaceThis command displays detailed information about your wireless connection, including the SSID, signal strength, and connection status.
Best Practices: Ensuring a Secure and Reliable Connection
While successfully connecting to a WiFi network is a significant accomplishment, it must be done securely. Here are some recommendations.
- Prioritize Strong Passwords: Always use strong, complex passwords that are difficult to guess. Combine upper and lower case letters, numbers, and special characters.
- Update Your Router Firmware: Keep your router's firmware up to date to patch security vulnerabilities
