how to transmit wifi to a laptop from laptop

Title: Transfer Files Between Two Laptops over Wi-Fi
Channel: Techy Druid
Transfer Files Between Two Laptops over Wi-Fi by Techy Druid
how to share wifi from laptop to laptop, how to transfer wifi from laptop to laptop, how to transfer files from laptop to laptop wirelessly, can you share wifi from laptop to pc, how to transfer files from laptop to laptop using wifi
Laptop to Laptop WiFi: The SHOCKINGLY Easy Trick You NEED!
Unlocking Wireless Wonders: The Secret Laptop-to-Laptop WiFi Connection You Didn't Know You Needed!
Ever felt stranded in a digital desert, miles from an internet oasis? Let’s face it, we all have. Imagine needing to transfer crucial files, share a presentation, or maybe just stream a movie, but the Wi-Fi is AWOL. Frustrating, right? Well, prepare to be amazed. Because tucked away in the digital ether is a deceptively simple trick. It unlocks a direct, laptop-to-laptop Wi-Fi connection that’s easier than you think. You’ll be astounded at how easy it is. Consider this your rescue kit for those connectivity emergencies.
Bypassing the Bottleneck: Direct WiFi – A Game Changer
Traditional methods often rely on routers and hotspots. But these can be unreliable. They can also be inconvenient. Instead, with a direct Wi-Fi connection, you bypass this entire setup. You create your own personal, wireless network. Think of it as a digital umbilical cord, connecting two machines directly. This eliminates dependence on external infrastructure. Consequently, you gain speed and control. This method truly redefines file sharing.
The Setup Symphony: Orchestrating the Connection
Getting started is genuinely a breeze. First, you’ll need your two laptops. Ensure both have Wi-Fi capabilities. The procedure is nearly identical on both Windows and macOS. So, don't worry about operating systems.
Windows Warriors: Head to your control panel first. Then, seek out "Network and Sharing Center". Next, select “Set up a new connection or network.” Choose “Set up a wireless ad hoc network.” Follow the prompts to create a network name and security key. Keep this key secure. This step is critical, so pay close attention.
macOS Mavericks: Click the Wi-Fi icon in your menu bar. Then, pick "Create Network." Give your network a name. Also, specify a channel. Choose a password. Because security is essential, never skip this step.
Once the network is established, the next step is the same for both systems. Find and connect to the newly created network on the second laptop. Input the security key when prompted.
The Dance of Data: Transferring Files with Flair
Once the connection is established, it's time to tango with data. Data transfer is now incredibly straightforward.
Windows Wonders: Locate the files you wish to transfer. Right-click on them. Select "Share." Choose your laptop from the network list. Make sure file sharing is enabled. If it's not, the connection won't work.
macOS Mavericks: Select the files or folders. Then, click "Share". Select "AirDrop". Ensure AirDrop is enabled for "Everyone" or "Contacts only". The process is seamless.
Your files now begin their journey across the digital divide. The speed will generally be much faster than a standard Wi-Fi connection.
Troubleshooting Triumphs: Conquering Connection Challenges
Even with the best intentions, problems may arise. Don’t worry, these are typically easily addressed.
Visibility Variance: Ensure both laptops are within range. A good rule of thumb is 30-50 feet, but this can vary. Also confirm that Wi-Fi is enabled on both machines.
Firewall Funk: Firewalls sometimes block connections. Temporarily disable your firewall during the connection. After testing, you can re-enable it. Remember to configure your firewall settings again.
Password Puzzles: Double-check your security key. It is case-sensitive. A simple typo can kill the connection. Be precise with the password.
Driver Dilemmas: Outdated drivers could cause issues. Update your network adapter drivers. This step often resolves many problems.
Beyond the Basics: Unleashing the Full Potential
This direct connection isn’t just for file transfers. Hence it has many uses. Consider remote screen sharing. Or, you can even play games locally. The possibilities are extensive. Explore different software options. Experiment with these advanced features. You will uncover new levels of efficiency.
The Grand Finale: Embracing the Wireless Revolution
In conclusion, this laptop-to-laptop Wi-Fi trick is a must-know. It offers unparalleled convenience and control. It is perfect for those emergency situations. With just a few simple steps, you can transform your laptops into a robust sharing environment. You are no longer at the mercy of public Wi-Fi. Now, you are empowered. So, embrace this essential technique. You will be amazed. You'll be prepared for any connectivity challenge. So, go forth and conquer the wireless world. Ultimately, you'll be glad you did.
Is Your WiFi Killing Your Laptop Battery? (Shocking Truth!)Laptop to Laptop WiFi: The SHOCKINGLY Easy Trick You NEED!
Hey there, fellow tech enthusiasts! Let's be honest, we've all been there. You need to transfer a massive file, share a crucial presentation, or just get something off your old laptop onto your shiny new one. And what do you get? The dreaded, time-consuming dance of USB drives, frustrating cloud uploads, or even worse, tangled Ethernet cables. Forget all that! We’re about to break down a ridiculously simple trick that lets you connect laptops wirelessly, directly, using the power of WiFi. It’s so easy, it’s practically magic.
1. The Problem: The Wired World is Holding You Back!
Remember dial-up? Okay, maybe not. But the point is, using physical connections for file transfers is, well, quaint. It's like trying to send a telegram when everyone else is video conferencing. We live in a wireless world! We stream movies, download games, and work from anywhere. Why should transferring files between your own laptops be so ridiculously complicated? We have to be smarter, right? I remember the last time I tried to use a USB drive for a large video file. I swear, it took longer to load the video onto the drive than it did to watch the darn thing! This old-school method isn't just inconvenient; it can also be slow, prone to errors, and, quite frankly, a pain in the rear.
2. Enter the Hero: Laptop-to-Laptop WiFi - No Internet Needed!
Here's the beauty of this trick: you don't need an active internet connection. Think of it like creating your own private, secure WiFi network just for your two laptops. It's like having your own personal data highway, bypassing all the traffic and congestion of the regular internet. Instead of uploading files to the cloud and then downloading them on the other laptop, you're cutting out the middleman. It’s direct, fast, and incredibly satisfying. It’s like having a secret handshake for your laptops.
3. What You'll Need (Spoiler: Not Much!)
The beauty of this process? You literally only need two things (besides, you know, the laptops):
- Two Laptops: Obviously. Running Windows 10 or later (or macOS – we'll cover that too!).
- A Little Patience: The initial setup takes a few minutes (tops!). But trust us, the payoff is HUGE.
4. Windows Warriors: The Step-by-Step Breakdown
Alright, Windows users, let's get down to business. This is where the magic happens!
- Step 1: Accessing the Network and Sharing Center: Search for "Network and Sharing Center" in your Windows search bar. Click on it. It’s like the control panel for your network settings.
- Step 2: Setting up the Connection: Click on “Set up a new connection or network.” This is the gateway to our direct connection.
- Step 3: Create an Ad-hoc Network: You'll be prompted with a few options. Choose "Set up a wireless ad hoc (computer-to-computer) network." Think of "ad-hoc" as your own little private party for your laptops.
- Step 4: Name That Network & Add Security: Give your network a unique name (e.g., "MyLaptopTransfer") and choose a security option. WPA2-Personal is generally the most secure and simple. Create a memorable password. This ensures only you can access this private network.
- Step 5: Sharing is Caring (and Necessary): Go to the "Network and Sharing Center" again. Click on “Change advanced sharing settings.” Ensure “Turn on network discovery” and "Turn on file and printer sharing" are enabled. This allows your laptops to see each other.
- Step 6: Connect the Second Laptop: On your second laptop, go to your WiFi settings and connect to the network you just created ("MyLaptopTransfer" or whatever you named it) using the password.
- Step 7: Sharing Folders (The Big Moment): On the laptop containing the files you want to share, right-click the folder you want to share. Select "Give access to" > "Specific people." Choose "Everyone" and click "Share." This makes the folder accessible to the other laptop.
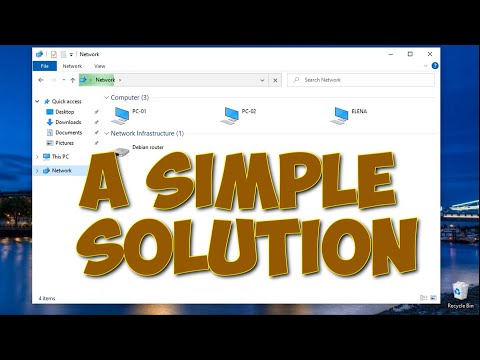
- Step 8: Access the Shared Folder: On the second laptop, open File Explorer. In the left-hand pane, you should see your first laptop under "Network" or "This PC." Click on it, and you should see the shared folder. Magic, right?
5. macOS Mavericks: The Apple Approach
Don't worry, Mac users, we haven't forgotten about you! Setting up laptop-to-laptop WiFi on a Mac is just as straightforward.
- Step 1: Open System Preferences: Click the Apple icon in the top-left corner of your screen and select "System Preferences."
- Step 2: Select Network: Click on "Network."
- Step 3: Create the Network: In the left-hand pane, choose "Wi-Fi," then click the "Advanced" button. In the "Preferred Networks" tab, click the "+" button to add a network.
- Step 4: Configure the Network: Give this network a name and choose a security type (WPA2 Personal is your best bet). Set up a password.
- Step 5: Enable File Sharing: Under System Preferences, click on "Sharing." Check the "File Sharing" option. You may need to click "+" under "Shared Folders" and add whatever folder(s) you want to share.
- Step 6: Connect the Second Laptop: On your second Mac, locate the ad-hoc network you created in Wi-Fi settings. Then you need to enter in your password.
- Step 7: Access the Shared Folder: On the second Mac, select your connected desktop and click "Connect as…" and type in your username and password. This will enable the desktop to share information with the other computer.
6. The "Why Didn't I Know This Sooner?" Moment!
Once you’ve experienced the speed and ease of this direct connection, you’ll wonder how you ever lived without it. No more waiting! No more frustration! Just pure, unadulterated data transfer bliss. It's like upgrading from a horse-drawn carriage to a sports car.
7. Speed Demons: How Fast Can You Go? Is It Really Faster?
The speed of your transfer will depend on your laptop's WiFi capabilities, but generally, laptop-to-laptop WiFi is significantly faster than using a USB drive (especially older ones). You're often looking at speeds in the megabytes per second range easily, making it perfect for large files. It's like watching a movie stream in super high quality, while the other methods are like watching with constant buffering.
8. Security First: Keeping Your Data Safe
While this setup is straightforward, always be mindful of security. Use a strong password for your ad-hoc network. Don’t share sensitive files on a public network. Think of it as the digital equivalent of locking your front door.
9. Troubleshooting Time: When Things Don't Go as Planned
Even the best tech can have hiccups. Here are some quick fixes if you run into trouble:
- Check Your Firewalls: Make sure your firewalls on both laptops aren't blocking the connection. You may need to temporarily disable them or create an exception.
- Double-Check the Password: It’s easy to mess up a password! Make sure you're entering the correct password for the ad-hoc network.
- Make Sure Sharing is Enabled: Go back and re-check your sharing settings on both laptops. This is where most problems originate.
- Restart Both Laptops: Sometimes, a simple reboot is all it takes to get things working smoothly.
- Update Your Network Drivers: Outdated drivers can cause all sorts of issues. Make sure your WiFi drivers are up to date on both laptops.
10. The Versatility of This Hack: Beyond Simple File Transfers
This isn't just for moving files. Think of the possibilities! You can:
- Stream Media: Play videos or music from one laptop to another.
- Share a Printer: Connect a printer to one laptop and share it with the other (if the printer supports it).
- Transfer Pictures: Quickly move photos and videos from one device to another, perfect for editing or backup.
- Collaborate on Projects: Share files and work on projects together, even when you're not connected to the internet.
11. Taking It Further: Advanced Tweaks and Optimizations
Want to dial things up even more?
- Use the 5 GHz Band: If your laptops support it, use the 5 GHz WiFi band for faster transfer speeds.
- Consider an Ethernet Adapter: If you have Ethernet ports on both laptops, consider using an Ethernet cable for even faster speeds.
- Explore Third-Party Software: There are also some paid software options that can simplify the process, but it’s usually not necessary. This basic method is more than sufficient.
12. The Benefits: Time Saved, Frustration Eliminated, and More!
This simple trick
Directional WiFi Antenna: Laptop's Secret Weapon for Blazing-Fast Internet!How to make any Windows computer or laptop as WiFi Repeater or WiFi Extender

By UniqueTutorials How to make any Windows computer or laptop as WiFi Repeater or WiFi Extender by UniqueTutorials
How to set up network sharing in Windows 10 and share files, folders between computers.Easily
By ipMalik How to set up network sharing in Windows 10 and share files, folders between computers.Easily by ipMalik
Help Desktop connect Wi-Fi via Laptop NETVN

By NETVN82 Help Desktop connect Wi-Fi via Laptop NETVN by NETVN82

Title: How to transfer files from PC to PC using WiFi Windows 10 7 8
Channel: IT Magics
How to transfer files from PC to PC using WiFi Windows 10 7 8 by IT Magics
Laptop Working
Laptop to Laptop WiFi: The SHOCKINGLY Easy Trick You NEED!
Unveiling the Secret: Direct Laptop to Laptop WiFi Mastery
Are you tired of being tethered to your home network or public Wi-Fi hotspots? Do you crave the freedom to transfer files, share presentations, or collaborate on projects directly between your laptops, regardless of internet accessibility? We understand your frustration! The ability to create a secure and direct WiFi connection between two laptops is a game-changer, opening up a world of possibilities, from emergency file transfers to seamless collaborative work sessions. Forget the hassle of external drives and email attachments; we are diving headfirst into the simple yet powerful trick you need, a solution so straightforward you'll wonder why you didn't discover it sooner. This guide will equip you with the knowledge and confidence to establish a laptop-to-laptop WiFi connection in mere minutes, empowering you to take control of your data transfer needs.
The Core Concept: Ad-Hoc Networking Unmasked
The magic behind this remarkably easy trick lies in ad-hoc networking. In essence, ad-hoc mode allows your laptops to communicate directly with each other, bypassing the need for a centralized router. One laptop effectively acts as a miniature wireless access point, broadcasting a signal that the second laptop can then connect to. This creates a private, localized network, ideal for data transfer and collaboration. Think of it as a personal, on-demand Wi-Fi hotspot connecting only your devices. Ad-hoc networking is universally supported by modern laptops, making it a readily available solution for nearly every user. The best part? There is no need to install any specialized software.
Windows: Your Step-by-Step Ad-Hoc Guide
For Windows users, establishing a direct laptop-to-laptop WiFi connection is remarkably simple. Let's break down the process:
Initiate the Ad-Hoc Network: Begin by navigating to your Network and Sharing Center. You can typically access this by right-clicking the Network icon in your system tray (usually in the bottom-right corner of your screen) and selecting "Open Network and Sharing Center." Alternatively, you can search for it in the Windows search bar.
Create a New Connection Manually: Within the Network and Sharing Center, click on "Set up a new connection or network." Choose the option "Set up a wireless ad hoc (computer-to-computer) network." Click "Next."
Network Configuration: The Crucial Details: A window will appear, prompting you to configure your ad-hoc network. Here's where you'll define your network's identity:
- Network Name: Choose a unique and memorable name for your network. This is the name that will appear on other devices when they search for available Wi-Fi networks. (e.g., ProjectNexus, LaptopLink).
- Security Type: Select "WPA2-Personal" or "WPA2" for the best security. Never select “WEP” as it is not secure. We recommend utilizing WPA2-Personal.
- Security Key: Create a strong password (at least 8 characters, ideally incorporating a mix of uppercase and lowercase letters, numbers, and symbols) to protect your network from unauthorized access.
- Save the Settings: Click "Next" to finalize your configuration. Windows will then start setting up your ad-hoc network.
Enabling the Network: Now that your ad-hoc network is configured, you’ll need to enable the connection. Go to "Change adapter settings" within the Network and Sharing Center. You should now see your newly created ad-hoc network listed among your available network adapters. Right-click on it and choose the "Enable" option. You may also see an option that says "Start the connection" or something similar that you should also click on.
Connecting the Second Laptop: On the second laptop, locate the Wi-Fi icon in the system tray (bottom right corner). Scan for available Wi-Fi networks. Your ad-hoc network, bearing the name you chose in Step 3, should appear in the list. Select it and enter the security key (password) you set during the first laptop's setup.
Troubleshooting Common Windows Hurdles
Encountering a few minor hiccups along the way is completely normal. Here's how to tackle some common Windows-related challenges:
"Unable to Connect" Errors: Double-check that you've entered the correct security key on the second laptop. Ensure that both laptops are within a reasonable range of each other (typically 10-30 meters, depending on the environment). If you still cannot connect, try restarting both laptops.
Network Not Appearing: Verify that the ad-hoc network has been enabled on the first laptop. Additionally, confirm that your network adapter drivers are up to date. You can update your drivers through Device Manager.
Limited Connectivity: This message typically indicates that your laptops haven't been assigned IP addresses. This is a common occurrence and is easily fixed.
- On the first laptop: Right-click your ad-hoc network adapter in "Network Connections", select "Properties", and then double-click "Internet Protocol Version 4 (TCP/IPv4)".
- Select: "Use the following IP address" and then manually enter an IP address (e.g., 192.168.1.1) and a subnet mask (e.g., 255.255.255.0).
- On the second laptop Repeat this process, and assign the IP address 192.168.1.2. The subnet mask should be the same. Save the settings. This will allow your devices to communicate.
macOS: Crafting Your Laptop-to-Laptop Connection
Mac users: The process is just as straightforward, if not even easier.
Access the Wi-Fi Menu: Click the Wi-Fi icon in the top-right corner of your screen (in the menu bar).
Create Network: Hold down the Option key on your keyboard and click the Wi-Fi icon again. You will see the option “Create Network.”
Network Configuration: The "Create Network" settings will appear. Here, select the network name, channel and security settings.
- Network Name: Just as with Windows, choose a distinctive name for your ad-hoc network.
- Channel: Leave this on auto.
- Security: Select WPA2 Personal and a strong password to protect your network.
Connect the Second Mac: On the second Mac, click the Wi-Fi icon and select the ad-hoc network you just created. Enter the password when prompted.
macOS Troubleshooting Tips
Network Visibility: If the network does not appear, ensure that the first Mac's Wi-Fi adapter is enabled and that it hasn't been accidentally turned off. Restarting both Macs can often remedy this.
File Sharing Permissions: If you can connect to the network but can't share files, double-check your file-sharing settings in System Preferences (System Settings in newer macOS versions). Ensure that file sharing is enabled and that the appropriate folders/disks are shared with the other Mac.
Firewall Interference: On rare occasions, the macOS firewall might be blocking the connection. Check your firewall settings in System Preferences/System Settings to ensure that "File Sharing" is allowed.
Sharing Data: Transferring Files and Collaboration
Now that your laptops are connected, the true power of this direct WiFi connection begins to shine! Here are a few common ways to share data, streamlining your workflow:
File Transfer through File Explorer/Finder: Access the shared folders on the destination computer through your local file explorer. Simply drag and drop the files and folders you wish to share onto the shared folders. This is a basic method that works on both Windows and Mac.
Direct Folder Sharing (Windows): Right-click on any folder on your first laptop. Select “Properties,” go to the “Sharing” tab, and select “Share.” You can then specify which users or devices on your network can access the folder. Then, on your second laptop, go to the Network section of File Explorer to find the computer and access the shared folder.
Network Browsing (Mac): Enable file sharing in System Preferences/System Settings. On the second Mac, open Finder and navigate to the "Network" section. The first Mac should appear. From there, you can access shared folders and files.
Utilizing Cloud Storage: Consider creating a dedicated folder, linked to a cloud storage service (Google Drive, Dropbox, OneDrive, etc.) on both laptops. This provides a real-time, synchronised collaboration experience.
Remote Desktop Software: Consider installing remote desktop software, allowing you to control one laptop from the other. This is useful to access applications.
Security Considerations: Protecting Your Data
While ad-hoc networking offers convenience, it's crucial to prioritize security.
Strong Passwords: Always use a strong, unique password for your ad-hoc network. Avoid easily guessable passwords such as simple words or dates.
Network Encryption: Ensure you're using WPA2-Personal encryption. Never use WEP, as it's easily cracked.
Limit Access: Be mindful of what you share. Use file-sharing permissions to restrict access to only
