compartir wifi desde mi laptop windows 8

Title: Compartir internet desde tu pc sin programas en windows 8, 8.1 y 10
Channel: TecTok 32
Compartir internet desde tu pc sin programas en windows 8, 8.1 y 10 by TecTok 32
como compartir wifi desde mi laptop windows 8
Unlock Your WiFi: Secret Windows 8 Laptop Hotspot Trick!
Unleash Your Inner WiFi Wizard: Turning Your Windows 8 Laptop into a Secret Hotspot!
Ever craved a personal WiFi portal, conjured from the very fabric of your Windows 8 laptop? Perhaps you're stranded without a reliable internet connection for your other devices. Or maybe you're just a tech enthusiast, eager to tap into a hidden world of connectivity. Well, buckle up, because you're about to discover a secret weapon. This isn't just about sharing your internet. It's about empowering yourself with a portable WiFi solution. It grants you control over your digital destiny. This is your chance to become a WiFi wizard!
The Genesis of the Hotspot: A Digital Backstory
Before delving into the how-to, let's briefly touch on the why. Imagine a scenario: You're traveling, and a stable WiFi signal feels like a distant dream. You need to get online. Your tablet, your phone, even your smart watch are begging for connectivity. Suddenly, a lightbulb flickers: your trusty Windows 8 laptop! It's your gateway. Initially, creating a mobile hotspot felt impossible. Yet, buried within your operating system is a hidden power. It's a capability designed to bridge the gap between devices. It's the gift of a personal access point.
Unveiling the Secret: Setting Up Your Virtual Hotspot
Now, let's bring the magic to life. The steps are surprisingly straightforward, and the rewards are substantial. Therefore, prepare to transform your laptop into a WiFi broadcaster. First, consider the command prompt your magic wand. Open it by searching “cmd” in your Windows 8 search bar. Right-click on the “Command Prompt” option and select "Run as administrator." This grants you the necessary authority to make network adjustments.
Next, type the following magical incantation, word for word: "netsh wlan set hostednetwork mode=allow ssid=[YourHotspotName] key=[YourPassword]". Replace “[YourHotspotName]” with a name you'll remember. Substitute “[YourPassword]” with a secure password, something complex, something unique. Then hit enter. You've just told your computer the basic parameters. This command will create an SSID (Service Set Identifier) and a password.
Now, activate the portal. Type "netsh wlan start hostednetwork" and press Enter. This command initiates the hosted network. If all goes well, your laptop is now broadcasting a WiFi signal. Nevertheless, there's one more crucial step.
Sharing the Internet: The Crucial Connection
Your hotspot is live, but it isn't sharing your internet just yet. Consequently, you must enable Internet Connection Sharing (ICS). Return to your network connections. You can find this in the Control Panel. Right-click on your active internet connection. Then, select "Properties." Navigate to the "Sharing" tab. Check the box that says, "Allow other network users to connect through this computer’s Internet connection." Then select your hosted network from the dropdown menu. Click "OK".
Finally, your hotspot is ready. Your other devices can now connect.
Troubleshooting Triumph: Conquering Common Challenges
Occasionally, you might encounter some bumps along the road. Don't worry. Troubleshooting is part of the adventure. Firstly, if the hosted network fails to start, double-check your command prompt. Make certain you ran it as an administrator. Moreover, verify the spelling of your commands. Even a small typo can disrupt the incantation.
Secondly, if devices connect but lack internet access, revisit the ICS settings. Confirm you’ve chosen the correct hosted network. Ensure your primary connection is also active and functioning.
Thirdly, consider your network adapter drivers. Outdated drivers sometimes cause connectivity hiccups. To fix this, access Device Manager and update your network adapter drivers.
Beyond the Basics: Advanced Adventures in WiFi
Once you've mastered the basics, you can explore advanced settings. Experiment with different security protocols, like WPA2-PSK. This ensures strong encryption. Also, consider the limitations of your hardware. Older WiFi adapters might not support the latest standards.
Furthermore, regularly monitor your hotspot’s performance. Check your data usage. Close any unnecessary applications. These actions will optimize your connection speed.
The Finale: Embracing the Digital Freedom
You now possess a powerful tool. You've learned a secret, a hidden capability within your Windows 8 laptop. Therefore, you can now establish your own WiFi network, even without a dedicated router. You've unlocked the potential within your machine. You can now readily share your internet connection with ease.
This tip is for personal use and educational purposes only. So, use your new knowledge wisely. Enjoy the freedom of a personalized WiFi experience. Go forth, and spread the connectivity!
Toshiba Satellite Wi-Fi Antenna Install: SHOCKINGLY Easy Guide!Unlock Your WiFi: Secret Windows 8 Laptop Hotspot Trick!
Hey tech adventurers! Ever been stuck in a Wi-Fi wasteland, craving that sweet, sweet internet connection? We’ve all been there, right? Trying to tether your phone, only to have it overheat faster than a popcorn kernel in a microwave? Well, breathe easy, because today, we’re diving headfirst into a super-secret, yet surprisingly simple, trick to turn your Windows 8 laptop into a blazing-fast Wi-Fi hotspot. Forget those clunky third-party apps and confusing setups. This is the real deal, a hidden gem nestled right inside your operating system. Think of it as unlocking a secret level in your favorite video game! Buckle up, buttercups, because we're about to embark on a journey to internet freedom!
1. The Wi-Fi Wilderness: Why a Windows 8 Hotspot Matters
Let's be honest, technology can be a fickle friend. There are countless scenarios when a personal hotspot is a lifesaver. Picture this: You're on a train, desperately trying to finish that important presentation, or you're at a hotel with terrible Wi-Fi (which, let's face it, is practically the norm). Maybe your kids are squabbling over the single Wi-Fi connection at a family gathering. In these situations, a laptop hotspot is like having a portable internet oasis. Windows 8, despite its sometimes-controversial reputation, actually houses a surprisingly efficient way to create your own Wi-Fi hotspot. It's like having your own personal Wi-Fi router in your pocket… or, well, on your lap!
2. Unveiling the Secret: The Hosted Network Command
The magic lies within the command prompt. Don't worry; this isn't some complicated coding exercise. It's more like whispering a secret password to unlock the door to Wi-Fi nirvana. We’re going to use a simple command to initiate the hosted network feature, which effectively turns your laptop's Wi-Fi adapter into a Wi-Fi access point. Picture it like this: your laptop is the radio station, and your other devices are the listeners tuning in.
3. Step-by-Step: Activating Your Hidden Hotspot
Ready to roll up your sleeves? Here's the step-by-step guide to setting up your Windows 8 hotspot. It's easier than assembling IKEA furniture (and hopefully less frustrating!).
Step 1: Open the Command Prompt (as Administrator). You can find it by searching for "cmd" in the Windows search bar. Then, right-click on "Command Prompt" and select "Run as administrator." This is crucial; otherwise, the magic won't happen.
Step 2: The Secret Command. Type the following command and hit Enter:
netsh wlan set hostednetwork mode=allow ssid=YourHotspotName key=YourPasswordssid=YourHotspotName: Replace "YourHotspotName" with the name you want your Wi-Fi network to have. Be creative!key=YourPassword: Replace "YourPassword" with a robust password. Think eight characters or more, incorporating numbers, letters, and symbols. Security first!
Step 3: Start the Hosted Network. Now, type this command and hit Enter:
netsh wlan start hostednetworkStep 4: Sharing Your Internet Connection. This is the final, crucial step. Go to the Network and Sharing Center (you can find it in the Control Panel, or search for it in the Windows search bar). Click on “Change adapter settings.”
- Identify your primary internet connection (the one your laptop uses to connect to the internet). Right-click on it and select "Properties".
- Go to the "Sharing" tab. Check the box that says "Allow other network users to connect through this computer's Internet connection."
- From the "Home network connection" dropdown, select the "Microsoft Hosted Network Virtual Adapter" (it will have a name similar to "Local Area Connection number").
- Click "OK."
You’re done! Now, you can connect your other devices to the Wi-Fi network you just created.
4. Troubleshooting Troubles: Common Hiccups and Quick Fixes
Sometimes, things don't go as planned. Don't panic! Here are some common issues and how to fix them:
Problem: "The hosted network couldn't be started."
- Solution: Make sure your Wi-Fi adapter is enabled. Also, check to ensure that the driver for your wireless adapter is up to date. Sometimes, a simple restart can work wonders.
Problem: "Can't connect to the hotspot."
- Solution: Double-check your password. Ensure that your device is within range of your laptop. Check that internet connection sharing is enabled.
Problem: Slow internet speeds.
- Solution: The speed of your hotspot will depend on the speed of your primary internet connection. Also, the more devices connected, the slower it becomes.
5. Customizing Your Hotspot Experience
Let's personalize your Wi-Fi haven! You can change your hotspot name and password whenever you want by repeating the steps in the setup. This is like giving your Wi-Fi a new wardrobe! To stop your hotspot, use the command netsh wlan stop hostednetwork.
6. Unleashing the Power of the Command Prompt
The command prompt might seem intimidating, but once you get the hang of it, it's incredibly powerful. It’s like having a backstage pass to the inner workings of your computer. You can use it for all sorts of things, from troubleshooting network issues to automating routine tasks. It's a rabbit hole of techy goodness.
7. Beyond the Basics: Advanced Wi-Fi Tinkering
Want to take your Wi-Fi game to the next level? Consider these advanced tips:
- Check Driver Updates: Keep your Wi-Fi adapter drivers up to date for optimal performance.
- Channel Selection: If you experience interference, experiment with different Wi-Fi channels in your router settings (if your primary internet connection is through Wi-Fi).
- Range Extenders: If your hotspot's range is limited, consider using a Wi-Fi range extender to boost the signal.
8. Security First: Protecting Your Hotspot
Security is paramount. Your hotspot is like a welcome mat for the internet, so you want to be sure you only let people in whom you trust.
- Strong Passwords: Always use a strong and unique password for your hotspot.
- Encryption: Ensure that your hotspot uses WPA2 or WPA3 encryption.
- Monitor Connections: Regularly check which devices are connected to your hotspot.
9. Battery Life Blues: Conserving Power
Running a hotspot can drain your laptop's battery. Here are a few tips to conserve power:
- Dim the Screen: Lower your screen brightness.
- Unplug Unnecessary Devices: Disconnect any devices you don’t need.
- Power Saving Mode: Enable your laptop's power-saving mode.
10. When to Embrace Your Hotspot Heroics
Now, let’s think like MacGyver. When is this little trick most useful?
- Travel: Always a winner for those hotel rooms or airport lounges with spotty Wi-Fi.
- Remote Work: Need internet when you are working outside the office? Perfect!
- Sharing with Friends: Sharing the love of Wi-Fi has never been this easy!
- Testing Devices: Perfect for testing a new gadget or device.
11. Windows 8's Legacy: Still Relevant?
Windows 8 might not be the newest kid on the block (we’re looking at you, Windows 10 and 11!), but it still has a lot of life left in it, especially for this nifty Wi-Fi trick. If you're still rocking Windows 8, there's no need to feel like you're stuck in the past. This hotspot trick proves that you can still enjoy modern convenience with older tech.
12. Hotspot Alternatives: Exploring Other Options
While the Windows 8 hotspot trick is fantastic, let's explore a few other options:
- Mobile Hotspots: These are dedicated devices that create a Wi-Fi network using a cellular data connection. Convenient, but they require a separate data plan.
- Tethering (using your phone): Most smartphones have a built-in hotspot feature. This is a quick and easy option, but it can drain your phone's battery and data allowance.
- Third-party Software: While we initially steered clear of these, some third-party apps offer hotspot functionality.
13. Comparing the Choices: Which Hotspot Method is Right for You?
It depends on your needs!
Windows 8 Hotspot: Great for when you have internet access on your laptop. Free, but relies on your existing internet connection. Excellent for those with existing data.
Mobile Hotspot: Best for when you need internet on the go and don't have access to Wi-Fi. Reliable, but requires a data plan.
Tethering: Convenient for quick use, but
como compartir internet desde tu pc windows 8.1 muy facil
By Samuel 507 como compartir internet desde tu pc windows 8.1 muy facil by Samuel 507
Compartir internet Windows 8, 8.1 y 10 SIN PROGRAMAS
By Samuel Segura Compartir internet Windows 8, 8.1 y 10 SIN PROGRAMAS by Samuel Segura
Crear un punto de acceso Wi-Fi con Windows 8.1 - Compartir internet
By Vivantic Crear un punto de acceso Wi-Fi con Windows 8.1 - Compartir internet by Vivantic

Title: Como compartir internet con windows 8 gratis
Channel: gonzalo sebastian
Como compartir internet con windows 8 gratis by gonzalo sebastian
Wifi Not Found
Unlock Your WiFi: The Windows 8 Laptop Hotspot Advantage
We've all been there: desperately needing internet access, perhaps on the road, in a coffee shop with unreliable Wi-Fi, or simply in a dead zone within our own homes. Wouldn't it be fantastic to transform your Windows 8 laptop into a personal, portable Wi-Fi hotspot, offering a reliable connection anywhere you go? The good news is that the capability is built right into your operating system, waiting to be unlocked. Forget juggling multiple devices and expensive data plans, and learn how to create your own private, secure, and surprisingly efficient Wi-Fi hotspot using the power of Windows 8. This isn't just about sharing your existing internet connection; it is about having complete control over it. This guide will show you how to achieve that.
Setting the Stage: Prerequisites for Hotspot Creation
Before we dive in, let's ensure you have everything you need to get started. First and foremost, you'll require a Windows 8 laptop. This is, naturally, the foundation of our hotspot creation. You'll also need a functional internet connection on your laptop. This could be through Ethernet, a wired connection, or a Wi-Fi connection to another network. The hotspot will, in effect, share this existing connection. Finally, and this is crucial, you'll need a Wi-Fi adapter in your laptop. Most modern laptops have this built-in, but confirm this in your device manager under "Network Adapters". If there is no Wi-Fi adapter, you will not be able to set up a Wi-Fi hotspot from your laptop.
Navigating the Windows 8 Interface: Accessing the Mobile Hotspot Feature
The process involves using a command-line tool to activate a hidden feature. Windows 8 makes the hotspot setup surprisingly easy to execute. To begin, locate the charms bar. This is usually accessed by moving your mouse to the right-hand side of your screen or by pressing the Windows key + C. Select “Search”. Now, in the search bar, you need to type "cmd." Right-click on "cmd" in the search results and select "Run as administrator." This is a critical step, as standard user privileges will not allow the necessary commands to be executed. The command prompt window will appear, ready for your instructions. This is where the magic truly begins.
The Command-Line Symphony: Creating Your Virtual Hotspot
Within the command prompt, you'll be entering a series of commands. These commands are succinct and powerful, but they must be entered precisely. First, we must configure the "hostednetwork." This feature is, in essence, the heart of your hotspot. Type the following command and press Enter:
netsh wlan set hostednetwork mode=allow ssid=YourHotspotName key=YourPassword
Replace "YourHotspotName" with the name you want to give your Wi-Fi hotspot. Choose a name that is easy to remember and that ideally doesn't reveal any unnecessary personal information. Replace "YourPassword" with a strong, secure password. This password is paramount for the security of your hotspot and the data that will traverse it. A robust password is at least 12 characters long, mixing upper and lowercase letters, numbers, and symbols. Keep in mind that the password is case-sensitive. Hit Enter.
Next, we start the hosted network. Type the following command and press Enter:
netsh wlan start hostednetwork
You will receive a confirmation message. Your virtual Wi-Fi adapter is now enabled, and ready to have its connection shared.
Sharing the Connection: Bridging the Gap Between Internet and Hotspot
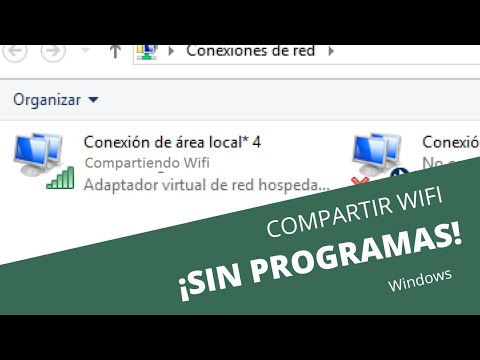
Simply enabling the hosted network doesn't automatically share your existing internet connection. It only creates the network. The next step is to tell your laptop to share its existing internet connection through the hotspot. Go back to the Windows 8 interface. Open the Network and Sharing Center. You can achieve this by searching in the charms bar or by right-clicking on the Wi-Fi icon in your system tray (the bottom right corner of your screen) and selecting "Open Network and Sharing Center."
In the Network and Sharing Center's left panel, select "Change adapter settings". Locate the adapter that provides your internet connection. This will either be the Wi-Fi adapter (if you connect to another Wi-Fi network) or the Ethernet adapter (if you're using a wired connection). Right-click on your internet connection's adapter and select "Properties".
In the properties window, navigate to the "Sharing" tab. Check the box that says, "Allow other network users to connect through this computer's Internet connection." Beneath that, choose the network connection to your hostednetwork from the dropdown menu. There, you should see the name of your hosted network. Click "OK" and close all of the windows.
Connecting Your Devices: Testing and Troubleshooting
With the setup complete, your hotspot is ready. Take your other devices – smartphones, tablets, or other laptops – and scan for available Wi-Fi networks. You should find the name you assigned to your hotspot in the list. Select it and enter the password you created. Your device should now connect to your laptop's Wi-Fi hotspot and, in turn, gain internet access. If, after a few moments, you are still unable to connect, double check the password. Ensure that your laptop is still connected to its original internet source.
Advanced Customization: Fine-Tuning Your Hotspot Parameters
The basic setup is now complete, but there are further steps you can take to optimize and manage your hotspot. You can change the SSID (hotspot name) and password from within the command line, as we learned. Moreover, you can control how long it remains active before the laptop automatically switches off.
To stop the hosted network, use the same command prompt window. Type:
netsh wlan stop hostednetwork
If you wish to temporarily disable the hosted network, you can also do so by disabling the virtual adapter. This is useful if you do not wish to utilize the hotspot for just a short time. To re-enable it, from the command prompt, type the following command:
netsh wlan start hostednetwork
Security Considerations: Protecting Your Data and Privacy
While the Windows 8 hotspot feature is convenient, it is imperative to prioritize security. Always use a strong password. Never share your hotspot password with untrusted individuals. Consider turning on a firewall on your laptop. This will help protect your data from unwanted access. Regularly update your operating system, as updates often include security patches. When you are not using the hotspot, disable the feature entirely. This minimizes the risk of unauthorized access. Always monitor the devices that are connecting to your hotspot, and disconnect any unknown devices.
Troubleshooting Common Issues: Quick Fixes for a Smooth Experience
Even though the setup is generally straightforward, you might occasionally run into problems. Fortunately, many common issues have simple solutions.
- Connection Problems: Ensure that your laptop is connected to the internet. Double-check your password. Restart the hosted network from the command prompt.
- Slow Speeds: The speed of your hotspot depends significantly on the speed of your original internet connection. Ensure you are using a reliable internet service. Consider the number of devices using the hotspot – the more devices, the slower the speed.
- Unexpected Disconnections: Ensure that your laptop is not going into sleep or hibernation mode, as this can disrupt the hotspot. You may need to adjust your power settings for optimal performance.
- "The hosted network couldn't be started": This is one of the more common errors. Ensure that your Wi-Fi adapter drivers are up to date. You might need to restart your laptop. Verify that the dependency services are active.
Beyond Basic Connectivity: Practical Applications for Your Hotspot
The Windows 8 hotspot is far more than just a way to share internet access. It offers a multitude of applications:
- Travel Companion: Create a Wi-Fi network to connect all of your devices while traveling.
- Guest Access: Provide temporary internet access for guests in your home without sharing your private Wi-Fi password.
- File Sharing: Establish a private network for quick and easy file transfers between your devices.
- Gaming on the Go: Enjoy online gaming on your laptop or other devices without the need for a public Wi-Fi network.
- Emergency Backup: In the event of a home internet outage, your laptop's hotspot capabilities, along with mobile data, could keep you and your family connected.
Conclusion: Mastering the Windows 8 Laptop Hotspot
By implementing this simple, command-line-based method, you have gained the ability to create your own personal Wi-Fi hotspot using your Windows 8 laptop. From the initial setup to the more advanced customizations and troubleshooting steps, you now understand how to share an internet connection with multiple devices, all without the need for any additional hardware. Regularly using these steps will allow you to unlock a significant, and often overlooked, feature within your Windows 8 laptop. Enjoy the newfound freedom and flexibility that having a portable Wi-Fi hotspot provides, and always remember to prioritize security. You are now equipped to transform your laptop into a powerful, mobile connectivity solution.
