can dusty laptop vents wifi
Title: DIY Laptop Cleaning
Channel: Salem Techsperts
DIY Laptop Cleaning by Salem Techsperts
Laptop Vents Dusty? WiFi Dying? (Shocking Fix Inside!)
Is Your Tech Tortured? Breathe New Life into Your Laptop & WiFi!
Have you ever felt like your digital life is gasping for air? Perhaps your laptop sounds like a miniature jet engine preparing for takeoff. Or maybe your WiFi signal resembles a phantom, flickering in and out of existence. Well, you're not alone. These issues plague countless tech users. However, the solutions might be simpler than you think. Prepare for some surprising revelations.
The Sneaky Culprit: Dust's Dirty Deeds
Dust, that insidious enemy of all things electronic, is often the silent instigator. It accumulates within your laptop's vents. Consequently, it forms a suffocating blanket. This build-up restricts airflow. The result? Overheating. Your laptop struggles to cool itself. Thus, performance plummets. Furthermore, components can degrade due to the extreme heat.
Think about it: your laptop is a complex ecosystem. Various delicate parts interact. Dust disrupts this balance. Therefore, regular cleaning is crucial. But don’t just grab any old tool.
Unleashing the Cleaning Cavalry: Tools of the Trade
Forget brute force. Delicate handling is key. You’ll need the right arsenal. First, acquire a can of compressed air. This is your primary weapon. Also, secure a microfiber cloth. These are gentle yet effective. Finally, consider a small, anti-static brush. This is perfect for dislodging stubborn dust bunnies.
Now, power down your laptop completely. Unplug the power adapter. This is a safety precaution. Open your laptop’s vents. With the compressed air, direct short bursts. Target the vents and fans. Be patient. Avoid spraying too close, though. You might cause condensation.
Next, use the brush to gently loosen any remaining debris. Then, wipe down the exterior surfaces with the microfiber cloth. This removes fingerprints and grime. Finally, reassemble your laptop. Power it up and observe the difference.
WiFi Woes: Identifying the WiFi Villains
Is your WiFi a persistent source of frustration? You're probably experiencing various symptoms. Slow download speeds, frequent disconnections, and weak signal strength are common complaints. Before you blame your internet provider, look closer. Several culprits could be at play.
First, consider your router's placement. Is it tucked away in a closet? Is there any obstructions? Thick walls and metal objects can cripple your signal. Also, distance matters. The further you are from the router, the weaker the signal becomes.
Furthermore, interference is another factor. Wireless devices like microwaves and cordless phones can also interfere. Think about all the devices you have. Do you really need to have them? Each radio frequency can be considered.
Reviving Your WiFi: A Signal Savior Plan
Now, let's get your WiFi back on track. Start by repositioning your router. Place it in a central location. Ensure you clear any obstructions. Elevate it for better signal propagation.
Next, check your router’s settings. Make sure it's using the latest firmware. Outdated firmware can cause performance issues. Access your router's configuration page. Usually, you can access this by typing the router's IP address into your web browser. Then, look for the firmware update option.
Additionally, channel interference can be managed. Download a WiFi analyzer app. This app will scan for the least crowded channel. Once you’ve identified the optimal channel, adjust your router's settings accordingly.
Still struggling? Reboot your router. This simple step often works wonders. Unplug it for 30 seconds, then plug it back in. Give it a few minutes to reconnect.
Beyond the Basics: Proactive Maintenance
Preventative care is the key to maintaining happy tech. Schedule regular cleaning sessions for your laptop. Consider dusting it every month. Also, check your WiFi signal regularly.
Moreover, keep your software updated. Outdated software can cause performance issues. Update your operating system, drivers, and applications. Ensure they are up to date.
Furthermore, consider investing in a laptop cooling pad. These pads improve airflow, preventing overheating. They're especially helpful if you use your laptop for demanding tasks. Similarly, analyze your WiFi coverage. A range extender may improve signal.
The Ultimate Reward: Enjoying Seamless Tech
By following these steps, you can breathe new life into your tech. You'll experience quicker speeds and fewer frustrations. Your laptop will perform optimally. Your WiFi will be strong and reliable. Therefore, take action. Improve your digital experience.
Laptop WiFi GONE? This FIX Will SHOCK You!Laptop Vents Dusty? WiFi Dying? (Shocking Fix Inside!)
Okay, folks, let's be honest. We've all been there. You're in the middle of something crucial – maybe a deadline at work, a winning streak in your favorite game, or even just a casual binge-watching session – and BAM! Your laptop decides to stage a digital rebellion. The WiFi sputters, the screen freezes, and suddenly, your trusty machine feels like it's running a marathon in a sauna. Sound familiar? I know it does to me! I've wrestled with this laptop gremlin more times than I can count. The culprit is often more mundane than you think: dust. Yes, plain old, ubiquitous, everywhere dust. And the connection between dust and digital disaster? It’s closer than you might believe.
1. The Silent Assassin: Dust & Your Digital Downtime
Think of your laptop as a tiny, high-powered engine packed into a sleek box. Just like a car engine, laptops generate a lot of heat. Now, imagine trying to drive that car across the Sahara Desert with the engine running in a closed room. Disaster, right? That’s where your laptop’s cooling system comes in, and that's where dust rears its ugly head. Dust settles in the vents, clogs the fans, and prevents proper airflow. This leads to overheating, which in turn can cause your laptop to slow down, freeze, and even shut down unexpectedly. This is the silent assassin of your digital life.
2. Unveiling the WiFi Connection: Why a Dusty Laptop Can Kill Your Signal
Now, let's dive into the WiFi woes. You're probably wondering: "What does dust possibly have to do with my internet?" The answer is indirect but crucial. Overheating, caused by dust-clogged vents, can impact everything inside your laptop, including the all-important WiFi card. Imagine the WiFi card as the antenna that receives and transmits those precious internet signals. If it's running too hot, it can become unstable, leading to dropped connections, slow download speeds, and the dreaded buffering wheel of doom. Basically, a dusty laptop is like trying to make a phone call with a bad connection when you're on top of a mountain! The signal's there, you can see it, but it's going to be flaky.
3. Spotting the Symptoms: Is Your Laptop Suffering?
Knowing how to diagnose the problem is the first step in fixing it. Let’s run through some telltale signs your laptop might be suffering from a dusty demise:
- Overheating: Does the bottom of your laptop feel like a hot plate?
- Slow Performance: Is your laptop sluggish, taking ages to start up or load programs?
- Fan Noise: Is the fan constantly whirring loudly, even when you're not doing anything intensive?
- Frequent Freezing: Does your screen freeze randomly, forcing you to restart?
- WiFi Dropouts: Are you experiencing constant WiFi disconnections or slow speeds?
If you answered "yes" to any of these, it’s time to take action! Consider it an urgent call from your laptop's emergency signal.
4. The Dust-Busting Arsenal: Tools You'll Need
Don't worry, you don't need a Ph.D. in computer science to tackle this. You'll need a few simple tools. Think of them as your digital cleaning brigade. Grab these when you're ready to start the cleaning process:
- Canned Air: This is your primary weapon against dust, a blast of air to dislodge debris. Make sure you have plenty!
- Microfiber Cloth: For wiping down surfaces and gently cleaning the screen.
- Small Screwdriver Set (Optional): If you’re comfortable disassembling the laptop a little (check your device’s manual first!), these are invaluable.
- A Well-lit Workspace: So you can see what you're doing!
5. The Grand Cleaning Operation: Step-by-Step Guide
Now for the fun part – the cleaning! Follow these steps carefully, and your laptop will thank you (and so will your WiFi).
- Power Down and Unplug: This is crucial for safety. Make sure your laptop is completely shut down and unplugged from the power source.
- External Cleaning: Use your microfiber cloth to wipe down the exterior of your laptop, including the screen and keyboard.
- Venting Inspection: Locate the vents (usually on the sides or bottom of the laptop). This is where the dust loves to hide.
- The Canned Air Assault: Aim the nozzle of the canned air into the vents and blast away! Use short bursts, moving the nozzle back and forth to dislodge dust.
- Keyboard Cleaning: Turn your laptop upside down and gently shake it to remove loose debris. You can use canned air to blast between the keys as well.
- Internal Cleaning (Advanced): This step is optional and depends on your comfort level. If you're comfortable, carefully open the laptop’s case (consulting your manual!). Use canned air to clean the fan and other internal components. Be extremely gentle!
- Reassembly: Once you're done cleaning, carefully reassemble the laptop if you've taken it apart.
6. Beyond the Basics: Preventive Measures
Cleaning your laptop isn’t a one-time fix, folks. Like any good relationship, it requires regular maintenance.
- Regular Cleaning: Aim to clean your laptop’s vents every few months, or more frequently if you live in a dusty environment.
- Surface Protection: Keep your laptop away from dusty surfaces and avoid eating or drinking near it.
- Elevate Your Laptop: Consider using a laptop stand or a cooling pad to improve airflow. It is a great way to allow more air to pass through your device.
7. Common Mistakes to Avoid: The Don'ts of Dust-Busting
Let's prevent any accidental harm! There are a few things not to do.
- Don't Use a Vacuum Cleaner: This can generate static electricity, which can damage internal components.
- Don't Use Liquids: Never use water or other liquids to clean the interior of your laptop.
- Don't Force Anything: If something feels stuck, don't force it. Consult your laptop’s manual or seek professional help.
8. Troubleshooting WiFi Woes: Beyond the Dust
Even after cleaning, your WiFi might still be a little temperamental. Here’s some additional troubleshooting.
- Restart Your Router: This is the tech support equivalent of "did you turn it off and on again", but it works surprisingly often.
- Check Your Internet Speed: Run a speed test to see if the problem is with your internet connection, not your laptop.
- Update Your Drivers: Outdated WiFi drivers can cause connection issues. Make sure they're up to date.
9. The "Hidden" Solution: Software Conflicts
Sometimes, the issue is not with the hardware; it's with the software. Make sure your laptop is free from malware and have a clean antivirus installed. Malware can hog resources and slow down your WiFi.
10. When to Call in the Cavalry: Professional Help
If you've tried all the above steps and your laptop is still struggling, it might be time to call in the pros. A local computer repair shop can diagnose and fix more complex issues.
11. The Impact of Dust on Battery Life
Dust can indirectly affect your laptop's battery life as well. Overheating puts a strain on your battery, causing it to drain faster. Keep those vents clean for a longer and more productive time.
12. The Role of Environment: Where You Use Your Laptop
Your environment plays a huge role. If you work in dusty conditions, you can clean your laptop more often. If you're in a clean place, less frequent cleanings will do the job.
13. The Power of Prevention: Long-Term Laptop Health
Regular cleaning and good habits contribute to the long-term health of your laptop. Think of it as an investment in your digital world.
14. Dust and Internal Damage: The Risks of Neglect
Ignoring dust can lead to serious damage, including component failure and reduced lifespan. So, better safe than sorry so, get on with it.
15. The Shocking Fix: Enjoying a Faster, Cooler Laptop
By following these steps, you can breathe new life into your laptop. You might be shocked at the difference after cleaning it.
In Conclusion:
So, there you have it folks – the lowdown on dust, WiFi, and the shocking fixes to get your laptop running smoothly again! Remember, a little cleaning and preventative maintenance can go a long way. Don't let dust become the digital death of your digital life and be proactive. Take care of your laptop, and it'll take care of you. And seriously, invest in some canned air. You won't regret it!
Frequently Asked Questions (FAQs)
- How often should I clean my laptop vents? Ideally, every few months. But the frequency depends on your environment.
- Can I use a vacuum cleaner to clean my laptop? No, it
Laptop Shuts Down Clear Dust with Bread and Straw. 8

By Mysimplefix Laptop Shuts Down Clear Dust with Bread and Straw. 8 by Mysimplefix
Laptop Overheating Issue Super Quick Fix Shorts

By Andrii Talks Tech Laptop Overheating Issue Super Quick Fix Shorts by Andrii Talks Tech
How To Clean a Laptop Fan Safelyshorts video gaming laptop

By TECH BY ABRAR How To Clean a Laptop Fan Safelyshorts video gaming laptop by TECH BY ABRAR
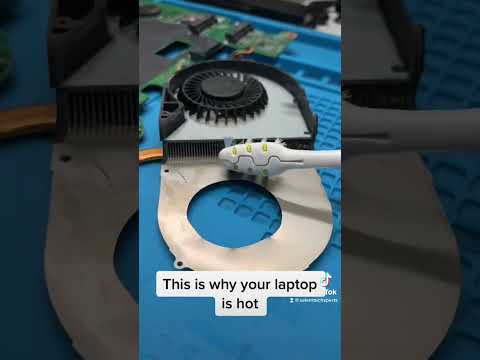
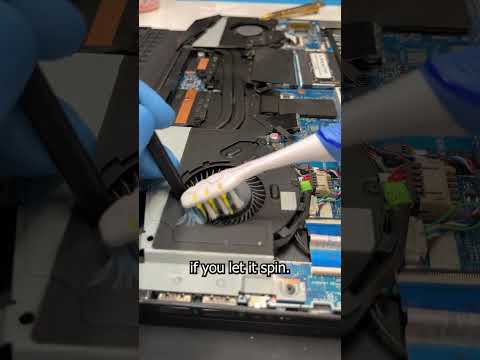
Title: This is why your laptop is running hot. Clean those vents people computer tech shorts
Channel: Salem Techsperts
This is why your laptop is running hot. Clean those vents people computer tech shorts by Salem Techsperts
Change Wifi Settings
Laptop Vents Dusty? WiFi Dying? (Shocking Fix Inside!)
We’ve all been there: that sinking feeling as your once-zippy laptop slows to a crawl. Webpages buffer agonizingly. Downloads crawl. The cursor hesitates. You’re left staring, frustrated, at a device that used to perform with effortless grace. While a multitude of culprits can be blamed for this digital lethargy, two often-overlooked adversaries emerge as primary instigators: dust accumulation and compromised WiFi signals. Let's delve into the specifics of these issues and, more importantly, how to reclaim your laptop’s former glory.
The Silent Killer: How Dust Strangles Your Laptop's Performance
The modern laptop, a marvel of engineering, packs immense processing power into a compact space. This power, however, generates heat. To combat overheating, laptops employ intricate cooling systems, typically involving fans, heat sinks, and vents. These vents, often found along the sides, bottom, and rear of your laptop, are critical for airflow. They're the lungs of your machine, allowing for the efficient dissipation of heat.
Over time, however, these vents become magnets for dust, pet hair, and other airborne debris. This accumulation forms a barrier, obstructing airflow and trapping heat within the laptop’s delicate components. Think of it like wearing a thick winter coat on a summer day. The laptop’s processor, graphics card, and other vital parts begin to overheat, leading to:
- Performance throttling: To prevent damage, the laptop’s CPU and GPU automatically reduce their processing speed when they detect excessive heat. This means slower performance, sluggish response times, and a general sensation of digital molasses. Forget seamless multitasking; you'll be lucky to have a single application function smoothly.
- System instability: Prolonged exposure to high temperatures can damage electronic components. This can manifest as random crashes, system freezes, and even complete hardware failure. Replacing components can be costly and time-consuming.
- Noisy operation: As the laptop struggles to cool itself, the fan(s) will spin faster and louder, resembling a miniature jet engine taking off. This constant whirring can be incredibly distracting and a sign that your laptop is in distress.
- Reduced battery life: Overheating components drain the battery more quickly. A dusty laptop can significantly shorten the time you can work or play on a single charge.
Unveiling the Dust Beast: A Step-by-Step Guide to Cleaning Your Laptop's Vents
Fortunately, addressing the dust problem is often a relatively straightforward task. Here's a detailed guide complete with vital tips – to reclaim airflow and breathe new life into your computer:
- Power Down and Disconnect: Before you begin, power down your laptop completely. Unplug the power adapter and remove the battery if it's user-removable. Safety first!
- Gather Your Tools: You'll need a few essential items:
- Canned Air: This is your primary weapon. Ensure you use a can specifically designed for electronics. Avoid household dusters that may contain propellants harmful to your laptop.
- Microfiber Cloths: These are perfect for wiping down the surfaces and removing any remaining dust particles.
- Small Brush (optional): A soft-bristled brush, such as a paintbrush, can help dislodge stubborn dust.
- Toothpicks or Cotton Swabs (optional): These can be helpful for cleaning tight spaces.
- Locate the Vents: Identify the vents on your laptop. They are usually located on the sides, bottom, or rear. Some laptops also have vents along the hinge area.
- The Cleaning Process:
- Exterior Cleaning: Gently wipe down the exterior surfaces of your laptop with a microfiber cloth to remove loose dust.
- Vent Cleaning: Hold the canned air nozzle close to the vents (but not touching the surface). Use short bursts of air to blow out the dust. Direct the airflow at different angles to ensure comprehensive cleaning. Repeat as needed, turning the laptop to access vents in various positions.
- Fan Inspection (advanced): If you're comfortable and have the technical ability, you can carefully open the laptop's bottom panel (consult your owner’s manual for instructions) to access the fan. Be extremely cautious and gentle. Once inside, you can use canned air to remove dust from the fan blades and surrounding areas. Make sure not to spin the fan blades with the force of the compressed air, as this can damage them.
- Screen Cleaning: While you are at it, use a microfiber cloth to clean the screen, if dirty.
- Reassemble and Test: Once you’ve finished cleaning and reassembled, replace the battery, plug in the power adapter, and turn on your laptop. Observe whether the fan noise is reduced and whether performance has improved.
WiFi Woes: Why Your Connection is Dying (and How to Revive it)
A sluggish WiFi connection can be as frustrating as a slow-running laptop. It means buffering video streams, delayed downloads, and a general feeling of being disconnected from the digital world. Multiple factors can contribute to a weak WiFi signal, but let's focus on two of the most common culprits:
- Distance and Obstacles: The farther you are from your router, the weaker the signal becomes. Walls, particularly those made of brick, concrete, or metal, can significantly degrade the signal strength.
- Interference: WiFi signals operate on radio frequencies, which can be interfered with by other devices, such as microwaves, cordless phones, Bluetooth devices, and even neighboring WiFi networks.
Reviving Your WiFi: Practical Solutions for a Stronger Signal
Fortunately, there are several things you can do to improve your WiFi signal and ensure a faster, more reliable internet experience.
- Router Placement: The location of your router is crucial. Experiment with different placements within your home:
- Central Location: Place your router in a central location to maximize signal coverage throughout your home.
- Elevated Position: Elevate your router off the floor, ideally on a shelf or table. This helps the signal travel more freely.
- Avoid Obstacles: Keep your router away from walls, metal objects, and appliances that can interfere with the signal.
- Channel Optimization: Your router broadcasts WiFi signals on different channels. Overlapping channels can cause interference. Most routers have an "auto" setting that automatically selects the least congested channel. You can also manually choose a channel using your router's configuration interface.
- Router Firmware Updates: Router manufacturers regularly release firmware updates that improve performance, security, and stability. Check your router's manual for instructions on how to update the firmware.
- WiFi Extenders: If you have a large home or a home with thick walls, a WiFi extender can help boost the signal to areas with weak coverage.
- Identify and Eliminate Interference:
- Microwaves and Cordless Phones: Keep your devices away from your router, as microwaves and cordless phones can interfere with the signal.
- Bluetooth Devices: Turn off Bluetooth devices that are not needed to reduce interference.
- Neighboring WiFi Networks: Use a WiFi analyzer app on your smartphone or computer to identify nearby WiFi networks and see which channels they are using. Try to select a channel that is less congested.
- Restart Your Router: This is a classic solution, but it often works. Restarting your router can clear temporary glitches and improve performance. Unplug the router for 30 seconds, then plug it back in.
Beyond the Basics: Proactive Maintenance for Peak Performance
Cleaning your laptop’s vents and optimizing your WiFi can make a massive difference. However, several other steps can help keep your laptop running smoothly over time.
- Regular Software Updates: Keep your operating system, drivers, and applications up-to-date. These updates often include performance improvements, bug fixes, and security patches.
- Disk Cleanup: Regularly clean up temporary files, cached data, and other unnecessary files that can clutter your hard drive and slow down your laptop.
- Defragment Your Hard Drive (If Applicable): If you have a traditional hard drive (HDD), defragmenting it can improve performance. However, this is not necessary for solid-state drives (SSDs), which benefit from TRIM functionality.
- Antivirus Protection: Install and maintain up-to-date antivirus software to protect your laptop from malware and other threats.
- Proper Shutdown: Properly shut down your laptop when you're finished using it. Avoid closing the lid without shutting down, as this can lead to increased heat and battery drain.
Conclusion: A Revitalized Laptop and a Seamless Connection
By addressing the issues of dust accumulation and WiFi signal degradation, you can dramatically improve your laptop's performance and enjoy a more seamless digital experience. Regular maintenance, proactive cleaning, and a few simple adjustments can extend the lifespan of your device, save you money on repairs, and eliminate the frustration of slow speeds. By making preventative care a part of your routine, you can ensure that your laptop remains a powerful and dependable work or entertainment companion for years to come. It's a small investment of time and effort that yields significant returns in terms of both performance and peace of mind.
