cara membuat wifi lan di laptop windows 7

Title: Cara Setting Jaringan LAN di Windows 7
Channel: dyana dheni
Cara Setting Jaringan LAN di Windows 7 by dyana dheni
Unlock Hidden WiFi Power: Turn Your Windows 7 Laptop into a Hotspot!
Unleash Your Inner WiFi Wizard: Transforming Your Windows 7 Laptop into a Hotspot
Ever wished you could share your internet connection with multiple devices? Do you find yourself tethered to a single Wi-Fi source? Well, prepare to be amazed. Your trusty Windows 7 laptop holds a secret. You can transform it into a powerful hotspot. This allows you to share your internet with other devices. It is easier than you might think!
The Gateway to Wireless Freedom: Understanding the Magic
Think of your laptop as a tiny router. It acts as a bridge, extending your internet access. This is especially helpful when you're on the go. Imagine using your phone, tablet, and even another laptop. All of these can connect simultaneously. The magic lies within Windows 7's capabilities. It boasts a built-in feature designed precisely for this. It is practically a hidden treasure chest!
Step-by-Step: Unveiling the Hotspot Creation Process
Ready to get started? Keep reading for clear instructions. We'll guide you throughout the process. You'll have your own Wi-Fi hotspot up and running. First, you want to ensure you have a working internet connection. This includes an Ethernet cable or your existing Wi-Fi. Next, locate the "Network and Sharing Center." You can usually find this in your Control Panel. Otherwise, right-click on your network icon. This icon is located in the system tray near the clock. This offers a shortcut.
Now, click on "Set up a new connection or network". Choose "Set up a wireless ad hoc network". Click "Next" to proceed. Now, give your hotspot a name. Select a security type, such as WPA2-Personal. Create a strong password that is complex. This will safeguard your network. Then, click "Next" again. You will then likely see a "Network name" and "Security Key." Take note of those.
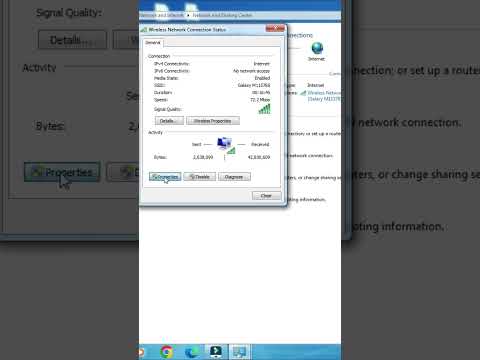
Then, you are all set with the first part in setting up your wireless hotspot. However, there is one more thing. You have to share the internet connection now. Go back to the "Network and Sharing Center." Click on "Change adapter settings". Locate the adapter that is currently providing your internet. This might be "Local Area Connection" if it is an Ethernet connection, or your Wi-Fi adapter. Right-click the adapter. Select "Properties".
Then click on the "Sharing" tab. Check the box that says "Allow other network users to connect through this computer's internet connection". Select the "Home networking connection" or the network adapter you just set up. It will likely be a "Wireless Network Connection" or "Local Area Connection." Click "OK." You should see your newly created network.
Troubleshooting Titans: Conquering Common Roadblocks
Sometimes, things don't go as planned. Don't despair! Several issues might come up. If other devices struggle to connect, check your password. Make sure you entered it correctly. Moreover, double-check your sharing settings. Confirm that internet connection sharing is enabled. If your internet speed feels slow, consider the number of connected devices. Too many devices will affect your speed of internet.
Also, sometimes, the laptop's firewall might be interfering. Temporarily disable your firewall. Test the connection. Then, remember to re-enable your firewall for safety. Otherwise, update your network drivers. Outdated drivers can cause connectivity problems. A simple driver update will often fix any issues. Furthermore, check your device's wireless adapter. Make sure it is enabled. Sometimes it turns off accidentally.
Beyond the Basics: Advanced Customization and Fine-Tuning
Your hotspot has more potential. You can further customize it. You can even control its behavior. First, you can modify the network name. You can also change your password at any time. The name and password can be changed through the "Manage Wireless Networks" settings. You can also limit bandwidth usage. This is particularly helpful when sharing with others. Limit the amount of data each device can consume.
Also, you can set up Mac address filtering. This will allow only authorized devices to connect. You can block unwanted visitors. This gives you greater control over your network. Explore the advanced settings in your network adapter properties. Adapt your setup. Fine-tune everything to suit your specific needs.
Security Savvy: Protecting Your Wireless Fortress
Security is paramount. Employ some extra safety measures. Always create a strong password, as mentioned. It should include a mix of uppercase and lowercase letters, numbers, and symbols. Change your password regularly. It reduces the risk of unauthorized access. Also, hide your network's SSID. This means, prevent your network name from being broadcast. Configure this setting in your wireless adapter properties.
Regularly monitor connected devices. Check for any unfamiliar devices. Remove any suspicious connections. The security of your data matters. Think about using a VPN software. This encrypts your data. It protects your online activities.
Embrace the Freedom: The End Result
Your Windows 7 laptop is now a hotspot! You have unlocked hidden potential. You've empowered yourself with portable Wi-Fi. Enjoy the freedom of sharing your Internet connection. Connect your devices wherever you are. Revel in this newfound versatility. So, go forth and explore! Share the joy with others.
Sonos & Laptop WiFi: The SHOCKINGLY Easy Connection Guide!Unlock Hidden WiFi Power: Turn Your Windows 7 Laptop into a Hotspot!
Hey tech lovers! Have you ever been in a situation where your phone's data plan is running low, but you have a perfectly good laptop with a stable internet connection? Perhaps you're traveling and the hotel Wi-Fi is a joke, or maybe your roommates are hogging the router. Well, guess what? We've all been there! And the solution, believe it or not, is often tucked away right under your nose. We're talking about turning your trusty Windows 7 laptop into a Wi-Fi hotspot. It’s like giving your laptop a superpower – the ability to share its internet connection with your other devices, like your phone, tablet, or even another laptop. Let's dive in and unlock this hidden potential!
Why Bother? Unveiling the Benefits of a Laptop-Turned-Hotspot!
Before we get our hands dirty with the technical stuff, let's chat about why you even should bother. Think of it like this: your laptop is a Swiss Army knife of connectivity. It can be a portal to the world, and sharing that portal is easier than you think.
- Data Saving Sensation: Running low on mobile data? This is your data-saving superhero move!
- Hotel Hell No More: Say goodbye to dodgy hotel Wi-Fi that barely loads a webpage.
- Sharing is Caring (and Connecting): Sharing your internet with friends, family, or colleagues has never been easier.
- Emergency Internet Savior: Need internet during a local outage? Your laptop could be the hero of the hour.
- A Simple Solution: It’s remarkably straightforward, even if you're not a tech whiz.
Before We Begin: What You'll Need (Spoiler Alert: Not Much!)
The good news is, you probably already have everything you need!
- A Windows 7 Laptop: This is, obviously, the star of the show.
- A Working Internet Connection: Whether it's through Wi-Fi or an Ethernet cable, you need an active internet source.
- A Bit of Patience: We'll walk you through it step-by-step, but sometimes things don’t happen overnight.
- (Optional) A Cup of Coffee: Because, well, why not?
Step-by-Step Tutorial: Turning Your Windows 7 Laptop into a Wi-Fi Hotspot!
Alright, gearheads, let's get to the nitty-gritty. Here's how to transform your laptop into a Wi-Fi hotspot. Follow these steps, and you should be good to go.
Open the Command Prompt (Run as Administrator): Click on the Start button, then type "cmd" in the search box. Right-click on "cmd.exe" and select "Run as administrator." This is crucial; otherwise, the magic won't work. It’s like trying to start a car without the key – you can try, but you’re just wasting your time.
The Magical Command: In the Command Prompt window, type the following command and hit Enter:
netsh wlan set hostednetwork mode=allow ssid="YourHotspotName" key="YourPassword"- Replace
"YourHotspotName"with the name you want your hotspot to have. This is what your devices will see when they search for Wi-Fi networks. We recommend something catchy, but not too obvious. - Replace
"YourPassword"with a strong password. This is essential for security, and your guests can't freeload.
This command essentially tells your laptop's wireless adapter to function in "hosted network" mode. Think of it as flipping a switch to enable the hotspot feature.
- Replace
Start the Hosted Network: Now, type the following command and press Enter:
netsh wlan start hostednetworkThis command activates the hotspot you just configured. If everything goes well, you should see a message saying that the hosted network has started successfully.
Share Your Internet Connection (The Key to Connectivity!)
Here's where it gets a bit like the final piece of a jigsaw puzzle. This step shares your existing internet with your new hotspot.
- Open the "Network and Sharing Center." You can find this by right-clicking on the network icon in your system tray (usually near the clock) and selecting "Open Network and Sharing Center."
- Click on "Change adapter settings" on the left-hand side.
- Identify the network adapter that has an active internet connection (e.g., Wi-Fi or Ethernet). Right-click on it and select "Properties."
- Go to the "Sharing" tab.
- Check the box that says "Allow other network users to connect through this computer's Internet connection."
- In the "Home networking connection" dropdown, select the hosted network adapter you just created (it will often have a name like "Microsoft Hosted Network Virtual Adapter").
- Click "OK."
Now, the hosted network adapter should be able to share its access to your connection. The final step in this procedure is the glue that holds everything together, like the final ingredient in a winning recipe.
Connect Your Devices!
On your phone, tablet, or other laptops, search for available Wi-Fi networks and look for the hotspot name you gave your laptop. Enter the password you set up, and you should be connected! Boom! You're broadcasting Wi-Fi.
Troubleshooting Troubles: Common Roadblocks and How to Overcome Them!
Sometimes, things don’t go perfectly. Don't worry; it's all part of the process. Let's tackle some common issues:
- "The Hosted Network Couldn't Be Started" Error: This often means the wireless driver is out of date. Head to your laptop manufacturer's website and get the latest driver.
- “Can’t Connect to the Internet” on Your Devices: Double-check the internet connection sharing settings (Step 4). Ensure you’ve shared the correct connection. Sometimes, restarting your laptop can resolve the issue.
- Password Issues: Did you mistype your password? It happens! Double-check it on both your laptop and the connecting devices.
- Conflicting Software: Some security software might interfere with hotspot creation. Try temporarily disabling your firewall or antivirus software.
Optimizing Your Hotspot: Boosting Speed and Security!
Making your hotspot truly shine isn’t just about setting it up; it's about making it fast and secure.
- Choose the Right Band: If your laptop supports it, select the 5 GHz band for faster speeds. 2.4 GHz is good for range, but 5 GHz tends to be faster.
- Strong Password is KEY: A strong, unique password is like having a security guard for your digital castle.
- Keep Your Software Updated: Regularly update your Windows 7 and wireless drivers. Updated software is less vulnerable to security gaps.
- Monitor Connected Devices: Most laptops have settings to view connected devices. Regularly review the connected devices and disconnect any unwanted connections.
- Limit the Bandwidth: Some hotspot utilities allow you to limit the bandwidth usage of connected devices to ensure that your own internet experience remains top-notch.
Software Solutions: Exploring Third-Party Hotspot Apps (Proceed with Care!)
While the built-in method works great, some third-party apps can simplify the hotspot creation process. However, always download these from reputable sources to avoid malware. Popular options include:
- Virtual Router Manager: A free and easy-to-use option.
- Connectify Hotspot: A paid application with a user-friendly interface and advanced features.
Remember: these apps often require a bit more research and can sometimes be less reliable than the built-in method.
The Future of Connectivity: Beyond Windows 7 (And Beyond!)
While this guide focuses on Windows 7, the underlying principles apply to other operating systems as long as the features are supported and the device has Wi-Fi capabilities. The concept of sharing your internet connection on the go is here to stay!
The End Game: You Are Now, a Hotspot Hero!
Congratulations! You’ve successfully transformed your Windows 7 laptop into a Wi-Fi hotspot. You have unlocked a powerful tool that can save you money, increase your connectivity on the road, and provide an instant internet solution in various situations. Remember the steps, and you’ll be ready to share your internet with the world (or at least with your phone).
FAQs: Your Burning Questions Answered!
Here are some frequently asked questions, straight from the tech trenches:
Q1: Is it safe to create a hotspot from my laptop?
Yes, if you use a strong password and keep your software updated. Think of it like locking your front door.
Q2: Will creating a hotspot drain my laptop's battery?
Yes, it will. Your laptop is working harder, so battery life will be reduced. Plan accordingly, especially if you're not near a power outlet.
Q3: Can I create a hotspot if my laptop's Wi-Fi is already connected to Wi-Fi?
Yes! The built-in method typically works even if your laptop is
Unlock Your Acer Laptop's WiFi Password: The Secret's Inside!CARA MENGAKTIFKAN WIFI DI WINDOWS 7

By Rdn Channel CARA MENGAKTIFKAN WIFI DI WINDOWS 7 by Rdn Channel
Cara Cepat Mengaktifkan Wifi di Windows 7

By HandleCustom Cara Cepat Mengaktifkan Wifi di Windows 7 by HandleCustom
Cara Berbagi Koneksi Internet Dari Windows 7
By Data Science Cara Berbagi Koneksi Internet Dari Windows 7 by Data Science

Title: cara Mengkoneksi internet melalui Kabel Lan ke komputer IndiHome
Channel: ARIE CELLULAR
cara Mengkoneksi internet melalui Kabel Lan ke komputer IndiHome by ARIE CELLULAR
Wifi Not Found
Unlock Hidden WiFi Power: Turn Your Windows 7 Laptop into a Hotspot!
Welcome! In a world saturated with connected devices, having a reliable and accessible internet connection has become absolutely crucial. Picture this: You're in a coffee shop, your phone's data is dwindling, and the public Wi-Fi is notoriously unreliable. Or perhaps, you're in a hotel with exorbitant internet fees, and you have multiple devices that need to connect. The solution? Your trusty Windows 7 laptop, transformed into a powerful mobile hotspot. We're not just talking about a simple internet connection; we're unlocking the potential of your laptop to become a central hub, a digital oasis in a sea of connectivity challenges. Let's delve into how you can effortlessly create a hotspot, ensuring seamless internet access wherever you go.
Understanding the Basics: What is a Hotspot and Why Do You Need One?
Before diving into the how-to, let's clarify the fundamental concept. A hotspot is, in its essence, a localized wireless network that allows multiple devices to connect to the internet using a single internet connection. Think of your laptop as a radio transmitter, rebroadcasting the internet signal it receives (typically from an Ethernet cable or a Wi-Fi network) to other devices within range, such as smartphones, tablets, and even other laptops. Why is this helpful? Well, it provides access for all your gadgets, eliminates the need to pay for multiple internet connections, and lets you bypass potential paywalls or inadequate public Wi-Fi signals. It’s about maximizing your digital freedom, ensuring connectivity where you need it most.
Prerequisites and Preparations: What You'll Need
Before initiating the hotspot process, a few essential elements need confirmation. First, ensure your Windows 7 laptop has a working Wi-Fi adapter. You can verify this by checking the system tray, located in the bottom right corner of your screen. If you see the Wi-Fi icon, you're likely good to go. Also, confirm that you have a stable internet source. This could be a wired Ethernet connection to your laptop or a pre-existing wireless network you can connect to. It’s important to ensure you have internet access on your laptop before proceeding. Finally, make sure you have administrative privileges on your computer. This is typically the default setting for most user accounts, but it’s worth confirming to avoid any unnecessary roadblocks.
The Step-by-Step Guide: Creating Your Windows 7 Hotspot
Now, let's get started. We will go through the process step-by-step, making sure that you can get a hotspot working immediately. Please follow along carefully.
Step 1: Accessing the Network and Sharing Center
Begin by navigating to the "Network and Sharing Center." You can quickly access this by clicking on the network icon in your system tray (the one that looks like a series of bars) and selecting "Open Network and Sharing Center." Alternatively, you can search for it in the Windows Start menu.
Step 2: Setting Up a New Connection
Within the Network and Sharing Center, click on “Set up a new connection or network.” A wizard will launch, guiding you through the setup process.
Step 3: Choose the Connection Method
In the wizard, choose the option: “Set up a wireless ad hoc network." An ad hoc network allows devices to connect directly to each other without needing a central router, which is what we are trying to achieve.
Step 4: Configure the Ad Hoc Network
You'll be prompted to configure the network settings. Here, the most important part is to define your network's name (SSID) and security settings.
- Network Name (SSID): Choose a memorable and unique name. This is what your devices will see when searching for available Wi-Fi networks. Be creative, but also relevant.
- Security Type: We strongly recommend selecting "WPA2-Personal” for the highest level of security. This method uses a strong encryption protocol.
- Security Key: Create a strong password for your network. This is crucial to protect your network from unauthorized access. Use a combination of upper and lowercase letters, numbers, and symbols for a robust password. Ensure you write it down, so you have access.
Step 5: Share Your Internet Connection
Go back to the Network and Sharing Center. Click on “Change adapter settings” on the left-hand side of the window. Right-click on the internet adapter you are using to connect to the internet (e.g., “Ethernet” if you are using a wired connection, or "Wi-Fi" if connecting to a wireless network) and select “Properties”.
Step 6: Sharing the Connection
In the properties window of your internet connection, go to the “Sharing” tab. Check the box that says, "Allow other network users to connect through this computer’s Internet connection.”
Step 7: Select the Network
Once you have checked the box to allow sharing, a drop-down menu will appear, allowing you to select the network. You can now select the network that you just created, which is your newly created ad-hoc network. This allows your laptop to “share” its internet connection with your devices.
Step 8: Start the Hotspot!
Go back to the Network and Sharing Center. Select “Manage wireless networks” from the left pane. Right-click the ad-hoc network you previously created, and click “Properties.” Uncheck the box that says, "Connect automatically when this network is in range.” This prevents your laptop from attempting to connect to the hotspot. Check the box that says, “This is a computer-to-computer (ad hoc) network; connections to an access point are not required.” The ad-hoc network is now established. Your hotspot should now be active and ready to accept connections!
Connecting Your Devices: The Final Step
With your hotspot successfully established, connecting your other devices is straightforward. On your smartphone, tablet, or other laptop, go to the Wi-Fi settings. Your new hotspot name (the SSID you defined earlier) should appear in the list of available networks. Select it, enter the security key (the password you configured), and connect. Your device should now have internet access through your Windows 7 laptop!
Troubleshooting Common Issues
Sometimes, things don’t go precisely as planned. Here are some common issues, accompanied by simple solutions.
- Connection Issues: If your devices can't connect, double-check the SSID and password for accuracy. Ensure that the firewall isn't blocking the connection. Also, try restarting your laptop.
- Limited or No Internet Access: Verify that your laptop has a stable internet connection. If you're using a wired connection, ensure the Ethernet cable is securely plugged in. Sometimes, rebooting your modem or router helps.
- Slow Speeds: The hotspot’s speed depends on your internet connection and the number of connected devices. Close programs on your laptop that are using a lot of bandwidth. Consider upgrading your internet package if you need faster speeds.
Enhancements and Considerations: Maximizing Your Hotspot's Potential
Once your hotspot is functional, further optimization can improve your experience. Regularly change your Wi-Fi password to maintain security. If your laptop allows, configure the power settings to prevent it from going to sleep or hibernation while connected to the internet. This will ensure connectivity. Consider the range of your Wi-Fi adapter, and avoid placing your laptop in areas where the signal may be weak.
The Last Word: Enjoy Your Wireless Freedom! That’s it! You have successfully created a Windows 7 hotspot. This opens up a world of possibilities, from providing internet access on the go to creating a temporary home network. The convenience of having your own private internet network cannot be overstated. Embrace the power of this hidden Wi-Fi feature, and enjoy the unparalleled freedom of connectivity.
