dell laptop suddently lost wifi iconnection windows 10

Title: Fix Dell Laptop Wi-Fi is Not Working Problem in Windows 1087 2025
Channel: FIXsage
Fix Dell Laptop Wi-Fi is Not Working Problem in Windows 1087 2025 by FIXsage
DELL Laptop WiFi GONE?! (Windows 10 FIX - SHOCKINGLY EASY!)
Dell Laptop WiFi Woes? A Shockingly Simple Windows 10 Rescue!
Ever stared blankly at your Dell laptop, the WiFi icon stubbornly defiant? You're not alone. This issue plagues countless users. But before you panic, breathe easy. This isn't some tech abyss you can't escape. Instead, it's a problem with surprisingly straightforward solutions. We'll explore these, turning your frustration into relief. Let's get your Dell back online, fast!
The Unseen Culprit: Common WiFi Connection Killers
First, let us acknowledge the usual suspects. Your WiFi might be AWOL for a multitude of reasons. Firstly, consider the obvious. Is your router even working? Have you tried restarting it? I know it sounds silly but this simple step resolves many issues. Then, ensure you're not too far from the access point. Walls and distance can be WiFi's kryptonite. Still no luck? The issue could be more internal, but even these can be easily tackled. After all, we are dealing with a Windows 10 fix.
Step 1: The Airplane Mode Assassin and Network Adapter Ninja
Airplane mode is a sneaky feature, capable of disabling your WiFi. It’s always good to check. Turn it off. Next, let’s delve into your network adapter. Windows might be experiencing hiccups. This feature is the communication hub. It needs to be functioning correctly.
- Go to your Windows search bar.
- Type "Control Panel" and open it.
- Locate "Network and Internet". Click on "Network and Sharing Center".
- On the left side, you will find "Change adapter settings". Click it.
Here you will see your network connections. Your WiFi adapter should be enabled. If it isn't, right-click it. Then choose "Enable." However, if it is enabled, try disabling and re-enabling it. This restarts the connection. Furthermore, an outdated driver could be the problem.
Step 2: Driver Dilemmas: Keeping Everything Updated
Drivers are essential. They are the software pieces that allow your hardware to communicate with your operating system. Outdated drivers can cause chaos. Therefore, keeping them updated is vital. How do we update them? Here’s how:
- Go to the search bar once again.
- Type "Device Manager" and open it.
- Expand the "Network adapters" section.
- Right-click on your WiFi adapter (it might be called something like "Intel Wireless" or "Dell Wireless").
- Choose "Update driver".
Windows will then search for updates. Follow the prompts. If Windows can't find an update, you may need to visit the Dell website. Find support for your device. Search for your laptop model. Download the latest WiFi drivers. Install them. This process often resolves the issues.
Step 3: Troubleshooting Trio: Windows at the Rescue!
Windows includes built-in troubleshooters. These are your friends in need. They automatically scan for problems. They propose potential fixes. To use them:
- Go to the search bar again.
- Type "Troubleshoot settings" and open it.
- Click on "Network Adapter".
- Run the troubleshooter.
The troubleshooter will detect any issues. It will attempt to repair them. This is a good starting point. It’s a simple, easy fix if you haven't already. After the process, test your connection. Hopefully, your WiFi is back in action.
Step 4: Command Prompt Cures: The Advanced Approach
If the previous steps haven't worked, get ready. We’ll employ a more advanced method. The command prompt is a powerful tool. It can sometimes fix deeper problems. Don't worry, it's not as scary as it sounds. Here's what you do:
- Search for "Command Prompt" in the search bar.
- Right-click on it.
- Select "Run as administrator".
Then, you'll type in these commands, one by one, pressing Enter after each one.
netsh winsock resetnetsh int ip resetipconfig /releaseipconfig /renewipconfig /flushdns
After you enter the commands, restart your computer. This can often refresh the network configuration. However, if this fails, it's time to move to the following step.
Step 5: The Nuclear Option (But Don't Panic!) - Network Reset
If everything else fails, there's one final step. This resets your network settings. It essentially brings them back to their original state. First, back up any essential network configurations. To do this:
- Go to "Settings" (Windows key + I).
- Select "Network & Internet".
- Click on "Network reset" (usually found under "Advanced network settings").
- Follow the prompts and restart.
Final Thoughts: Staying Connected
Hopefully, your Dell laptop now has a working WiFi connection. Sometimes, the solutions are simpler than expected. Therefore, don't lose hope. Most WiFi problems have easy fixes. Also, remember to keep your drivers updated. Regularly check your network settings. If these steps don't work, you may require professional help. So, now your WiFi is back. Re-establish your connection. Enjoy the internet.
Laptop WiFi Nightmare? FIX It NOW!DELL Laptop WiFi GONE?! (Windows 10 FIX - SHOCKINGLY EASY!)
Hey there tech warriors! Ever had that heart-stopping moment when your trusty Dell laptop, the one you rely on for everything from binge-watching to brutal work deadlines, suddenly decides it's done with Wi-Fi? The little Wi-Fi icon in the corner morphs into a frustrating "no connection" symbol, and your digital life grinds to a halt. Trust me, we’ve all been there. Panic sets in, right? You start imagining deadlines missed, entertainment deprived, and the world essentially ending. But before you chuck your laptop out the window, breathe! Because, in many, many cases, the solution is surprisingly simple. We're talking shockingly easy. Let’s dive into how to bring your Dell back from the Wi-Fi abyss.
1. The Dreaded 'No Wi-Fi' Situation: Decoding the Anomaly
First things first, let's acknowledge the elephant in the room – that sudden, unwelcome disappearance of your Wi-Fi. This isn’t just a minor inconvenience; it’s a digital crisis! Usually, one of two things is happening. Either your laptop truly isn’t seeing any Wi-Fi networks, or it sees them, but can’t connect. It’s like being stranded in a dessert, surrounded by oases, however unable to drink. Understanding the difference is vital; this will quickly help narrow down the problem.
2. Is It REALLY the Dell? Or Is It… Everywhere Else?
Before you start tearing your hair out, a critical reality check: is it the Dell? I know, it sounds silly, but sometimes the problem is, well, everywhere else. Try these quick checks:
- Other Devices: Does your phone, tablet, or another laptop connect to the Wi-Fi? If they don’t, you’ve got an internet problem, not a Dell problem. Time to call your internet service provider (ISP).
- The Router Reboot: A classic, but often effective. Unplug your router and modem for a full minute. Plug them back in and let them power up. Often, this is the equivalent of giving your computer a good night’s sleep!
3. The Driver Dilemma: Your Dell's Guide to the Wireless World
Alright, let’s assume it is the Dell. The most common culprit? An outdated or corrupted Wi-Fi driver. Think of drivers as the instruction manuals that tell your laptop's hardware how to behave. If the manual is missing, old, or damaged, your Wi-Fi can’t function. This is where the real fun begins.
4. Diving into Device Manager: Where the Magic Happens
Windows has a powerful tool called Device Manager – your laptop’s digital detective agency. Here’s how to access it:
- Search Bar: Click the Windows search bar (magnifying glass icon) in the bottom left.
- Type "Device Manager": Start typing, and it should pop up.
- Open it: Click on "Device Manager."
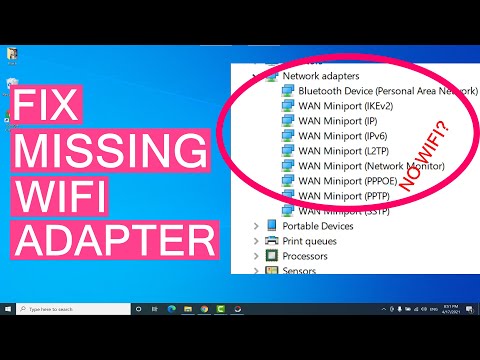
5. Unveiling the Network Adapters: Your Wi-Fi's Identity
Once in Device Manager, find "Network adapters" and click the little arrow to open it. You should see a list of network devices, including your Wi-Fi adapter (it might have a manufacturer name like "Intel," "Broadcom," or "Dell Wireless").
6. Troubleshooting the Wi-Fi Adapter: Your First Line of Defense
Right-click on your Wi-Fi adapter and check the following:
- "Enable Device": Is it enabled? If it's disabled, enable it. Seems simple, but it's shockingly common!
- "Update Driver": If it’s enabled, try “Update driver.” Windows will search for the latest drivers. This is like giving your laptop a tech upgrade!
- "Properties": Go to "Properties" > "Driver." Check the driver version. Is it significantly old? An update might be needed.
- Error Codes: Any error codes? They can give valuable clues.
7. The Power of a Reboot: Giving Your Laptop a Fresh Start
After making any driver adjustments, always restart your Dell. This simple act of rebooting gives the system a chance to apply the changes properly. It’s like hitting the reset button on a complicated situation, allowing everything to settle anew.
8. Still No Luck? Uninstall and Reinstall the Driver: A Deep Clean
If updating doesn’t work, try this:
- Uninstall: Right-click on your Wi-Fi adapter and select "Uninstall device."
- Restart: After uninstallation, restart your Dell. Windows will often automatically reinstall the driver.
- Manual Re-install: If Windows doesn’t reinstall it, you might need to download the driver from the Dell support website.
9. Dell's Support Website: Your Official Rescue Squad
If all else fails, head to the Dell support website. Enter your Service Tag (found on your laptop) to identify your specific model. Then, navigate to the drivers section and download the latest Wi-Fi drivers. Consider it the official map to the lost Wi-fi treasure!
10. Airplane Mode's Sneaky Shenanigans: The Accidental Airplane Mode Trap
Double-check one more thing: Airplane mode. Accidental toggling happens to the best of us. Is Airplane mode off? If it's on, your Wi-Fi is automatically disabled. It's like accidentally putting your car in park and wondering why the engine won't start.
11. Windows Troubleshooter: The Digital Detective
Windows has built-in troubleshooting tools. Search for "Network troubleshooter" in the search bar and see what it finds. It's your digital detective squad.
12. BIOS Update: A Deep Dive (Use With Caution!)
Updating your BIOS (Basic Input/Output System) can sometimes resolve Wi-Fi issues. This is a more advanced step (think of it as major surgery), and you should only do it if you are comfortable and follow instructions precisely. Check the Dell support website for detailed instructions. It's like upgrading the entire operating system of your laptop!
13. Checking Physical Switches (Yes, They Exist!)
Some Dell laptops have physical Wi-Fi switches (usually on the side or front). Make sure it's switched on. It's like forgetting to turn on the lights – you’re in the dark, quite literally!
14. Firewall Fallout: The Silent Intruder
Your firewall, which is there to protect you, sometimes takes its job a little too seriously. Check your firewall settings (Windows Firewall or a third-party firewall) and make sure your Wi-Fi adapter is allowed access. It can be like an overzealous guard at a party, preventing your guest (Wi-Fi) from entering.
15. Last Resort: The System Restore Option
If you recently installed new software or made major system changes, System Restore lets you revert your Dell to a point in time before the Wi-Fi issues began. Think of it as rewinding the clock to a period when everything worked fine.
Closing Thoughts:
So there you have it! We've traversed the Wi-Fi wilderness together. Hopefully, these steps will help you navigate the frustrating scenario of "Dell laptop Wi-Fi gone." Remember, troubleshooting is a process – sometimes it's a quick fix, and sometimes it takes a little digging. But stay patient, follow the steps, and you'll likely get your digital life back on track. You are not alone. We believe in you! Now, get connected!
Frequently Asked Questions (FAQs):
Q1: My Dell laptop shows ‘no Wi-Fi networks found.’ What should I do first?
A: Start by restarting your laptop and router. Then, check Device Manager (as detailed above) to ensure your Wi-Fi adapter is enabled and its drivers are up-to-date. If still nothing, reset your network settings from the 'network and internet' section in settings.
Q2: My Wi-Fi adapter isn’t listed in Device Manager. What does this mean?
A: This suggests a hardware issue or a driver problem. Try restarting your laptop, and if it still doesn't appear, you can perform a hard reset: Shut down the laptop, remove the power adapter and battery (if possible), press and hold the power button for 30 seconds, reinsert everything, and try again. Contact Dell support if it persists.
Q3: I’ve tried everything, and my Dell still won’t connect. Are there any more solutions?
A: Consider performing a system restore to an earlier date. If the problem started after a specific software installation, undo it. Also, check if the Wi-Fi antenna cables inside the laptop are well-connected. If you're still stuck, contact a tech professional or Dell support.
Q4: Is it possible my Wi-Fi adapter has physically failed?
A: Yes, hardware failure is possible, though less common than driver issues. Symptoms include the adapter not appearing in Device Manager or consistently failing, even after troubleshooting.
Q5: What should I do if the fixes work, but the Wi-Fi connection is slow?
A: Try moving closer to your router. Check your internet speed (speedtest.net)
Laptop WiFi Adapter: The SHOCKING Secret to Blazing-Fast Internet!Fix WiFi Not Showing in Settings On Windows 10 Fix Missing WiFi 2025

By Sandeep Singh Fix WiFi Not Showing in Settings On Windows 10 Fix Missing WiFi 2025 by Sandeep Singh
7 Ways to Fix a Computer That Can't Find or Connect to Wifi Windows 10 Laptops & Desktops

By Ask A Computer Geek 7 Ways to Fix a Computer That Can't Find or Connect to Wifi Windows 10 Laptops & Desktops by Ask A Computer Geek
How To Fix Wireless Adapter Missing In Windows 10 Get WiFi Adapter Back
By Sandeep Singh How To Fix Wireless Adapter Missing In Windows 10 Get WiFi Adapter Back by Sandeep Singh

Title: How to Fix WiFi Not Showing Up on Windows 10 - Howtosolveit
Channel: Howtosolveit
How to Fix WiFi Not Showing Up on Windows 10 - Howtosolveit by Howtosolveit
Working With Laptop
DELL Laptop WiFi GONE?! (Windows 10 FIX - SHOCKINGLY EASY!)
Having your Dell laptop's Wi-Fi suddenly vanish can be incredibly frustrating. One moment you're cruising the internet, the next, that vital connection drops, leaving you stranded. But before you panic or start envisioning a tech support odyssey, we're here to help. In many cases, the solution is surprisingly straightforward, a quick adjustment that can get you back online in minutes. We'll walk you through the processes, providing detailed, step-by-step instructions to regain your connectivity and get your Dell laptop's Wi-Fi working flawlessly again.
Identifying the Root Cause: A Preliminary Diagnosis
Before diving into solutions, a little detective work is in order. The disappearance of Wi-Fi can stem from various culprits. The first, and often simplest, is a disabled Wi-Fi adapter. This could have been inadvertently switched off using a physical switch on your laptop or through a software shortcut. Another common cause is a driver issue – an outdated, corrupted, or incompatible network adapter driver. Sometimes, a simple Windows update can unexpectedly interfere with your network settings. Lastly, it's worth considering the possibility of a physical issue, though less likely.
The First Line of Defense: The Physical Switch and Function Keys
Many Dell laptops, particularly older models, feature a physical hardware switch dedicated to controlling the Wi-Fi adapter. This switch can be located on the side or the front of the laptop. Ensure the switch is in the "on" position. If it's already on, try toggling it off and then back on to see if this resets the connection.
Next, focus on the function keys. Look for a key combination, usually involving the "Fn" key (located near the Ctrl key) and a key displaying the Wi-Fi symbol (often a small antenna). Pressing this key combination should toggle the Wi-Fi adapter. Experiment by holding the "Fn" key down and pressing the key with the Wi-Fi symbol. Observe the screen for an on-screen display that shows whether Wi-Fi is enabled or disabled.
Navigating the Device Manager: The Driver's Domain
If the physical switch and function keys don't restore your Wi-Fi, the Device Manager is your next port of call. To access it, right-click the Start button and select "Device Manager." Alternatively, you can type "Device Manager" into the Windows search bar.
Within the Device Manager, look for "Network adapters." Expand this section to see the listed network adapters. Your Wi-Fi adapter should be named something along the lines of "Wireless Network Adapter" or "Wi-Fi Adapter," followed by the specific brand and model (e.g., "Intel Wireless-AC 9560").
Checking Adapter Status and Activation:
- Disabled Adapter: If the Wi-Fi adapter has a small down arrow icon overlaid on it, it's disabled. Right-click the adapter and select "Enable device."
- Driver Issues: If the Wi-Fi adapter has a yellow exclamation mark or a red "X" icon, this signifies a driver issue. Right-click the adapter and select "Properties."
Updating and Reinstalling Drivers:
In the Properties window, under the "General" tab, you'll find information about the issue. Often, the problem lies within the "Driver" tab. Select this tab and try these steps:
- Update Driver: Click the "Update Driver" button. Select "Search automatically for drivers." Windows will attempt to find and install the latest drivers. If it finds one, follow the on-screen prompts to complete the installation.
- Roll Back Driver: If the Wi-Fi stopped working after a recent driver update, try rolling back to a previous version. In the "Driver" tab, the "Roll Back Driver" button should be enabled. Click it, and follow the on-screen prompts.
- Uninstall and Reinstall: If updating and rolling back don't work, you can uninstall and reinstall the driver. In the "Driver" tab, click "Uninstall Device." Follow the prompts. Then, restart your laptop. Windows should automatically attempt to reinstall the driver upon startup. If not, return to the Device Manager, right-click your Wi-Fi adapter, and select "Scan for hardware changes."
Manual Driver Download:
If the automatic driver updates fail, you can manually download the latest drivers from Dell's website (dell.com/support). You will need your Dell laptop's Service Tag or Express Service Code. Alternatively, you can use the automatic tool to identify your laptop model and download drivers. Navigate to the "Drivers & Downloads" section and search for the Wi-Fi or Wireless network drivers. Download and install the appropriate driver version.
Power Cycling Your Router and Modem: A Network Refresh
Sometimes, the problem doesn't lie within your laptop, but within the network itself. A simple power cycle of your router and modem can often resolve connectivity issues.
- Power Down: Unplug your modem and router from the power outlet.
- Wait: Wait for at least 60 seconds. This allows the devices to fully reset.
- Power Up: Plug the modem back in first and wait for it to fully power on. The lights on the modem will indicate its status. Once the modem has established a connection, plug the router back in and wait for it to power on.
- Reconnect: Once both devices are fully powered up, try connecting your Dell laptop to the Wi-Fi network again.
Troubleshooting Windows Network Settings: The Software Side
If basic hardware steps have failed, turn your attention towards the Windows software. Windows includes a built-in network troubleshooter designed to automatically detect and fix common network problems.
- Access the Troubleshooter: Right-click the Wi-Fi icon in the system tray (bottom-right corner of the screen). Select “Troubleshoot problems.” Windows will then diagnose and attempt to fix the issue.
- Network Reset: If the troubleshooter fails, consider resetting your network settings. Go to "Settings" (Windows key + I), then navigate to "Network & Internet." Under the "Status" section, scroll down and click "Network reset." This will reset all network adapters, along with related settings. You will need to re-enter your Wi-Fi password after the reset.
- Check Network Profile: In "Settings," go to "Network & Internet," and then select "Wi-Fi." Click "Change adapter options." Right-click your Wi-Fi adapter and select "Properties." Ensure that "Internet Protocol Version 4 (TCP/IPv4)" and "Internet Protocol Version 6 (TCP/IPv6)" are enabled and checked in the list of items.
Run a Malware Scan: Eliminating External Threats
In rare cases, malware can interfere with network connections. Though less common, consider running a full system scan with your preferred antivirus software. Ensure your antivirus definitions are up to date before initiating the scan.
Consider a System Restore: Reverting to a Prior State
If the Wi-Fi issue began recently, a system restore to a point before the problem occurred can be a powerful method. System Restore allows you to revert your system settings to a previous state, potentially undoing any problematic changes that have caused the Wi-Fi disruption.
- Access System Restore: Type "Create a restore point" into the Windows search bar and select the result.
- System Restore: Click the "System Restore" button.
- Choose a Restore Point: Follow the on-screen prompts to select a restore point from before the Wi-Fi issue began. Note any programs that will be affected by the restore, and then proceed.
Last Resort: Reinstalling Windows (Data Backup Essential)
If all else fails, you may need to consider reinstalling Windows. This is a more drastic measure, as it will erase all data on your hard drive. Before proceeding, back up all personal files.
- Create Installation Media: Use the Windows Media Creation Tool to create a bootable USB drive with the latest Windows 10 or 11 installation files.
- Boot from USB: Restart your Dell laptop and enter the BIOS setup (usually by pressing the F2, Delete, or Esc key during startup). Change the boot order to prioritize the USB drive.
- Install Windows: Follow the on-screen instructions to reinstall Windows. Choose to perform a clean installation, which will erase your existing operating system.
- Install Drivers: Once Windows is installed, you will likely need to manually install drivers, including the Wi-Fi adapter driver, from Dell's website.
Preventative Measures: Staying Connected Long-Term
Once you've resolved the Wi-Fi issue, adopt some preventative measures.
- Regular Updates: Keep Windows and your drivers up to date, automatically or manually.
- Antivirus Protection: Install and maintain reliable antivirus software.
- Network Security: Secure your Wi-Fi network with a strong password and consider using WPA3 encryption.
- Monitor Performance: Check for network interruptions or issues.
By systematically working through these steps, you'll significantly increase your chances of restoring your Dell laptop's Wi-Fi connectivity.
