connct laptop to sony bravia wifi

Title: How to Connect & Mirror Laptop Screen on Any Smart TV Wirelessly No App
Channel: MJ Tube
How to Connect & Mirror Laptop Screen on Any Smart TV Wirelessly No App by MJ Tube
connect laptop to sony bravia wireless, connect laptop to sony tv via wifi, how to connect laptop to sony bravia wirelessly, how to connect laptop wireless to sony bravia tv
Connect Your Laptop to Sony Bravia WiFi: The SHOCKINGLY Easy Method!
Unlock Your Sony Bravia's Wi-Fi – The Unbelievably Simple Guide!
Have you ever dreamed of mirroring your laptop screen onto your Sony Bravia? You aren't alone. We all desire seamless connectivity. It’s the modern way we enjoy entertainment. Fortunately, there's no need for complicated manuals or tech jargon. Connecting your laptop to your Sony Bravia's Wi-Fi is remarkably straightforward. Intrigued? Let's dive in.
First Things First: Gathering Your Arsenal
Before commencing, assemble your essentials. You'll need your Sony Bravia smart TV. Also, have your laptop ready. Ensure your Wi-Fi network is accessible on both devices. This is crucial for a successful connection. Make sure your Bravia is powered on. That’s definitely a good beginning. Now, let's prepare the laptop. A working internet connection is paramount.
Confirming Compatibility – Are We a Match?
Before proceeding, verify compatibility. Almost all recent Sony Bravia models support Wi-Fi connectivity. Therefore, it is likely your TV is compatible. The easiest way is checking your TV's specifications. Look for mentions of Wi-Fi Direct or screen mirroring capabilities. Alternatively, consult your TV's manual. If you are unsure, consult the manufacturer's website for your specific model. If it's equipped, then you're ready to move forward.
The Setup: A Step-by-Step Expedition
Now comes the exciting part. We will connect your laptop and TV. Follow these steps meticulously. It is easier than you imagine.
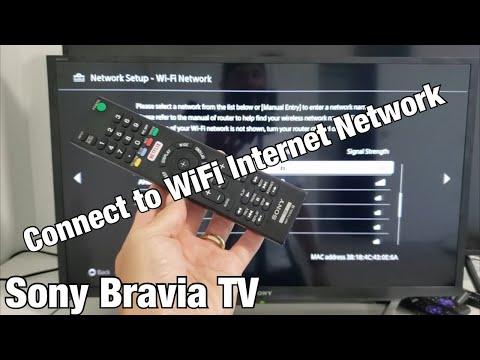
Step 1: Accessing Your Bravia's Settings: Locate your TV remote. Then, press the "Home" or "Menu" button. This will open your Bravia's main menu. Navigate to the "Network" or "Settings" section. The exact wording might differ. Hence, familiarize yourself with the menus.
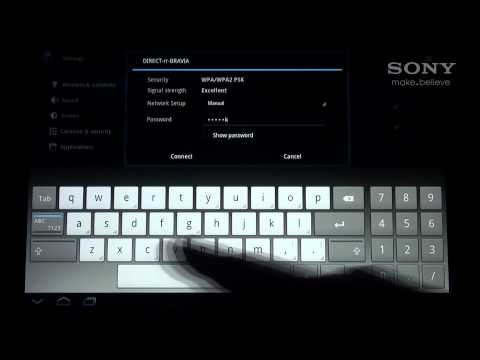
Step 2: Enabling Wi-Fi: Within the Network or Settings menu, find the Wi-Fi configuration. Select it. Ensure your Wi-Fi is enabled. Sometimes there's a simple on/off toggle. Select your home Wi-Fi network. Enter your network password if prompted. Your TV is now connected to your Wi-Fi.
Step 3: Finding the Right Feature: Your Bravia likely offers various screen mirroring options. These usually include "Screen Mirroring," "Wi-Fi Direct," or "Miracast." The exact name may vary slightly. Look for the option that allows you to "mirror" your laptop's screen.
Step 4: Laptop Preparation: On your laptop, ensure your Wi-Fi is active. Click on the network icon in your system tray. Look for the option to "cast" or "connect to a wireless display." This setting varies depending on your operating system.
Step 5: Connecting the Dots: Your laptop will begin searching for available displays. Your Sony Bravia should appear in the list. Select your TV's name to initiate the connection. You may be prompted for a PIN. If so, it'll appear on your TV screen. Enter the PIN on your laptop.
Troubleshooting Tips: Navigating Potential Roadblocks
Sometimes, the connection doesn't work instantly. No worries! It’s often a simple fix. In such cases, try these troubleshooting steps:
Restart Everything: Restart both your TV and laptop. This is a classic solution that often works. It clears temporary glitches.
Check the Network: Verify your Wi-Fi network’s stability. Ensure both devices are connected to the same network. A weak signal can cause problems.
Update Drivers: Outdated drivers can be problematic. So, update your laptop's Wi-Fi drivers. This can resolve compatibility issues. You'll find driver updates in your device manager.
Check for Updates: Ensure your Sony Bravia's software is up-to-date. Updates can sometimes improve connectivity.
Distance Matters: Keep your laptop and TV relatively close to each other. This minimizes signal interference.
Enhancing Your Viewing Experience
Now that you've successfully connected, consider these tips. You will truly enjoy the benefits of this process.
Optimize Your Display Settings: Adjust your display settings on both devices. Find the best resolution for optimal viewing. Make sure it looks great on your TV screen.
Explore the Possibilities: Stream movies, browse the web, or play games. Show off your favorite photos and videos on the big screen. It’s fantastic entertainment.
Enjoy the Freedom: Control your laptop from your couch. Furthermore, enjoy a more comfortable viewing experience. This is what it’s all about.
Conclusion: Your Connected Future
Connecting your laptop to your Sony Bravia Wi-Fi is easier than you thought. You've now unlocked a world of entertainment potential. Embrace the convenience and flexibility. Consequently, you are now well-equipped to start. Take advantage of this simple technology. Enjoy seamless screen mirroring and endless possibilities. So, get ready to transform your viewing experience. Go forth and connect!
Dell Laptop WiFi: SHOCKING Fix for Weak Signal!Connect Your Laptop to Sony Bravia WiFi: The SHOCKINGLY Easy Method!
Alright, tech adventurers! Ever found yourself staring at your gorgeous Sony Bravia, itching to show off that killer presentation or binge-watch your favorite show, only to be flummoxed by the connection process? Don’t worry, we’ve all been there. Trying to connect your laptop to your Sony Bravia via Wi-Fi used to feel like deciphering ancient hieroglyphics. But fear not! We're here to crack the code and show you The SHOCKINGLY Easy Method to get your laptop and your Bravia playing nice, fast. So, buckle up; we're about to embark on a simplified journey of digital connection!
1. The Initial Hurdles: Why Is This Even Tricky?
Let's be honest, the whole "connecting devices" game can sometimes feel like a digital obstacle course. We're talking about different operating systems, wireless protocols, and sometimes, just plain old compatibility issues. It's enough to make you want to throw your laptop out the window… (Just kidding! Mostly.) The good news is that Sony, with their Bravia TVs, has generally made this process smoother than a well-oiled machine. But first, we need to clear a few hurdles.
2. The Essentials: What You'll Need Before We Begin
Before we dive headfirst, let's make sure we've got all our ducks in a row. Think of this like gathering your ingredients before baking a cake. You wouldn't start without flour, would you? (Unless you're really adventurous.) Here's your checklist:
- A Sony Bravia Smart TV: Obviously! And make sure it's connected to your home Wi-Fi network. If you haven't done this, it's the first step.
- A Laptop: Windows or macOS? Doesn't matter! As long as it has Wi-Fi capabilities, you're golden.
- A Wi-Fi Connection: Your laptop and your Bravia need to be on the same wireless network. This is crucial!
- A Sense of Adventure: Because, let's face it, the internet can be a wild place.
3. The Simplest Method: Screen Mirroring – Your Digital Magic Wand
This is the holy grail, the easiest route, the one we're going to focus on. Screen mirroring, also known as "casting" or "screen sharing," lets you wirelessly stream your laptop's display directly to your TV. Think of it like holding up a mirror to your laptop screen, with the Bravia being the reflection.
4. Windows 10/11 Users: The Quickest Route to Bravia Bliss
If you're a Windows user, you're in luck! Microsoft has made this beautifully simple. Here's the lowdown:
- Step 1: Make sure your laptop screen is on: This might seem obvious, but hey, we all have those moments!
- Step 2: Access the Action Center: Look for the little notification icon (a speech bubble) in the bottom-right corner of your screen. Click it.
- Step 3: Click "Connect": If you don't see it, click "Expand" to show more options.
- Step 4: Select Your Bravia: Your TV should appear in the list of available devices. Click on it.
- Step 5: Enjoy the Show!: Your laptop screen is now mirrored on your Bravia!
Troubleshooting Tip: If your Bravia isn't listed, ensure both devices are on the same Wi-Fi network and that your Bravia is turned on. If it still isn't working, try updating your laptop's drivers.
5. macOS Mavericks and Beyond: AirPlay to the Rescue!
Apple users, rejoice! You also have a straightforward method. The technique is different than Windows.
- Step 1: Ensure you have a compatible setup: This is usually straightforward. This means your Bravia must be compatible with AirPlay.
- Step 2: Ensure AppleTV app is installed: If you're running macOS Monterey (version 12) or later, it will be pre-installed.
- Step 3: Go to your laptop's screen with your video or presentation ready: Prepare exactly what you want to display!
- Step 4: Mirror or Screen Share: Click the AirPlay icon in your menu bar along the top of your screen. Select your Bravia.
- Step 5: Enjoy the Show! That's it!
Troubleshooting Tip: Make sure your laptop and Bravia are both on the same Wi-Fi network. If you don't see the AirPlay icon, try restarting your laptop and your Bravia. You may also need to update the software on your Bravia.
6. A Sneak Peek at Other Methods: Casting Without Wi-Fi?
While screen mirroring is the easiest, there are other methods, though they might require a bit more technical know-how.
- HDMI Cable: The old-school, reliable choice. Connect your laptop to your Bravia via an HDMI cable. Simple, effective, and provides the best picture quality.
- Google Chromecast: If your Bravia doesn't have built-in screen mirroring, using a Chromecast is a solid alternative. Plug it into your TV, connect to your Wi-Fi, and you can cast from your Chrome browser or many apps.
- DLNA (Digital Living Network Alliance): Some Bravias support DLNA, which allows you to stream media files from your laptop to your TV. This is more complex than screen mirroring, so we won't go into detail here.
7. Understanding the Protocols: A Quick Tech Primer
Let's get a little nerdy for a moment. Don't worry, we'll keep it simple. Screen mirroring uses protocols like Miracast (for Windows) and AirPlay (for Apple) to wirelessly transmit the image from your laptop to your TV. Think of these protocols as the language your devices use to "talk" to each other. HDMI, on the other hand, is a direct, wired connection, which usually leads to fewer compatibility issues.
8. The Fine Print: Wi-Fi Network Considerations
Your Wi-Fi network plays a crucial role. Here's what to keep in mind:
- Bandwidth: A faster Wi-Fi connection (802.11ac or newer) will result in smoother streaming, especially if you're watching HD videos.
- Distance: The further your laptop is from your Wi-Fi router, the weaker the signal, and the more likely you are to experience lag or buffering.
- Interference: Other devices using the same Wi-Fi network can slow things down. Try to reduce the number of devices streaming at the same time.
9. Optimizing Your Experience: Getting the Best Picture and Sound
Want to take your viewing experience from "meh" to "marvelous"? Here's how:
- Adjust Your Bravia's Picture Settings: Play around with the picture settings on your TV to get the look you want.
- Use External Speakers: For a truly immersive experience, connect your Bravia to a soundbar or home theater system.
- Close Unnecessary Apps: Shut down any apps on your laptop that you’re not using to conserve resources and avoid lag.
10. Common Issues and Solutions: Troubleshooting Like a Pro
Sometimes, things don't go as planned. Here are some common problems and solutions:
- My Bravia Isn't Showing Up: Double-check that both devices are on the same Wi-Fi network and that your Bravia is turned on. Restart both devices.
- Lagging or Buffering: Move your laptop closer to the Wi-Fi router. Close other apps on your laptop. Consider upgrading your Wi-Fi router.
- Poor Picture Quality: Check your resolution settings on your laptop. Ensure your Wi-Fi connection is strong.
11. Security Matters: Protecting Your Privacy
When connecting devices, it’s smart to think about security. Make sure your Wi-Fi network is password-protected, and consider using a VPN (Virtual Private Network) for added security if you're streaming sensitive content.
12. Beyond the Basics: Exploring Advanced Features
For the truly adventurous, there are more advanced features to explore, like customizing your Bravia's settings for optimal performance or using third-party apps for specific streaming needs. But let's keep it simple for now!
13. Is It Really Worth the Trouble? Absolutely!
Connecting your laptop to your Bravia opens up a world of possibilities. From sharing photos and videos with friends and family to giving killer presentations, the convenience is undeniable. It’s like having a giant, personal entertainment center in your living room!
14. The Future of Connectivity: What's Next?
Technology is always evolving. Expect even easier and more seamless methods of connecting your devices in the future, possibly with even less reliance on wires and more intuitive integration.
15. Recap: The Essential Steps to Bravia Brilliance
Let's recap the key takeaways:
- Screen Mirroring is King: It is the easiest connection method for most users.
- **
Sony Bravia TV How to Connect to Wifi Network Internet
By WorldofTech Sony Bravia TV How to Connect to Wifi Network Internet by WorldofTech
How to Mirror Screen cast your laptop to Sony Bravia TV via Wi Fi

By TIP OF THE DAY How to Mirror Screen cast your laptop to Sony Bravia TV via Wi Fi by TIP OF THE DAY
Sony BRAVIA Wi-Fi Direct How to Video.....
By Sony Canada Training Sony BRAVIA Wi-Fi Direct How to Video..... by Sony Canada Training

Title: Sony BRAVIA Wireless Connection How-To
Channel: Sony Canada Training
Sony BRAVIA Wireless Connection How-To by Sony Canada Training
Wifi Not Found
Connect Your Laptop to Sony Bravia WiFi: A Seamless Guide to Wireless Viewing
Welcome! We understand the frustration of tangled cables and the desire for a truly immersive entertainment experience. This guide will walk you through, step-by-step, how to effortlessly connect your laptop to your Sony Bravia TV via Wi-Fi, transforming your viewing habits. Forget complex setups; we'll make it remarkably straightforward. Prepare to enjoy your favorite content on the big screen with unparalleled ease.
Unveiling the Wireless Connection: A Primer
Before diving into specifics, let's clarify the fundamental principle. Connecting your laptop to your Sony Bravia via Wi-Fi typically leverages the power of either screen mirroring technologies or a network connection, allowing your TV to become an extension of your laptop's display. This grants you the freedom to wirelessly stream movies, view photos, and conduct presentations – all without the limitations of physical connections. The process, while seemingly complex, boils down to a handful of intuitive steps.
Prerequisites: Ensuring a Smooth Connection
To embark on this wireless journey, certain prerequisites are essential. First, confirm that both your laptop and your Sony Bravia TV are connected to the same Wi-Fi network. This is the bedrock of the connection; without a shared network, the devices won't be able to communicate. Next, ensure your Sony Bravia is a smart TV model, capable of wireless connectivity. This feature is standard on most modern Sony Bravia models. Finally, make sure your laptop's software is updated. The operating system on your laptop needs to have the most recent updates.
Method 1: Screen Mirroring - The Instantaneous Solution (Windows)
Screen mirroring is the simplest path, especially for Windows users. Here’s how:
- Initiate the Connection: Click the notification icon in the bottom-right corner of your Windows desktop – it resembles a speech bubble. This will open the Action Center. Within the Action Center, locate and click on the "Connect" tile. If the "Connect" tile isn't immediately visible, you may need to click "Expand" to reveal it.
- Select Your Sony Bravia: Windows will begin searching for available devices. Your Sony Bravia TV, provided it's powered on and connected to the same Wi-Fi network, should appear in the list. Click on the name of your Sony Bravia.
- Establishing the Link: Windows will now attempt to establish a connection with your TV. There may be a brief delay while this occurs. The TV screen may display a connecting message.
- Display Options: Once connected, your laptop's screen will be mirrored on your TV. The "Connect" pane in your Windows Action Center will provide options to adjust the display mode. You can choose to duplicate your laptop's display (showing the same content on both screens), extend your display (using your TV as a second monitor), or connect to a wireless display.
- Controlling the Experience: You can control your entire viewing experience from your laptop. Use the mouse and keyboard to navigate apps, play videos, and browse the web, all displayed on your Sony Bravia.
Method 2: Screen Mirroring - The Effortless Approach (macOS)
Mac users will find screen mirroring equally accessible:
- Activate AirPlay: Click the AirPlay icon in the menu bar at the top of your screen. If the icon isn't visible, you may need to enable it in System Preferences > Display.
- Choose Your TV: From the dropdown menu that appears, select your Sony Bravia TV.
- Mirror or Extend: You may be prompted to enter an AirPlay passcode that appears on your TV screen. Once connected, you'll have the option to mirror your display (showing the exact same content on both your laptop and TV), or extend your display (using your TV as a second monitor). Select your preferred option by clicking the AirPlay icon in the menu bar.
- Enjoy the Stream: You can now view your entire interface on the Sony Bravia.
Method 3: Utilizing Sony Bravia Built-In Apps (Laptop and TV)
Sony Bravia TVs often come with built-in apps such as screen mirroring or casting functions, offering a direct connection without relying entirely on your laptop's mirroring capabilities. Here's how to leverage these apps:
- Access the TV's App Store: Navigate to your Sony Bravia's home screen and locate the app store, typically labeled "Google Play Store" or something similar.
- Download the Necessary Apps: Download and install applications that enable mirroring or casting from your laptop if you haven't done so already. Your TV might already have built-in apps such as Chromecast or Screen Mirroring.
- Launch the App (on the TV): Open the installed application on your Sony Bravia. The app will typically display a screen, waiting to connect.
- Connect Your Laptop: On your laptop, open the equivalent app (e.g., Google Chrome for Chromecast). This app will identify available devices on your network. Select your Sony Bravia TV from the list.
- Begin Streaming: Once connected, you can begin streaming content from your laptop to your TV.
Method 4: Utilizing a Media Server (Advanced)
For users with a more extensive media library, a media server provides a centralized solution for streaming content.
- Install Media Server Software: Install a media server application like Plex, Jellyfin, or Kodi on your laptop. These applications organize your media files (movies, TV shows, music, photos) and make them accessible over your Wi-Fi network.
- Configure Your Media Server: Configure your media server settings. Add your media library folders and customize the display to your liking.
- Access the Media Server on Your Sony Bravia: On your Sony Bravia, launch the Plex, Jellyfin, or Kodi app (install as needed). If you are using Chromecast, you will need to open the app on the TV.
- Browse and Play: Browse your media library from within the TV's app. Select the content you wish to watch and enjoy.
Troubleshooting Common Issues
Encountering difficulties? Here’s how to resolve some common problems:
- Connection Failure: Double-check that both devices are connected to the same Wi-Fi network. Restart both your laptop and your Sony Bravia. Ensure that the required apps are up-to-date.
- Poor Video Quality: The video quality can be affected by your Wi-Fi connection. Try moving your laptop and your TV closer to your router to improve signal strength. Consider switching to a 5 GHz Wi-Fi network, which generally offers more bandwidth than the 2.4 GHz band.
- Audio Problems: Verify your TV's audio settings and confirm that the audio output is correctly configured. Consider a reboot.
- Lagging or Stuttering Video: This often indicates a weak Wi-Fi signal or a lack of processing power. Close any unnecessary applications running on your laptop and/or TV. Try a wired connection between a device and the router for a more stable streaming experience.
- Cannot Find the TV: Make sure screen mirroring is enabled on Sony bravia TV.
Maximizing Your Viewing Pleasure: Tips and Tricks
To enhance your streaming experience further:
- Optimize Your Wi-Fi: A stable, strong Wi-Fi signal is paramount. Position your router in a central location and minimize physical obstructions between your router and your devices.
- Manage Multiple Devices: If multiple devices are using your Wi-Fi network simultaneously, it can impact streaming performance. Close any unnecessary applications on your other devices that are using the Wi-Fi.
- Update Regularly: Keep your laptop's operating system, your Sony Bravia's software, and all associated apps updated. Updates often include performance improvements and fixes.
- Explore Video Streaming Services: Subscribing to streaming services offers high-quality content directly to your TV via apps such as Netflix, Disney+, and Hulu.
- Experiment with Display Settings: Adjust your laptop’s display settings, and the settings on your Sony Bravia, to optimize the picture quality for your content. Some content might look great on different devices or in different settings.
- Clear Browsing Tabs: When mirroring, close any tabs to free up resources.
- Reduce Resolution: Try reducing the resolution to improve performance.
Conclusion: Embracing the Wireless Future
Connecting your laptop to your Sony Bravia via Wi-Fi is a remarkably simple process. With the steps outlined above, you'll find yourself enjoying your favorite content in a whole new way: wirelessly, effortlessly and in captivating detail. Your living room has now been transformed into a personal home theater. Step into the future of entertainment, and cast away the cables!
