acer laptop not detecting wifi windows 7

Title: Not connected no connections are available windows 7 laptop
Channel: IT Magics
Not connected no connections are available windows 7 laptop by IT Magics
acer laptop not detecting wifi windows 7, acer laptop not detecting wifi windows 10, acer laptop not detecting wifi, acer laptop not showing wifi option
Acer WiFi Nightmare on Windows 7? FIX IT NOW!
Acer WiFi Woes on Windows 7: Rescuing Your Connection!
Oh no! Is your Acer laptop refusing to connect to Wi-Fi on Windows 7? Frustration mounts quickly when the internet vanishes. Don't despair, my friend! In this guide, we will help you reconnect to the online world. We’ll make your Acer laptop's Wi-Fi sing again.
The Annoying Acer and Its Wi-Fi Troubles
Acer laptops, at times, seem to have a specific grudge against Wi-Fi on older operating systems. Many users face these issues. Before we get into the nitty-gritty of solutions, let's acknowledge the problem. The symptoms can range from complete connection failures to slow speeds. You have probably encountered dropped signals or a frustrating "limited connectivity" error.
Digging Deeper: Pinpointing the Root Cause
First, consider the possibilities. Is it the network adapter, your router, or Windows 7? It’s important to be precise. To understand the problem demands detective work. Often, the issue stems from outdated drivers. Compatibility issues also creep in. Sometimes, it’s just a simple misconfiguration.
Step 1: Breathe, Reboot, and Reconnect (The Basics)
Before panic sets in, try basic troubleshooting. Restarting your Acer laptop is often the first step. Shut down your router and modem and restart them too. Wait a minute or two. Then, turn them back on. Observe the Wi-Fi connection. Many times, this clears up the issue! This simple step resolves many connectivity issues.
Step 2: Driver Detective Work: Updating Your Wi-Fi Credentials
Drivers are the heart of your hardware. Outdated drivers cause problems. Download the latest drivers for your specific Acer model. Proceed to the Acer support website. Find the drivers for your Wi-Fi adapter. Windows 7 users might need to search specifically. Many times, this is the solution. Install the new drivers carefully. Then, restart your laptop.
Step 3: Network Adapter Settings – A Fine-Tuning Approach
Sometimes, settings need a bit of tweaking. Go to your network connections area. Right-click on your Wi-Fi adapter. Select "Properties". Make sure "Client for Microsoft Networks" is selected. Also ensure "Internet Protocol Version 4 (TCP/IPv4)" is enabled. These seemingly small settings are important.
Step 4: The Troubleshooter's Touch: Let Windows Help!
Windows 7 has a built-in troubleshooter. It's an excellent tool for diagnosing problems. Right-click the Wi-Fi icon in the system tray. Choose "Troubleshoot problems". Let the troubleshooter do its work. It will suggest fixes automatically. Give it a try, you never know!
Step 5: Router Revelation: Examining Your Wireless Configuration
Next, examine your router’s settings. Check your security settings. Make sure your Wi-Fi password is correct. Also, be aware of channel interference. Try changing your Wi-Fi channel. Research the optimal channel for your area. This can enhance your signal strength.
Step 6: Security Software Shenanigans: Considering Your Firewall
Sometimes, your firewall or antivirus interferes. Temporarily disable your security software. Try reconnecting to Wi-Fi. If it works, you might need to adjust your settings. You'll have to allow your Wi-Fi connection through. Then, re-enable your protection.
Step 7: Seeking Professional Aid (When All Else Fails)
If the above steps don't work, seek help. Consider contacting Acer support. Maybe a local computer repair shop is a better option. Describe your problem in detail. They can assess the problem further. Don’t be afraid to ask for help.
Final Thoughts: Back to Browsing Bliss!
Dealing with Wi-Fi troubles can be incredibly frustrating. Remember those days of effortless browsing through the internet? Following these steps should get you back online. With a bit of patience and determination, you can conquer your Acer Wi-Fi woes. Now, go forth and enjoy your restored connection. Happy surfing!
HP Printer WiFi Nightmare? FIX It NOW! (Laptop Connection)Acer WiFi Nightmare on Windows 7? FIX IT NOW!
Alright, friends, let's be honest. We've all been there. That sinking feeling when the little WiFi icon in the system tray decides to throw a tantrum. And for those of us rocking an Acer laptop with Windows 7, well, it can sometimes feel like a full-blown digital drama. The good news? We're in this together, and we can fix it! I've wrestled with these Acer WiFi woes myself (more times than I care to admit!), and I'm here to share the battle-tested strategies that have saved my bacon – and, hopefully, yours too. Forget those frustrating buffering wheels and get ready to reclaim your internet freedom.
1. The Acer WiFi Anomaly: Why is This Happening?
Before we dive into the fix-it-now part, let's understand the enemy. Why does Acer and Windows 7 seem to have this… complicated relationship with WiFi? Well, a few factors are often at play. Compatibility issues, driver glitches, and outdated software are the usual suspects. It could be a simple clash of hardware and software, or perhaps a driver update that decided to take a vacation from being helpful. Think of it like a dance where the partners just aren't quite in sync. This disconnect leads to dropped connections, slow speeds, and the ultimate internet frustration: that dreaded "limited connectivity" message.
2. Driver Downloads: Your First Line of Defense.
Right, enough with the metaphors! The first thing to tackle is your WiFi adapter drivers. They're like the translators between your laptop and the vast world of the internet. Outdated or corrupted drivers are prime suspects in this WiFi mystery.
- Head over to the Acer support website. Search for your specific Acer laptop model. (You can often find this on a sticker on the bottom of your laptop.)
- Navigate to the "Drivers and Manuals" section.
- Look for the network or WiFi adapter drivers. Download the latest version available.
Now, here's a pro-tip: download the drivers to your desktop first. This ensures you have them readily available.
3. Installation & Updating: A Step-by-Step Guide.
Now, for the installation process. This is crucial, so follow along, and we'll banish those connection demons forever!
- Uninstall: Before installing anything new, go to the Device Manager (type "Device Manager" into the Windows 7 search bar). Find your network adapter (it'll usually be listed under "Network adapters"). Right-click it and select "Uninstall." Important: Check the box that says "Delete the driver software for this device" if it's available.
- Restart: Reboot your laptop. This gives everything a fresh start.
- Install the Driver: Navigate to the downloaded driver file on your desktop and run the setup. Follow the on-screen instructions. It's usually a breeze.
- Restart Again: Another reboot never hurts, especially after a driver installation.
4. The Wireless Network Troubleshooter: A Quick Check.
Windows 7 actually has a built-in troubleshooter designed for these very situations. Think of it as the tech support wizard living right inside your laptop.
- In the system tray (lower right corner), right-click the WiFi icon.
- Select "Troubleshoot problems."
- Let Windows diagnose any problems. It might offer a quick fix. Sometimes, it's surprisingly effective!
5. Power Management Settings: Don't Let Your Laptop Sleep on the Job!
Believe it or not, your laptop's power management settings can sometimes interfere with your WiFi connection. This is especially true if your laptop is configured to conserve power by shutting down or limiting the power to your network adapter.
- Go back to Device Manager (remember where that is?).
- Expand "Network adapters."
- Right-click your wireless adapter and select "Properties."
- Go to the "Power Management" tab.
- Uncheck the box that says "Allow the computer to turn off this device to save power."
This simple tweak can make a huge difference.
6. Check Your Router: The Gatekeeper of the Internet.
Occasionally, the problem isn't your laptop; it's your router. Remember, your router is the gatekeeper to the internet.
- Reboot the Router: Unplug your router from the power outlet, wait 30 seconds, and plug it back in. This basic step fixes a surprising number of issues.
- Check Router Channels: Your router broadcasts on different channels. These channels can sometimes overlap and cause interference, especially in crowded WiFi environments (lots of neighbors!). Log into your router's settings (usually by typing your router's IP address into a web browser–check your router's manual for the default address). Look for the WiFi settings and try changing the channel. Experiment with different channels to see if it improves your connection.
- Router Firmware: Make sure your router's firmware is up to date. This is another tip that often gets overlooked.
7. Firewall Issues: Is Your Computer Protective to a Fault?
Sometimes, your firewall might be blocking your WiFi connection. Think of it as an overly zealous bouncer who just won't let the internet party into your laptop.
- Go to your Control Panel and find Windows Firewall.
- Click "Allow a program or feature through Windows Firewall."
- Make sure your wireless network adapter is allowed access. If it's not, add it to the exceptions list.
8. Network Adapter Settings: Tweaking for Optimal Performance.
There are a few more settings you can tweak within the network adapter itself. These are like fine-tuning adjustments for the connection engine.
- Go back to Device Manager and right-click your wireless adapter, and then select "Properties."
- Click the "Advanced" tab.
- Experiment with settings like "Wireless Mode" (try different options like 802.11g or 802.11n) or "Transmit Power." Be careful when adjusting these – a wrong setting can make things worse! If you're unsure, research what each setting does before changing it.
9. The DHCP Protocol: Understanding IP Addresses
Your laptop needs an IP address to communicate on the network. This is usually automatically assigned using the DHCP protocol. Occasionally, there might be an issue.
Release and Renew: Open a Command Prompt (type "cmd" in the search bar). Type the following commands, pressing Enter after each:
ipconfig /releaseipconfig /renew
This will force your computer to request a new IP address from your router.
10. The Security Key: Double-Check the Password.
This may sound silly, but it's amazing how often it's the culprit! Make sure you're entering the correct WiFi password. Capitals, lowercase, numbers, and symbols all matter! You might have misspelled a letter or forgotten a special character.
11. Physical Obstacles: The WiFi Range Issue.
WiFi signals, like actual waves, can be blocked by physical objects. Walls, metal objects, and even water can interfere with the signal strength.
- Move Closer: If possible, move your laptop closer to the router.
- Minimize Obstacles: Try to minimize the objects between your laptop and router.
- Check Placement: Is your router tucked away in a closet? Bringing it into a more open space might improve the range.
12. Run Microsoft's Network Diagnostics.
Microsoft has another set of troubleshooting tools that can help. It’s worth exploring these.
- Type "Network and Sharing Center" into the Windows 7 search bar.
- Click "Troubleshoot problems."
- Select "Network Adapter" and let it run. It may reveal a simple fix.
13. Registry Fixes: (Use with Caution!)
Disclaimer: Modifying the registry can be risky. Make a backup before proceeding.
Sometimes, tweaking the registry can provide a fix, but only if you know what you are doing. Incorrect registry changes can cause serious system problems. This is only a solution if you are computer savvy.
14. Reset Network Settings to Default.
As a last resort, you can reset your network settings to their default configuration. This will remove all custom settings and return your network adapter to its original state.
- Go to Network and Sharing Center in the control panel.
- Click "Change adapter settings."
- Right-click on your network adapter and select "Repair."
15. Call Acer's Support, or a Professional, If All Else Fails.
If you've tried everything above and you're still facing the Acer WiFi nightmare, it's time to call in the pros. Contact Acer customer support or take your laptop to a reputable computer repair shop. They might have access to tools or specific knowledge that can help diagnose and resolve your issue. Sometimes, a more serious hardware problem is at play, which might require their expertise. Don't be afraid to seek help!
Conclusion: Breathe Easy, You've Got This!
So, there you have it! A comprehensive guide to tackling those infuriating Acer WiFi problems on Windows 7. We've covered everything from driver updates to router settings, power management to security keys. Remember, the key is to
Hotel Wi-Fi Hack: Get Online INSTANTLY!Fix Acer Wi-Fi Not Working in Windows 1087 2025

By TechFixIT Fix Acer Wi-Fi Not Working in Windows 1087 2025 by TechFixIT
Windows was unable to connect wifi windows 7 Laptop and Desktop

By IT Magics Windows was unable to connect wifi windows 7 Laptop and Desktop by IT Magics
Wifi network not showing in windows 7

By Being Selftech Wifi network not showing in windows 7 by Being Selftech
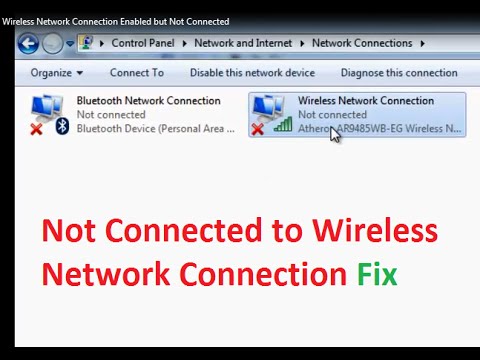
Title: Wireless Network Connection Enabled but Not connected Fix Windows 7
Channel: troubleshooterrors
Wireless Network Connection Enabled but Not connected Fix Windows 7 by troubleshooterrors
Laptop Wifi Connect
Acer WiFi Nightmare on Windows 7? FIX IT NOW!
We understand the frustration. You're attempting to connect your Acer laptop, or perhaps a desktop with an Acer-branded WiFi adapter, to your home or office network, and instead of seamless browsing, you're staring down the barrel of a WiFi connection that refuses to cooperate. The dreaded "limited connectivity," intermittent dropouts, agonizingly slow speeds – the hallmarks of a WiFi nightmare. And with Windows 7, a platform that, while still functional, is often a gateway to a troubleshooting odyssey, the challenges can seem amplified. But fear not. We've compiled a comprehensive guide, meticulously crafted to dissect the common culprits plaguing your Acer WiFi connection and empower you with the solutions to finally banish the network gremlins.
Diagnosing the WiFi Woes: Pinpointing the Problem
Before launching into fixes, accurate diagnosis is crucial. Assuming a blanket approach leads to wasted time and frustration. Several factors can contribute to WiFi problems, and correctly identifying the root cause is, well, the root of the solution.
- Driver Dilemmas: Outdated, corrupted, or incompatible network drivers are prime suspects. Windows 7, while dependable, might not automatically supply the optimal drivers for your specific Acer hardware. This can lead to poor performance, frequent disconnections, or outright failure to detect the WiFi network.
- Router Rumble: While the issue appears to be the Acer laptop, frequently the problem originates on the other side. The router itself could be experiencing problems. Firmware issues, overloaded channels, or a failing wireless radio can wreak havoc on your WiFi connection.
- Security Setbacks: Incorrect security settings on your Acer laptop or the router can impede the connection process. Mismatched encryption types, password errors, or firewall interference can all contribute to connectivity issues.
- Hardware Hindrances: Sometimes, the problem is physical. A loose WiFi card, physical interference, or even a failing wireless adapter within the Acer laptop can cause significant difficulties.
Step-by-Step Solutions: Conquering the Connection
Now, let's delve into the solutions, progressing from the simplest adjustments to more advanced troubleshooting techniques.
1. Driver Revitalization: The First Line of Defense
Driver issues are some of the most common causes of WiFi problems. Fortunately, they are often among the easiest to resolve.
- Method 1: Device Manager Deep Dive: Access the Device Manager by searching for it via the Windows 7 Start Menu. Expand the "Network adapters" category. Here, you'll see the network adapters installed in your system, including your Acer's built-in WiFi adapter (likely named something like “Wireless Network Adapter”.) Right-click on the adapter and select "Update Driver Software…". Select "Search automatically for updated driver software." Windows will automatically locate and install any available drivers. If this process fails, don’t worry.
- Method 2: The Acer Driver Arsenal: Visit the Acer support website (support.acer.com) and navigate to the driver download section. You'll need to input your Acer laptop's model number to download the correct drivers. You can find this model number via the label affixed to the bottom of your Acer laptop. Locate the Wireless LAN or WiFi drivers specifically. Download the driver package that suits your system. Once downloaded, double-click the executable file and follow the on-screen instructions to install the new driver. Remember to restart your computer after installation.
- Method 3: Driver Rollback – A Strategic Retreat: If the problem started after a recent driver update, a rollback might be necessary. In the Device Manager, right-click your WiFi adapter, select "Properties," then navigate to the "Driver" tab. If available, the "Roll Back Driver" button will allow you to revert to the previously installed version.
2. Router Reboot and Channel Optimization
Sometimes, the solution lies outside your Acer laptop. Your router might be the culprit.
- The Power Cycle: Unplug your router and modem (if separate). Wait at least 30 seconds. Plug the modem back in, allowing it to fully boot up (this may take a minute or two). Then, plug the router back in and let it fully initialize. This classic reset often clears temporary glitches.
- Channel Congestion Combat: Wireless routers operate on specific channels. A crowded channel can lead to interference and reduced performance. Access your router’s configuration interface via your web browser (typically by typing its IP address, such as 192.168.1.1, into the address bar). Consult your router’s manual for login credentials (the username and password). Within the wireless settings, look for a section on channel selection. Experiment with different channels. Channels 1, 6, and 11 are generally considered less congested, but the best choice depends on your specific environment.
- Firmware Fixes: Check your router’s firmware. Outdated firmware can cause compatibility issues. Access your router's configuration interface and look for a firmware update section. Download and install any available updates.
3. Security Synchronization and Connection Configuration
Incorrect security settings can prevent your Acer laptop from connecting to your WiFi network.
- Password Primer: Double-check your WiFi password. It's amazing how often a simple typing error causes connection failures. Ensure that Caps Lock is not engaged.
- Encryption Elevation: Verify that your router supports WPA2 or WPA3 encryption, and that your Acer laptop is using the same security protocol. WEP encryption is outdated and insecure. Change it if possible.
- Firewall Friendliness: Some firewalls, including Windows Firewall and third-party security software, can sometimes block WiFi connections. Temporarily disable your firewall to see if it resolves the issue. If it does, you'll need to configure your firewall to allow your WiFi connection.
4. Advanced Troubleshooting and Hardware Considerations
If the previous steps haven’t resolved the issue, further investigation is required.
- Network Diagnostics: Windows 7 has built-in network diagnostic tools. Right-click the WiFi icon in your system tray (the area near the clock) and select "Troubleshoot problems." Follow the on-screen prompts. While diagnostics might not always provide a definitive solution, they can sometimes pinpoint the problem.
- IP Address and DNS Configuration: Ensure that your Acer laptop is obtaining its IP address automatically (DHCP). You can check this in the Network and Sharing Center (accessed through the control panel). Verify your DNS settings. Consider using a public DNS server, such as Google’s (8.8.8.8 and 8.8.4.4) or Cloudflare’s (1.1.1.1 and 1.0.0.1), which can sometimes improve connection speed and reliability.
- Hardware Inspection: If persistent problems remain, there could be a hardware issue. Inspect the WiFi adapter for any visible damage. If you are comfortable doing so, open your Acer laptop (consult your laptop’s manual for safe disassembly procedures) and check the physical connection of the WiFi card to the motherboard. A loose connection can easily lead to issues. In more extreme cases, the WiFi adapter itself might need replacing. This is often a straightforward procedure, but it might require professional assistance.
- External Interference Elimination: Physical objects, such as microwaves, cordless phones, and other electronic devices, can cause interference. Move your Acer laptop closer to the router and ensure that there are no obstructions between the laptop and the router.
After the Fix: Ongoing WiFi Maintenance
Once you've successfully restored your Acer’s WiFi connection, remember to maintain it.
- Regular Driver Updates: Periodically check for and install new driver updates.
- Router Firmware Updates: Keep your router's firmware up to date.
- Security Vigilance: Regularly rotate your WiFi password.
- Performance Monitoring: Monitor your WiFi speed and performance. If issues arise again, review the troubleshooting steps outlined above.
By meticulously following these steps you dramatically increase your chance of resolving your Acer WiFi issues. Enjoy your newly restored, reliable connection!
