cara mempercepat koneksi wifi pada laptop windows 8.1

Title: Cara Mempercepat Koneksi Jaringan Wifi Di Laptop
Channel: Wira HK
Cara Mempercepat Koneksi Jaringan Wifi Di Laptop by Wira HK
Is Your Windows 8.1 WiFi SLOW? This Trick Makes It Blazing Fast!
Is Your Windows 8.1 WiFi Dragging You Down? Unleash Lightning-Fast Speeds With One Simple Tweak!
Are you fighting a losing battle with your Windows 8.1 WiFi? Do sluggish download speeds and frustrating buffering woes plague your online experience? It's incredibly irritating, isn't it? Don't despair! You are not alone. Many users encounter these issues. Fortunately, there's a surprisingly simple solution that could significantly boost your wireless internet performance. Keep reading, I promise you'll be surprised.
The WiFi Woes of Windows 8.1: A Common Complaint
Windows 8.1, while a functional operating system, can sometimes struggle in the WiFi department. Several factors can contribute to this problem. It's possible the network adapter is outdated. Driver issues might also be at play. Moreover, interference from other devices can hamper performance. However, before you consider drastic measures, let's try a less intrusive approach.
Unveiling the Secret: Power Management Optimization
The key to unlocking faster WiFi speeds in Windows 8.1 lies within your power management settings. Believe it or not, a hidden configuration can throttle your network adapter. This can dramatically affect your internet performance. So, what precisely is this hidden configuration? Let’s dive in.
Step-by-Step Guide: Tweaking Your Power Settings
Getting started is straightforward. Follow these simple steps to optimize your WiFi. First, find the "Device Manager." You can easily access it through the search bar. Simply type "Device Manager" and select it.
Next, locate "Network adapters" in the Device Manager window. Click the arrow to expand the list. Once expanded, you should see your WiFi adapter listed here. The name will vary. It usually includes "Wireless Network Adapter" or something similar.
Right-click your WiFi adapter. Then, choose "Properties" from the context menu. A new window will appear with several tabs.
Now, navigate to the "Power Management" tab. You should see a checkbox labeled "Allow the computer to turn off this device to save power." Crucially, this is the culprit.
Uncheck this box! That's the magic step. After unchecking, click "OK" to save the changes. Close the Device Manager.
The Immediate Aftermath: What To Expect
Immediately after making this adjustment, you might witness a marked difference. For some, the change is subtle. Others will experience a significant speed boost. Web pages will load faster. Downloads should complete more quickly. Streaming videos will buffer less frequently. Moreover, the improvement should be immediately noticeable.
Why This Trick Works: Power and Performance
This simple tweak works because it prevents Windows from putting your WiFi adapter into a low-power state. The system, by default, might try to conserve energy by turning off the device. Doing so negatively impacts performance. Consequently, you experience slower speeds. Disabling this option ensures the adapter is always ready to receive and transmit data at its maximum capabilities.
Troubleshooting and Further Considerations
If you don't instantly see a difference, don't lose hope. First, restart your computer. This ensures the changes take full effect. Nonetheless, it's important to consider other factors. Your internet service provider (ISP) plays a crucial role. The router's condition also matters. It may be time for an upgrade. Finally, other devices on your network might consume bandwidth.
Moreover, check for driver updates. Outdated drivers can cause performance bottlenecks. You can update drivers through the Device Manager. Right-click your WiFi adapter and select "Update driver." Follow the on-screen instructions.
Beyond the Tweak: Boosting Your WiFi Further
While optimizing power management is a great first step, other techniques can enhance your WiFi experience. For instance, ensure your router's firmware is up-to-date. Upgrading your router to a newer standard is also a valid idea. The latest standards support faster speeds. Plus, positioning your router strategically can also improve signal strength.
A Final Word: Enjoy Your Revitalized WiFi!
Hopefully, this tip rejuvenates your Windows 8.1 WiFi performance. With a few simple clicks, you could transform a frustrating experience into a seamless, high-speed connection. So, take a few minutes to try this method. You'll be surprised by the results. It's a quick fix. It's also incredibly effective. Go forth and enjoy a faster, more reliable internet experience.
Laptop WiFi Setup: Ditch the Extender, Get Online NOW!Is Your Windows 8.1 WiFi SLOW? This Trick Makes It Blazing Fast!
Hey everyone, let's be honest, we've all been there. You're settled in, ready to binge-watch your favorite show, or maybe you're finally getting around to that important online task, and BAM! The dreaded spinning wheel of doom. Your Wi-Fi is slower than a snail in molasses, and you're left staring at your screen, wishing you could just will the internet to be faster. If you're still rocking Windows 8.1 (no judgment, we all have our reasons!), and your Wi-Fi is giving you the slow blues, then you've come to the right place. We're going to dive deep and find out how to turbocharge that connection and get you back to enjoying the digital world at breakneck speed.
The Silent Suffering: Recognizing the Signs of Slow Windows 8.1 Wi-Fi
Before we get to the good stuff, let's make sure we're actually dealing with a Wi-Fi problem. Slow Wi-Fi can manifest in a bunch of frustrating ways. Are you experiencing constant buffering when streaming videos? Does it take forever to load a simple webpage? Is downloading anything a multi-hour affair? If you answered yes to any of these questions, then the odds are good you're suffering from the slow Wi-Fi blues. Think of it like having a clogged artery – your internet is struggling to get the information it needs to function properly.
The Usual Suspects: Common Causes of Wi-Fi Slowness
Before we start throwing around "magical fixes," let's quickly identify the usual suspects. Sometimes, the problem isn't your Windows 8.1, but external factors. Check these first:
- Distance Matters: Are you too far from your router? The further you are, the weaker the signal. It's like trying to shout from a football field – the message just doesn't travel well.
- Router Overload: Too many devices connected to the same network can hog bandwidth. Imagine a crowded highway; traffic slows down.
- Obstructions: Walls, metal objects, and even microwaves can interfere with the Wi-Fi signal.
- Outdated Router Firmware: This is like using an old, outdated map. Your router might not be optimized for the latest technologies.
- Internet Service Provider (ISP) Issues: Sometimes, the problem isn't you; it's them! Check with your ISP to see if there are any known outages in your area.
The Secret Weapon: Unleashing the Power of Your Wireless Adapter Settings
Alright, let's get to the heart of the matter. This one trick, often overlooked, can make a massive difference. It's all about tweaking your wireless adapter settings. Think of it as tuning up a car engine – sometimes, a small adjustment can unleash a whole lot of power.
Here's how you do it:
- Open Device Manager: Right-click on the Start button (or hit the Windows key + X) and select "Device Manager."
- Expand Network Adapters: Click the arrow next to "Network adapters" to see a list of your network devices.
- Find Your Wireless Adapter: Look for something like "Wireless Network Adapter" or "Wi-Fi Adapter." It will have the name of your Wi-Fi card, which might be different depending on your computer's manufacturer.
- Right-Click & Properties: Right-click on your wireless adapter and select "Properties."
- Advanced Tab: Click on the "Advanced" tab. This is where the magic happens.
Digging Deep: Understanding the Critical Settings
The "Advanced" tab is a treasure trove of settings. We're going to zero in on a few key ones. Don't worry; we'll break it down simply.
- 802.11n/ac Mode (or Wireless Mode): This is the most important setting. It dictates the Wi-Fi standards your adapter uses.
- If you have a newer router that supports 802.11ac, make sure your adapter is set to use it. This generally provides a much faster speed and greater range.
- If you're unsure, you can experiment, but "802.11ac" or "Auto" is usually the best bet.
- Channel Width: This setting controls how much "bandwidth" your adapter uses.
- For 2.4 GHz networks, set this to "20 MHz."
- For 5 GHz networks, select "40 MHz" or "80 MHz (if your router supports it)." Experiment to find the most optimal settings for your specific setup.
- Power Saving Mode: This setting can sometimes throttle your Wi-Fi.
- Set this to "Maximum Performance" to ensure your adapter is using its full potential.
- Roaming Aggressiveness: This setting controls how aggressively your adapter searches for better Wi-Fi signals.
- Experiment with "Medium" or even "Highest" if you're experiencing poor connection quality.
The Fine-Tuning Process: Experimentation is Key
We've given you the blueprint, but every network setup is a little different. Now comes the fun part: experimentation. Apply the changes, hit "OK," and then test your Wi-Fi speed. If it hasn't improved, try adjusting the settings. Sometimes, you'll need to reboot your computer for the changes to take full effect. It might take a couple of tries, but the payoff is often worth it.
Beyond the Adapter: Other Potential Fixes
While tweaking your wireless adapter settings is often the silver bullet, there are other things you can try:
- Update Your Wireless Adapter Driver: Outdated drivers can cause all sorts of problems. In the Device Manager, right-click on your wireless adapter, select "Update driver," and let Windows search for the latest version.
- Restart Your Router and Modem: This classic troubleshooting step often works wonders. It's like hitting the reset button on your internet connection.
- Change Your Router's Wi-Fi Channel: Wi-Fi routers broadcast on different channels. Some channels can be more congested than others. Access your router's settings (usually by typing its IP address into your browser) and experiment with different Wi-Fi channels.
- Consider a Wi-Fi Extender: If your Wi-Fi signal is weak in certain areas of your home, a Wi-Fi extender can help boost the signal strength.
Is There a Speed Test? Measuring the Results
How do you know if your tweaks are working? Simple – test your Wi-Fi speed! There are plenty of free online speed tests available. Use a speed test website to measure your download and upload speeds before and after making changes. This allows you to see the impact of any settings adjustments you've made.
The Future is Now: Why Upgrading Might Be a Good Idea
Let's be honest, Windows 8.1 is getting a bit long in the tooth. While this trick can breathe new life into your Wi-Fi, keep in mind that older hardware has its limitations. If you're running on an older laptop or desktop, the Wi-Fi card itself might be a bottleneck. Consider upgrading to a new Wi-Fi adapter or even a new computer for the best performance, especially if you’re a gamer.
Securing Your Connection: A Quick Word on Wi-Fi Security
Fast Wi-Fi is great, but security is paramount. Make sure your Wi-Fi network is password-protected and secure. When using a public Wi-Fi network, be cautious about what information you share. Use a VPN for added security, which encrypts all of your online traffic.
Troubleshooting Specific Problems: When Things Go Sideways
Sometimes, even after trying everything, you might still face issues. Here are a few troubleshooting tips:
- Check for Hardware Problems: Is your Wi-Fi adapter physically damaged? Try using a different Wi-Fi adapter, if you have one.
- Reinstall Your Wi-Fi Adapter Driver: If the driver is corrupted, reinstalling it can solve the problem. In Device Manager, right-click on your Wi-Fi adapter, select "Uninstall device," and then restart your computer. Windows will usually reinstall the driver automatically.
- Contact Your ISP: If you've exhausted all other options, it might be time to contact your internet service provider. They can often help troubleshoot problems on their end.
The Power of Knowledge: Why Understanding Matters
Understanding how your Wi-Fi works allows you to take control. It's like understanding the mechanics of a car. You don't have to be a mechanic, but knowing the basics will help you diagnose and fix problems. The more you know, the better equipped you are to maintain a blazing-fast connection.
Celebrating Success: Reaping the Rewards of a Fast Connection
Once you’ve finally optimized your Wi-Fi, the reward is a seamless online experience. Streaming, gaming, working, and browsing will become a joy, not a frustrating experience. Enjoy the fruits of your labor!
Closing Thoughts: Embrace the Fast Lane
So there you have it! Hopefully, with the help of these tips, you've managed to banish the slow Wi-Fi blues from your Windows 8.1 experience. Remember, a little bit of tinkering can go a long way. Don't be afraid to experiment, and
Windows 10 WiFi Nightmare? FIX Your Laptop's Connection NOW!Cara Mempercepat Kinerja Windows 88.1 Yang Lemot

By Teckfo Computer Cara Mempercepat Kinerja Windows 88.1 Yang Lemot by Teckfo Computer
Cara Mempercepat Sinyal Wifi Laptop Di Windows 1087 Tutorial

By MDTechVideos Cara Mempercepat Sinyal Wifi Laptop Di Windows 1087 Tutorial by MDTechVideos
Cara Mempercepat Koneksi Internet WIFI Pada Laptop dan PC 100 AMPUH - How to Speed Up Internet

By Reyhan Affan Cara Mempercepat Koneksi Internet WIFI Pada Laptop dan PC 100 AMPUH - How to Speed Up Internet by Reyhan Affan
Title: laptop lemah menangkap sinyal wifi,begini solusinya
Channel: Cemex Tutor
laptop lemah menangkap sinyal wifi,begini solusinya by Cemex Tutor
Laptop Wifi Hotspot
Is Your Windows 8.1 WiFi SLOW? This Trick Makes It Blazing Fast!
Is your Windows 8.1 experience marred by sluggish WiFi speeds? Do you find yourself staring at loading icons, waiting for web pages to render, or struggling with buffering videos? We understand your frustration. A slow WiFi connection can transform a productive afternoon into a time-wasting ordeal, hindering your ability to work, stream, or simply browse the internet. Fortunately, there's no need to endure this technological torment. We've uncovered a remarkably effective configuration adjustment that can dramatically accelerate your Windows 8.1 WiFi performance, transforming your connection from a glacial crawl into a lightning-fast stream. Forget the annoyance of dropped connections and buffering woes; get ready to experience the internet the way it was meant to be – swift, reliable, and always at your fingertips.
Understanding the WiFi Culprit: The 802.11n Standard and Its Limitations
Before we dive into the solution, it’s crucial to understand the potential culprit behind your slow WiFi: the 802.11n wireless standard. Windows 8.1, while still a capable operating system, may, by default, be configured to utilize the 802.11n standard for its WiFi connections. While 802.11n was a significant advancement in its time, offering increased speeds and range compared to its predecessors, it’s no longer the fastest game in town. Modern WiFi routers and devices often support the much faster 802.11ac or even the latest 802.11ax (WiFi 6) standards. When your Windows 8.1 system defaults to 802.11n, it essentially bottlenecks your connection, even if your router is capable of delivering much higher speeds. This is because the two devices, the PC and the Router, must mutually agree on the speed and in this case, the PC dictates the lowest speed. We are going to change that.
The Solution: Maximizing WiFi Speed with Advanced Adapter Settings
The key to unlocking faster WiFi speeds on your Windows 8.1 system lies in optimizing your network adapter’s settings. By configuring your wireless adapter to utilize the most capable protocols and channels, you can significantly improve your connection speed and overall performance. Follow these straightforward steps to transform your WiFi experience.
Step 1: Accessing the Device Manager
The first step is to access the Device Manager, the central hub for managing your computer's hardware. There are several ways to reach it:
- Using the Search Charm: Swipe in from the right edge of your screen to access the Charms bar. Select the "Search" charm and type "Device Manager" in the search box. Click on the "Device Manager" icon in the search results.
- Via the Control Panel: Right-click on the Start button (or press the Windows key + X) and select "Control Panel" from the context menu. Within the Control Panel, navigate to "Hardware and Sound," then click on "Device Manager."
- Through Run: Press the Windows key + R to open the "Run" dialog box. Type "devmgmt.msc" (without the quotes) and press Enter.
Step 2: Locating Your Wireless Network Adapter
Within the Device Manager, you'll find a list of all your computer's hardware devices. Expand the "Network adapters" category. You will see a list of network adapters installed on your system. This list typically includes your Ethernet (wired) adapter, and your wireless network adapter. Your Wireless network adapter’s name often includes the word "Wireless" or "WiFi". Identify your wireless network adapter. The exact name will vary depending on your hardware (e.g., "Intel Dual Band Wireless-AC 7260," "Broadcom 802.11n Network Adapter," etc.).
Step 3: Accessing the Adapter's Properties
Right-click on your wireless network adapter’s name and select "Properties" from the context menu. This will open a new window displaying the adapter's detailed configuration.
Step 4: Navigating to the Advanced Tab
In the Properties window, click on the "Advanced" tab. This tab provides access to a wide range of advanced settings for your network adapter. These settings control various aspects of its operation, including its performance, compatibility, and security.
Step 5: Configuring Crucial Settings for Optimal Performance
Within the "Advanced" tab, you'll find a list of configurable properties. Here are the key settings we will modify, along with their optimal values. Note, these settings may vary slightly depending on the manufacturer of your wireless network adapter. Always consult your adapter's documentation if you have any doubt.
- 802.11n Channel Width: This setting controls the bandwidth used by your wireless adapter. It will most likely be set to "Auto." Change this to "20/40 MHz". This setting allows your adapter to utilize both 20 MHz and 40 MHz channels, maximizing compatibility and speed. Setting it to 40 MHz only will remove compatibility with older routers. A setting above this will break compatibility and cause issues.
- 802.11n Mode: This setting allows you to choose which WiFi standards are supported by your adapter. It is likely set to "Enabled." Leave this in "Enabled," if not, set it to "Enabled". This ensures your adapter can utilize the 802.11n standard.
- Wireless Mode: This setting determines whether the adapter will choose the best mode automatically, or if you can set it. If it is set to “Auto” or “Best,” You will want to set it to "802.11a/b/g." or "802.11a/b/g/n." This provides the most compatibility and optimal speed. Note that setting it to "g" only will dramatically slow down your speeds
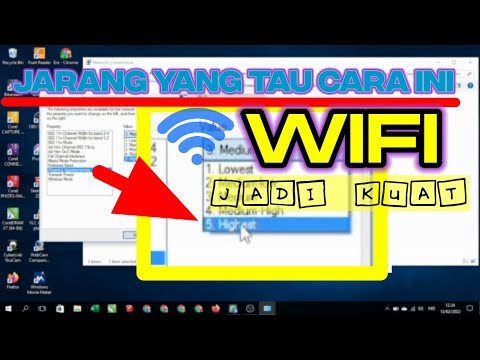
- Roaming Aggressiveness: This setting determines how aggressively your adapter will seek out the best WiFi signal. Set this to "Lowest" or "1." This minimizes the chance of your adapter constantly switching to different access points, which can interrupt your connection and slow down your speeds.
- Transmit Power: This setting controls the signal strength of your adapter. Set this to "Highest." This ensures your adapter transmits at its maximum power, improving its range and connectivity.
Step 6: Applying the Changes
After configuring the settings, click the "OK" button at the bottom of the Properties window. Windows will automatically apply the changes to your network adapter. This process may take a few seconds.
Step 7: Restarting Your Computer
In some cases, you may need to restart your computer for the changes to take full effect. If you experience any connectivity issues or notice no immediate improvement in your WiFi speeds, restart your computer.
Step 8: Verifying the Results
Once your computer has restarted (or immediately after clicking "OK" in Step 6), test your WiFi connection. Conduct a speed test using a reliable online tool (like Speedtest.net or Google's speed test). Compare your new speeds to your previous speeds. You should notice a significant performance improvement, particularly if your router supports the 802.11n, or even the newer 802.11ac or 802.11ax WiFi standards.
Advanced Tips for Maximizing Your WiFi Performance
While the above steps are the core of the solution, here are additional tips to further optimize your WiFi experience:
- Router Placement: The physical location of your router is crucial. Position it in a central, elevated location in your home, away from obstructions like walls, metal objects, and other electronic devices that can interfere with the signal.
- Router Firmware Updates: Ensure your router's firmware is up-to-date. Router manufacturers regularly release firmware updates that improve performance, security, and compatibility. Check your router's manufacturer's website for the latest firmware version.
- Channel Selection: Your router broadcasts its WiFi signal on a specific channel. If your router is set to auto-select the channel, consider manually choosing a less congested channel to reduce interference from neighboring WiFi networks. Use a WiFi analyzer app on your smartphone or tablet to identify the least crowded channels in your area.
- Router Security: Secure your WiFi network with a strong password and enable WPA2 or WPA3 encryption. This prevents unauthorized access to your network, which can slow down your connection and compromise your privacy.
- Reduce Interference: Identify and eliminate potential sources of interference, such as microwave ovens, cordless phones, and Bluetooth devices. These devices operate on the same frequency as WiFi and can disrupt your connection.
- Consider a Router Upgrade: If you're still experiencing slow WiFi speeds after following these steps, it might be time to consider upgrading your router. Modern routers with 802.11ac or 802.11ax (WiFi 6) support can deliver significantly faster speeds than older 802.11n routers.
Troubleshooting Common WiFi Issues
Even after implementing these optimizations, you may occasionally encounter WiFi issues. Here's how to troubleshoot common problems:
- Slow Speeds: If your speeds remain slow, double-check that you've correctly configured the network adapter settings as described above. Also, test your connection on other devices to determine if the issue is specific to your Windows 8.1
