connect two laptops wifi windows 10

Title: Transfer Files Between Two Laptops over Wi-Fi
Channel: Techy Druid
Transfer Files Between Two Laptops over Wi-Fi by Techy Druid
connect two laptops using wifi windows 10, connect two computers with wifi windows 10, connect two computers via wifi windows 10, can i connect my laptop to two wifi networks at the same time, how to connect two laptops wirelessly windows 10
**WiFi Warrior: Connect TWO Laptops in SECONDS (Windows 10 Trick!)**
Become a WiFi Warrior: Unleash the Secret to Connecting Laptops Instantly (Windows 10!)
Ever felt the frustration of needing to share files, collaborate on a project, or simply play a quick game with a friend, and a tangled web of wires stands between you? Well, fret no more! You are about to become a WiFi Warrior. This isn't some futuristic technology, it is a simple, yet often overlooked, Windows 10 trick. And, it will change how you connect two laptops forever.
Conquering the Connectivity Chaos
Let's be honest; the old ways are tedious. Fumbling with USB drives, emailing files, or relying on cloud services can slow you down. These options, while helpful, can still take more time than you have. But now, imagine connecting two laptops in mere seconds. It is totally within your reach.
The Hidden Power of Windows 10's “Ad Hoc” Network
Windows 10 offers a hidden gem for instant laptop connections. It’s often called an ad hoc network. Think of it like creating a temporary mini-network. You can connect your laptops directly to each other, using the built-in WiFi. This bypasses the need for a router. Therefore, it's a fantastic solution when a traditional network isn’t accessible.
Unveiling the Secret Steps: Your WiFi Warrior Training
Getting this set up is incredibly easy. We'll walk you through the process. Follow these steps closely, and you'll be a WiFi Warrior in no time.
Initiate the Sharing: First, on the laptop you want to share files from. Open the "Settings" app. Navigate to "Network & Internet." Look for "Mobile Hotspot" (or sometimes just "Hotspot").
Crafting Your Secret Network: This is where the magic begins. Click on "Edit" under the “Share my internet connection from.” You will need to configure a network name (SSID) and a password. Make it something unique! This keeps your network secure.
Activating the Fortress: Toggle the “Share my internet connection with other devices” feature to "On." Windows will now broadcast a WiFi signal, acting as a miniature router.
Joining the Alliance (Second Laptop): Take your second laptop. Open the WiFi settings again. Scan for available networks. You should see the network name you just created in the previous steps.
Entering the Code (Password): Select your network name. Then, enter the password you created. You are now connected! Your laptops are on the same network, even without an actual router.
Sharing the Spoils of Victory: File Transfer Tactics
So, you've connected your laptops. But, what can you do with them? You can transfer files. Thus, the possibilities are endless.
Mastering the File Explorer: Open File Explorer on the laptop you want to share files from. Right-click on the file or folder you want to share. Then, select "Give access to" and choose "Specific people."
Welcoming Your Comrade: A window will pop up. Select the user account on the other laptop (if prompted) or type in “Everyone” if you want to readily share it with all users. Click "Add."
Granting the Right Permissions: Change the permission level (in the dropdown menu). You'll gain the option to give only read permission, or read and write permission. Choosing carefully is important. Click "Share".
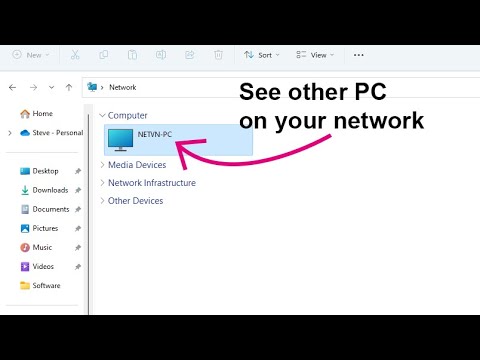
Discovering the Treasure (On the Second Laptop): On the second laptop, open File Explorer. In the left-hand menu, click "Network." You should see the first laptop listed there. Double-click it.
Claiming Your Prize: You can now view the shared folder and files. Transfer them to your second laptop.
Troubleshooting Common Challenges
Sometimes, you might face a few hurdles. Don't worry; even a WiFi Warrior needs a bit of help now and then.
Visibility Issues: If you don't see the other laptop in the "Network" view, make sure network discovery is enabled. Go to Control Panel > Network and Internet > Network and Sharing Center > Change advanced sharing settings. Enable network discovery and file and printer sharing.
Password Problems: Double-check the WiFi password. Also, be sure to enter it correctly.
Firewall Fortifications: Your firewall may interfere with the connection. Temporarily disable the firewall on one or both laptops. However, be cautious, of course.
Embracing the Future of Connectivity
Connecting laptops swiftly is a game changer. From collaborative projects to quick file sharing, the possibilities are truly vast. Since Wi-Fi technology is present in nearly every laptop, you can instantly access this valuable feature. Stop letting wires hold you back.
Your WiFi Warrior Legacy Begins Now!
You're now equipped with the knowledge to connect laptops. You can share files instantly. You've unlocked a valuable skill. So, go forth and become a WiFi Warrior!
LG TV to Laptop Wireless: The SHOCKINGLY Easy Trick!WiFi Warrior: Connect TWO Laptops in SECONDS (Windows 10 Trick!)
Hey tech enthusiasts, fellow digital nomads, and anyone who’s ever felt the agonizing frustration of trying to share files or play a game with a friend on different laptops! Have you ever been stuck staring at each other's screens, desperately trying to figure out how to get those two digital worlds to connect? We've all been there, haven't we? The endless clicking, the confusing menus, the inevitable head-scratching… it can feel like navigating a maze built by gremlins! But guess what? We're here to tell you, you don’t need to suffer anymore. Today, we're going to unlock the secrets to becoming a WiFi Warrior, connecting two laptops in mere seconds using a super simple Windows 10 trick. Prepare to be amazed!
1. The Age-Old Struggle: Why Connecting Laptops Feels Like Rocket Science
Let's be honest, setting up even the simplest network connections can sometimes feel like a Herculean task. Remembering IP addresses, fiddling with security settings, and deciphering outdated tutorials… it's enough to make you want to chuck your laptop out the window. Why does it have to be so complicated? Is it some grand conspiracy designed to keep us from sharing cat videos and epic gaming sessions? Probably not (we hope!). The truth is, the underlying technology, while powerful, can be a bit… finicky. But fear not! We’re here to demystify the process.
2. The Magic Wand: Unveiling the Windows 10 Secret!
Alright, enough suspense. The "secret" we’re referring to is the built-in Wi-Fi Direct feature in Windows 10. Yes, you read that right. Your operating system has been hiding this amazing tool right under your nose. Think of Wi-Fi Direct as a direct, wireless link between two devices, bypassing the need for a router. It's like having a personal, high-speed data highway, ready to whisk your files and fun between your laptops. Now, is that cool or what?
3. Prepping for Battle: What You'll Need (It's Really Easy!)
Before we dive into the specifics, let's make sure you have the necessary armor and weapons (figuratively speaking, of course!). You will need:
- Two laptops running Windows 10.
- Wi-Fi enabled on both laptops (obviously!).
- A few minutes of your time. And that's it! See? We told you it was easy.
4. Step-by-Step: How to Become a Wi-Fi Warrior in Minutes
Here's the playbook. Follow these steps, and you'll be sharing files and conquering virtual worlds in record time!
4.1. Laptop 1: Initiating the Direct Connection
- Step 1: Open the Settings App. Click the Start Menu (Windows icon) and select the "Settings" gear icon.
- Step 2: Navigate to "Devices." In the Settings window, choose "Devices."
- Step 3: Select "Bluetooth & other devices”. Within the "Devices" settings, click on "Bluetooth & other devices".
- Step 4: Add a Device (Wi-Fi Direct). Click "Add Bluetooth or other device." In the "Add a device" window, select "Wireless display or dock". Windows will now start searching for nearby Wi-Fi Direct enabled devices.
4.2. Laptop 2: Accepting the Invitation
- Step 1: Repeat steps from section 4.1. Follow steps 1-3 in the "Initiating the Direct Connection" section above.
- Step 2: Wait and Accept. Eventually, the first laptop’s name should appear as a selectable device. Select it! You may have to grant access on either machine.
- Step 3: The Link is Forged! Your machines are now paired!
4.3: Success!
You are now connected. You can now share files, play games, and generally enjoy some digital synergy.
5. Sharing is Caring: Sharing Files Like a Pro (After the Connection)
Now that you're connected, let's talk about the good stuff – sharing files! The process is incredibly straightforward. Here’s how:
- Enable File Sharing: Right-click on the folder or files you want to share, select "Properties," go to the "Sharing" tab, and click "Share."
- Select the Recipient: Choose the other laptop's user account from the list. If needed, you will be prompted to grant those users permission.
- Access the Shared Files: On the receiving laptop, open File Explorer (Windows key + E), click "Network" on the left panel, and locate the sending laptop's name. Click on it, and bam! The shared folder is there.
6. Gaming Glory: Playing Multiplayer Without the Router Blues
This is where the magic truly shines! Wi-Fi Direct is perfect for those impromptu gaming sessions with a friend. Once connected, both laptops should see each other as part of the local network. Launch your favorite multiplayer games (those that support local networking), and get ready to battle or cooperate, whatever floats your boat.
7. Troubleshooting Troubles: What to Do When Things Go Wrong
Sometimes things don't work perfectly the first time. Don't panic! Here are a few common issues and how to fix them:
- Connection Fails to Appear: Make sure Wi-Fi Direct is enabled on both laptops and that they are within range (usually, 20-30 feet).
- File Transfer Slow: Wi-Fi Direct is fast, but transfer speeds can be affected by signal strength or interference. Try moving closer together.
- Can't See Shared Folders: Double-check that you've enabled file sharing correctly and that the other user has the necessary permissions.
8. The Future is Wireless: Beyond File Sharing and Gaming
Wi-Fi Direct is more than just a quick fix. It's a glimpse into the future of wireless connectivity. As technology evolves, we can expect even more innovative applications. Think of wireless printing, projector connectivity, and seamless streaming between devices. The possibilities are endless.
9. Speed Demon: Comparing Wi-Fi Direct to Other Methods
Let's do a quick comparison to help you fully understand the awesomeness of Wi-Fi Direct:
- Hotspot: Setting up a hotspot is another popular option. However, it requires battery power and is sometimes slower than a router connection.
- USB Transfer: The old-school method. Painfully slow.
- Cloud Services: Definitely useful for sharing files, but requires an internet connection and adds extra steps.
- Wi-Fi Direct: Blazing fast, directly between devices, requires no internet, and requires simple setup.
10. Security First: Protecting Your Digital Frontier
While Wi-Fi Direct is convenient, it is essential to be mindful of security. When sharing files over a network, always ensure that you’re sharing with trusted devices. Don't share sensitive information over untrusted networks.
11. Unleash the Power: Practical Applications You Can Use Right Now
Think beyond just sharing files. Wi-Fi Direct is a versatile tool with tons of potential:
- Presentations: Share your screen directly during a meeting without cable clutter.
- Collaboration: Work on documents simultaneously with a friend.
- Data Backup: Quickly transfer files from one laptop to another.
12. The Myth of the Complicated: Debunking Common Misconceptions
Let's clear up a few myths about connecting laptops:
- You Need a Router: Nope! Wi-Fi Direct bypasses the need for a router.
- It's Only for Tech Wizards: Absolutely not! The steps are surprisingly simple.
- It's Insecure: Like any network connection, you should exercise caution and only share with trusted devices.
13. Staying Updated: Keeping Your Windows 10 at its Peak
Make sure your Windows 10 is up to date. Check for updates regularly. Updates often include performance improvements, security patches, and potentially even new features for Wi-Fi Direct.
14 Future Proofing Your Connection: What Comes Next?
As technology progresses, expect improvements that will create even better user experiences.
15. The Final Touch: Time to Conquer the Digital World!
And there you have it! You are now officially equipped to become a WiFi Warrior. We hope you enjoyed the tips and are ready to conquer the digital world alongside friends and colleagues. The world of sharing and networking is at your fingertips. Go forth and connect!
Closing Section
So, there you have it! The secret to connecting two laptops in seconds with Windows 10. We hope this article has empowered you to break free from the shackles of complicated networking setups. Now, go forth, share some files, play some games, and conquer the digital world! Remember, technology is meant to be enjoyable, fun, and helpful. So, embrace it! And happy connecting, fellow tech enthusiasts!
Frequently Asked Questions (FAQs)
1. Can I use Wi-Fi Direct on older versions of Windows?
Sorry, Wi-Fi Direct is primarily a Windows 10 feature
Download Wifi Master Key for Laptop: FREE & SECURE Access NOW!WINDOWS 10 Koneksi langsung 2 Laptop Secara Nirkabel

By NETVN82 WINDOWS 10 Koneksi langsung 2 Laptop Secara Nirkabel by NETVN82
Windows 1110 - Cara membuat jaringan lokal dan berbagi file antar komputer melalui jaringan

By ipMalik Windows 1110 - Cara membuat jaringan lokal dan berbagi file antar komputer melalui jaringan by ipMalik
Cara Memperbaiki Tidak Dapat Melihat Komputer Lain di Jaringan jendela 1011
By NETVN82 Cara Memperbaiki Tidak Dapat Melihat Komputer Lain di Jaringan jendela 1011 by NETVN82

Title: Cara Mempersiapkan 2 PC untuk LAN Offline Multiplayer Gaming File Sharing
Channel: Gamers Art
Cara Mempersiapkan 2 PC untuk LAN Offline Multiplayer Gaming File Sharing by Gamers Art
Laptop Working
WiFi Warrior: Connect TWO Laptops in SECONDS (Windows 10 Trick!)
Are you juggling multiple projects or collaborating on a presentation with a colleague? Do you find yourself constantly frustrated by the limitations of single-laptop setups, especially when data transfer speeds become a bottleneck? Fear not! As seasoned professionals deeply immersed in the digital landscape, we understand the paramount importance of seamless connectivity and lightning-fast data sharing. We’re here to equip you with a remarkably straightforward, yet often overlooked, technique to connect two laptops effortlessly – a trick that leverages the inherent capabilities of Windows 10, saving you valuable time and enhancing your productivity.
Unveiling the Power of Ad-Hoc Networking: Your Secret Weapon
The solution lies in harnessing the power of ad-hoc networking. Forget complicated configurations or specialized hardware. In its simplest form, ad-hoc networking allows two or more devices to communicate directly with each other, effectively creating a localized, transient network. This eliminates the need for a central router. With this method, your laptops establish a direct wireless connection, facilitating swift file transfers and data sharing without the usual network overhead. This approach is especially beneficial when you're in locations with unreliable or nonexistent Wi-Fi, making it a true lifesaver.
Step-by-Step Guide: Harnessing the Windows 10 Ad-Hoc Magic
Follow these precise steps to establish your ad-hoc network and effortlessly connect your two Windows 10 laptops:
Laptop 1: The Network Host
Access the Network and Sharing Center: Open the Control Panel on your first laptop. Navigate to Network and Internet, then select Network and Sharing Center.
Set Up a New Connection or Network: In the Network and Sharing Center window, click on the option labeled “Set up a new connection or network.”
Choose the 'Set up a wireless ad hoc network' Option: From the available options, choose "Set up a wireless ad hoc network." Click "Next" to proceed.
Configure Your Ad-Hoc Network:
- Network Name: Enter a unique name for your ad-hoc network. This name will be visible to other devices searching for available networks. Choose something memorable and easily identifiable, such as "LaptopCollaboration."
- Security Type: Select the security type. For maximum compatibility and ease of setup, consider choosing WEP. However, be aware that WEP is not the most secure option. If security is a paramount concern, delve into the advanced settings and set up WPA2-Personal.
- Security Key: Create a strong security key (password) for your network. This password will be required to connect other devices.
Click "Next" to proceed.
Enable the Ad-Hoc Network: Windows will now attempt to configure the ad-hoc network. You may see a message indicating "Waiting for other users to connect."
Adjust Network Settings (Important): While the network is active, click on "Change advanced sharing settings" in the Network and Sharing Center window.
- Private (Current profile): Ensure that "Turn on network discovery" and "Turn on file and printer sharing” are enabled. This allows other devices to discover and connect to the network and share resources.
- Guest or Public: Likewise, enable "Turn on network discovery" and "Turn on file and printer sharing."
- All Networks: Crucially, under the "All Networks" section, enable "Turn on sharing so anyone with network access can read and write files in the Public folders." Also, set "Use 128-bit encryption to help protect file sharing connections" and disable password-protected sharing to remove any barriers to connecting.
Laptop 2: The Network Client
Scan for Available Networks: On your second laptop, click on the Wi-Fi icon in the system tray (bottom right corner of the screen). This will display a list of available wireless networks.
Select Your Ad-Hoc Network: Locate the ad-hoc network you created on Laptop 1 (e.g., "LaptopCollaboration") and select it.
Enter the Security Key: When prompted, enter the security key (password) you created on Laptop 1. Click "Connect."
Verify the Connection: Once successfully connected, your second laptop should show that it's connected to the ad-hoc network.
Unlocking Seamless File Sharing and Data Transfer
With your two laptops now connected via the ad-hoc network, you're ready to share data, collaborate on projects, and transfer files with remarkable ease. Here's how to make the most of your newfound connectivity:
Sharing Folders:
Select a Folder: Open File Explorer on either laptop and navigate to the folder you wish to share.
Access Properties: Right-click on the folder and select "Properties."
Navigate to the Sharing Tab: In the Properties window, click the "Sharing" tab.
Advanced Sharing: Click the "Advanced Sharing…" button.
Enable Sharing: Check the box labeled "Share this folder." You can optionally rename the share name as needed.
Permissions (Critical): Click the "Permissions" button.
- Add Access: Click "Add…" and type "Everyone" into the object name field. Click "Check Names."
- Grant Permissions: Select "Everyone" and in the "Permissions for Everyone" section, check "Allow" for "Read," "Change," and "Write" if you want the other laptop to be able to modify files. Click "Apply" and then "OK."
Apply and Close: Click "Apply" and then "OK" in all of the open dialog boxes to save your sharing settings.
Accessing Shared Folders:
Open File Explorer: On the other laptop (the one that needs to access the shared folder), open File Explorer.
Navigate to Network: In the left-hand navigation pane, click on "Network."
Locate the Host Laptop: You should see an icon representing the first laptop that is hosting the ad hoc network. Double-click on the icon.
Access Shared Folders: You should then be able to see and access the shared folders from the other laptop. You can copy, move, and edit files within these shared folders, depending on the permissions you've granted.
Troubleshooting Common Connection Hurdles
While the setup is generally straightforward, you may encounter some hurdles. Here's a troubleshooting guide to help resolve common issues:
- Network Discovery Issues: If you do not see the other laptop in the "Network" section of File Explorer, double-check the network discovery settings. Confirm that they are enabled. Remember, you can turn them on in both private and public profiles. Also, restart both laptops.
- Firewall Interference: Your Windows Firewall or any third-party firewall may be blocking the connection. Temporarily disable your firewall on both laptops to test if this is the cause. If it resolves the issue, you’ll need to configure the firewall to allow network traffic.
- Incorrect Security Key: Double-check the security key (password) you entered when connecting to the ad-hoc network. Ensure it precisely matches the key set on the host laptop.
- Driver Issues: Ensure that the wireless network adapters on both laptops have up-to-date drivers. You can update drivers through Device Manager.
- IP Address Conflicts: In rare cases, IP address conflicts can disrupt the connection. Windows typically handles IP address assignment automatically. If you suspect this issue, manually assign static IP addresses to both laptops within the same subnet. For example, Laptop 1 could use 192.168.1.10 and Laptop 2 could use 192.168.1.11, with a subnet mask of 255.255.255.0.
- Wireless Adapter Compatibility: Though uncommon, some older or less compatible wireless adapters may encounter issues with ad-hoc connections. Try testing with a different wireless adapter, if possible.
- Restart and Retry: A simple restart of both laptops can often resolve temporary glitches and network connectivity problems. Always try this as a first step.
Enhancing Your Productivity: Beyond File Transfers
The advantages of this ad-hoc network extend far beyond simple file transfers:
- Real-time Collaboration: Work simultaneously on documents, spreadsheets, and presentations, eliminating the need for email attachments and version control headaches.
- Shared Printing: Share a printer connected to one laptop with the other, streamlining your printing workflows.
- Screen Sharing: Utilize remote desktop software (such as built-in Windows Remote Desktop) to control one laptop from another, facilitating teamwork and remote assistance.
- Gaming: While not its primary purpose, you can set up a local network for some multiplayer games.
- Backup Solutions: Use ad-hoc networking for quick backups between your laptops, ensuring data protection.
Conclusion: Embrace the Power of Seamless Connectivity
By mastering the ad-hoc networking technique, you're no longer constrained by the limitations of a single laptop. The ability to connect two laptops in seconds unlocks a world of possibilities, boosting your efficiency and collaboration capabilities. This method offers a fast, simple, and reliable solution
