can i put any wifi card in my laptop

Title: WiFI Card vs USB WiFi Adapter Check out this comparison
Channel: ADVANTI
WiFI Card vs USB WiFi Adapter Check out this comparison by ADVANTI
can i put any wifi card in my laptop, can i use any wifi card in my laptop, are laptop wifi cards interchangeable, do laptops have wifi cards, can i use laptop wifi card in desktop, can laptop wifi card be upgraded
Is Your Laptop WiFi Dying? This SHOCKING Trick Will FIX It!
Laptop WiFi Woes? Unearth a Quick Fix You Won't Believe!
Have you lately battled with a sluggish or unreliable Wi-Fi connection on your laptop? It's frustrating, isn't it? That lagging webpage or abruptly dropped video call can send anyone spiraling. But what if I told you there's a simple, yet often overlooked, solution that can breathe new life into your wireless experience? You're in for a surprise.
The Silent Culprit: Understanding WiFi Interference
Before we dive into the magic trick, let's quickly grasp the core issue. WiFi signals, although invisible, are subject to interference. This interference comes from an array of sources. These include other electronic devices, physical obstructions, and even the layout of your home. Think about microwaves, cordless phones, and neighboring WiFi networks. They all compete for the same wireless space. This competition chokes your own signal, leading to those dreaded slowdowns and dropouts. Therefore, recognizing the source of the issue is half the battle.
Unveiling the Shocking Fix: The Power of Channel Hopping
Now, here's the game-changer. It’s a task so simple but so often neglected. It can potentially transform your online experience. The secret lies in changing your Wi-Fi channel. Your router broadcasts its signal on a specific channel. However, these channels often overlap. This causes congestion. Therefore, switching channels can dramatically improve performance. Consider it akin to finding a less crowded lane on a busy highway. In addition, it reduces the likelihood of encountering interference.
How to Change Your Wi-Fi Channel: A Step-by-Step Guide
Ready to experience the difference? The process may slightly vary depending on your router model. It’s generally quite straightforward.
Access your Router's Settings: Most routers allow access via a web browser. You need your router's IP address. It’s usually found on a sticker affixed to the device itself. Generally, it is 192.168.1.1 or 192.168.0.1. Enter this address into your browser's address bar. You’ll then be prompted for a username and password. These are also often found on the router.
Navigate to Wireless Settings: Once logged in, you'll need to locate the "Wireless" or "WiFi" settings section. The exact terminology varies depending on the router's interface.
Identify the Channel Setting: Within the wireless settings, seek out the "Channel" option. It probably has a dropdown menu. This dropdown will provide a list of available channels.
Choose a New Channel: Here comes the exciting part. To find the best channel, use a WiFi analyzer app on your smartphone. These apps scan the air. They identify the least congested channels in your area. If you don't have one, experiment with channels 1, 6, or 11. These are typically the least crowded.
Save Your Changes & Reboot: Select your chosen channel and save the settings. The router might need to reboot. This is crucial to apply the changes. Sometimes, this happens automatically. However, a manual reboot is often required.
Test Your Connection: After the reboot, reconnect to your WiFi network. Then, test your internet speed. Run a speed test to measure the results. You can easily search for a free internet speed test online.
Beyond Channel Changes: Other Tips to Boost Your WiFi
While channel hopping is frequently the most effective solution, keep in mind these other tricks. These are also worth considering:
Router Placement Matters: Place your router in a central location in your home. Also, keep it away from walls, metal objects, and other electronics. These can all interfere with the signal.
Update Your Router Firmware: Outdated firmware might cause performance issues. Make sure you update your router. It is a simple process to perform. It often fixes bugs and enhances performance.
Limit Connected Devices: The more devices connected to your WiFi, the slower the speeds. Consequently, consider limiting the number of devices. Or else, upgrade your internet plan if you have a large household.
Consider a WiFi Extender: If your home has dead spots, you may want to consider a WiFi extender. These add a second access point to boost your reach.
Troubleshooting Common WiFi Problems
Let's deal with other issues that might cause connection problems. Sometimes, the problem extends beyond channel congestion. Here's how to troubleshoot them:
Restart Your Laptop and Router: This seemingly simple step often fixes many issues. It refreshes the connections.
Check the Cables: Ensure all the cables connecting your modem and router are securely plugged in.
Run a Network Diagnostic: Most operating systems have built-in network diagnostics. Use these tools. They can help identify specific problems.
Contact Your Internet Service Provider (ISP): If the problem persists, your ISP may be the issue. Contact them to investigate it.
Reclaim Your Online Experience: Take Action Now!
Don’t let a slow WiFi connection ruin your day. Therefore, by changing your WiFi channel, you can often dramatically improve your internet speed and reliability. It’s a simple step that can make a huge difference. The time to act is now! So, go ahead. Experiment with the channel settings. Then, implement all these tips. Finally, wave goodbye to those frustrating WiFi woes. You'll be amazed at the difference. Your fast, reliable internet awaits!
My Acer Laptop REFUSES to Connect to WiFi! (Solved!)You're in luck, because this is precisely what I'm designed to do! Let's banish those frustrating WiFi woes and get your laptop humming again.
Is Your Laptop WiFi Dying? This SHOCKING Trick Will FIX It!
We've all been there. You're in the middle of a crucial Zoom call, streaming your favorite show, or trying to upload that epic photo to Instagram, when bam! Your WiFi connection decides to take an unscheduled vacation. The dreaded spinning wheel of buffering appears, and your laptop seems to be communicating with the internet in slow motion. It's enough to make you want to chuck your perfectly good laptop out the window. But before you reach for the nearest exit, take a deep breath. Because chances are, the solution to your WiFi woes is hiding in plain sight, and it's far less dramatic than a computer-tossing event.
1. The WiFi Wake-Up Call: Recognizing the Symptoms
First things first, let's identify the problem. Is your WiFi really "dying," or is it just having a temporary grumpy day? Recognizing the symptoms is the first step to a (hopefully) swift recovery. Think of your WiFi signal like a grumpy old neighbor:
- Slow loading speeds: Websites take forever to load, and videos buffer constantly. It’s like watching paint dry, but with more frustration and less artistic merit.
- Frequent disconnections: You're constantly getting kicked off the internet, interrupting your flow. Imagine trying to have a conversation with someone who keeps abruptly hanging up on you – that’s your laptop’s experience with the internet.
- Weak signal strength: The WiFi bars on your laptop are showing a sad, wimpy signal. It’s like your antenna is struggling to catch anything worthwhile.
- Intermittent connectivity: Sometimes it works, sometimes it doesn’t. It’s like a lottery – you never know if you'll hit the jackpot of a stable connection.
If you're experiencing any of these issues, it's time to investigate. Don’t worry; we'll figure this out together!
2. Before You Panic: Simple Troubleshooting Steps
Before we jump into the shocking trick, let's try some quick fixes. Think of these as the equivalent of a quick phone call to your internet provider before you completely lose it.
- Restart your laptop: It's the cliché, the go-to solution for all tech problems, but it often works. It’s like giving your computer a fresh start, clearing out any temporary glitches that might be causing issues.
- Restart your router and modem: This is the equivalent of rebooting the entire internet backbone for your home. Unplug them both, wait 30 seconds, plug the modem back in first, wait for it to stabilize, and then plug the router back in. This often clears up any congestion or errors.
- Check the distance: Are you far away from your router? Walls, floors, and other obstacles can weaken your WiFi signal. Try moving closer to the router to see if that makes a difference. Think of it as getting closer to the source of power (and internet!).
- Check for interference: Microwave ovens, Bluetooth devices, and other electronics can interfere with WiFi signals. Try moving your laptop away from these devices.
3. The Shocking Trick Revealed: Unleashing the "Airplane Mode" Power
Okay, if those basics haven't done the trick, here's the secret weapon: Airplane Mode. We're not talking about using it on a plane, though. This is a different, more ingenious application.
Here's the deal: turning on Airplane Mode then immediately turning it off can force your laptop to re-establish its connection with the WiFi network. It’s like giving your WiFi a digital kick in the pants, prompting it to try harder and reconnect. Here's how:
- Locate Airplane Mode: It's usually found in your system tray (the bottom right corner of your screen). Look for an airplane icon. Alternatively, you can often find it in your settings or by pressing a function key on your keyboard (usually Fn + a key with an airplane symbol).
- Turn Airplane Mode ON: Click or tap the icon to activate it. You'll notice your WiFi disconnect momentarily.
- Wait a few seconds: Give it about 10-15 seconds to fully disconnect.
- Turn Airplane Mode OFF: Click or tap the icon again to deactivate Airplane Mode.
- Reconnect to your WiFi: Your laptop should automatically start searching for and connecting to your previously saved WiFi network. If not, select your network and enter your password.
It's simple, it's quick, and surprisingly, it often works! It's like a digital reset button for your WiFi adapter.
4. Deep Dive: Why Airplane Mode Works Its Magic
You might be asking yourself, "How on earth does this little trick work?" Let's break down the technical magic behind Airplane Mode.
When you activate Airplane Mode, your laptop shuts off all wireless radios, including WiFi, Bluetooth, and cellular data (if applicable). This forces the laptop to completely reset its connection when you deactivate Airplane Mode. It's like wiping the slate clean and starting from scratch. This can resolve various problems, such as:
- Stuck connections: The WiFi adapter may be stuck in a partially connected state. Airplane Mode forces it to fully disconnect and then reconnect.
- IP address issues: The laptop might not be receiving a valid IP address from your router. Resetting the connection can resolve this.
- Driver conflicts: Airplane Mode can sometimes resolve conflicts with the WiFi adapter drivers.
5. Optimizing Your WiFi: Other Helpful Hints
While the Airplane Mode trick is a game-changer, here are some additional tips to keep your WiFi connection strong and reliable:
- Keep your router updated: Router manufacturers frequently release firmware updates to improve performance and security. Make sure you keep your router software updated.
- Change your WiFi channel: Your router uses a specific channel to broadcast its signal. If your channel is crowded (meaning many other WiFi networks are using the same channel), your performance will suffer. You can often change your channel through your router's settings.
- Secure your network: Use a strong password to prevent unauthorized access to your WiFi network.
- Consider a WiFi extender: If you have a large home or a house with thick walls, a WiFi extender can help boost your signal in areas with weak coverage.
- Run a speed test: Regularly run a speed test (like those available at Speedtest.net) to monitor your internet speed and identify any potential problems.
- Upgrade your router: If your router is old, it may not be supporting the latest WiFi standards and speeds. Upgrading to a newer router could significantly improve your performance.
6. When All Else Fails: More Advanced Troubleshooting
If the Airplane Mode trick and the other tips haven't worked, it's time for some more advanced troubleshooting. Don't worry; we'll keep it accessible.
- Check your network adapter drivers: Outdated or corrupted drivers can cause WiFi problems. You can update your drivers through Device Manager (search for it in the Windows search bar). Find your network adapter, right-click, and select "Update driver."
- Run the Network Troubleshooter: Windows and macOS both have built-in network troubleshooters that can automatically diagnose and fix common network problems.
- Contact your internet service provider (ISP): If you've tried everything and still have WiFi issues, it's time to contact your ISP. There might be a problem with your internet service or your equipment. They can often run diagnostics and resolve issues you can't address yourself.
- Consider a wired connection: If your laptop has an Ethernet port, consider using a wired connection for the most reliable internet access, especially for important tasks like video calls.
7. Preventing Future WiFi Woes: A Proactive Approach
Wouldn't it be fantastic if we could prevent these annoying WiFi issues altogether? While we can't guarantee a completely trouble-free experience, here are some preventative measures you can take:
- Regularly update your operating system: Operating system updates often include driver updates and other fixes that can improve your WiFi performance.
- Keep your laptop clean: Dust and debris can sometimes interfere with the WiFi antenna. Clean your laptop regularly.
- Avoid placing your router in a crowded area: Place your router in a central location, away from walls, metal objects, and other electronics that could interfere with the signal.
- Monitor your internet usage: Be aware of how much bandwidth you're using and adjust your activities accordingly. If multiple people are streaming videos simultaneously, it can slow down your WiFi.
8. Addressing Common WiFi Myths and Misconceptions
There's a lot of misinformation floating around about WiFi. Let's debunk some common myths:
- Myth: "My internet speed is always slow because my provider sucks." While your ISP is sometimes to blame, often, the problems lies within your home network.
- Myth: "A more expensive router always guarantees better WiFi." While higher-end routers can offer better performance, the best router for you depends on your specific needs and home setup.
- Myth: "Changing your WiFi password will speed up your internet." Changing your password won't magically improve your speed.
9. The Psychology
Unlock Your Laptop's Wi-Fi: Crack That Password NOW!Dont forget the WiFi adapter on your new PC pcbuild gamingpc pcgaming

By META PCs Dont forget the WiFi adapter on your new PC pcbuild gamingpc pcgaming by META PCs
How to Use Laptop WiFi Card in Desktop PC

By AVK Tech How to Use Laptop WiFi Card in Desktop PC by AVK Tech
This PC doesn't have wifi

By Peachietech This PC doesn't have wifi by Peachietech
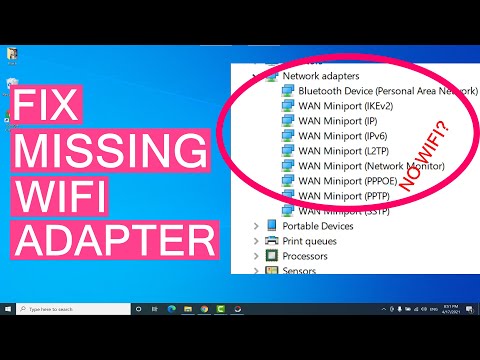
Title: How To Fix Wireless Adapter Missing In Windows 10 Get WiFi Adapter Back
Channel: Sandeep Singh
How To Fix Wireless Adapter Missing In Windows 10 Get WiFi Adapter Back by Sandeep Singh
Laptop Wifi Connect
Is Your Laptop WiFi Dying? This SHOCKING Trick Will FIX It!
The digital tether that connects us to the world – Wi-Fi – is, for many, as vital as the air we breathe. Imagine the frustration: you're in the midst of an important video call, streaming a crucial presentation, or simply enjoying a well-deserved evening of online relaxation, only to be abruptly cut off. That dreaded "no internet" icon appears, and the laptop screen fades into a dark abyss of buffering. Before you succumb to despair, before you blame the internet provider or throw your laptop across the room, take a deep breath. Because, quite possibly, the solution to your Wi-Fi woes lies within your control. We're not talking about complex network configurations or expensive hardware upgrades. We're talking about a surprisingly simple, yet often overlooked, tactic that can breathe new life into your laptop's Wi-Fi capabilities.
Understanding the Silent Saboteur: Wireless Interference
The modern home, office, and even public spaces are awash in a sea of electromagnetic waves. Radios, microwaves, Bluetooth devices, other Wi-Fi networks – all vying for the same limited airspace. Think of it like a crowded room where everyone is shouting, making it difficult to hear a single voice. Your laptop's Wi-Fi adapter is trying to "listen" for the router's signal, but this chorus of interference can drown out the essential communication. The result? Weak, unreliable, or completely nonexistent Wi-Fi connectivity. The type of interference can also vary. Some common causes include:
- Other Wi-Fi Networks: Neighboring Wi-Fi routers operating on the same channel as yours.
- Microwave Ovens: These appliances emit powerful electromagnetic radiation, particularly when in use.
- Bluetooth Devices: Bluetooth headphones, speakers, mice, and keyboards can compete for bandwidth.
- Wireless Radios with Poor Shielding: The components may not be fully shielded, causing interference.
- Physical Obstructions: Walls, especially those containing metal or reinforced concrete, can significantly weaken the Wi-Fi signal.
The SHOCKING Trick: Channel Surfing for a Stronger Signal
The key to unlocking a stronger, more reliable Wi-Fi connection is often as simple as changing the channel your router uses to broadcast its signal. Think of Wi-Fi channels like radio stations. By default, many routers automatically select a channel, but this choice isn't always the most optimal. If your router and all your neighbor's routers are set to the same channel, the collision of all these signals can cause a weak connection.
- Identifying Congested Channels: To determine which channels are the least congested, you'll need to use a Wi-Fi analyzer app. These applications scan the surrounding airwaves for other routers nearby and show data related to signal strength and channel occupancy. Popular options include:
- Android: Wi-Fi Analyzer (by farproc)
- iOS: Airport Utility (Apple)
- Windows: Acrylic Wi-Fi Home, NetSpot.
- macOS: NetSpot
- Accessing Your Router's Configuration: Once you've identified a less crowded channel, you'll need to access your router's settings webpage. This is typically done by typing your router's IP address into your web browser (e.g., 192.168.1.1 or 192.168.0.1 – check your router's documentation if you're unsure).
- Locating the Wireless Channel Settings: The exact location of the channel settings varies depending on your router's make and model, but you'll typically find them within the "Wireless," "Wi-Fi," or "Advanced Settings" section. Look for options like "Channel," "Wireless Channel," or "802.11 Channel".
- Changing the Channel: Select a channel that is less congested, as identified by your Wi-Fi analyzer app. Popular, less crowded channel choices are 1, 6, and 11 in the 2.4 GHz band.
- Saving and Testing: Save the new settings and restart your router for the changes to take effect fully. After the router reboots, reconnect your laptop to the Wi-Fi and test your connection. Observe how the connection performs after the change.
Beyond Channel Changes: Additional Optimizations
While changing your Wi-Fi channel can often work miracles, a few other things can contribute to a more stable and reliable connection:
1. Router Placement:
The physical location of your router plays a critical role.
- Elevated Positioning: Place your router in an elevated position, such as on a shelf or a desk, rather than on the floor. This improves signal propagation.
- Central Location: Position the router as centrally as possible within your home or office to maximize its coverage area.
- Eliminate Obstructions: Remove objects blocking the router's signal path, such as walls, metal objects, and appliances.
2. Router Hardware Maintenance
- Firmware Updates: Regularly check for and install firmware updates for your router. These updates often include performance improvements and bug fixes that can enhance Wi-Fi stability.
- Restart Routinely: Reboot your router regularly (once a week) to clear its memory and resolve any temporary glitches.
- Antenna Orientation: Experiment with the position of your router's antennas. If your router provides external antennas, try varying their orientation to see if this improves coverage.
3. Laptop-Specific Adjustments
- Driver Updates: Ensure that your laptop's Wi-Fi adapter drivers are up-to-date.
- Power Saving Modes: Check your laptop's power settings. If it’s set to a mode which prioritizes battery life over performance, this could limit the Wi-Fi adapter's capabilities.
- Run the Network Troubleshooter: Most operating systems have network troubleshooters that can diagnose and sometimes fix Wi-Fi problems.
4. 5 GHz vs. 2.4 GHz
If your router supports it, switch to using the 5 GHz band. The 5 GHz band offers:
- Less Congestion: Fewer devices use the 5 GHz band, making it less susceptible to interference.
- Faster Speeds: 5 GHz provides higher data transfer rates, resulting in faster download and upload speeds.
- Shorter Range: The 5 GHz band does have a shorter range than the 2.4 GHz band, so it may not be ideal for larger homes.
Troubleshooting Common Wi-Fi Issues
Even after implementing the above strategies, you might encounter intermittent Wi-Fi problems. Here's how to address them:
- Intermittent Connection Drops:
- Restart your modem and router.
- Check your Wi-Fi channel.
- Move your laptop closer to the router.
- Ensure your Wi-Fi adapter drivers are up-to-date.
- Slow Internet Speeds:
- Test your internet speed using an online speed test.
- Close bandwidth-intensive applications.
- Change your Wi-Fi channel.
- Upgrade your internet plan if necessary.
- Run a malware scan.
- Wi-Fi Not Connecting:
- Verify the correct Wi-Fi password.
- Restart your modem and router.
- Check the Wi-Fi adapter settings on your laptop.
- Check your network name on the router.
The Bottom Line: Taking Control of Your Wi-Fi Experience
Dealing with a dying Wi-Fi connection can be incredibly frustrating. But by using the straightforward trick of channel selection and other optimizations, you can significantly enhance the performance of your laptop. Remember, troubleshooting a weak Wi-Fi signal is an iterative process. Start with channel selection, experiment with router positioning, and make adjustments to your laptop's settings. By being proactive and implementing the simple techniques outlined in this guide, you can regain control of your wireless experience, and enjoy a consistently fast and reliable Wi-Fi connection. Don't let a dying Wi-Fi signal disrupt your workflow or relaxation time. Take action, and you'll be pleasantly surprised by the difference a few simple tweaks can make.
