command to share wifi from laptop windows 7

Title: How to Share WiFi From Laptop - Windows 7810
Channel: GizPrime
How to Share WiFi From Laptop - Windows 7810 by GizPrime
Unlock Your Laptop's WiFi Hotspot: Windows 7 Secret Revealed!
Unleash Your Inner WiFi Guru: Windows 7 Hotspot Secrets
Hey there, tech adventurer! Ever wished you could share your laptop's internet connection with the world (or at least your phone)? Windows 7, surprisingly, holds a secret. It's a secret about creating your own personal WiFi hotspot. It's easier than you think, honestly. So, prepare to transform your laptop into a wireless powerhouse. Let's explore how to unlock this hidden potential. We assure you; this is going to be quite exciting.
Crafting Your Wireless Haven: The Fundamentals
First things first, gather your tools. You'll need a Windows 7 laptop with a working internet connection. You'll also need a network adapter. Most laptops have one built-in. It's for this reason that we can start. Before we proceed, ensure your internet connection is live and kicking. Think of it as the foundation of your WiFi castle. Now, let's begin constructing your hotspot.
Cmd to the Rescue: Your Command Center
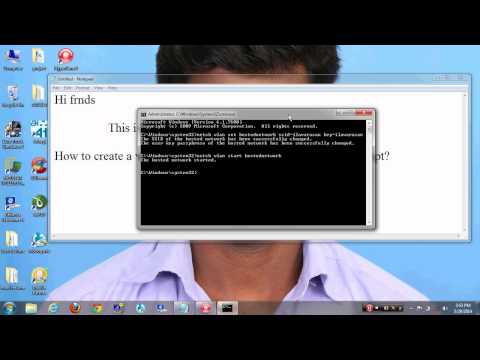
We're going to use the Command Prompt. Don't worry; it's not nearly as scary as it sounds. Seek the Command Prompt in your start menu. Right-click it and select "Run as administrator." Administrator privileges are crucial. It provides permission to weave our WiFi magic. This allows the necessary changes to function. The black window is your command center. It is here that our adventure starts.
Setting Up Your Virtual Network: The Magic Words
Now, type the following command into the Command Prompt:
netsh wlan set hostednetwork mode=allow ssid="YourHotspotName" key="YourPassword"
Replace "YourHotspotName" with the name you want for your hotspot. Ensure it is unique and memorable. Replace "YourPassword" with a secure password. This shields your network from unwanted visitors. Press Enter. That's the first step accomplished. It is a simple yet effective command.
Activating Your Hotspot: Bringing it to Life
Next, type the following command:
netsh wlan start hostednetwork
Press Enter once more. Success! You’ve officially activated your virtual WiFi network. But we're not done yet. The network is active. But it is not broadcasting yet!
Sharing Your Internet: The Final Piece
This is where everything comes together. Head to the Network and Sharing Center. You can find this in your Control Panel. Click "Change adapter settings." Locate the network adapter connected to your internet. It could be Ethernet or WiFi. Right-click on it and select "Properties." Go to the “Sharing” tab. Check the box marked "Allow other network users to connect through this computer’s internet connection." Now, select your newly created virtual network from the dropdown menu, and click Ok.
Troubleshooting Tips: Smooth Sailing Ahead
Encountering issues? It happens. Firstly, ensure your wireless adapter is enabled. Secondly, double-check your commands for typos. Thirdly, try restarting your laptop. Sometimes, a simple restart works wonders. If problems persist, consult online forums for Windows 7 networking. It may assist with your solutions. Remember, patience is key.
The Perks of a Personal Hotspot: Convenience and Freedom
Why go through all this trouble? A personal hotspot brings immense benefits. It allows you to connect multiple devices to the internet. This is especially helpful when traveling. It can also be a backup solution if your primary WiFi fails. The convenience is unmatchable. You gain control over your connectivity.
Securing Your Network: Protecting Your Data
Security is crucial. Use a strong password for your hotspot. Keep your software updated. This mitigates vulnerability. Be wary of public networks. Always enable a firewall. It is very essential to remain safe. These steps safeguard your information.
Beyond Windows 7: Modern Day Applications
While this is specific to Windows 7, the underlying concepts still apply today. Most modern operating systems offer similar hotspot features. Even smartphones can act as hotspots. However, this classic method still serves a purpose. Now you can share your connection.
Conclusion: You're Now a WiFi Wizard!
Congratulations, you've done it! You've successfully created a WiFi hotspot using your Windows 7 laptop. Embrace the freedom and convenience. You are now a WiFi wizard. You're ready to connect anything, anywhere. Enjoy your newfound wireless power. Embrace the possibilities. Go forth and share your internet! We wish you the very best with this process.
Laptop WiFi Upgrade: Blazing-Fast Speeds, Guaranteed!Unlock Your Laptop's WiFi Hotspot: Windows 7 Secret Revealed!
Hey there, tech enthusiasts and fellow WiFi wanderers! Remember those days of juggling multiple devices and a single internet connection? The struggle was real, wasn't it? Well, buckle up because we're diving headfirst into a time machine and revisiting Windows 7 – a powerhouse that, with a few clever tweaks, can transform your laptop into a personal WiFi hotspot, saving you from internet woes and network frustrations. We're going to unravel the secrets to turning your Windows 7 laptop into a WiFi sharing machine, making life a whole lot easier.
1. Windows 7: Still Got It! The Underrated Hotspot Hero
Let’s be honest, Windows 7 might be a bit of an old soul now, but don't underestimate its capabilities. It’s like that trusty old car that always gets you where you need to go. While newer operating systems might boast fancy features, Windows 7 quietly offers a hidden gem: the ability to create a WiFi hotspot. It’s a simple, yet effective solution for sharing your internet connection with other devices, whether it’s your phone, tablet, or even another laptop. Think of it as your personal WiFi concierge, effortlessly connecting your devices to the internet.
2. Why Bother? The Perks of Turning Your Laptop Into a Hotspot
Why even bother setting up a hotspot? Well, let me tell you, the benefits are plentiful. We're talking about:
- Sharing your Internet: Share your wired or Wi-Fi connection with multiple devices. Crucial when you're in a hotel and need to connect your phone and tablet but only have one Ethernet port available.
- Saving Money: Avoid paying for extra internet connections. If you have a limited data plan on your phone, you can save data by using your laptop's connection for other devices.
- Boosting Your Productivity: Imagine being able to work anywhere, anytime, without the limitations of a single internet source. That's the kind of freedom a hotspot affords.
3. Preparation is Key: What You'll Need Before We Start
Before we dive into the nitty-gritty, let's gather our tools. You’ll need a Windows 7 laptop with a working internet connection (either via Ethernet or Wi-Fi). Make certain your laptop’s wireless network adapter is enabled and ready to go. If you're using Ethernet, be ready for your laptop to broadcast the internet connection through Wi-Fi. Think of this process as carefully setting the stage for your personal WiFi theatre.
4. The Command Prompt: Our Secret Weapon
Here’s where the magic begins. We’re going to use the command prompt – the digital equivalent of a Swiss Army knife. Don’t worry; it’s easier than it sounds. It might seem like a bit of geeky code, but trust me, we’ll walk you through it step-by-step.
5. The First Command: Setting Up the Virtual Hosted Network
Open the command prompt by typing "cmd" in the start menu search and pressing Enter. Now, type this command:
netsh wlan set hostednetwork mode=allow ssid="Your_Hotspot_Name" key="Your_Password"
Replace "Your_Hotspot_Name" with a name for your WiFi hotspot (like "MyLaptopWiFi") and "Your_Password" with a strong password. This is like giving your hotspot its name and a secure passcode.
6. Activating the Hotspot: Turning On the Hosted Network
Next, we need to activate the hosted network. In the same command prompt window, type:
netsh wlan start hostednetwork
This command is the "on" switch for your newly created hotspot.
7. Sharing Your Internet Connection: The Final Touch
Almost there! Now, right-click on your internet connection icon in the system tray (the little computer icon in the bottom right). Select "Open Network and Sharing Center." Click on "Change adapter settings" on the left. Right-click on the internet connection you are using (e.g., Wi-Fi or Ethernet), go to "Properties," and click on the "Sharing" tab. Check the box that says "Allow other network users to connect through this computer's Internet connection," and from the drop-down menu, select the name of the virtual network adapter you set up earlier. Click "OK." This is the equivalent of sharing your feast with your friends.
8. Troubleshooting Common Issues: When Things Go Wrong
Sometimes, things don't work perfectly the first time. Here are a few common problems and their solutions:
- Hotspot Not Showing Up: Double-check your hotspot name and password. Ensure the wireless adapter is enabled.
- No Internet Connection on Connected Devices: Make sure your internet connection is actually working on your laptop, and that the "Sharing" option is correctly set.
- Command Prompt Errors: Ensure you are running the command prompt as administrator (right-click, "Run as administrator").
9. Security First: Keeping Your Hotspot Safe
Just like with any WiFi network, it's crucial to secure your Windows 7 hotspot. A strong password is your first line of defense. Consider enabling WPA2-PSK encryption for added security. Remember, a secure hotspot protects your data and privacy.
10. Monitoring Your Connection: Staying in the Know
After setting up your hotspot, keep an eye on the connected devices and data usage. This helps you understand how your bandwidth is being utilized and can prevent unforeseen data charges or slowdowns. It's like being the watchful gatekeeper of your internet realm.
11. The "Turn Off" Switch: Deactivating Your Hotspot
When you're done using your hotspot, you can easily turn it off to conserve your laptop's battery and disable the wireless network. Go back to the command prompt and type:
netsh wlan stop hostednetwork
This is the "off" switch for your personal WiFi theatre.
12. Beyond the Basics: Advanced Customization
Want to get even more advanced? Windows 7 offers options for customizing your hotspot's settings. You can limit the number of connected devices or set up a schedule for when the hotspot is active.
13. The Laptop as a Router: Exploring the Functionality
Consider your laptop not just as a device, but as a gateway. By activating the hotspot feature, you're essentially turning your laptop into a miniature router, extending your internet reach throughout your personal zone.
14. The Future of Hotspots: Windows 7 in the Present
Even though Windows 7 might not be the freshest operating system, its hotspot functionality is still incredibly relevant. It's a testament to the power of simple, reliable solutions.
15. The Joy of Freedom: Unleashing Your Internet
The ability to create a WiFi hotspot is all about freedom – the freedom to connect, share, and work from anywhere. Hopefully, by following these steps, we’ve unlocked a new realm of internet possibilities.
And That's a Wrap!
So there you have it! You've successfully transformed your Windows 7 laptop into a WiFi hotspot, unlocking a new level of convenience and connectivity. We hope you found this guide helpful and easy to follow. Feel free to experiment, adjust the settings to your liking, and enjoy the newfound freedom of a portable WiFi hotspot. Remember, the tech world can seem intimidating, but with a little patience and the right guidance, anything is achievable. Now go forth and share the internet with the world!
FAQs
1. Will this drain my laptop's battery?
Yes, creating a WiFi hotspot will consume more battery power. It's best to plug in your laptop when using it as a hotspot for extended periods.
2. Can I change the hotspot name and password later?
Absolutely! You can change these settings through the command prompt using the same commands as before, just replacing the old values with the new ones.
3. Is this feature secure?
Yes, if you set a strong password and enable WPA2-PSK encryption, your hotspot can be very secure.
4. Can I use this with a mobile broadband connection?
Yes, you can share your mobile broadband connection just like any other internet connection.
5. Does this still work in 2024?
Yes, as of 2024, these methods are still functional. While support for Windows 7 itself has ended, the core functionality still works.
- Principal Keywords: Laptop, WiFi, Hotspot, Windows 7, Share
- SEO Headline: Share WiFi: Laptop Hotspot Revealed (Windows 7 Secrets!)
- Pathway: Laptop WiFi
- Meta Summary: Transform your Windows 7 laptop into a WiFi hotspot! Learn how to share your internet with multiple devices, with simple steps and security tips in this guide.
- Image Alt Text: Windows 7 laptop creating a personal WiFi hotspot, sharing internet.
How to Enable Internet Connection Sharing in Windows 7
By HOWTECH How to Enable Internet Connection Sharing in Windows 7 by HOWTECH
How to Create a WiFi Hotspot with Windows 7

By 1stepatatime How to Create a WiFi Hotspot with Windows 7 by 1stepatatime
How to create a wifi hotspot in windows 7 using command prompt
By Computer Traning School How to create a wifi hotspot in windows 7 using command prompt by Computer Traning School

Title: How To Make Laptop WiFi Hotspot Without Any Software to Share LAN
Channel: NeSky India
How To Make Laptop WiFi Hotspot Without Any Software to Share LAN by NeSky India
Wifi On Laptop Phone
Unlock Your Laptop's WiFi Hotspot: Windows 7 Secret Revealed!
Let's face it: in this hyper-connected age, the ability to share your internet connection is practically a necessity. Whether you're stranded in a coffee shop with unreliable Wi-Fi, need to provide internet access to a colleague on the go, or simply want to extend your home network, turning your Windows 7 laptop into a Wi-Fi hotspot is a remarkably useful skill. While more modern operating systems may boast built-in features that make this process seem seamless, the underlying technology and principles remain fundamentally the same. Here, we'll delve deep into the specifics of how to achieve this on your Windows 7 machine, offering a robust and reliable solution that will have you broadcasting a wireless signal in minutes. Forget clumsy third-party software; we’re relying on the power already residing within your operating system.
Understanding the Foundation: Ad-Hoc vs. Hosted Network
Before we dive into the how-to, it's important to understand the two primary methods of creating a Wi-Fi hotspot on Windows 7. The first, and the older method, is the ad-hoc network. Ad-hoc networks are peer-to-peer connections, meaning each device connects directly to each other. While straightforward in setup, ad-hoc networks have limitations. They typically lack robust security options beyond basic WEP encryption and can be less stable than other methods. Furthermore, only devices compatible with the ad-hoc standard – often older devices – can connect.
The method we'll focus on is the "hosted network." This leverages the built-in wireless capabilities of your laptop's network adapter and creates a virtual access point. The hosted network method addresses the shortcomings of ad-hoc networks by using a software-based access point. This approach offers improved security through WPA2 encryption, greater compatibility with a wider range of devices, and, generally, a more stable and reliable connection. This is the modern, preferred choice.
Preparing Your Windows 7 Laptop: Essential Prerequisites
Before taking the plunge, several preliminary checks are essential to ensure a smooth and successful setup. First and foremost: your laptop must have a wireless network adapter. This might seem obvious, but verifying its functionality is crucial. You can find this information by navigating to your Device Manager. There are multiple methods to get there; the quickest way is to type "Device Manager" in the Start menu search bar.
Within Device Manager, expand the "Network adapters" section. Look for your wireless network adapter; it will likely be named something generic, such as "Wireless Network Adapter" or something more specific, like "Intel Centrino Wireless-N 1000." Examine the adapter for any error symbols, such as a yellow exclamation point, which would indicate a driver issue. If you find an error symbol, you'll need to address this issue first by updating or reinstalling the appropriate drivers. You can usually download the latest drivers from the manufacturer's website, such as Intel's website. Ensure your network adapter is enabled - right-click the device and check the 'Enable device' option.
The second crucial requirement is that your laptop has a supported Wi-Fi driver. The method described here requires the Windows Wireless Hosted Network service to be available. Most modern Wi-Fi adapters support this functionality, but it's still worth confirming. You can verify support by using the Command Prompt.
Unveiling the Code: Configuring Your Hosted Network with Command Prompt
Now comes the magic. We'll use the power of the Command Prompt to configure and activate your hosted network. Open the Command Prompt by typing "CMD" into the Start menu search, right-clicking the "Command Prompt" option, and selecting "Run as administrator." This elevated privilege is critical for making the required system-level changes.
In the Command Prompt window, enter the following command and press Enter:
netsh wlan set hostednetwork mode=allow ssid="YourHotspotName" key="YourPassword"
Replace YourHotspotName with your desired network name (SSID) and YourPassword with a strong password. It is critical to choose a robust password consisting of at least eight characters, combining upper and lowercase letters, numbers, and special characters. For instance, a password like "MySecureHotspot123!" is much more secure than "password." This command essentially tells your computer to create a virtual Wi-Fi network, setting the network name (SSID), and the password (key) to protect it.
Following the execution of this command, you should see a confirmation message detailing the success of creating your network. If you encounter an error, double-check the command for typos and ensure you ran the Command Prompt as an administrator.
Next, we'll activate the hosted network by entering and running this command in the Command Prompt:
netsh wlan start hostednetwork
This command initiates the wireless network, making your laptop’s hotspot active. At this point, your computer is, in essence, broadcasting the Wi-Fi signal. However, connected devices will still not have internet access, as we must share your active internet connection with the hotspot.
Sharing Your Internet Connection: The Gateway to Connectivity
The final piece of the puzzle is sharing your existing internet connection with the newly created hosted network. The process involves a minor configuration within your network settings.
Close the command prompt window. Click the Start button, and then click Control Panel. Within the Control Panel, navigate to "Network and Internet," and then to "Network and Sharing Center."
On the Network and Sharing Center screen, click on the "Change adapter settings" on the left side of the screen. This will display all available network adapters. Locate the network adapter that is currently providing your internet connection (e.g., your Ethernet adapter, or your laptop's Wi-Fi adapter if it is connected to another Wi-Fi network). This is the connection you want to share.
Right-click on the network adapter providing your internet connection and select "Properties".
In the properties window, click to the "Sharing" tab.
Check the box that says, "Allow other network users to connect through this computer's Internet connection."
Under “Home networking connection,” select the “Microsoft Hosted Network Virtual Adapter” or a similar name that is used to represent our newly created Wi-Fi network.
Click "OK" to save the changes.
At this stage, your Windows 7 laptop is now functioning as a fully operational Wi-Fi hotspot. All devices connecting to the hotspot will be able to access the internet, provided they have the correct password.
Monitoring and Managing Your Hosted Network
Once your hotspot is up and running, it is useful to monitor its status and manage it. To view the current state of your hosted network (e.g., if it's running, the number of connected devices, etc), use the following command in an elevated Command Prompt:
netsh wlan show hostednetwork
This will display details like the SSID, authentication type, the number of connected clients, and the status. It also provides information about data transferred. This information can be invaluable for troubleshooting or optimizing your connection in the future.
To stop the hosted network—effectively turning off your Wi-Fi hotspot—use the following command in the Command Prompt, run as administrator:
netsh wlan stop hostednetwork
This command gracefully shuts down the virtual access point, preventing any further devices from connecting and conserving battery life. Starting and Stopping the Hosted Network using the Command Prompt is a much simpler method than using advanced third-party applications, which may be unreliable.
Troubleshooting Common Issues
While the process is generally straightforward, you may encounter issues. Here are some solutions to the most common problems:
- "The hosted network couldn't be started": This could be due to several reasons. Verify that your Wi-Fi adapter supports the hosted network feature (using the command
netsh wlan show driversin the Command Prompt). Ensure that your drivers are up to date. Also, double-check that you ran the Command Prompt as an administrator. - Connected Devices Can't Access the Internet: This is often caused by incorrect sharing settings. Revisit the “Sharing” tab of your primary internet connection’s properties, and confirm once again that the correct virtual adapter is selected for sharing. Also, verify that your Windows Firewall isn't unduly blocking traffic; allow network connections to pass through.
- Slow Speeds: Several factors can impact speed (signal strength, distance from the laptop, and interference from other devices). Ensure the laptop is close to the connected devices, and try to position it away from sources of interference, such as microwaves and Bluetooth devices. Also, consider upgrading your Wi-Fi adapter to support the most current Wi-Fi standards.
- Password Issues: Ensure the password is being entered correctly in the connecting device. Remember that passwords are case-sensitive. Try renaming the hotspot (SSID) and creating a new password.
Maximizing Your Hotspot Experience: Best Practices and Considerations
Beyond the basic setup and troubleshooting, consider these tips for a more optimized Wi-Fi hotspot experience. First, be mindful of your laptop's battery life. Broadcasting a Wi-Fi signal consumes battery power. Plug in your laptop if you will be using the hotspot for an extended period. Second, use strong, unique passwords. This is critical for your security. Never reuse passwords, and consider a password manager for generating and securely storing complex passwords. Third, regularly review the devices connected to your hotspot. If you notice any unauthorized devices, immediately change your password. Fourth, be aware of
