how to turn laptop to wifi hotspot windows 7

Title: How to Create a WiFi Hotspot with Windows 7
Channel: 1stepatatime
How to Create a WiFi Hotspot with Windows 7 by 1stepatatime
how to make laptop as wifi hotspot windows 7
Turn Your Windows 7 Laptop into a WiFi Hotspot in 60 Seconds!
Unleash Your Inner Wireless Guru: Instantly Transform Your Windows 7 Laptop into a WiFi Hotspot!
Imagine this: you're stranded. Your phone’s data allowance has vanished, and the nearest Wi-Fi signal is miles away. But your Windows 7 laptop sits ready, a silent powerhouse of untapped potential. What if you could conjure a personal Wi-Fi hotspot, right there, in seconds? Well, the good news is you absolutely can! This isn’t some techie myth; it’s a practical reality. And it’s simpler than you think.
Making the Magic Happen: A Quickfire Guide
First, prepare yourself. We're about to journey into the realm of wireless connectivity. We'll transform your laptop into a signal-broadcasting beacon. So, take a deep breath. You’ve got this!
The secret weapon in our arsenal is the "hosted network" feature, built right into Windows 7. Consequently, you won't need any third-party software. It's all native functionality. Hence, save those precious megabytes.
The Command Prompt Command: Unveiling the Hotspot's Core
Open the Command Prompt as an administrator. Otherwise, the magic won't work. You can find it by typing “cmd” in the Start menu search. Right-click the “Command Prompt” result and select “Run as administrator.”
Now, here’s the key. Type the following command and press Enter:
netsh wlan set hostednetwork mode=allow ssid="YourHotspotName" key="YourPassword"
Therefore, replace "YourHotspotName" with your desired network name. Also, the "YourPassword" should be replaced with a password you'll remember. Make it strong! This is your wireless gateway.
Activating the WiFi Wizard: Setting Up the Connection
Next, we activate the hosted network. Execute this command in the Command Prompt:
netsh wlan start hostednetwork
Consequently, you've just created a Wi-Fi hotspot.
However, we're not quite done. We need to share your internet connection. If we don't do this, the hotspot won't have internet access.
Sharing the Love: Internet Connection Sharing
Head to the Network and Sharing Center. You can reach it via the Control Panel.
Find “Change adapter settings” on the left. Consequently, this opens a list of your network connections. Now, right-click on your active internet connection (the one your laptop uses to connect to the internet). Then, pick “Properties.”
Select the “Sharing” tab. Check the box that says, “Allow other network users to connect through this computer’s internet connection.” Also, select the hosted network connection from the dropdown menu. This typically is the one like “Microsoft Hosted Network Virtual Adapter”. Now, hit "OK."
Testing the Waters: Verifying Your Wireless Creation
Your hotspot is virtually ready. Therefore, test it. Grab your phone, tablet, or another Wi-Fi-enabled device. Search for available networks. Do you see the name you provided? If yes, then connect using your password.
Then, try to browse the internet. If it works, congratulations! You've successfully transformed your Windows 7 laptop.
Troubleshooting Troubles: What to Do When Things Go Awry
Sometimes, things don't work perfectly. It's like that with technology! But don’t worry. Troubleshooting is often simple.
First, double-check your commands. Typos are common. Secondly, verify your internet connection. Thirdly, ensure your Wi-Fi adapter is enabled. Finally, reboot your laptop. Usually, these steps will resolve any minor issues.
Advanced Options: Customizing Your Wireless Experience
Don’t stop there! You can customize your hotspot further. For example, you can change the network name and password. Also, you can stop the hosted network when you no longer need it.
To stop the hosted network, use this command in Command Prompt (as administrator):
netsh wlan stop hostednetwork
Furthermore, explore the Windows 7 settings for more power. You have the power to become a true wireless maestro!
Beyond the Basics: Unleashing the Power of Your Hotspot
What uses can you imagine? Think about sharing your internet access with others. Moreover, consider troubleshooting network issues. You could also create a temporary network for work or gaming on the go.
Therefore, your laptop becomes a versatile tool. It extends your digital reach. Because of this, you can stay connected, no matter where you are.
The Final Takeaway: Embracing Wireless Freedom
In conclusion, setting up a Wi-Fi hotspot on your Windows 7 laptop in seconds is not just possible; it’s simple. By following these straightforward steps, you've unlocked extra functionality. So, you are equipped for on-the-go connectivity.
So, the next time you find yourself in a data-starved situation, remember this guide. You’ll be broadcasting Wi-Fi bliss in no time at all. Go forth and connect!
HP Laptop WiFi Nightmare? FIX It NOW!Turn Your Windows 7 Laptop into a WiFi Hotspot in 60 Seconds!
Alright, tech adventurers! Ever been stranded in a digital desert, desperately craving the sweet oasis of the internet? Picture this: you're juggling your phone, your tablet, maybe even a dusty old Kindle, and suddenly – bam! – your Wi-Fi decides to take a vacation. Or perhaps you're tethered to a slow, unreliable public Wi-Fi connection, wishing you could just share your laptop's internet. Well, grab your virtual compass because we're about to embark on a quick and easy quest to transform your trusty Windows 7 laptop into a personal Wi-Fi hotspot. Forget complicated tech jargon; we're talking about turning your laptop into a Wi-Fi genie – granting internet wishes in, well, roughly a minute! Let's roll!
1. The SOS Call: Why Create a Wi-Fi Hotspot?
Let's be frank, the need for a Wi-Fi hotspot is like a digital emergency signal. Think of it as your personal internet lifeboat, ready to rescue you from a sea of connectivity chaos. Maybe you're on the road, away from your usual broadband comfort, and your other devices are desperate for data. Or perhaps you're sharing a limited Wi-Fi connection with others, and want to extend the signal’s reach. Consider these scenarios:
- Limited Data: You've used up your mobile hotspot allowance.
- Dead Zones: You're in a locale with poor Wi-Fi, but you need a reliable internet connection.
- Sharing is Caring (and Necessary): You have multiple devices or want to share your internet with someone.
- Hotel Room Hassles: Those hotel Wi-Fi fees are starting to sting.
Creating a hotspot allows the flexibility and freedom to stay plugged in, no matter where life throws you.
2. Gathering Your Supplies: What You'll Need
Before we jump in, let's gather our digital tools. The beauty here is the simplicity! You’ll primarily need:
- Your Windows 7 Laptop: Obviously! Make sure it's charged or plugged in.
- An Internet Connection: Your laptop needs to be connected to the internet, either through an ethernet cable or an already established Wi-Fi network. This is the ‘source’ of your new hotspot.
- Your Patience (For 60 Seconds): Seriously, this is quicker than waiting for your coffee to brew!
3. Diving In: The Magic Trick (The Command Prompt Method)
Forget fancy software. We're going old-school, channeling the power of the Command Prompt. Don't panic; it's not as scary as it sounds! We're going to execute a few simple commands that work wonders.
Step 1: Open Command Prompt (As Administrator): Hit the Windows key, type "cmd," right-click "Command Prompt," and select "Run as administrator." This gives us the necessary power to make changes. Think of it as giving the magic genie a direct order!
Step 2: The First Spell (Setting Up the Hosted Network): Paste this command into the Command Prompt and hit Enter:
netsh wlan set hostednetwork mode=allow ssid="YourHotspotName" key="YourPassword"Replace "YourHotspotName" with the name you want your Wi-Fi network to broadcast (e.g., "MyLaptopHotspot"). Replace "YourPassword" with a strong password (at least 8 characters). Remember this password; you'll need it!
Step 3: The Second Spell (Starting the Hosted Network): Type this command and press Enter:
netsh wlan start hostednetworkThis initiates the magical connection.
Step 4: The Connecting Charm (Sharing the Internet Connection):
- Open the Network Connections window. You can find this by searching for "View network connections" in the Windows search bar.
- Identify the connection your laptop is using to access the internet (e.g., Ethernet, Wi-Fi).
- Right-click the connection and select "Properties."
- Click the "Sharing" tab.
- Check the box that says "Allow other network users to connect through this computer's internet connection."
- In the "Home networking connection" dropdown menu, select the hosted network you just created.
- Click "OK."
That's it! You're practically a Wi-Fi wizard!
4. Troubleshooting Troubles: Common Issues and Quick Fixes
What if things don't go according to plan? Don't sweat it. Here are a few common bumps in the road and how to smooth them out:
- "The hosted network couldn’t be started." Ensure your wireless adapter is enabled in Device Manager (search for "Device Manager" in Windows). You may need to update your drivers from the manufacturer’s website.
- Devices can't connect. Double-check the password you entered and ensure you selected the correct hosted network in the sharing settings.
- Slow speeds? Remember that the speed of your hotspot depends on the speed of your original internet connection.
5. The Afterglow: Connecting Your Devices
Now for the fun part! On your phone, tablet, or even another laptop, search for available Wi-Fi networks. You should see the name of the hotspot you created. Select it, enter your password, and voila! You’re surfing the web courtesy of your laptop. Think of it as setting up camp in the digital wild.
6. Staying Secure: Password Protect Your Hotspot
Never forget that your hotspot is only as safe as your password. Always use a strong password, and change it periodically to prevent unauthorized access. This is like locking the door to your digital home.
7. Going Beyond the Basics: Exploring Advanced Settings (Optional)
For the curious tech-savvy minds, you can dive deeper. You can customize the channel your hotspot broadcasts on (reducing interference if you live in a crowded area). You can also monitor the connected devices and control their internet access, if required.
8. When to Call It Quits: Turning Off Your Hotspot
When you're done hotspotting, it's essential to shut it down to conserve battery life and prevent unauthorized use. Head back to the Command Prompt (as administrator). Type netsh wlan stop hostednetwork and hit Enter. You can also disable the sharing settings in your network connections.
9. The Benefit of Speed: Why This Method Shines
Why is this method so great? It's fast, built-in to Windows 7, and eliminates the need for third-party software. No messing around with complex installations. It's like a secret weapon already loaded in your tech arsenal!
10. Alternatives: Other Hotspot Options (Brief Overview)
While this Command Prompt method is our star, there are alternative ways to create a hotspot:
- Third-Party Software: Applications designed specifically for hotspot creation. These often offer more features but may carry potential risks linked to security, speed decline and unnecessary memory usage.
- Mobile Hotspot (if applicable): Some devices provide built-in hotspot functionality.
11. A Word of Caution: Battery Life and Data Usage
Be mindful of your laptop's battery life and data usage. Running a hotspot drains the battery faster. Always check your ISP data plan to avoid exceeding your data allotment, and incurring additional expenses.
12. The Power of Simplicity: Why Avoid Complicated Software?
We chose the Command Prompt method because it's elegant in its simplicity. No software downloads, no bloatware, just direct access to your laptop's capabilities. It’s a testament to the power of Windows 7's built-in features.
13. Embracing Mobility: Hotspot Use Cases
Think about the countless situations where a laptop hotspot comes in handy:
- Working from a coffee shop with unreliable Wi-Fi.
- Providing internet for your family members when you have an internet outage.
- Staying connected on road trips or during travel.
- Connecting multiple devices effortlessly.
14. The Future of Hotspots: What's Next?
As technology evolves, hotspots will probably become even more integrated and intuitive. Anticipate more refined security features, more customization, and seamless integration with other devices.
15. Reaping the Rewards: The Joy of a Connected Life
In the end, the ability to create a Wi-Fi hotspot is about freedom. It’s about staying connected on your terms, empowering you to work, play, and communicate wherever you are. Armed with this knowledge, you are not just a user; you're a Wi-Fi pioneer!
Wrapping Up: Your Personal Hotspot Oasis
So there you have it, friends! In a few simple steps and with nothing more than your trusty Windows 7 laptop and an internet connection, you’ve transformed into a personal Wi-Fi hotspot provider. Now you are ready to share internet with others, provide connections to other devices, and take control of your digital experience. Remember, it's about convenience, flexibility, and staying connected in a world that is always, always online. Now go forth, and spread the Wi-Fi love!
**
Laptop WiFi Speed: SHOCKING Fix That WORKS!Turn Your Windows 7 Laptop into a WiFi Hotspot 2
By AvoidErrors Turn Your Windows 7 Laptop into a WiFi Hotspot 2 by AvoidErrors
Turn Your Windows 7 Laptop into a WiFi Hotspot
By AvoidErrors Turn Your Windows 7 Laptop into a WiFi Hotspot by AvoidErrors
Create a laptop WiFi hotspot in under 30 seconds Windows 7
By jacobspeeds Create a laptop WiFi hotspot in under 30 seconds Windows 7 by jacobspeeds
Title: How to make your Windows 7 PC, a Wi-Fi hotspot
Channel: Tech Raj
How to make your Windows 7 PC, a Wi-Fi hotspot by Tech Raj
Laptop Working
Turn Your Windows 7 Laptop into a WiFi Hotspot in 60 Seconds!
Imagine a scenario: You're in a hotel room with a flaky, paid-for Wi-Fi connection. Your tablet, yearning for connectivity, languishes. Your smartphone, desperate to update its social media feed, is stuck on the dreaded "No Internet Connection" message. You need a solution, and you need it fast. Fortunately, if you possess a Windows 7 laptop, you have the power to transform it into a fully functional WiFi hotspot, often in less time than it takes to brew a cup of coffee. The process, once understood, is incredibly straightforward, offering a lifeline in countless situations where reliable internet access is essential, yet elusive. We shall walk you through the remarkably easy steps.
Understanding the Foundation: What Makes This Possible?
Before diving into the practical steps, it’s helpful to understand the underlying principle. Windows 7, blessed with a degree of adaptability, includes a feature that effectively turns your laptop's wireless adapter into a virtual router. This virtual router broadcasts a WiFi signal, allowing other devices to connect and share your laptop's existing internet connection. This existing connection could be from an Ethernet cable, a 3G/4G USB modem, or even another, less-than-perfect WiFi connection. The beauty lies in its versatility: it utilizes hardware you likely already own, making it a cost-effective and immediately accessible solution.
Step-by-Step Guide: Creating Your WiFi Hotspot
The process is broken down into easy-to-follow steps, designed for maximum clarity.
Accessing the Command Prompt (Administrator Mode): This initial step is crucial. The Command Prompt is your gateway to configuring the virtual WiFi adapter. To access it, click the Start button (often the Windows logo in the bottom left corner). Then, in the search box, type “cmd.” Don't just press Enter. Instead, right-click on "cmd" or "Command Prompt" from the search results, and select "Run as administrator." This is absolutely critical; without administrator privileges, you won’t be able to make the necessary system-level changes.
Configuring the Virtual Adapter: Now, the Command Prompt window appears. Type the following command exactly as it is shown, observing all spaces and punctuation:
netsh wlan set hostednetwork mode=allow ssid="YourHotspotName" key="YourPassword"- Replace
YourHotspotNamewith the name you'd like to be associated with your WiFi hotspot. Choose something memorable, but also consider something that doesn't broadcast your personal information for security reasons. - Replace
YourPasswordwith a strong, secure password. This is vital for protecting your internet connection from unauthorized access. It should be at least 8 characters long, and ideally a mix of uppercase and lowercase letters, numbers, and symbols.
Once you've entered the command, press Enter. You should see a confirmation message indicating that the hosted network mode has been set and the SSID (Service Set Identifier, or network name) has been changed successfully.
- Replace
Starting the Hosted Network: Next, type the following command in the same Command Prompt window and press Enter:
netsh wlan start hostednetworkThis command activates the virtual WiFi adapter, and begins broadcasting your new WiFi signal. You should see a confirmation message that the hosted network has started.
Sharing Your Internet Connection: This is the final, and arguably, the most important step. You need to tell Windows 7 to share its existing internet connection through the newly created WiFi hotspot.
- Click the Start button again, and then open the Control Panel.
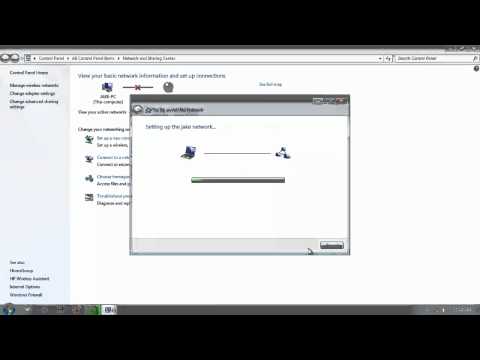
- In the Control Panel, select Network and Internet, and then Network and Sharing Center.
- In the left pane, click Change adapter settings. This will display a list of your network connections.
- Locate the connection your laptop is using to access the internet. This is likely labeled as "Local Area Connection" if you're using an Ethernet cable, or "Wireless Network Connection" if you're connected to another WiFi network. It can have a different name depending on your network settings.
- Right-click on the internet connection, and select Properties.
- In the Properties window, click the Sharing tab.
- Check the box that says “Allow other network users to connect through this computer’s Internet connection.”
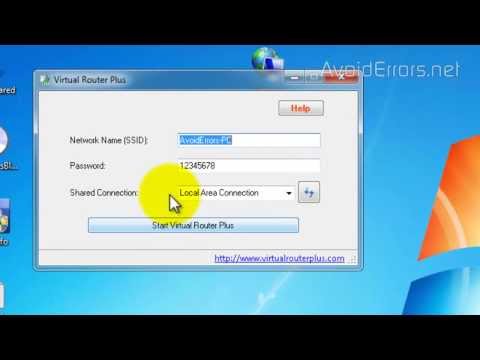
- From the "Home networking connection" dropdown menu, select “Microsoft Hosted Network Virtual Adapter” or “Wireless Network Connection [Name of your Hotspot]”. If there is an option [Name of your Hotspot], choose that option instead.
- Click OK.
Testing and Troubleshooting: At this point, your WiFi hotspot should be active. Take your other devices - your tablet, smartphone, or any device with WiFi capabilities - and search for available WiFi networks. You should see the name of your hotspot (the one you chose in Step 2). Select it, enter the password you created, and attempt to connect. If it does not connect, check these items:
- Check the Command Prompt Make sure that there are no errors that appeared while following the first three steps. Re-enter the commands if a mistake was made.
- Restart the Hosted Network Sometimes, simply restarting the hosted network can resolve connection difficulties. In the Command Prompt (Administrator Mode), type
netsh wlan stop hostednetwork, followed bynetsh wlan start hostednetwork. - Firewall Interference Your firewall settings might be blocking traffic. Temporarily disable your firewall (for testing purposes only) to see if this is the cause. If it resolves the issue, you'll need to configure your firewall to allow traffic through the hosted network.
- Driver Issues It’s rare, but your wireless adapter driver may be outdated. Visit the manufacturer's website for your laptop or wireless adapter and download the latest drivers.
Advanced Customization: Refining Your WiFi Hotspot
Once you’ve mastered the basics, you can explore advanced customization to optimize your hotspot for your specific needs.
Changing Your Hotspot Name and Password: If you want to change the name or password of your hotspot, repeat Step 2. Simply replace the
YourHotspotNameandYourPasswordvalues with your desired new settings. Remember to stop and restart the hosted network (Step 5) after making these changes for the new settings to take effect.Automatic Startup: To automatically start your hotspot every time your laptop boots up, you can create a scheduled task. Open Task Scheduler (search for it from the Start Menu). Then, create a new basic task and follow the prompts.
- For the trigger, select “When the computer starts.”
- For the action, choose “Start a program.”
- In the “Program/script” box, enter
netsh. - In the “Add arguments” box, enter
wlan start hostednetwork.
This will ensure that your hotspot is always running whenever your laptop is on, saving you the trouble of manually starting it each time.
Monitoring Bandwidth Usage: If you're on a limited data plan, you may want to monitor the bandwidth being used by your hotspot. Windows 7 itself doesn’t provide detailed bandwidth monitoring for the hotspot features, but you can use third-party software like NetBalancer or NetWorx to keep track of data consumption. These tools can help you stay within your data limits.
Security Best Practices: Always use a strong password. Change it periodically. Keep your laptop's operating system and drivers up to date, which helps to close security holes potentially present within the system.
Beyond the Basics: Practical Applications
The ability to create a WiFi hotspot on demand is invaluable in a variety of situations.
- Travel: Hotels, airports, and public spaces often charge exorbitant fees for Wi-Fi access. Your Windows 7 laptop becomes an instant money-saving solution. Share a single, affordable internet connection from another device to your other devices on the road.
- Emergency Connectivity: When your primary internet connection fails, the hotspot becomes a lifeline. Use your smartphone's mobile data plan to create a hotspot and keep your laptop online.
- Sharing with Friends and Family: If you would like to share your Internet connection with others, it is a simple step to set up this feature.
- Educational Purposes: The feature allows you to educate friends and family about the feature and how it works to help them when they need it.
Troubleshooting Common Issues
While the process is usually straightforward, you may encounter some issues.
- "The hosted network couldn't be started" error: This often indicates a problem with your wireless adapter drivers or configurations. Ensure your drivers are up to date, and check your wireless adapter's settings in Device Manager.
- "The group or resource is not in the correct state to perform the requested operation" error: This is often associated with permissions or security issues. Make sure you're running the Command Prompt as an administrator.
- Devices connect, but no internet: This is typically a problem with the internet connection sharing settings. Double-check that you’ve selected the correct network connection for sharing in the Network and Sharing Center. Also, confirm that the "Allow other network users to connect through this computer’s Internet connection
