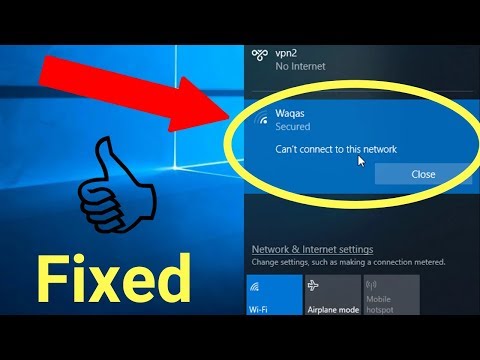
laptop not connecting to particular wifi network

Title: Fix Can't Connect to This Network Error On Windows 10 - WiFi & Internet
Channel: Sandeep Singh
Fix Can't Connect to This Network Error On Windows 10 - WiFi & Internet by Sandeep Singh
laptop cannot connect to a specific wireless network, my laptop is not connecting to a particular wifi network, laptop can't connect to any wifi network, laptop won't connect to specific wifi, why my laptop is not connecting to particular wifi
Laptop Refuses to Connect to YOUR Wi-Fi? (Solved!)
Laptop Won't Play Nice with Your Wi-Fi? Troubleshooting Secrets Revealed!
Picture this: You're ready to binge-watch your favorite show, or perhaps you're about to jump into a crucial work meeting. You open your laptop, ready to conquer the digital world. Then, bam! Your Wi-Fi refuses to cooperate. Suddenly, frustration mounts rapidly. But before you chuck your laptop out the window, take a deep breath. Because, thankfully, we’ve all been there. So, you are not alone, and often the fix is easier than you think. Let’s dive in and troubleshoot this annoying problem.
Is It Really Your Laptop's Fault? Checking the Obvious First
Before you start tearing your hair out, consider this: is the issue truly your laptop? In other words, sometimes the problem lies elsewhere. To clarify, many factors could cause a connectivity crisis. Therefore, before we point fingers, let’s run through a quick checklist. First, double-check your other devices. Do your phone or tablet connect to the Wi-Fi successfully? If the answer is no, then it’s highly likely the issue is with your router or internet service. If other devices are connecting, then the problem probably centers on your laptop. Also, ensure your modem is working. After that, often a simple reboot of your modem and router can work wonders. This often clears up temporary glitches and connectivity issues.
Decoding the Wi-Fi Icon: Clues in Plain Sight
Your laptop’s Wi-Fi icon is like a detective, ready to give you vital clues. So, what does the icon say? Is it showing a full signal? An empty signal? Or maybe a little exclamation mark? Each of these visual cues holds importance. A full signal indicates a strong connection to the Wi-Fi network. However, if it’s empty or showing only a few bars, you might be experiencing weak signal strength. In addition, an exclamation mark suggests you’re connected, but there’s no internet access. Consequently, understanding these signals helps direct your troubleshooting steps.
The Forgotten Password Fiasco: Entering the Right Credentials
Let's face it, we've all been there. Misremembering our Wi-Fi password is a common digital faux pas. So, have you recently changed your Wi-Fi password? Or perhaps you’re just entering it incorrectly? Double-check the password you're typing. Sometimes a simple typo is the culprit. Check for capitalization errors, and make sure you are using the correct case. Also, it is a good idea to try removing the network from your laptop's stored connections. Afterwards, add the network again. This will prompt you to re-enter the password.
Driver Dilemmas: Are Your Wireless Drivers Up-to-Date?
Drivers are the unsung heroes of your laptop. They are essential software that enables your hardware to function correctly. Your wireless network adapter needs drivers to communicate with your Wi-Fi router. Therefore, outdated or corrupted drivers often cause connection problems. So, you should check your drivers. Here's how: Go to your Device Manager (search for it in the Windows search bar). Expand "Network adapters." Right-click on your wireless network adapter (it might be labeled something like "Wi-Fi" or "Wireless Network Adapter"). Select "Update driver." Follow any on-screen prompts. Also, consider uninstalling and reinstalling the adapter. Remember to restart your laptop after updating or reinstalling drivers.
The Airplane Mode Anomaly: Overlooked but Important
It sounds simple, right? However, it’s easy to miss. Have you accidentally activated airplane mode? Airplane mode disables all wireless communication, including Wi-Fi. Moreover, it's a surprisingly common mistake. To check, look at your taskbar. You'll probably see a little airplane icon. If so, simply click it to turn airplane mode off. And then try connecting to the Wi-Fi again.
Router Rumble: Resetting for a Fresh Start
Sometimes, the problem isn’t your laptop at all, but your router. A router reset can work wonders. Unplug your router from the power outlet. Wait a full 30 seconds. Then, plug it back in. Allow the router to fully boot up. This might take a few minutes. After that, try connecting your laptop to Wi-Fi. This simple step often resolves temporary glitches.
Investigating Interference: Minimizing Wireless Obstacles
Wireless signals, like radio waves, can face interference. Other wireless devices can sometimes cause this. Therefore, distance and obstacles can negatively impact your connection. Walls, metal objects, and other electronic devices can act as barriers. To address this, try moving your laptop closer to the router. Also, make sure nothing physically blocks the router's signal. Furthermore, move any devices that might be causing interference away from the router.
Advanced Solutions: When Troubleshooting Gets Tricky
If you've exhausted the basic steps, it's time to explore slightly more advanced solutions. First, consider running the Windows Network Troubleshooter. Right-click on the Wi-Fi icon in your taskbar. Then, select "Troubleshoot problems." Windows will attempt to diagnose and fix any issues automatically. Second, if all else fails, consider resetting your network settings. Keep in mind that this will erase all your saved Wi-Fi passwords. Therefore, back them up somewhere first. To reset, go to Settings > Network & Internet > Network reset.
Final Thoughts: Staying Connected, Staying Sane
Dealing with Wi-Fi issues can be frustrating. But, by following these troubleshooting steps, you’ll put yourself in a better position. You are now armed with a wealth of knowledge. So, the next time your laptop refuses to connect, you’ll know exactly what to do. Therefore, don't panic, stay calm, and follow the steps outlined above. Most importantly, don’t give up! Because eventually, your laptop will connect. Above all, let’s face it: a stable Wi-Fi connection is crucial in today’s world. Therefore, keep exploring these solutions. You will soon get back to streaming, working, and connecting.
My Laptop's WiFi Died?! (The SHOCKING Fix You NEED!)Laptop Refuses to Connect to YOUR Wi-Fi? (Solved!)
Ever feel like your laptop is staging a silent rebellion? You’re sitting there, ready to dive into work, binge-watch a guilty pleasure, or video call your best friend, but your trusty companion just stares back at you, refusing to connect to the Wi-Fi. The dreaded “No internet connection” message flashes across the screen, and your blood pressure starts to rise. We've all been there, haven't we? It’s like your laptop is deliberately choosing the worst possible moment to go on strike. Don't worry, we're here to help! This article is your survival guide to conquering the Wi-Fi woes. We'll walk you through the troubleshooting steps – think of it as a digital triage for your laptop's internet connection – and get you back online in no time.
1. The Annoying Reality of Wi-Fi Woes
Let's be honest, a laptop that won't connect to Wi-Fi is about as useful as a chocolate teapot. It’s a tiny, frustrating inconvenience that can quickly turn into a major productivity killer. Whether you're working from home, traveling, or just trying to stream your favorite show, a stable internet connection is absolutely essential. This happens to every single one of us. One minute you are working, and the next, internet connection is gone and your world comes crashing down. Sounds familiar? Good, you are not alone.
2. Is It Really Your Laptop, Or Something Else? The Initial Check.
Before you start tearing your hair out (we've all been tempted!), let's do a quick reality check. Is it definitely your laptop that's the problem? Think of it like this: are the other devices in your household connected? Before pointing fingers at your laptop, check the following:
- Other Devices: Can your phone, tablet, or another laptop connect to the Wi-Fi? If they can, it suggests the problem lies specifically with your laptop. If they can't, the issue is likely with your router or internet service.
- The Router: Is the router turned on? (Yes, we know it sounds silly, but it's a common culprit!). Have you tried restarting it? Unplugging it for 30 seconds and plugging it back in can work wonders, kind of like giving it a digital reboot.
- Internet Service: Is your internet service provider (ISP) experiencing an outage? Check their website or social media channels for any reported problems.
3. The Obvious First Step: Restarting Your Laptop
This is the digital equivalent of "turning it off and on again." Often, a simple restart can resolve a multitude of tech gremlins. Closing and reopening your laptop isn't the same thing. A full reboot shuts down all processes, clears temporary files, and allows the system to refresh. Go to your start menu (or click the Apple logo if you're a Mac user), select "Restart," and let your laptop work its magic.
4. Checking Your Wi-Fi Settings: The Network Detective
Now, let’s delve a bit deeper. Your laptop has a section that deals with network connections. We need to double-check a few settings to ensure everything’s in order.
- Wi-Fi is Enabled: Ensure your Wi-Fi adapter is turned on. On Windows, look for the Wi-Fi icon in the system tray (down by the clock). If it's grayed out, Wi-Fi is disabled. Click it and select your network. If you're on a Mac, look for the Wi-Fi icon in the top-right corner of the screen. Turn Wi-Fi on if it's off.
- Correct Network: Are you connected to the correct Wi-Fi network? I confess that this has happened to me more times than I'd like to admit! Double-check that you're selecting your home network and not a neighbor's.
- Password: Make sure you're entering the correct Wi-Fi password. Passwords are case-sensitive, and one tiny typo can prevent you from connecting.
5. Troubleshooting Steps: The Advanced Mechanics
If the simple steps don't work, it's time to become a bit more hands-on. It’s like getting under the hood of a car. Here are some more advanced troubleshooting steps:
- Forget and Reconnect: On both Windows and Mac, you can "forget" the Wi-Fi network and reconnect. This resets the connection profile and can often resolve connectivity problems. Go to your network settings and look for the option to "forget" the network. Then, reconnect by selecting it again and entering your password.
- Update Network Drivers: Outdated network drivers can be a common culprit. Think of drivers like little translators that allow your laptop's hardware to communicate with the operating system. Out-of-date drivers can disrupt this communication.
- Windows: Search for "Device Manager" in the Start menu. Expand the "Network adapters" section. Find your Wi-Fi adapter (it might say something like "Wireless Network Adapter"). Right-click on it and select "Update driver." Choose the option to "Search automatically for drivers."
- Mac: Apple usually handles driver updates automatically, but it's worth checking. Go to "System Preferences," then "Software Update." Install any available updates.
6. Running the Network Troubleshooter: Your Digital Doctor
Both Windows and Mac have built-in network troubleshooters. They are designed to diagnose and attempt to fix common network problems. It's like having a digital doctor that runs a few tests and suggests a solution.
- Windows: Right-click on the Wi-Fi icon in the system tray and select "Troubleshoot problems." Follow the on-screen instructions.
- Mac: Go to "System Preferences," then "Network." Select your Wi-Fi connection and click "Assist Me…" Follow the prompts to troubleshoot the connection.
7. Checking for Interference: The Environmental Factors
Wi-Fi signals are like invisible radio waves, and they can be disrupted by other devices. They're like delicate flowers, easily damaged by anything and everything.
- Physical Obstacles: Thick walls, metal objects, and even some appliances can interfere with your Wi-Fi signal. Try moving your laptop closer to the router or removing any potential obstacles.
- Other Electronic Devices: Microwaves, baby monitors, and other devices that operate on the 2.4 GHz frequency can interfere with your Wi-Fi signal. Try changing your router's channel settings if possible (this is usually done through your router's configuration settings).
8. Router Reboot Reloaded: The Ultimate Reset
We mentioned restarting the router earlier, but sometimes, it needs a more forceful reboot.
- Unplug and Wait: Unplug your router from the power outlet for a full minute. This allows it to completely reset.
- Plug Back In: Plug the router back in and wait for it to fully power up (usually a few minutes) before trying to connect your laptop again.
9. Checking Your IP Address Configuration: The Network Navigator
An IP (Internet Protocol) address is like your laptop's unique address on the internet. It's used for communication.
- Automatic vs. Manual: Ensure your laptop is configured to obtain an IP address automatically. In your network settings, look for the "IP configuration" settings and make sure it's set to "DHCP" (Dynamic Host Configuration Protocol), which means it automatically gets an IP address from the router.
10. Firewall Frustrations: The Security Bully
Your firewall is like a security guard for your laptop, blocking potentially harmful traffic. However, it can sometimes block legitimate connections.
- Temporarily Disable the Firewall: For testing purposes only, temporarily disable your firewall to see if it's the culprit. If this resolves the issue, you'll need to configure the firewall to allow access. Be cautious and re-enable the firewall as soon as possible after testing.
- Windows: Search for "Windows Defender Firewall" in the Start menu. Click "Turn Windows Defender Firewall on or off" and temporarily turn it off.
- Mac: Go to "System Preferences," then "Security & Privacy." Click the "Firewall" tab and click "Turn Off Firewall."
- Exception Lists: The firewall is your best friend. It is meant to protect you from any harmful activity. However, many times, it can become a problem. You can try adding a rule to allow access to your network. This will tell your firewall to allow certain actions to pass. If you cannot do it yourself, you may consider hiring a technician who can help you.
11. Malware Mayhem: The Digital Saboteur
Sometimes, malware can interfere with your network connection.
- Run a Scan: Run a full system scan with your antivirus software to check for any malware infections.
- Remove Suspicious Software: Remove any recently installed programs that you suspect may be causing problems.
12. MAC Address Filtering (Advanced): The Router's Bouncer
Some routers have a feature called MAC address filtering, which allows you to control which devices can connect to your network.
- Check the Router Settings: Log in to your router's configuration settings (usually by typing your router's IP address into a web browser). Check the MAC address filtering settings to ensure your laptop's
7 Ways to Fix a Computer That Can't Find or Connect to Wifi Windows 10 Laptops & Desktops

By Ask A Computer Geek 7 Ways to Fix a Computer That Can't Find or Connect to Wifi Windows 10 Laptops & Desktops by Ask A Computer Geek
All But My WiFi Network Not Appeared Solved 2020

By Simplify All But My WiFi Network Not Appeared Solved 2020 by Simplify
Can't connect to this network wifi windows10 networkcomputer youtube subscribe

By Technical Rajni Rajput Can't connect to this network wifi windows10 networkcomputer youtube subscribe by Technical Rajni Rajput
Title: Can't connect to this Network Windows 10 WiFi Wireless Internet Error
Channel: Wisely Stream & Tech
Can't connect to this Network Windows 10 WiFi Wireless Internet Error by Wisely Stream & Tech
Wifi On Laptop Phone
Laptop Refuses to Connect to YOUR Wi-Fi? (Solved!)
Is your laptop suddenly giving you the cold shoulder when you try to connect it to your home Wi-Fi network? You're not alone. This frustrating experience can halt your productivity, disrupt your entertainment, and generally send your stress levels soaring. But take a deep breath. We're here to help you navigate this digital hurdle and get you back online quickly. We've compiled a comprehensive guide to troubleshoot and resolve the most common reasons why your laptop might be stubbornly refusing to join your Wi-Fi network. Let’s dive in.
1. The Initial Sanity Check: Restarting Everything
Before we delve into more complex solutions, let's start with the simplest and often most effective fix: the restart. This applies to everything involved.
Restart Your Laptop: This clears temporary files, resets the operating system, and re-initializes network drivers. A good old-fashioned reboot can often solve surprisingly complex problems. Shut down your laptop completely, wait a minute or two, and then power it back on.
Restart Your Router and Modem: Your internet connection relies on these crucial pieces of hardware. Unplug both your modem and router from their power sources. Wait at least 60 seconds to allow them to fully reset. Then, plug the modem back in first and wait for it to power up completely (usually indicated by solid indicator lights). Finally, plug in the router and allow it to boot up. This refreshes their configurations and can resolve temporary glitches.
2. Verifying Your Wireless Password and Network Name (SSID)
Sometimes, the simplest oversight can cause the most trouble. Double-check the details.
Double-Check Your Password: Are you absolutely certain you’re entering the correct Wi-Fi password? Case sensitivity is a common culprit. Make sure you're typing it accurately, paying close attention to uppercase and lowercase letters, numbers, and symbols. Consider showing the password as you type to ensure accuracy.
Confirm the Correct Network Name (SSID): Ensure you are selecting the correct Wi-Fi network from the list of available networks. Your network name (SSID) is what identifies your specific Wi-Fi signal. If you have multiple networks set up (e.g., a 2.4 GHz and a 5 GHz network), make sure you're trying to connect to the intended one. SSIDs are often broadcasted by default, but you can modify them.
3. Examining Your Laptop’s Wireless Adapter and Drivers
Your laptop's wireless adapter is the hardware responsible for connecting to Wi-Fi. It’s critical that this component is functioning correctly, and its drivers are up-to-date.
Check the Physical Wireless Adapter: Most laptops have a physical switch or a function key combination (often Fn + a specific key, like F2 or F12) that enables or disables the Wi-Fi adapter. Make sure the wireless adapter is turned on. Check your laptop’s documentation if you aren't sure how to enable it.
Diagnose Driver Issues: Outdated or corrupted network drivers can prevent your laptop from connecting to Wi-Fi. Here's how to troubleshoot:
- Device Manager: Right-click the Windows Start button and select “Device Manager.” Expand the “Network adapters” section. Look for your wireless adapter (it might be named something like “Intel Wireless-AC 9560” or “Realtek 8821CE Wireless LAN 802.11ac PCI-E NIC”).
- Driver Status: If there’s a yellow exclamation mark next to the adapter, there's a problem. Right-click the adapter, select “Properties,” and check the “Device status” under the “General” tab for an error message.
- Update the Driver: Right-click the wireless adapter and select “Update driver.” Choose “Search automatically for drivers.” Windows will search for and install the latest available driver. If that doesn't work, try downloading the driver directly from the manufacturer's website (Intel, Realtek, etc.) and installing it manually.
- Roll Back the Driver: If the problem started after a recent driver update, you can try rolling back to the previous version. In Device Manager, right-click the adapter, select “Properties,” go to the “Driver” tab, and click “Roll Back Driver.”
4. Network Settings Configuration on Your Laptop
Your laptop's network settings need to be properly configured to connect to your Wi-Fi network.
IP Address Configuration: Your laptop needs a valid IP address to communicate with your router and the internet.
- Automatic IP Address: Ensure your laptop is configured to obtain an IP address automatically. Go to “Settings” > “Network & Internet” > “Wi-Fi,” then click “Change adapter options.” Right-click your Wi-Fi adapter, select “Properties,” double-click “Internet Protocol Version 4 (TCP/IPv4),” and ensure “Obtain an IP address automatically” is selected.
- Manual IP Address (Less Common): If you have a specific need for a static IP address, make sure the address and gateway settings are correct and compatible with your router's settings. Incorrect manual settings will block the connection.
DNS Server Settings: Domain Name Servers translate website addresses (like google.com) into IP addresses.
- Automatic DNS: Ideally, your laptop should obtain DNS server addresses automatically from your router. Verify this in the same TCP/IPv4 properties window as above.
- Alternative DNS Servers (Troubleshooting): As a troubleshooting step, you can try using public DNS servers like Google's (8.8.8.8 and 8.8.4.4) or Cloudflare's (1.1.1.1 and 1.0.0.1). This can sometimes resolve connectivity problems.
5. Router Settings and Compatibility
Your router's configuration is absolutely crucial for Wi-Fi connectivity.
Channel Interference: Wi-Fi signals can be affected by interference from other devices and networks operating on the same channels.
- Changing Wi-Fi Channels: Access your router's configuration interface (usually by typing its IP address – often 192.168.1.1 or 192.168.0.1 – into your web browser). Look for the “Wireless Settings” or “Wi-Fi Settings” section. Experiment by changing the Wi-Fi channel to a less congested one (e.g., 1, 6, or 11 for 2.4 GHz networks). Most routers will automatically select the best channel, so you can revert to that setting after troubleshooting.
- Channel Width: Consider adjusting your channel width in the router settings. For 2.4 GHz networks, a narrower channel width (20 MHz) can sometimes improve stability, while 5 GHz networks often benefit from a wider channel width (40 or 80 MHz).
Dual-Band Routers and Frequency Selection: Many modern routers broadcast on both 2.4 GHz and 5 GHz frequencies.
- Separate SSIDs: Make sure each frequency has a distinct SSID (network name) so that you can differentiate them.
- Compatibility: Some older laptops might not be compatible with the 5 GHz band, and if you are trying to connect to a 5 GHz network and your laptop does not support it, that would explain the issue. Try connecting to the 2.4 GHz network to test this.
Router Firmware: Outdated router firmware can cause connectivity issues. Check your router manufacturer's website for firmware updates and install them (carefully following the manufacturer's instructions).
MAC Address Filtering: MAC address filtering allows your router to restrict which devices can connect to the network based on their unique MAC addresses.
- Check Your Router's Settings: Access your router's configuration and verify if MAC address filtering is enabled. If it is, make sure your laptop's MAC address is on the "allowed" list. You can find your laptop's MAC address in the "Status" section of your Wi-Fi adapter properties in Device Manager.
6. Firewall and Security Software
Firewalls and security software can sometimes block network connections.
Windows Firewall:
- Check Firewall Rules: Go to “Control Panel” > “System and Security” > “Windows Defender Firewall.” Click “Allow an app or feature through Windows Defender Firewall.” Make sure that “Network discovery” and “File and printer sharing” are enabled for both “Private” and “Public” networks.
- Temporarily Disable Firewall (Troubleshooting): As a troubleshooting step, temporarily disable the Windows Firewall (but only do this for a very brief period). If your laptop can connect to Wi-Fi while the firewall is off, the firewall is the problem, and you'll need to adjust your firewall rules.
Third-Party Security Software: If you have security software installed (e.g., Norton, McAfee, or antivirus), check its firewall settings. It might be blocking your Wi-Fi connection. Temporarily disable the security software's firewall (again, briefly) to test if this is the cause. If it is, you’ll have to configure the software to allow the Wi-Fi connection.
7. Network Troubleshooter
Windows has built-in troubleshooting tools.
- **The Network
