broken wifi antenna laptop

Title: Wifi antenna cable connector repair Kablosuz anten kablosu konnektr onarm
Channel: Merakl Bilgisayarc
Wifi antenna cable connector repair Kablosuz anten kablosu konnektr onarm by Merakl Bilgisayarc
replace wifi antenna laptop, laptop wifi antenna broken, do laptops have wifi antenna, laptop wifi antenna not working, repair laptop wifi antenna, wifi antenna for pc not working, wifi broken on laptop
Laptop WiFi Antenna Broken? This SHOCKING Fix Will Restore Your Signal!
Is Your Laptop's Wi-Fi on the Fritz? This Unexpected Fix Works!
It happened to you, didn't it? One minute, you're streaming your favorite show, and the next, your laptop's Wi-Fi connection is kaput. You're staring at those frustrating bars, or worse, nothing at all. You're probably wondering, "What gives?" The problem might not be as dire as you think. In reality, that broken signal could have a surprisingly simple solution.
The Frustration of a Weak Wi-Fi Signal
Let's face it; modern life revolves around the internet. We practically live online. We work, play, and connect with loved ones through our laptops. Therefore, a weak Wi-Fi signal can be incredibly maddening. It can lead to dropped video calls, sluggish browsing, and a general feeling of digital isolation. It is certainly not a fun predicament to be in. You've probably considered numerous fixes. You are not alone. Perhaps you've restarted your computer countless times. You might have even cursed your internet provider. But the issue often lies much closer to home.
Unmasking the Culprit: Your Laptop's Antenna
Your laptop's Wi-Fi antenna is the unsung hero, responsible for receiving and transmitting those crucial wireless signals. This tiny component is inside your laptop. It's usually near the screen or embedded in the lid. Over time, this delicate piece can become damaged. Because it is a fragile component, it's susceptible to wear and tear. For instance, physical impacts, accidental drops, or just general use can take their toll. Consequently, this can lead to a severely weakened signal.
The Shocking, Simple Solution: Sometimes, it's as Simple as This!
Here's the surprising part: The solution might not involve expensive repairs or complicated tech wizardry. Now, are you ready for the secret? Sometimes, the fix can be as simple as repositioning your laptop. I know it sounds too good to be true. However, it's often the best starting point. You can greatly improve your signal strength by simply changing your laptop's orientation.
Experimentation is Key: Find the Sweet Spot
So, how do you find this "sweet spot"? Firstly, start by slightly adjusting your laptop's position. Then, pay close attention to the Wi-Fi signal strength indicator. If the signal gets stronger, great! Secondly, if it doesn't, try rotating the laptop. Continue experimenting until you find the position that yields the strongest signal. Often, even a small change can make a huge difference. The right positioning can be the key to unlocking a stronger connection.
Beyond Simple Repositioning: Deeper Troubleshooting
Of course, repositioning won't always solve every problem. However, this is a simple first step. Nevertheless, if the situation persists, a few other things might be worth trying.
Checking for Obstacles: The Signal's Enemies
Walls, furniture, and other electronic devices can interfere with Wi-Fi signals. So, make sure nothing is blocking the path between your laptop and the router. Consider moving your laptop to a more open space. Also, try to remove any electronics that could be causing interference.
Software and Driver Updates: Keeping Things Current
Outdated drivers can also cause Wi-Fi problems. So, make sure your wireless network adapter drivers are up to date. Updating your drivers can often resolve compatibility issues. Furthermore, make sure your operating system is up to date. This ensures you have the latest security patches. Regularly updating is an important habit for all.
External Wi-Fi Adapters: A Backup Plan
If all else fails, consider an external Wi-Fi adapter. These small devices plug into a USB port. They are another route to a stronger connection. They can bypass your laptop's built-in antenna altogether. This can be a lifesaver for those struggling with persistent connectivity issues. They are generally affordable and easy to set up.
When to Seek Professional Help
While many Wi-Fi issues have simple solutions, some require more expert attention. If you've tried all the above steps and still have problems, it might be time to consult a professional. Specifically, if you suspect physical damage to your laptop's internal antenna, professional repair is recommended. A qualified technician can diagnose the problem. They possess the expertise to make sure any repairs are done correctly.
Reclaiming Your Digital Life
Having a weak Wi-Fi signal can be a frustrating experience. However, with a bit of knowledge and some simple troubleshooting steps, you can often restore your connection. Start with the basics. Therefore, reposition your laptop, and check for obstacles. Update your drivers and contemplate an external adapter. You will probably be able to enjoy a strong and reliable Wi-Fi signal once again. You will be back to enjoying your online world in no time! So, take a deep breath, and get ready to reclaim your digital life!
**WiFi Password Nightmare? This Laptop Trick Fixes It INSTANTLY!**Laptop WiFi Antenna Broken? This SHOCKING Fix Will Restore Your Signal!
Hello, fellow tech travelers! Ever been stranded on the digital highway, your Wi-Fi signal vanishing like a magician's rabbit? That's the feeling, right? One minute you're streaming, the next… nothing. The culprit? A suspected broken laptop Wi-Fi antenna. Don't despair! We've all been there, staring at that frustrating lack of bars, the dreaded "no internet connection" message flashing like a digital red alert. But before you resign yourself to the wired life, or worse, a new laptop, let's dive into the surprising truth about your wireless woes. We're here to tell you: there is hope, and often, the fix is easier than you think.
1. The Wi-Fi Wasteland: Decoding the Dreaded Low Signal
First things first: let's diagnose the problem. Your laptop's Wi-Fi antenna, the unsung hero tucked away inside, is essentially a tiny radio receiver. It picks up the invisible airwaves carrying the sweet, sweet nectar of the internet. A broken antenna is like a bad ear – it can't hear the signal properly. But how do you know it's the antenna, and not just a dodgy router or a faulty Wi-Fi card?
Think of it like a game of whispers. You're trying to hear the secret message (the internet) from a distance. If the whisperer (your router) is quiet, or you have a bad ear (a weak antenna), you won't get the message. Start by checking your signal strength in different locations around your house. If the bars fluctuate wildly, or disappear completely, particularly when you're further from the router, the antenna might be the issue. Also, try connecting to other Wi-Fi networks if available. If those are also weak or non-existent, that points to a problem within your laptop.
2. Common Culprits: What Damages a Tiny Antenna?
So, what exactly causes these antennas to go kaput? They're surprisingly delicate. Think of them like the shoelaces of your laptop's internal workings. Here are a few common reasons:
- Physical Trauma: Dropping your laptop, or even a hard bump, can dislodge or damage the antenna wires and connectors. It’s like having a wire in your headphones break because of being tangled too many times.
- Age and Wear: Over time, components degrade. The antenna connection may loosen or corrode, especially if situated in a dusty or humid environment. It’s like an old engine losing its spark.
- Internal Damage: Sometimes, components around the antenna (like the screen or other internal parts) fail and affect the antenna's performance.
- Manufacturing Defects: Occasionally, a faulty antenna or connection can be present right from the factory.
3. The First Line of Defense: Simple Troubleshooting Steps
Before we get to the "shocking fix," let's try some quick, easy troubleshooting. It's like checking the fuse before calling an electrician.
- Restart Your Laptop: Yes, we know, it's the tech equivalent of "have you tried turning it off and on again?" But it works surprisingly often.
- Restart Your Router: Often the problem stems from elsewhere. Like the previous tip, restart the router to ensure your connection is working. This resets everything.
- Check the Wi-Fi Switch: Some laptops have a physical Wi-Fi switch. Make sure it's on, and the wireless adapter is enabled in your operating system, check the icon in the taskbar.
- Update Drivers: Outdated drivers can wreak havoc. Go to Device Manager (Windows) or System Information (macOS) and ensure your network adapter drivers are up-to-date. This is analogous to applying the new updates to your operating system.
- Run the Network Troubleshooter: Windows (and sometimes macOS) has a built-in troubleshooter. This is like a digital detective.
4. Unveiling the Unexpected: The Shocking Fix
Alright, now for the moment of truth. If the above measures haven't worked, it's time to get a little more hands-on. The "shocking fix" isn't exactly shocking in the literal sense, but it is often surprisingly effective, and it doesn't necessarily involve expensive repairs.
The "shocking fix" might simply be a matter of re-seating the antenna connectors.
Yep. That's right. And it’s often easier than you'd think.
How to re-seat the antenna connectors(Proceed with caution. If unsure seek professional help):
- Power Down: Turn off your laptop and remove the battery (if possible). This is crucial for safety!
- Open Your Laptop: Consult your laptop's manual or search online for a guide specific to your model. You'll need to open the laptop's case (usually, it involves unscrewing the bottom panel).
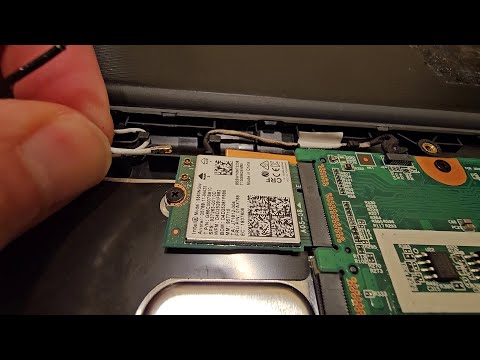
- Locate the Antenna: The antenna wires are usually thin, often black and white, and run to the Wi-Fi card (a small circuit board usually near the screen hinge). These are connected with tiny connectors.
- Re-seat the Connectors: Gently unplug and carefully re-plug the antenna wires into the Wi-Fi card. Be gentle, these are delicate! Do them one at a time. Ensure they are firmly seated.
- Reassemble Everything: Put the laptop back together, screw everything back in, including the battery, and power it up.
Why this Works: Often, these connectors come loose over time, or are slightly disconnected from a bump or drop. Reseating them restores the connection.
5. The DIY Dilemma: When To Call in the Cavalry
While re-seating the connectors is often a straightforward fix, there are times when it's best to call in the professionals. When should you seek help?
- Beyond Your Comfort Zone: If you're uncomfortable opening your laptop, or lack the tools or technical know-how, don't risk damaging it further.
- Hardware Issues: If the antenna wires are visibly damaged, or if you suspect other component failures, a repair shop visit is inevitable.
- Still No Signal: If you've tried the fix and still have poor Wi-Fi connectivity, there's likely another issue at play.
6. The Antenna Replacement: Getting a New One
If the re-seating technique doesn't work, or the antenna is beyond repair, you may need to replace it. This sounds daunting, but it's often more manageable than you might think.
- Find the Right Antenna: Search online by your laptop's model number to find a compatible replacement antenna.
- Follow the Guide: Refer to a repair guide or video to help you install the new antenna. Make sure the connections are securely in place.
- Test, Test, Test: After the replacement, test the Wi-Fi signal thoroughly.
7. Enhancing Your Signal: External Antennas
If the internal fix isn't sufficient, or you're finding the signal still weak, consider external options too.
- USB Wi-Fi Adapters: These are plug-and-play solutions that can boost your range and speed.
- Wi-Fi Boosters: These amplify your existing Wi-Fi signal.
8. The Router's Role: A Critical Component
Don't forget that your router plays a vital role. Sometimes, the problem is your router, not your laptop.
- Router Placement: Ensure your router is in a central, open location, away from walls and obstructions.
- Wi-Fi Standards: Ensure your router supports the latest Wi-Fi standards (like 802.11ac or 802.11ax) for optimal performance.
- Router Firmware: Keep your router's firmware up to date for improved security and performance.
9. The Importance of Location: Environmental Factors
Where you position your laptop matters too. Walls, metal objects, and even microwaves can weaken your Wi-Fi signal.
- Minimize Obstructions: Keep your laptop clear of walls, metal objects, and other electronic interference when possible.
- Experiment with Placement: Try different locations in your home to find the spot with the strongest Wi-Fi signal.
10. The Power of Diagnostics: Running Tests
To get an accurate assessment of your laptop's Wi-Fi, run network tests.
- Speed Tests: Use a website like Speedtest.net to measure your download and upload speeds.
- Signal Strength Apps: Download a Wi-Fi analyzer app on your smartphone to see the signal strength in different parts of your home.
11. Preventing Future Problems: Proactive Measures
Prevention is key. How can you protect your laptop's antenna from future problems?
- Handle with Care: Avoid dropping or bumping your laptop.
- Regular Cleaning: Remove dust or debris from the vents to improve airflow.
12. Troubleshooting Tips: When All Else Fails
If all else fails, let's try to gather more troubleshooting options.
- Check the BIOS Settings: Sometimes the Wi-Fi is accidentally disabled in BIOS.
- Perform a System Restore: Roll your laptop back to a previous time.
How to remove and reattach WiFi antenna cables
By James Has Answers How to remove and reattach WiFi antenna cables by James Has Answers
DIY USB Wifi Adapter from an Old Tablet REALTEK RTL8188ETV

By LoopLinks DIY USB Wifi Adapter from an Old Tablet REALTEK RTL8188ETV by LoopLinks
Peningkatan Antena Laptop 49

By andrew mcneil Peningkatan Antena Laptop 49 by andrew mcneil

Title: How to repair WiFi antenna connector
Channel: CRM
How to repair WiFi antenna connector by CRM
My Laptop Work
Laptop WiFi Antenna Broken? This SHOCKING Fix Will Restore Your Signal!
It’s a digital tragedy we’ve all faced: the dreaded low or nonexistent WiFi signal. You're poised to stream your favorite movie, attend a crucial video conference, or simply browse the web, only to be met with a frustratingly intermittent connection. The culprit? A seemingly broken laptop WiFi antenna. But before you resign yourself to a wired existence or the expense of professional repair, let us assure you: a solution might be closer, and significantly less expensive, than you think. This guide unveils a straightforward fix that has surprised many users, often restoring full signal strength in a matter of minutes. Prepare to be astonished.
Understanding the WiFi Antenna's Role: The Gateway to Your Digital World
Before diving into the fix, let's grasp the core function of this often-overlooked component. Your laptop's WiFi antenna is a tiny, yet mighty, receptor that acts as a translator, converting radio waves emitted by your router into the data your laptop interprets. Think of it as a miniature radio receiver, specifically tuned to the frequencies used by your WiFi network. The better the antenna performs, the stronger the signal it receives, and the faster and more reliable your internet connection will be. A damaged or poorly positioned antenna directly translates to a weak or dropping connection.
Identifying the Culprit: Pinpointing the Source of Your WiFi Woes
Before attempting any repairs, diligent diagnosis is key. Don't assume the antenna is the problem immediately. Consider these preliminary checks:
- Router Proximity: Are you too far from your router? Walls, especially those constructed with reinforced concrete or brick, can severely impede signal strength. Try moving closer to the router to see if the signal improves.
- Router Reboot: This often-overlooked step resolves a multitude of network issues. Unplug your router for 60 seconds, then plug it back in. This simple reset can work wonders.
- Interference: Other electronic devices, especially microwave ovens and cordless phones, can interfere with the 2.4 GHz frequency band commonly used by WiFi routers. Try switching your router to the 5 GHz band if your router supports it.
- Software Glitches: Occasionally, outdated or corrupted network drivers on your laptop can cause connectivity problems. Ensure your network adapter drivers are up to date. Check the manufacturer's website for the latest driver.
- Physical Damage: Look for any visible signs of damage to your laptop's antenna housing. Cracks, dents, or loose components are telltale signs of a problem.
If you've exhausted these preliminary checks and the problem persists, it's time to focus on the antenna itself.
Unveiling the Shocking Solution: The Aluminum Foil Amplification Technique
Here's the surprising part: Sometimes, a physically undamaged antenna simply needs a little boost. This is where the aluminum foil trick comes in. It's a remarkably simple, yet effective, technique that can significantly enhance your antenna's signal reception. The principle is straightforward: aluminum foil acts as a reflector, focusing and amplifying the incoming radio waves that your antenna intercepts.
Step-by-Step Guide: Crafting Your WiFi Signal Booster
Follow these simple steps carefully, and you'll potentially witness a dramatic improvement in your WiFi connection:
- Gather Your Materials: You'll need:
- A small piece of aluminum foil. About the size of your palm should suffice.
- Scissors.
- Tape (electrical tape or any strong adhesive tape works best).
- Shape the Reflector: There are several ways to shape the foil, experiment with each to find the best angle for your specific environment and antenna placement:
- The "U" or "V" Shape: Fold the aluminum foil into a shallow "U" or "V" shape. This directs the signal towards your laptop.
- The Shield: Create a small shield by folding the foil in half. This method focuses the signal and reduces potential interference from other devices.
- The Cylinder: Roll the foil around a pencil or pen to create a small cylinder. This acts as a directional antenna, focusing the signal.
- Position the Reflector: This is critical. The goal is to position the reflector to maximize signal capture.
- External Antennas: If your laptop has external antennas (small protrusions on the side of the screen or body), carefully position the foil reflector nearby. Experiment with different angles and distances.
- Internal Antennas: If your laptop has internal antennas, placement will be slightly more challenging. You will need to know where your antenna is located on the internal side of your laptop's screen. This is typically near the top of the screen. Before fixing the foil, check the location, by checking the web with a search of your laptop model.
- The Angle of Attack: Experiment with the angle of the reflector. Try aiming it directly at your router, or try slightly adjusting the angle to see if the signal improves.
- Secure the Reflector: Use tape to affix the foil reflector to your laptop. Ensure the tape doesn't obstruct any ports or interfere with the laptop's operation. Use a small amount of tape to avoid leaving residue when the foil is eventually removed.
- Test the Results: Reboot your laptop and assess your WiFi signal strength. You should see a noticeable improvement. Test your connection speed by browsing websites, streaming video, or downloading files. You can perform speed tests at any common speed test websites.
Troubleshooting and Refinement: Fine-Tuning Your Signal Booster
If the initial efforts don't yield the desired results, don't despair! Here's how to refine your approach:
- Experiment with Placement: Move the reflector around, trying different distances and angles. The ideal position will vary depending on your router's location and the layout of your home.
- Adjust the Shape: Try different shapes (U, V, shield, cylinder) to determine which one performs best.
- Multiple Reflectors: In some cases, using more than one reflector can improve performance. Experiment by creating a small array of reflectors.
- Antenna Location: Use an online search to determine your specific laptop model and the location of the internal antenna. This helps to optimize reflector placement.
- Obstructions: Ensure there are no physical obstructions, such as metal objects, between the reflector and your router.
Beyond the Foil: Exploring Additional Solutions
While the aluminum foil trick is often surprisingly effective, it's not a universal panacea. If it doesn't work, or if you need a more permanent solution, consider these alternatives:
- External USB WiFi Adapter: These inexpensive devices plug into a USB port and offer significantly improved range and performance compared to built-in laptop antennas.
- Internal Antenna Replacement: If the antenna is physically damaged or severely degraded, replacing it may be necessary. This typically involves opening up your laptop, a task that can be challenging. If you're not comfortable with electronics, consider having a professional perform the replacement.
- Router Upgrade: An outdated or underpowered router could be the source of your problems. Upgrading to a modern router with the latest WiFi standards (like Wi-Fi 6 or Wi-Fi 6E) can provide significant improvements in range and speed.
- WiFi Extenders or Mesh Networks: If your home has dead zones, a WiFi extender or mesh network can help to spread the signal throughout your home. These solutions can be particularly helpful in larger homes or homes with multiple floors.
Preventative Measures: Protecting Your WiFi antenna
Once you achieve a stable connection, consider these measures to safeguard your antenna:
- Handle Your Laptop With Care: Avoid dropping your laptop or exposing it to excessive physical stress.
- Regular Cleaning: Dust and debris can sometimes interfere with antenna performance. Gently clean the surrounding area with a soft, dry cloth. Be careful not to use harsh chemicals.
- Optimal Placement: Position your laptop in a location with good signal coverage. Avoid placing it near walls, metal objects, or other sources of interference.
Conclusion: Reclaiming Your Connectivity
A broken WiFi antenna can be a major source of frustration. But as this guide demonstrates, a quick and inexpensive fix, like the aluminum foil technique, might be all that's needed to restore your online experience. By following these steps and troubleshooting tips, you can often resolve connectivity issues without resorting to costly repairs or replacements. Don't let a weak WiFi signal hold you back. Take action today and reclaim your digital freedom!
