how to create virtual wifi hotspot in laptop

Title: How to Create WiFi Hotspot & Make Your Laptop a Virtual WiFi Router
Channel: Ston Palmer
How to Create WiFi Hotspot & Make Your Laptop a Virtual WiFi Router by Ston Palmer
Unlock Your Laptop's Secret Wi-Fi Hotspot: The Ultimate Guide!
Unleash the Power Within: Your Laptop as a Wi-Fi Hotspot Masterpiece
Ready to transform your laptop into a portable internet powerhouse? It's simpler than you think. You can share that precious Wi-Fi connection with the world – or at least your immediate surroundings. This guide will be your roadmap to Wi-Fi sharing success.
The Hidden Potential of Your Digital Companion
Your laptop possesses a secret ability. It can become a Wi-Fi hotspot. It is a digital chameleon. You can connect various devices. Think smartphones, tablets, and even other laptops. It's like having your own personal Wi-Fi router, always at the ready. This functionality is incredibly useful. Consider when you are in a hotel room. Alternatively, imagine you're at a coffee shop. You might be facing limited Wi-Fi options. You can use your laptop to solve this issue. You are, in essence, creating your own private network.
Setting the Stage: Preparing for Wi-Fi Dominion
First, ensure your laptop has a working internet connection. This is the foundation upon which your hotspot will be built. It could be through an Ethernet cable. Perhaps you are using a pre-existing Wi-Fi network. Furthermore, ensure that you have administrator privileges. This will allow you to make the necessary system changes. Next, consider your security preferences. Think of setting a strong password. A strong password protects your network. It prevents unauthorized access. Therefore, it's essential to have a secure setup.
Windows: Your Hotspot's Warm Embrace
The Windows operating system offers a built-in feature. It is called Mobile Hotspot. It's a straightforward and user-friendly tool. Begin by going to your settings menu. You can typically find this by clicking the Start button. Then, navigate to “Network & Internet.” Locate the “Mobile Hotspot” option. Now, configure your hotspot settings. You can choose a network name (SSID). Pick a strong password. Now, toggle the “Share my internet connection with other devices” switch to "on." Voila! Your Windows laptop is now a Wi-Fi hotspot.
However, occasionally, problems may arise. If you are facing issues, first check your internet connection. Sometimes, a simple restart can work. Another troubleshooting step could be updating your network drivers. Also, check your firewall settings. They might be blocking the hotspot functionality.
Mac OS: Elegance in Hotspot Creation
Mac users aren't left in the cold. While macOS doesn't have a direct, dedicated hotspot feature like Windows, it's easily managed. You'll be utilizing Internet Sharing. Open “System Preferences” from the Apple menu. Click on “Sharing.” In the left-hand panel, select “Internet Sharing.” Select the connection you want to share (e.g., Wi-Fi or Ethernet) under "Share your connection from." Choose “Wi-Fi” from the "To computers using" dropdown menu. Click "Wi-Fi Options." Give your hotspot a name and choose a password. Then, start the sharing process. You just need to click the checkbox next to "Internet Sharing." It’s as simple as that!
Beyond the Basics: Customizing Your Wi-Fi Experience
Once your hotspot is running, you can get creative. You can limit the number of devices that can connect. This helps to manage your bandwidth. You can also monitor the data usage. Knowing how much data each device consumes is helpful. Regularly check your settings. This keeps your hotspot running smoothly. Consider these subtle tweaks for maximum performance.
Troubleshooting Troubles: Conquering Connectivity Challenges
Not everything always goes according to plan. Let's address some common problems. What if devices cannot connect? Ensure the password is correct. Perhaps the signal strength is weak. Move your laptop closer to the devices. If you consistently experience slow speeds, consider the number of connected devices. Too many devices might be overwhelming your internet connection. Check for interference from other electronic devices. They can sometimes disrupt the Wi-Fi signal. In case of persistent problems, refer to your device's user manual or search online.
Security First: Shielding Your Hotspot Fortress
Security is paramount. Never share your Wi-Fi password publicly. Consider using a strong, complex password. This will prevent unauthorized access. Keep your laptop's operating system updated. Software updates often include security patches. They help to address vulnerabilities. Regularly monitor connected devices. Know who is using your hotspot. This prevents potential misuse. Consider these measures as essential defenses.
Embracing the Freedom: The Benefits of a Wi-Fi Hotspot
Having a Wi-Fi hotspot brings numerous advantages. It provides internet access for multiple devices simultaneously. Hence, it's perfect for travel. It’s great for scenarios with unreliable public Wi-Fi. You gain control over your internet connection. You can manage bandwidth and security settings. Essentially, it's a convenient and adaptable solution. It lets you stay connected wherever you go. You can now enjoy the independence it offers.
Final Thoughts: Your Next Step to Wi-Fi Mastery
You now have the knowledge to transform your laptop. It can easily become a capable Wi-Fi hotspot. You can create a personal network. Whether you are a Windows or Mac user, the process is accessible. Experiment, explore the settings, and customize your experience. Embrace the power of your laptop. You are ready to share your internet.
Laptop WiFi Card Pinout: The Ultimate Guide (With Pictures!)Unlock Your Laptop's Secret Wi-Fi Hotspot: The Ultimate Guide!
Alright tech adventurers, ever found yourself in a Wi-Fi wilderness, desperate for a connection? Maybe you're stuck on a train, chilling at a coffeeshop with notoriously spotty internet, or just trying to connect your tablet to the network without lugging out that extra router. Well, guess what? Your laptop likely holds the key to unlocking its very own secret Wi-Fi hotspot, a trusty little internet friend whenever you need it. Forget wrestling with dodgy public Wi-Fi or burning through your phone’s data. We’re diving deep into how to transform your laptop into a personal Wi-Fi powerhouse. Let's get started!
1. Why Bother Turning Your Laptop Into a Hotspot? The Benefits, Unveiled!
Before we jump into the how, let's talk about the why. Why should you even bother turning your laptop into a Wi-Fi hotspot? Think of it as your personal Wi-Fi concierge, always available to connect your other devices. It's like having a personal Wi-Fi butler, but instead of fetching your slippers, it fetches you internet.
- Convenience King/Queen: Need to connect your tablet, phone, or another laptop? Boom! Instant access.
- Data Saviour: Avoid burning through your mobile data plan. Connect those devices straight to your laptop’s connection.
- Travel Companion: Perfect for on-the-go connectivity, especially in places with unreliable Wi-Fi.
- Sharing is Caring (and Connecting): Easily share your internet with friends or family, making you the hero of the hour.
- Security First: By creating your own hotspot, you have more control over your network, making it potentially safer than public Wi-Fi.
See? Pretty sweet, right? It's a simple trick that can drastically change how you connect.
2. Understanding the Techy Bits: What You'll Need
Don't worry, we won't bore you with complex technical jargon. Think of this section as your tool kit inventory. The great news is, you probably already have everything you need!
- A Laptop: This is pretty obvious, but make sure the laptop has a Wi-Fi adapter (99.99% likely).
- An Internet Connection: You'll need a way for your laptop to get the internet in the first place. This could be through Wi-Fi (if you have access), Ethernet, or even a cellular connection (tethering to your phone).
- A Little Patience: It's not rocket science, but sometimes computers can be a bit temperamental.
- Windows or macOS: The process is slightly different for each, but don’t panic. We’ll cover both!
3. Windows Warriors: Creating a Hotspot Using the Built-in Feature
Windows makes it surprisingly easy to set up a hotspot. It's like creating a secret portal for your devices to join the internet party! Let’s walk through the steps:
- Open Settings: Click the Windows icon (usually in the bottom left corner), and then click the gear icon to open Settings. Alternatively, you can search for "Settings" in the search bar.
- Network & Internet: Select "Network & Internet."
- Mobile Hotspot: Click on "Mobile hotspot" in the left-hand menu.
- Share your Internet connection from: In the dropdown, choose how your laptop is currently receiving internet. If using Wi-Fi, it'll show your Wi-Fi network. If using Ethernet, it will pick up the Ethernet connection.
- Share my Internet connection with other devices: Toggle the switch to "On."
- Edit: Click "Edit" to customize your hotspot's settings:
- Network name: Give your hotspot a friendly name (like "MyLaptopHotspot").
- Network password: Create a strong password to protect your hotspot. This is crucial!
- Network band: Choose 2.4 GHz or 5 GHz. 5 GHz is faster but has a shorter range. 2.4 GHz has better range, but it's slightly slower. Choose what works best for you or select 'Automatic'.
- Connect Your Devices: On your other devices (phone, tablet, etc.), search for the Wi-Fi network you just created, enter the password, and you’re good to go!
See? Not so scary, right? It's like following a recipe, but instead of a delicious cake, you get internet for everyone.
4. macOS Mavericks: Sharing Internet the Apple Way
Apple makes things notoriously user-friendly, and creating a hotspot on your Mac is no exception. It's all about sharing the love – of internet, that is.
- Open System Preferences: Click the Apple icon in the top-left corner of your screen and select "System Preferences." (Or System Settings, depending on your macOS version)
- Sharing: Click on "Sharing."
- Internet Sharing: In the left-hand menu, select "Internet Sharing."
- Share your connection from: Use the dropdown menu to pick where your Mac is getting its internet from (typically Wi-Fi or Ethernet).
- To devices using: Check the box next to "Wi-Fi."
- Wi-Fi Options: Click the "Wi-Fi Options…" button.
- Network Name: Give your hotspot a name.
- Channel: Leave on automatic unless you're troubleshooting interference.
- Security: Choose WPA2 Personal (recommended for security).
- Password: Create a strong password.
- Start the Sharing: Check the box next to "Internet Sharing" to enable the hotspot. You may be prompted to confirm you want to enable internet sharing; click "Start."
- Connect Your Devices: Search for the hotspot, enter the password, and connect!
There you have it. Easy as pie! Now your Mac is acting as a Wi-Fi hero, providing internet to your other devices.
5. Troubleshooting Troubles: When Things Go Wrong
Even the best-laid plans can sometimes hit a snag. Don't worry, we've got some troubleshooting tips to get you back on track.
- No Internet Connection: Double-check that your laptop itself has a working internet connection. If it doesn't, your hotspot won't either.
- Devices Can’t See the Hotspot:
- Make sure your laptop’s Wi-Fi adapter is enabled.
- Check that you've entered the hotspot's name and password correctly.
- Restart your laptop and try again.
- Slow Speeds:
- Try moving your devices closer to the laptop.
- If you have a 5 GHz network, try switching to the 2.4 GHz band (or vice versa) in your hotspot settings.
- Limit the number of devices connected.
- Your original internet connection speed dictates the speed of the hotspot!
- Hotspot Keeps Disconnecting:
- Ensure your laptop isn't going to sleep. Adjust your power settings to keep it awake while the hotspot is active.
- Update your Wi-Fi driver (search online for instructions specific to your laptop model).
If you're still struggling, a quick search online with the specific error message you're seeing can often provide a solution.
6. Security Savvy: How to Keep Your Hotspot Secure!
Creating a hotspot is awesome, but it's crucial to protect it by using a strong password. It's like locking the door to your house – you wouldn't want just anyone waltzing in!
- Use a Strong Password: Aim for at least 12 characters, mixing uppercase and lowercase letters, symbols, and numbers.
- Change the Password Regularly: This might seem like overkill, but it adds an extra layer of security.
- Monitor Connected Devices: Most operating systems allow you to see which devices are connected to your hotspot. Keep an eye out for any unexpected guests.
- Consider Encryption: WPA2 (or WPA3 if supported) is the recommended security type. Make sure your hotspot is using one of these encryption protocols.
- Turn It Off When Not in Use: When you don’t need the hotspot, turn it off to prevent unauthorized access.
7. Maximizing Your Hotspot's Performance: Range, Speed, and Battery Life
Let's optimize your hotspot experience for peak performance.
- Placement Matters: Position your laptop in a central location to maximize the Wi-Fi range. Avoid placing it near walls or metal objects, which can interfere with the signal.
- Choose the Right Band: As mentioned earlier, 5 GHz is faster but has a shorter range than 2.4 GHz.
- Limit Connected Devices: The more devices connected, the slower the speed for each one.
- Monitor Battery Life: Creating a hotspot drains your laptop's battery faster. Plug it in if possible, or be mindful of how long you're using it.
- Optimize Power Settings: On Windows, check your power plan settings to ensure your Wi-Fi adapter isn
How to Create a Free Virtual Wifi Hotspot on Your Laptop

By Mandakiniya How to Create a Free Virtual Wifi Hotspot on Your Laptop by Mandakiniya
MyPublicWiFi Turn your computer into a Virtual WiFi Hotspot with Firewall ,Bandwidth Manager 30.1
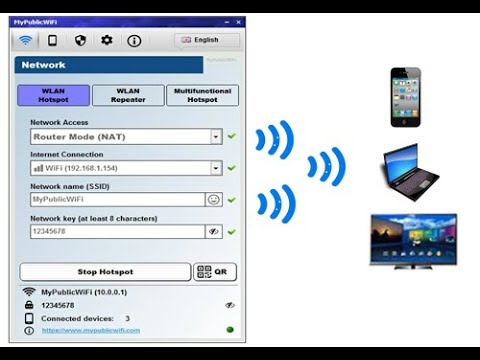
By MyPublicWiFi True Software MyPublicWiFi Turn your computer into a Virtual WiFi Hotspot with Firewall ,Bandwidth Manager 30.1 by MyPublicWiFi True Software
How to create hotspot using your laptop How to Create Wifi Hotspot in Windows 10 Tutorial.

By JuuNews How to create hotspot using your laptop How to Create Wifi Hotspot in Windows 10 Tutorial. by JuuNews

Title: How to Enable and Use Microsoft Virtual WiFi Miniport Adapter
Channel: Murugan S
How to Enable and Use Microsoft Virtual WiFi Miniport Adapter by Murugan S
Working With Laptop
Unlock Your Laptop's Secret Wi-Fi Hotspot: The Ultimate Guide!
We understand the frustration of limited Wi-Fi coverage. Whether you're navigating a remote workspace, sharing files with colleagues, or simply trying to stream your favorite shows, a reliable internet connection is paramount. Luckily, your laptop possesses a hidden superpower: the ability to transform into a Wi-Fi hotspot. This comprehensive guide will equip you with the knowledge and practical steps to unlock this feature and establish your own personal wireless network, offering seamless connectivity wherever you go.
Why Turn Your Laptop into a Wi-Fi Hotspot? A World of Possibilities
The benefits of creating a Wi-Fi hotspot from your laptop are multifaceted. Consider these compelling scenarios:
- Expanded Connectivity: Extend your Wi-Fi range, creating a zone where devices beyond your router's reach can connect. This is particularly helpful in large homes, offices, or outdoor settings. No more dead zones!
- Sharing Your Connection: Easily share your internet connection with friends, family, or colleagues when a primary Wi-Fi network is unavailable or unreliable. Create a temporary shared office from any location.
- Mobile Productivity: Transform your laptop into a mobile hotspot while traveling, accessing the internet on your phone, tablet, or other devices where Wi-Fi is absent. Work uninterrupted from anywhere.
- Troubleshooting Network Issues: Bypass your home or office network to diagnose connection problems on your other devices. Isolate the problem quickly.
- Enhanced Security: Utilize a secure connection provided via your own device. This ensures a certain level of privacy and control over the network, especially in public settings.
- Emergency Backup: In the event of a router outage, your laptop can act as a crucial internet lifeline, keeping you connected. Stay connected during unexpected disruptions.
Understanding the Prerequisites: What You'll Need
Before diving into the setup process, ensure your laptop meets the minimum requirements:
- A Laptop: This may seem obvious, but the device, whether a Windows or macOS machine, is the central hub of your hotspot.
- An Active Internet Connection: Your laptop, obviously, needs to get its own internet connection, whether it is through Ethernet, Wi-Fi, or a mobile data plan. The hotspot shares this existing connection.
- A Compatible Operating System: Both Windows and macOS offer built-in features for hotspot creation. Update your system to the latest version to ensure smooth operation.
- Administrative Privileges: You'll need administrator rights on your laptop to configure network settings.
- Wireless Network Adapter: Your laptop needs a functional wireless adapter. Verify this in your operating system's Device Manager (Windows) or System Information (macOS).
- Security Considerations: Have a strong password for your hotspot's security.
- Battery Life: Using your laptop as a hotspot will consume power. Plug in your laptop or make sure you have enough battery.
Setting Up Your Wi-Fi Hotspot on Windows: A Step-by-Step Guide
Windows offers a built-in Mobile Hotspot feature. Here's how to enable it:
- Access Settings: Click the Windows "Start" button and select the "Settings" gear icon.
- Navigate to Network & Internet: In the Settings menu, choose "Network & Internet."
- Select Mobile Hotspot: Click on "Mobile hotspot" in the left-hand menu.
- Enable Mobile Hotspot: Toggle the "Share my Internet connection with other devices" switch to "On."
- Choose Internet Source: Under "Share my Internet connection from," select the source of your internet connection (e.g., Wi-Fi or Ethernet).
- Edit Hotspot Settings (Optional): Click "Edit" to customize your hotspot's name (SSID) and password. Choose a memorable network name and a strong, unique password for enhanced security.
- Connect Devices: On your other devices (phones, tablets, etc.), search for available Wi-Fi networks and select your new hotspot's name. Enter the password when prompted.
- Monitor Connections: The Mobile Hotspot setting displays the number of connected devices, allowing you to monitor activity.
Fine-Tuning Your Windows Hotspot: Advanced Options and Configuration
After setting up the core hotspot, consider these advanced settings:
- Network Band Selection: Windows often lets you choose between 2.4 GHz and 5 GHz bands. 5 GHz offers faster speeds but shorter range. 2.4 GHz sacrifices speed for range. Choose the band appropriate for your needs.
- Data Usage Limits: You may be able to set data limits to prevent exceeding your internet plan's allowance, particularly if you’re using the hotspot with a metered connection.
- Power Saving: Configure your laptop's power settings to ensure the hotspot remains active even when the lid is closed (if applicable).
- Troubleshooting: If connections fail, restart your laptop and the connecting devices. Double-check your password. Ensure your drivers are updated.
Creating a Wi-Fi Hotspot on macOS: A Streamlined Approach
macOS simplifies hotspot creation through its built-in capabilities:
- Open System Preferences: Click the Apple icon in the top-left corner of your screen, then select "System Preferences." Then, depending on your macOS version, it may be named "System Settings."
- Choose Internet Sharing: Click "Sharing."
- Select Internet Sharing: From the left-hand menu, select "Internet Sharing."
- Choose Internet Connection Source: In the "Share your connection from" dropdown menu, select the source of your internet (e.g., Wi-Fi or Ethernet).
- Select Devices Sharing the Connection: In the "To computers using" list, check "Wi-Fi."
- Wi-Fi Options: Click the "Wi-Fi Options…" button.
- Configure Hotspot Settings: Enter a name for your hotspot (Network Name), choose a security type (WPA2 Personal is recommended), and create a strong password.
- Start Internet Sharing: Check the box next to "Internet Sharing" to turn on the hotspot. You may be prompted to confirm.
- Connect Devices: On your other devices, search for available Wi-Fi networks and connect to your new hotspot, entering the password when prompted.
Optimizing Your macOS Hotspot: Advanced Considerations
Here are some tips for improving your macOS hotspot experience:
- Monitor Connections: macOS provides real-time status information to display the number of connected users.
- Network Band Selection: Ensure you've selected the optimal Wi-Fi band.
- Firewall Settings: Make sure your macOS firewall isn't preventing any connections. Adjust the firewall if needed.
- Power Management: Ensure your laptop is set to stay awake when the lid is closed (if desirable) by configuring power settings.
- Troubleshooting: If devices cannot connect, reboot your laptop and verify the hotspot settings.
Troubleshooting Common Wi-Fi Hotspot Issues
Encountering problems? Here are solutions to common issues:
- Devices Cannot Connect:
- Double-check the hotspot password.
- Restart the hotspot function.
- Ensure your laptop's Wi-Fi adapter is enabled.
- Verify your internet connection.
- Check drivers.
- Slow Internet Speeds:
- Limit the number of connected devices.
- Move closer to your laptop.
- Consider a different Wi-Fi band (e.g., 5 GHz).
- Close bandwidth-intensive applications on your laptop.
- Hotspot Not Appearing:
- Ensure the hotspot is enabled.
- Verify the security settings.
- Try restarting your laptop.
- Check that you have an active internet connection.
- Random Disconnections:
- Check that the laptop's power settings are set appropriately.
- Verify the Wi-Fi drivers.
- Check on your internet connection speed.
Security Best Practices for Your Wi-Fi Hotspot
Protect your data and privacy with these security precautions:
- Strong Passwords: Always use a strong, unique password for your hotspot consisting of a mix of uppercase and lowercase letters, numbers, and symbols.
- Encryption: Ensure WPA2 or WPA3 encryption is enabled to safeguard your network's security.
- Regular Password Changes: Change your hotspot password periodically.
- Monitor Connected Devices: Regularly check which devices are connected to your hotspot.
- Disable Hotspot When Not in Use: Turn off your hotspot when it's not needed to prevent unauthorized access.
- Update Your Software: Keep your operating system and security software updated.
- Be Mindful of Public Wi-Fi: Never connect to a hotspot that is not encrypted. Refrain from disclosing information that may compromise privacy.
Conclusion: Embrace the Power of Your Laptop's Hotspot
Unlocking your laptop's Wi-Fi hotspot is a simple yet incredibly valuable skill. It empowers you to stay connected, share your internet access, and boost your productivity. With the appropriate understanding, setup, and vigilance, you can use your laptop as a personal hotspot. Experiment with the settings, troubleshoot issues, and tailor the experience to meet
