create wifi hotspot with laptop windows 8

Title: Make a Wi fi Hotspot Using your Windows 8 Laptop
Channel: Syed Shah Zahurullah Hussaini
Make a Wi fi Hotspot Using your Windows 8 Laptop by Syed Shah Zahurullah Hussaini
Unlock Your Laptop's WiFi Hotspot: Windows 8 Secret Revealed!
Unleash Your Digital Fortress: Windows 8's Hidden WiFi Hotspot Power!
Ah, the allure of instant internet access! We all crave it, don't we? Imagine this: you're stranded. Your phone's data is kaput. Your neighbor's WiFi remains stubbornly locked. Suddenly, a solution dawns! Your trusty Windows 8 laptop transforms. It's not just a device, but a powerful WiFi hotspot. Are you intrigued? Prepare to be amazed.
The Unseen Network: A Windows 8 Revelation
Windows 8, often misunderstood, holds a secret. It offers a hidden pathway. It allows your laptop to share its internet connection. This is not some obscure command-line trick. It's a built-in feature, waiting to be discovered. Many users overlook its presence. Because it's not immediately evident. This functionality is a game-changer. Specifically, it’s for mobile productivity or helping a friend.
Preparing Your Arsenal: Gathering the Essentials
Before you begin this digital transformation, gather a few things. First, ensure your laptop has a stable internet connection. Ethernet cable or existing WiFi works fine. You'll also need some patience. The process is straightforward, really. However, a tiny bit of tech know-how helps. Furthermore, make sure your Windows 8 installation is up-to-date. Afterwards, you are ready to proceed.
Step-by-Step: Creating Your Wireless Haven
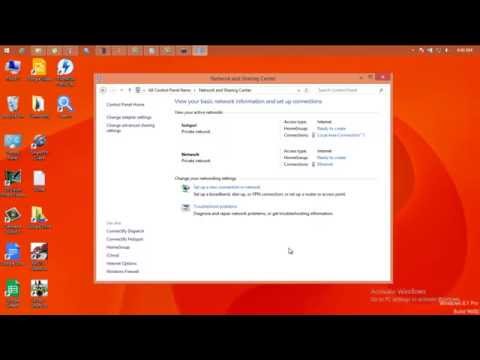
Now, the exciting part! Let's create this WiFi hotspot. You will be amazed how simple it is. First, open the "Network and Sharing Center." You can find it in the Control Panel. Therefore, search for "Control Panel" in the Start menu. Next, look for the "Change adapter settings" option. Click it, and see your network connections.
The Magic of "Hosted Network": Unveiling the Beast
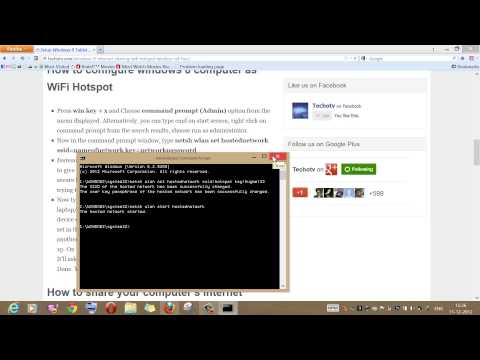
Here’s where things get interesting. You'll need to create a "Hosted Network." This is the secret sauce. The command prompt is the key to unlock this feature. So, open the command prompt as an administrator. Search for "cmd" in the Start menu. Then, right-click it and choose "Run as administrator." Got it? Good!
Setting the Stage: The Command Line Commands
Now, let's type in some powerful commands. These commands are the secret incantations. First, type netsh wlan set hostednetwork mode=allow ssid=YourHotspotName key=YourPassword. Replace YourHotspotName with your desired hotspot name. Then, replace YourPassword with a strong, secure password. Remember the password! It's essential. After you have done that, hit enter.
Igniting the Flame: Starting the Hosted Network
You've set up the base. Time to launch the network. Type netsh wlan start hostednetwork. Press enter. You'll see confirmation. Your hosted network is starting to get ready. Next, go back to the "Network and Sharing Center." Click "Change adapter settings" again. There should be a new connection.
Bridging the Gap: Sharing Your Internet
Now for the grand finale! Right-click your active internet connection. This is the connection your laptop is actively using. Choose "Properties." Click the "Sharing" tab. Check the box that allows other network users to connect. Select your newly created hosted network from the drop-down menu. Then, click "OK." And Voila!
Troubleshooting Tactics: Bouncing Back from Hiccups
Sometimes, things don't go perfectly. Don't worry! Here are a few common troubleshooting tips. If the hosted network doesn't work, double-check your password. Make sure your internet connection is stable. Also, verify that your network drivers are up-to-date. Ultimately it is a simple process.
Beyond the Basics: Advanced Customization
Feeling adventurous? You can tailor your hosted network. Change the wireless network settings. Adjust the security features for your hotspot. Explore options like channel selection. This is for more technical users. Experiment with different settings until they meet your specific needs. Furthermore, consider the power saving considerations.
The Power of Connection: Embracing Digital Freedom
And there you have it! You've turned your Windows 8 laptop into a WiFi hotspot. You can now share your internet connection. Share it with friends or multiple devices. This unlocks a new level of digital freedom. You are now ready to connect where you want.
Final Thoughts: Embrace the Future of Connectivity
Windows 8's hidden feature is a powerful tool. It brings you the ability to create a hotspot. Now, you can stay connected everywhere. Embrace this technology. Share it with others. The world is connected; now, so are you. Enjoy your new freedom!
**Neighbor's Wi-Fi: Unlock the Secret NOW!**Unlock Your Laptop's WiFi Hotspot: Windows 8 Secret Revealed!
Hey there, tech enthusiasts and Wi-Fi warriors! Remember those days when you were scrambling for Wi-Fi, tethered to a flimsy public network, or desperately searching for a signal? Well, we’re here to tell you, those days are over, especially if you're still rocking a Windows 8 laptop! It’s like having a secret superpower, a hidden portal to sharing your internet connection with all your devices – your phone, your tablet, even your friend’s laptop. Ready to unlock the magic? Let’s dive in and reveal the secret of turning your Windows 8 laptop into a personal Wi-Fi hotspot.
1. The Quest for Connectivity: Why a Windows 8 Hotspot Matters
Think of your laptop as a Swiss Army knife of connectivity. We live in a hyper-connected world. We need access to the internet everywhere, for everything! From checking emails on the go to streaming your favorite shows during a long commute, a personal hotspot makes your digital life so much easier. Forget the frustrating search for public Wi-Fi or the annoyance of tethering through your phone – we’re creating our own internet oasis!
2. Understanding the Basics: What You'll Need to Get Started
Before we crack the code, let’s make sure we’re on the same page. You’ll need a laptop running Windows 8 (duh!), a working internet connection (preferably Ethernet or a Wi-Fi connection itself, because, you know, you need internet to share internet!), and a little bit of patience. It's like baking a cake; you need all the right ingredients! Don't worry, this recipe is easy. We'll make it a piece of cake!
3. The Pre-Flight Checklist: Checking Your Network Adapter's Capabilities
Before you get excited, let’s ensure everything is ship-shape. Not all network adapters are created equal. We need to confirm that your laptop's Wi-Fi adapter supports "hosted networks." This is the key to the whole operation. Think of it as checking if your car has a working engine before you plan your road trip.
- How to Check:
- Open the Command Prompt (search for "cmd" in the Start menu).
- Type
netsh wlan show driversand press Enter. - Look for the line that says "Hosted network supported : Yes." If it says "No," then, unfortunately, this method won’t work, but hey, there might be other solutions we'll explore later.
4. The Secret Weapon: Configuring the Hosted Network
Alright, assuming your network adapter is ready to roll, here comes the fun part: configuring the hosted network. This is where we tell your laptop to share its internet connection. It's like giving your laptop a new superpower!
- Step-by-Step Guide:
- Open Command Prompt as an administrator. (Right-click on the "cmd" result and select "Run as administrator.")
- Type the following command and hit Enter:
netsh wlan set hostednetwork mode=allow ssid="YourHotspotName" key="YourPassword"Replace "YourHotspotName" with the name you want for your hotspot (like "MyAwesomeHotspot") and "YourPassword" with a strong password. - Next, type
netsh wlan start hostednetworkand press Enter. This activates your hotspot and lets other devices connect to it.
5. Sharing the Internet: The Bridge Connection
Your hotspot is created, but it's not sharing the internet yet. It's like having a beautiful, empty mansion. The next step is about making the connection from your internal internet source, to the hotspot.
- Here's how:
- Open the Network and Sharing Center (search for it in the Start menu).
- Click on "Change adapter settings."
- Identify your primary internet connection (Ethernet or Wi-Fi).
- Right-click on that connection and select "Properties."
- Go to the "Sharing" tab.
- Check the box that says "Allow other network users to connect through this computer’s Internet connection."
- Select your newly created hosted network from the "Home network connection" dropdown.
- Click "OK."
6. Troubeshooting Time: Common Hiccups and Their Fixes
Sometimes, things don't go as planned. Computer gremlins seem to love to mess up our tech, but don't fret. We've got your back. Here are some common issues and how to fix them:
- "The hosted network couldn’t be started": Double-check your password, ensure your network adapter is enabled, and try restarting your laptop.
- No internet access: Make sure the internet connection is shared as described in the bridge connection section. Check your primary internet connection for any outages.
- Slow speeds: Wi-Fi hotspots can be slower than a direct connection. Consider moving closer to your laptop or using a stronger internet source.
7. Optimizing Your Hotspot: Enhancing Performance
Just because your hotspot works doesn't mean it can't be made better. We can crank it up a notch.
- Channel Selection: Check your Wi-Fi router settings and find the channel with the lowest congestion. This can reduce interference and boost speeds.
- Keep It Secure: Use a strong password and avoid sharing your hotspot with untrusted users.
- Positioning: Keep your laptop in an open area to improve Wi-Fi range.
8. When Things Go Wrong: Troubleshooting Common Issues
Let's face it; technology has its quirks. From time to time, things might not work as expected. Let's troubleshoot a bit more!
- Check Driver Issues: Sometimes, old or corrupt drivers can cripple your connection. Reinstalling or updating Wi-Fi drivers is a good tactic.
- Firewall Interference: Your firewall might be blocking the connection. Temporarily disable it to evaluate whether this is the problem.
- Restarting Your Laptop: Sounds simplistic, but a simple restart sometimes works wonders.
9. The Advantages of a Personal Hotspot: Freedom Unleashed
The advantages are vast. Think of the uses! A personal Wi-Fi hotspot transforms your laptop into a portable Wi-Fi router. It's an instant connection for your tablet, phone, and other devices anytime, anywhere. It's perfect for sharing internet access with friends, family, or roommates.
10. The Safety First Approach: Keeping Your Hotspot Secure
Security is paramount. Use a strong password to protect your hotspot, ensuring only those you trust can access it. Also, change your password regularly. It’s like locking your front door – essential! Consider using additional security software.
11. Windows 8's Subtle Advantages: Tailored for Hotspot Creation
Windows 8, while having its quirks, is actually relatively user-friendly when it comes to creating hotspots. Its built-in features and functionalities support straightforward process, making it easy to share your internet connection.
12. Comparing Methods: Windows 8 vs. Other Hotspot Solutions
While other methods exist, such as third-party software, Windows 8's built-in solution offers a simple and often more reliable way to create a hotspot. It saves you from needing to install extra software, and it usually causes fewer compatibility problems.
13. The Power of Simplicity: Embracing the Ease of the Built-in Feature
We're all for simplicity. This built-in feature in Windows 8 is efficient, user-friendly, and provides an efficient way to share your internet connection. Enjoy the simplicity!
14. Beyond Wi-Fi: Exploring Other Connectivity Options
WiFi isn't the only option. Consider using Bluetooth for your hotspot as an alternative, which is beneficial when needing to save battery life or in environments where Wi-Fi may be limited.
15. The Future of Personal Hotspots: Trends To Keep An Eye On
The future is exciting! As technology develops, expect more advanced features like improved security protocols, increased bandwidth, and integration with more devices.
Closing Thoughts: Embrace the Convenience
So, there you have it! We’ve uncovered the secret to unleashing your laptop's Wi-Fi hotspot on Windows 8. With a few simple steps, you can create your own personal internet hub, transforming your laptop into a connectivity powerhouse. Now go forth and share the Wi-Fi love! Enjoy your newfound freedom and the convenience of always-on internet. From now on, the internet is always within reach!
FAQs:
Q1: Can I use my laptop's hotspot while it's connected to another Wi-Fi network?
A: Yes, absolutely! You can connect your laptop to a Wi-Fi network and simultaneously share that connection as a hotspot.
Q2: How do I change the hotspot name and password?
A: You'll need to use the Command Prompt again to modify these settings. Follow the steps in Section 4 but replace "YourHotspotName" and "YourPassword" with your desired new details.
Q3: Does using my laptop as a hotspot drain its battery significantly?
A: Yes, using your laptop as a hotspot
Laptop WiFi Dropping? This SHOCKING Fix Works Every Time!Share internet via WiFi on Windows 8 without router with other computer or devices
By Techotv Share internet via WiFi on Windows 8 without router with other computer or devices by Techotv
Create WiFi Hotspot in windows 8.1, 8, 7 LaptopPC
By ANDREW CRUZ Create WiFi Hotspot in windows 8.1, 8, 7 LaptopPC by ANDREW CRUZ
How to create wifi hotspot in windows 88.1 Easy method 100 works

By Engineerhoon How to create wifi hotspot in windows 88.1 Easy method 100 works by Engineerhoon

Title: Turn Windows 8 Laptop into WiFi HotSpot How To
Channel: TechEmpty
Turn Windows 8 Laptop into WiFi HotSpot How To by TechEmpty
Change Wifi Settings
Unlock Your Laptop's WiFi Hotspot: Windows 8 Secret Revealed!
Introduction: Your Portable WiFi Powerhouse
We've all been there: stranded without WiFi, desperately searching for a connection. Imagine transforming your Windows 8 laptop into your own personal WiFi hotspot – a mobile gateway to the internet, ready whenever and wherever you need it. Forget scrambling for public networks or relying on dwindling data plans. This tutorial will unveil the secrets to creating a WiFi hotspot directly from your Windows 8 laptop, allowing you to share your internet connection with multiple devices. Prepare to become the ultimate WiFi provider, empowering your smartphones, tablets, and even other laptops with the freedom of seamless connectivity. No more frustration, just instant, reliable WiFi at your fingertips.
Pre-Flight Checklist: Preparing for Launch
Before we embark on this journey, let's ensure your laptop is primed for hotspot creation. This pre-flight checklist mitigates potential hiccups and ensures a smooth transition:
- Operating System: Naturally, you'll need a Windows 8 operating system. This tutorial is specifically tailored to the nuances of Windows 8's networking capabilities. Ensure you're running a fully updated version of Windows 8. Updates often include crucial network driver enhancements.
- Wireless Network Adapter: Your laptop must possess a functioning wireless network adapter. Most laptops come equipped with this by default. You can confirm its presence in the Device Manager (search for "Device Manager" in the Windows 8 start screen). Look for a "Network adapters" section; your wireless adapter should be listed there.
- Internet Connection: You'll need an active internet connection. This could be a wired Ethernet connection, a 3G/4G mobile broadband connection, or a WiFi connection from another source. This is the internet connection the hotspot will share.
- Administrator Privileges: You must be logged into a user account with administrator privileges. This is essential for making network configuration changes.
- Sufficient Power: For optimal performance, ensure your laptop is connected to a power source. While the hotspot feature can operate on battery power, it can significantly drain your battery life.
Method 1: The Command Line Command: The Ultimate Control
The command line offers a robust and reliable method for creating your Windows 8 WiFi hotspot. This method grants you granular control over the hotspot's configuration. This is the preferred method for power users and those seeking ultimate customization.
Opening the Command Prompt as Administrator: This is paramount. Search for "cmd" in the Start screen, right-click on "Command Prompt," and select "Run as administrator." Failure to do so will prevent you from making necessary network modifications.
Setting Up the Hosted Network: Type the following command and press Enter:
netsh wlan set hostednetwork mode=allow ssid="YourHotspotName" key="YourPassword"- Replace
"YourHotspotName"with the desired name for your WiFi hotspot. Choose a name that's easily recognizable, but consider its security implications. - Replace
"YourPassword"with a strong, complex password. Aim for at least 12 characters, incorporating a mixture of uppercase and lowercase letters, numbers, and symbols. This safeguards your hotspot from unauthorized access.
- Replace
Starting the Hosted Network: Execute the following command:
netsh wlan start hostednetworkThis command activates your created WiFi hotspot. At this stage, your hotspot is potentially ready to share your internet connection, but let's configure this next.
Sharing Your Internet Connection: This final step configures the actual sharing of your internet.
Open the "Network and Sharing Center." You can access this by right-clicking on the network icon in the system tray (bottom-right corner of your screen) then proceed to open Network and Sharing Center from the menu.
Click on "Change adapter settings." This will display a list of your network adapters.
Identify the network adapter representing your active internet connection. This is typically the adapter that is connected to your Internet connection. (For example, if you are connecting through a wired Ethernet or WiFi connection for Internet) Right-click this connection and select "Properties."
Navigate to the "Sharing" tab.
Check the box that says "Allow other network users to connect through this computer's Internet connection."
In the "Home networking connection" dropdown, select "Microsoft Hosted Network Virtual Adapter." This is the virtual adapter created by the hotspot setup.
Click "OK" to save the changes.
Your Windows 8 laptop is now broadcasting a WiFi hotspot, sharing your internet connection with devices within range.
Method 2: The Graphical Interface: For the Visually Inclined
While the command line offers power, the graphical interface provides a more intuitive experience. This method might appeal to users who prefer a visual approach to network configuration.
Accessing the Mobile Hotspot Settings: Windows 8, unfortunately, does not have a built-in mobile hotspot setting. Instead, we employ the above method with the command line.
Creating a Virtual Network: Once you have used the command line to enable the hosted network you can verify it is created by:
- Search for "View Network Connections."
- Look for a virtual network adapter, often named "Microsoft Hosted Network Virtual Adapter."
Sharing Your Internet Connection (Graphical Method): Similar to the command-line method, the crucial step is sharing your internet connection.
Open the "Network and Sharing Center." Access this by right-clicking on the network icon in the system tray (bottom-right corner of your screen).
Click on "Change adapter settings."
Identify the network adapter associated with your internet connection.
Right-click this connection and select "Properties."
Navigate to the "Sharing" tab.
Check the box that says, "Allow other network users to connect through this computer's Internet connection."
In the "Home networking connection" dropdown, select "Microsoft Hosted Network Virtual Adapter."
Click "OK" to finalize the settings.
Troubleshooting Common Hiccups
Even the most meticulously crafted setup can sometimes encounter minor obstacles. Here's a troubleshooting guide to address common issues:
- "The hosted network couldn't be started": This usually indicates a problem with the network adapter drivers or permissions. Ensure your drivers are up-to-date. Verify you're running the command prompt "as administrator." Restarting your laptop can also sometimes resolve this issue.
- Devices cannot connect to the hotspot: Double-check the password you entered during setup. Ensure your devices are within range of the hotspot. Restart both your laptop and the connecting devices. Verify you have established an internet connection.
- Slow internet speeds: The hotspot's speed is limited by the speed of your internet connection. Make sure no other devices are downloading large files.
- Limited connectivity: If devices connect but have limited connectivity (e.g., they can't access the internet), ensure you've correctly shared your internet connection through the network adapter settings' "Sharing" tab.
Security Best Practices: Fortifying Your Hotspot
Securing your WiFi hotspot is paramount. Here are key security measures to implement:
- Strong Password: Always use a robust password containing a mix of uppercase and lowercase letters, numbers, and symbols. The longer, the better. Change the password periodically.
- Network Name (SSID): Avoid using personally identifiable information in your hotspot's name. Consider a generic or non-descriptive name.
- Encryption: WPA2-Personal is the recommended encryption protocol. Ensure your hotspot is configured with this encryption.
- Monitor Connected Devices: Regularly check the devices connected to your hotspot. If you notice any unfamiliar devices, disconnect them immediately by changing the password.
- Turn Off When Not in Use: Disable the hotspot when it's not needed. This minimizes the risk of unauthorized access.
Beyond the Basics: Advanced Customization
For the more technically inclined, here are some advanced customization options:
- Changing the SSID and Password: You can modify your hotspot's name and password using the
netsh wlan set hostednetworkcommand. You can change the password by using the exact command you previously did with a new password of your choice. - Setting a Static IP Address: If you have a specific need, you can assign a static IP address to the hosted network adapter. This requires configuring your network settings.
- MAC Address Filtering: MAC address filtering allows you to permit or deny access based on the device's MAC address (a unique hardware identifier). This adds an extra layer of security, but can be cumbersome to manage. However, the first step towards this is to make sure the Internet connection is secured with a strong password.
Conclusion: Your WiFi Liberation Awaits
By mastering these methods, you've unlocked the power to transform your Windows 8 laptop into a readily available WiFi hotspot. No longer be tethered to unreliable public networks or expensive data plans. Embrace the freedom of having your own portable WiFi zone, instantly connecting your devices and keeping you connected to what matters most. Go forth, and experience the liberation of seamless, on-demand internet access, all thanks to the hidden secrets of your Windows 8 laptop.
