how to connect vista laptop to wifi
Title: Bagaimana menghubungkan Windows Vista ke jaringan nirkabel Anda
Channel: NetComm
Bagaimana menghubungkan Windows Vista ke jaringan nirkabel Anda by NetComm
Vista Laptop WiFi Connection: The SHOCKINGLY Easy Fix!
Unlocking Your Vista’s Wi-Fi: A Surprisingly Smooth Ride!
Remember those days of clunky laptops and the endless hunt for a decent Wi-Fi signal? Well, if you're still rocking a Vista laptop, you might be experiencing a flashback. Don’t toss that trusty machine just yet! Believe it or not, getting your Vista laptop connected to Wi-Fi can be surprisingly straightforward. We'll explore how to breathe new life into your browsing experience.
The Mystery of the Missing Wireless Signal
First, let's acknowledge the potential frustrations. Your Vista machine might be acting up. Maybe it's refusing to recognize your wireless network. Perhaps it keeps dropping the connection. It's exceptionally frustrating, isn’t it? However, before you despair, consider the often-overlooked possibilities. We can troubleshoot these issues.
Diagnosing the Wi-Fi Woes: Your First Steps
Start with the basics. Is your Wi-Fi actually switched on? Locate the physical switch on your laptop. It might be a slider or a button. Ensure it’s in the “on” position. Then, check the Wi-Fi indicator light. Is it lit up? Does it change color? These may offer clues. If the light remains off, you may have a disabled wireless card.
Next, examine your network settings. Click on the network icon in your system tray. This is usually located in the bottom right corner of your screen. You'll see a list of available wireless networks. Your home network should be listed. If it isn't, that’s a problem we'll address shortly. If it's there, but you can't connect, then move along to the next section.
Digging Deeper: Refining Your Vista's Connection
Now, let’s tackle some more advanced troubleshooting steps. These are vital. These techniques can often solve the problem. You'll want to verify your network adapter is enabled. Go to the "Control Panel." Then go to "Network and Internet" followed by "Network and Sharing Center."
From there, find and select "Change adapter settings." You will see a list of network adapters. Your wireless adapter should be listed here. But, if it’s disabled, right-click on it. Then select “Enable.” Also, double-check that the driver is up-to-date. Outdated drivers are a frequent culprit.
Updating Your Wireless Driver: A Quick Fix
Outdated drivers can cause all sorts of connection issues. Thankfully, updating them is usually simple. You can perform this procedure through the Device Manager. Access it through the Control Panel. Then find "System and Security" and select "Device Manager." Expand the "Network Adapters" category. Locate your wireless network adapter. Right-click on it. Select "Update driver." Choose the option to search for the driver online. Windows will search and install the latest version, hopefully. Restart your machine, after the update.
Checking the Router: The Other Side of the Coin
Your Vista laptop isn’t always the problem. The issue might reside with your router. If other devices connect to the internet, then the router is likely fine. But, examine the router itself. Is it powered on? Are the lights flashing as expected? Sometimes, a simple power cycle can do the trick. Unplug your router. Wait about a minute. Then, plug it back in. Give it time to boot up. Check the Wi-Fi signal on your Vista after.
Security Settings: The Password Puzzle
Security settings are often an obstacle. Ensure your Wi-Fi password is correct. You may be entering it incorrectly. Double-check your password. Also, verify that the security settings on your router match the settings on your laptop. For instance, WPA2 is typically the most secure and widely compatible. Make sure they align!
The Final Resort: Considering Hardware
Let's face it: Sometimes, things go wrong. If you’ve tried everything, the wireless network adapter on your Vista laptop may be faulty. Consider a replacement. These are often available. You could seek professional help. A computer repair shop can diagnose hardware issues effectively. This is the last resort.
Embracing the Vista Legacy: Staying Connected Today
Connecting your Vista laptop to Wi-Fi doesn't have to be a headache. With these steps, you’ll hopefully be back online in no time. Troubleshooting Wi-Fi can seem daunting. Remember to remain patient. However, with a little effort, you can enjoy a smooth browsing experience. Many users report success. So, embrace your Vista machine. Enjoy a renewed internet connection. This will keep your machine running smoothly.
**Dell Laptop WiFi Nightmare? This FIX Works Every Time!**Vista Laptop WiFi Connection: The SHOCKINGLY Easy Fix!
Hey everyone, it’s been a while, hasn’t it? Remember Vista? That operating system that felt like it was constantly trying to outsmart us, even when all we wanted was to, you know, connect to the internet? I do. I vividly recall hours spent wrestling with it, desperately trying to get my shiny new laptop to play nice with my home WiFi. It was a battle, a real digital slugfest, but guess what? We've survived, and more importantly, we've figured it out. And trust me, the solution to a Vista laptop WiFi connection is far less complicated than you might think. Prepare to be amazed (and possibly a little embarrassed at how long you struggled before). We're going to make sure your old Vista machine is back online, faster than you can say "dial-up!"
1. The Ghost of WiFi Past: Why Vista Can Be So Tricky
Let’s be real, Vista was a bit like that quirky aunt who always meant well but had a knack for making things…complicated. The WiFi connection process was just one of those areas where Vista seemed to relish in adding extra steps. It's like it was actively trying to keep you from the sweet, sweet world of the internet. I recall my own frustrations clearly. This was before I was a tech guru (or even remotely competent), and I felt utterly defeated. The constant dropping of connections, the cryptic error messages – it was a special kind of torture. But, fear not! We're going to banish those digital demons today!
2. Understanding the Enemy: Common Vista WiFi Woes
Before we jump into the fix, let's identify the usual suspects. Knowing your enemy (the WiFi gremlins in this case) is half the battle. Here are some of the most common problems you might encounter:
- Incorrect Network Password: Yep, a classic. Typing in your password wrong, even once, is a surefire way to stay offline.
- Driver Issues: Sometimes, Vista just doesn't have the right drivers for your wireless adapter. It's like trying to speak a language the computer doesn't understand.
- Network Settings Gone Awry: Something in the labyrinthine network settings has been fiddled with, either by you, a well-meaning family member, or a rogue gremlin.
- Hardware Problems: Occasionally, the wireless adapter itself might be on the fritz. But let's hope we don't have to go there just yet.
- Security Protocols: Vista, being a bit older, sometimes struggles with those fancy new security protocols your modern router might be using.
3. Step 1: The Password Check - The Simplest Solution First!
Okay, let's start with the obvious. Are you absolutely, positively sure you have the right password? I know, I know, it sounds silly, but it's the easiest fix. Double-check, triple-check, and then maybe have a friend check. The most common problem is the CAPS lock key; that can change your password without you even realizing it.
4. Step 2: The Driver Detective - Ensuring Compatibility
Drivers are like the translators that allow your laptop and WiFi adapter to communicate. If the driver is outdated or missing, you're going to have problems. Here’s how to check and update your drivers:
- Go to Device Manager: Click the "Start" button, type "Device Manager" in the search bar and press Enter.
- Look for Network Adapters: Expand the "Network adapters" section. You should see your wireless adapter listed.
- Check for Warnings: Does it show a yellow exclamation mark or a red X? Those are bad signs!
- Update the Driver: Right-click on your wireless adapter and select "Update driver". Let Windows search automatically. If that fails, you might need to download the driver manually from your adapter manufacturer’s website. Think of this step like giving your laptop its yearly medical checkup to look for problems.
5. Step 3: The Router Renegade - Checking Your Router's Settings
Your router is the gatekeeper of your internet connection. Sometimes, it's the router and Vista that refuses to get along. Here are things to check:
- Security Protocol: Vista might not support the latest security protocols like WPA3. Try switching your router to WPA2(AES) for compatibility.
- Channel: Routers broadcast on different channels. Try changing the channel setting on your router to a different one (e.g., 1, 6, or 11) to reduce interference.
- Distance: Make sure your laptop is within a reasonable distance of your router. Walls, distance, and other electronics can all affect the WiFi signal.
6. Step 4: The IP Address Illusion - Fixing Network Confusion
Sometimes, your laptop gets confused about its IP address, the unique identifier it uses to connect to the network. Here's how to reset it:
- Open the Command Prompt: Click "Start," type "cmd" and press Enter.
- Type
ipconfig /releaseand press Enter. This releases your current IP address. - Type
ipconfig /renewand press Enter. This gets you a new IP address. - Restart your laptop: This usually does the trick.
7. Step 5: The Troubleshooting Toolkit - Using Vista's Built-In Help
Vista, despite its quirks, did have some built-in troubleshooting tools. Consider them as your digital Swiss Army knife:
- The Network Troubleshooter: Right-click on the network icon in your system tray (the little icon in the bottom right corner) and select "Troubleshoot problems." Vista will try to diagnose the problem.
- Windows Help and Support: Use the "Windows Help" feature to search for common WiFi problems.
8. The "If All Else Fails" Strategy: Consider a USB WiFi Adapter
If all else fails, don't despair! A USB WiFi adapter can be a lifesaver. These little dongles plug into a USB port and provide a new, up-to-date wireless connection. They’re usually relatively inexpensive and work with modern protocols. This is like giving your Vista laptop its own dedicated WiFi superhero.
9. Fine-Tuning: Improving Your WiFi Connection Strength
Apart from getting a connection, you might also want to optimize the speed. Here's how to improve your WiFi:
- Move your router: Place it in a central location, away from walls and other electronics.
- Update router firmware: Keep your router's firmware up to date for optimal performance.
- Reduce interference: Try to minimize the amount of interference from other devices, like microwaves or cordless phones.
10. The Hidden Secret: Why Persistence Pays Off
The key is perseverance. Don't give up! Sometimes, it takes a bit of trial and error. Think of it like a puzzle; you just have to find the right piece to fit.
11. Safety First: Security Basics for Your Vista Laptop
Even though Vista is old, security is still important. Here are some basic steps:
- Install a good antivirus: Even older operating systems need protection.
- Keep your web browser updated: Ensure that your browser is up to date to patch potential vulnerabilities.
- Use a strong password: Not just for your WiFi, but for your computer as well.
12. Bridging the Gap: Connecting to Hidden Networks on Vista
In some cases, if your network isn't automatically detected, you might need to manually add it. This is quite easy:
- Go to Network and Sharing Center: From the control panel, click on “Network and Sharing Center”.
- Set up a new connection or network: Click on "Set up a new connection or network".
- Manually connect to a wireless network: Choose the option to connect to a network manually.
- Enter your network details: Input the SSID (network name), security type (WPA2-PSK), and password.
13. Back to Basics: Restarting Your PC
Sometimes, the oldest trick in the book works. A simple restart can clear temporary glitches and get things flowing again.
14. Hardware Inspection: Checking Your Laptop’s Wireless Card
Though rare, sometimes the wireless card itself might have a fault. A quick inspection is key:
- Open the Device Manager: As described in section 4, look at the “Network Adapters”.
- If it’s completely missing, or disabled: Try restarting the device or installing the compatible driver.
15. Enjoy Your Newly Connected Vista Laptop!
Congratulations! You've tamed the Vista WiFi beast! Now you can browse the web, check your email, and revisit those old websites. Celebrate your victory! You've officially resurrected a piece of internet history.
So, there you have it, the shockingly easy fix for Vista laptop WiFi connections. We hope this guide made it easier for you. Remember, technology doesn’t have to be intimidating. With a little knowledge and some patience, you can conquer even the most frustrating tech challenges. Now, go forth and enjoy your newly connected laptop!
FAQs:
**1. My Vista laptop still won't connect to WiFi! What do I do?
Starbucks WiFi Nightmare: My ASUS Laptop's Wi-Fi Refusal!Connecting to a Wi-Fi Network with Vista

By NetZenUS Connecting to a Wi-Fi Network with Vista by NetZenUS
Cara memperbaiki masalah Wi-fi di Windows 7,Window 8 Vista, dan XP Tanpa Akses Internet

By Bip America Cara memperbaiki masalah Wi-fi di Windows 7,Window 8 Vista, dan XP Tanpa Akses Internet by Bip America
Koneksi Nirkabel VISTA
By Computer Geeks On Call Koneksi Nirkabel VISTA by Computer Geeks On Call

Title: Hubungkan ke jaringan nirkabel di Vista
Channel: Chris Waite
Hubungkan ke jaringan nirkabel di Vista by Chris Waite
Laptop Working
Vista Laptop WiFi Connection: The Surprisingly Simple Solution
Navigating the digital world from the comfort of your home or the convenience of a coffee shop hinges on one crucial element: a stable, reliable WiFi connection. For those of us still wielding the power of a Windows Vista laptop, the frustration of a dropped connection or the inability to connect at all can be a significant impediment. But rest assured, the solution, surprisingly, often lies within a few straightforward steps. We’re here to eliminate the technological hurdle. This guide empowers you to reclaim your online accessibility and experience the seamless connectivity you deserve. Let's demystify the process and get you back online.
Diagnosing Your Vista Laptop's WiFi Woes: A Preliminary Assessment
Before plunging into solutions, it’s essential to perform a preliminary assessment to understand the root cause of your connectivity issues. This initial investigation will help streamline the troubleshooting process, preventing unnecessary steps and saving valuable time. There are a few key areas to examine.
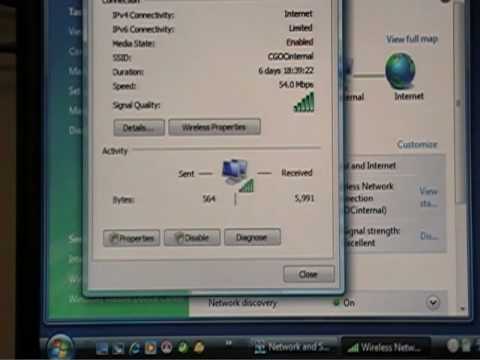
First, visually inspect your laptop's WiFi indicator. This is usually a small light or icon on the laptop's case or on the taskbar. Its color and state (on, off, blinking) provide valuable clues about the connection status. A solid light generally signifies a successful connection, while an off light indicates WiFi is disabled. Blinking often suggests it’s attempting to connect or encountering an error.
Second, take a critical look at the physical environment. Are you too far from the router? Obstructions like thick walls, metal objects, and even large mirrors can weaken the WiFi signal. Try moving closer to your router temporarily to see if the connection improves. Furthermore, assess if any other devices are interfering with the signal. Microwave ovens, cordless phones using older frequencies, and even Bluetooth devices can sometimes cause disruptions.
Third, verify the router's status. Ensure it’s powered on and functioning correctly. Check its indicator lights for any error messages. Restarting your router, a simple but often effective solution, can resolve temporary glitches. Unplug the router, wait a few seconds, and then plug it back in. This resets its internal processes.
Finally, consider recent changes to your system. Have you installed any new software or hardware? Have you updated your network drivers? These changes can sometimes introduce conflicts. Carefully review any recent modifications to your system configuration.
Enabling the Wireless Adapter: The Foundation for Connection
The first, most fundamental step is to ensure your Vista laptop's wireless adapter is enabled. This adapter is the hardware component that allows your laptop to communicate with the WiFi network. Sometimes, through inadvertent keystrokes or software conflicts, the adapter can become disabled, preventing you from connecting.
Locate the physical WiFi switch on your laptop. Many Vista laptops have a dedicated switch, often located on the side or front edge. Ensure the switch is in the "on" position. This is the most immediate step.
If there is no physical switch or the switch doesn’t resolve the issue, you navigate to the Windows Mobility Center. You can usually access this by clicking on the battery icon in your system tray. Then, look for the "Wireless" or "WiFi" setting within the Mobility Center. If it’s disabled, clicking on it will enable it.
Alternatively, access the Network Connections window through the Control Panel. Click on "Network and Internet," then "Network and Sharing Center," and finally, "Change adapter settings." In this window, you’ll see a list of your network adapters. Look for your Wireless Network Connection. If it's disabled, right-click on it and select "Enable." This will activate your wireless adapter. Once enabled, the adapter will search for available networks.
Configuring Your Wireless Network Connection: A Detailed Walkthrough
With the wireless adapter enabled, the next step involves configuring your network connection. This entails connecting to your WiFi network and entering the correct password to ensure secure and authenticated access.
First of all, click on the WiFi icon in the system tray, usually located in the bottom right corner of your screen. This will display a list of available wireless networks within range.
Identify and select your home network’s name (SSID). Your network’s name is usually printed on your router or in the router's settings.
Once selected, a prompt will appear requesting your network security key or password. This password is also typically located on the router or in the router’s settings. Enter the password precisely, carefully checking for capitalization and any errors. WiFi passwords are case-sensitive.
Ensure the “Connect automatically” box is checked. This ensures your laptop will reconnect to your home network automatically whenever it’s within range.
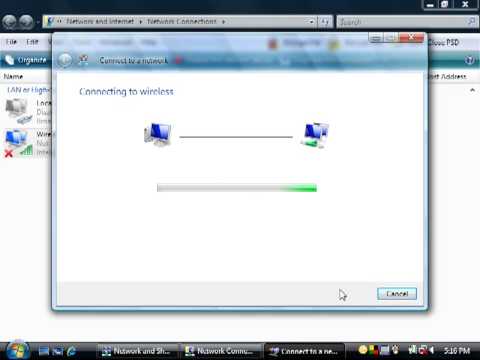
After entering the password, Windows Vista will attempt to connect to your network. If successful, the WiFi icon in the system tray will display a connected status. If the connection fails, then go back to the first step.
Updating Your Wireless Network Adapter Drivers: A Necessary Modernization
Outdated or corrupted network adapter drivers are a common cause of WiFi connectivity issues. Updating your drivers ensures your laptop can communicate effectively with your wireless network hardware, optimizing performance and resolving compatibility problems.
Begin by accessing the Device Manager. You can find it through the Control Panel. Click on "System and Maintenance", then "Device Manager". In Windows Vista, you can also access the Device Manager by typing "Device Manager" in the Search bar.
In the Device Manager, expand the "Network adapters" section. This will display a list of all network adapters installed on your laptop, including the wireless adapter.
Right-click on your wireless network adapter, which is usually identified by its manufacturer and model (e.g., "Intel WiFi Adapter," "Broadcom Wireless Network Adapter"), and select "Update driver software."
Windows Vista will then search for an updated driver automatically. The operating system will either locate and install the driver from its internal database or prompt you to search online for an updated version.
If the automatic search does not yield results, you can manually download the latest driver from the manufacturer's website. This requires knowing the exact make and model of your wireless adapter. Find this information by right-clicking your wireless adapter in the Device Manager, selecting "Properties," and checking the "Details" tab. Once you know the model, visit the manufacturer's website, browse their downloads section, locate the driver for your adapter, and install it.
After the driver update, you may be prompted to restart your laptop.
Troubleshooting Common WiFi Connection Problems: Step-by-Step Resolutions
Even after following the previous steps, you might encounter persistent WiFi connection issues. These are some specific, targeted strategies to swiftly resolve them.
Problem: Limited or No Connectivity
If your laptop connects to the network but experiences limited or no internet access, verify your router is connected to the internet. Check the router’s status lights or attempt to access the internet using another device connected to the same network. If other devices are working correctly, the issue is likely with your laptop. Restart your laptop and the router. Clear your browser's cache and cookies, as these can occasionally interfere with internet access.
Problem: The Network Is Not Visible
If your WiFi network does not appear in the list of available networks, verify your router is broadcasting its SSID (network name). Log into your router’s settings (usually through a web browser using the router's IP address, found in its documentation) and ensure the SSID broadcast is enabled. Reset your network adapter by disabling and re-enabling it in the Network Connections window.
Problem: Incorrect Password Entry
If you repeatedly fail to connect and are prompted for the password, double-check that you are entering the correct network security key or password. Wireless passwords are case-sensitive. Consider resetting your router to its default settings (consult the router's documentation) to eliminate potential password inconsistencies. You can then reconfigure the router and the network connection on your Vista laptop.
Advanced Troubleshooting: Going Beyond the Basics
For more complex WiFi issues, consider these advanced troubleshooting techniques.
Check TCP/IP Settings: Wrong settings might be the reason for the problem. In the Network Connections window, right-click your wireless connection, select "Properties," and then double-click "Internet Protocol Version 4 (TCP/IPv4)." Ensure that "Obtain an IP address automatically" and "Obtain DNS server address automatically" are selected. If static IP addresses or DNS servers are defined, consider resetting or resetting them to default values.
Run the Network Troubleshooter: Windows Vista has a built-in network troubleshooter that can automatically diagnose and fix common network problems. Right-click the WiFi icon in the system tray and select "Troubleshoot problems." The troubleshooter will guide you through a series of steps to identify and resolve the issue.
Reset Your Router: Sometimes, the issue lies within your router itself. Resetting your router to its factory settings can clear up many issues. Use the reset button on your router. However, be aware that resetting will erase any custom router settings, so you will need to reconfigure the router after the reset.
Maintaining a Stable WiFi Connection: Proactive Measures
Once you've established a stable WiFi connection, taking proactive measures can help maintain its reliability over time.
Regularly update your wireless adapter drivers to the latest versions available.
Ensure your router's firmware is up to date. Router firmware updates often include performance improvements and security patches. Check your router manufacturer's website for the latest firmware and follow their instructions to perform the update.
Secure your WiFi network with a strong password. Use a strong WPA2 or WPA3 encryption protocol instead of using the older, less secure WEP protocol.
Position your router in a central location, away from obstructions, to optimize signal coverage.
These steps greatly improve your
