hp laptop wifi disabled by mobility center

Title: TURN Wireless ON WIFI HP LAPTOP - Windows Mobility Center
Channel: Rdn Channel
TURN Wireless ON WIFI HP LAPTOP - Windows Mobility Center by Rdn Channel
HP Laptop WiFi Nightmare? FIX It NOW!
Is Your HP Laptop's WiFi Driving You Crazy? Solutions Inside!
Ever found yourself staring at your HP laptop, willing the Wi-Fi to connect? We've all been there. The frustration is real, isn't it? But what if I told you there's usually a simple fix? Forget those tech support headaches. Let’s get your HP back online, fast.
Step 1: The Obvious Checks (Don’t Skip These!)
First things first, let's cover the basics. Are you sure the Wi-Fi is even switched on? Sounds silly, I know. However, it's a common oversight. Locate the Wi-Fi button on your keyboard. Often it’s a function key, like F2 or F12. Press it. Does the Wi-Fi light illuminate? If not, give it another try. Also, ensure airplane mode isn't activated. This is easily overlooked. Locate the airplane mode icon; it often looks like a tiny airplane. Is it toggled on? Switch it off immediately.
Step 2: The Router Revelation: A Quick Reset
Now, let's ensure your router is functioning correctly. Your laptop's Wi-Fi may be perfectly fine. The issue could stem from your internet source. Unplug your router. Wait a full 60 seconds. Plug it back in. Allow it to reboot completely. Observe the lights. Once everything is stable, attempt to connect again. This simple step resolves many Wi-Fi woes. Often, it’s all that's needed.
Step 3: Driver Drama: Updating is Key
Still no luck? Drivers are the next suspect. These are the software pieces which allow your laptop to "talk" to the Wi-Fi adapter. They sometimes become outdated or corrupted. Don’t panic though. Updating drivers is usually straightforward. Navigate to your Device Manager. You can find it by searching for it in the Windows search bar. Expand the "Network adapters" section. Right-click on your Wi-Fi adapter (it might be labeled as something like "wireless network adapter"). Select "Update driver." Choose "Search automatically for drivers." Let Windows do its thing. However, if this seems too complex, there's another option. You can visit the HP support website. Enter your specific laptop model. Download the latest Wi-Fi drivers. Install them. Afterward, restart your laptop.
Step 4: Network Troubleshooter: Your Built-In Ally
Windows offers a built-in network troubleshooter. This is surprisingly useful. It can often identify and resolve common Wi-Fi problems. Access the troubleshooter settings in your Windows settings. Type "troubleshoot" in the search bar. Select "Network and Internet." Run the troubleshooter. Follow the prompts. It will walk you through possible solutions. In fact, it's often the first thing, you should try.
Step 5: The Hidden SSID Hunt (and Security Settings)
Sometimes, the network name isn't visible. This is called a hidden SSID. Your router could be hiding its name. You may need to manually add the network connection. Click the Wi-Fi icon in the taskbar. Choose "Network and Sharing Center." Select "Set up a new connection or network." Choose "Manually connect to a wireless network." Enter the network name (SSID), security type, and password. Furthermore, check your security settings. Ensure your network security is WPA2 or WPA3. They provide the best protection and compatibility. The network settings configuration also offers this.
Step 6: Consider Interference: The Silent Culprit
Wi-Fi signals are vulnerable. They can be disrupted by interference. Electronic devices cause this. Microwaves, cordless phones, and even Bluetooth devices can interfere. Place your laptop nearer to the router. Remove any obstructions. In addition, you could switch to the 5 GHz band. This band is less prone to interference. Your router will have this setting.
Step 7: Hardware Health Check: Inspecting the Adapter
It's possible the Wi-Fi adapter itself has an issue. Rarely, this is the case. The adapter may be loose. Or, it may need replacing. This is the most advanced step on our list. If you are comfortable, you could open your laptop. Consult your HP laptop's service manual first. Locate the Wi-Fi adapter. Ensure it’s properly seated in its slot. If you aren't comfortable doing this, seek professional help. A computer repair shop is the best choice.
Step 8: Factory Reset: The Nuclear Option (Use with Caution!)
As a last resort, consider a factory reset. This will wipe your laptop. Back up your important files first. This returns your system to its original state. Afterward, reinstall your Wi-Fi drivers. If the problem persists after every other step, this can be the final resort. However, don’t dismiss it if all else fails.
Final Thoughts: Back Online and Ready to Go!
Hopefully, one of these steps has worked for you. Wi-Fi troubles can be incredibly frustrating. Also, remember to keep your laptop updated. Regular updates often include fixes. You now have a guide that provides many helpful solutions. You're equipped with the knowledge to diagnose and solve your HP laptop Wi-Fi issues. You can now stream, browse, and work without interruptions. Enjoy your fast and reliable connection!
Laptop to WiFi Printer? This Trick Makes it INSANELY Easy!HP Laptop WiFi Nightmare? FIX It NOW!
Hey everyone, ever felt like your HP laptop is a digital snail, agonizingly crawling through the internet instead of soaring through the digital skies? We've all been there! That frustrating WiFi lag, those buffering videos, the sheer inability to even load a simple webpage. It’s a modern-day tragedy, right? But don't despair! We're going to dive deep into the world of HP laptop WiFi woes and, more importantly, how to slay the beast. Consider this your survival guide, a battle plan for getting your HP laptop back on the fast track to internet bliss.
1. The WiFi Villain Revealed: Why Is My HP Laptop So Slow?
Before we charge in, swords drawn, we need to understand the enemy. What's really going on when your HP laptop's WiFi acts up? Think of your WiFi connection like a highway. Sometimes, there's a traffic jam (slow internet). Sometimes, the road is closed entirely (no connection!). The reasons vary, but it usually boils down to a few key suspects:
- Weak Signal: Distance from your router, walls, and other obstacles can significantly weaken your WiFi signal. Imagine trying to whisper across a football field – the message gets lost!
- Router Overload: If your router is handling multiple devices (phones, tablets, other laptops), it can get congested, like a rush hour on the highway.
- Driver Issues: Your network adapter (the piece of hardware that connects to WiFi) needs the right software (drivers) to function properly. Outdated or corrupted drivers are a common culprit.
- Interference: Other electronic devices (microwaves, Bluetooth devices) can interfere with your WiFi signal, creating static and slowing things down. Think of it as trying to listen to a radio station with a lot of interference.
- Software Conflicts: Sometimes, software or security programs can unintentionally block or slow down your internet connection.
- Malware Infections: In certain cases, malware can consume your internet bandwidth in the background.
2. Checking the Basics: Are You Really Connected?
Okay, before we start dismantling your laptop, let’s make sure we're not overlooking the obvious. It sounds silly, but check the following:
- Is WiFi Enabled? Look for the WiFi icon in your system tray (the bottom-right corner of the screen). Is it lit up, showing a connection? If not, click it and make sure WiFi is turned on.
- Are You Connected to the Right Network? Double-check that you're connected to your home WiFi network, not a neighbor's (or a random, unsecured one!).
- Has Your Router Been Rebooted? This is the classic tech support advice, and for good reason. Power cycling your router can often solve simple connectivity issues. Unplug it, wait 30 seconds, then plug it back in. It's like giving your brain a reset.
3. Location, Location, Location: Finding the WiFi Sweet Spot
Imagine you’re trying to plant a garden. Would you do it in a dark, rocky corner? Nope! Your WiFi signal also needs the right environment. Here’s how to optimize your location:
- Get Closer to the Router: This is often the easiest fix. The closer you are, the stronger the signal.
- Elevate the Router: Placing your router on a higher shelf or table can help it broadcast its signal better, similar to how a lighthouse works.
- Avoid Obstacles: Walls, especially thick ones made of concrete or brick, can block WiFi signals. Try to position yourself and your router in a more open area.
- Minimize Interference: Keep your router away from other electronic devices that could cause interference.
4. Driver Detective: Updating Your Network Adapter Drivers
This is a crucial step! Outdated drivers are a major cause of WiFi problems. Think of drivers as translators: they allow your laptop to "speak" the language of your network adapter. Here’s how to update them:
- Right-click the Start Menu and select "Device Manager."
- Expand "Network Adapters." You should see your network adapter listed (e.g., "Intel(R) Wireless-AC 9560").
- Right-click your network adapter and select "Update driver."
- Choose "Search automatically for drivers." Windows will search for the latest drivers online.
- If Windows doesn't find anything, You can try searching for drivers directly from the HP website (enter your laptop model). Or visit the website of the network adapter manufacturer (Intel, Realtek, etc.)
- Restart Your Laptop: After installing new drivers, restart your laptop to apply the changes.
5. Router Reset: Unleashing the Power of the Reboot
We touched on this earlier, but it deserves its own section. Resetting your router is the digital equivalent of a "restart." It clears temporary files, re-establishes connections, and often solves common WiFi problems.
- Unplug Your Router and Modem: If you have a separate modem and router, unplug both.
- Wait 30 Seconds: This gives them time to fully reset.
- Plug in the Modem: Wait for it to power up completely (usually indicated by solid lights).
- Plug in the Router: Wait for it to power up completely.
- Test Your Connection: See if your internet speed has improved.
6. Channel Surfing: Optimizing Your Router's WiFi Channel
Your router broadcasts its WiFi signal on a "channel." Just like radio stations, different channels can experience different levels of congestion. The best channel can vary from house to house, day to day.
- Access Your Router's Settings: You'll usually do this by typing your router's IP address (e.g., 192.168.1.1 or 192.168.0.1) into your web browser. Refer to your router's manual if you're unsure of the address.
- Log In: You'll need your router's username and password (usually found on the router itself).
- Find the WiFi Settings: Look for a section related to "Wireless" or "WiFi."
- Change the Channel: Most routers offer automatic channel selection, which is often a good starting point. However, you can also manually select a channel (1, 6, or 11 are often recommended for 2.4 GHz networks, but this varies). Experiment to find the best one for your environment.
- Save Your Changes and Reboot the Router to apply the new channel.
7. Bandwidth Boost: Choosing the Right WiFi Band (2.4 GHz vs. 5 GHz)
Modern routers often offer two WiFi bands: 2.4 GHz and 5 GHz. They’re like different roads. The 2.4 GHz band has a longer range but is slower and more prone to interference. The 5 GHz band is faster and less congested but has a shorter range.
- If you need speed and are close to your router, use the 5 GHz band.
- If you need a wider range, use the 2.4 GHz band.
8. Security Check: Protecting Your WiFi Network
An unsecured WiFi network is an invitation for hackers and can also slow down your internet.
- Use a Strong Password: Don't use the default password! Create a strong password that is unique and hard to guess.
- Enable WPA2 or WPA3 Encryption: These are the latest and most secure encryption protocols.
- Disable WPS (Wi-Fi Protected Setup): WPS is often vulnerable and can be exploited by hackers. Check your router's settings to turn it off.
9. Software Sleuthing: Identifying Software Conflicts
Sometimes, other software on your laptop can interfere with your WiFi connection.
- Temporarily Disable Security Software: See if disabling your antivirus or firewall improves your connection. If it does, you may need to adjust the settings of those programs to allow your WiFi to function smoothly.
- Check for Background Programs: Use the Task Manager (Ctrl+Shift+Esc) to see if any programs are consuming a lot of bandwidth.
- Uninstall Suspicious Software: If you suspect a program is causing problems, uninstall it and see if your WiFi improves.
10. Malware Mayhem: Scanning for Viruses and Malware
Malware can consume your internet bandwidth and significantly slow down your connection.
- Run a Full System Scan: Use your antivirus software to scan your entire system for viruses and malware.
- Use a Malware Scanner: Consider using a dedicated anti-malware scanner (like Malwarebytes) for a second opinion.
11. Power Management Puzzles: Adjusting Power Settings
Your power settings can sometimes affect your WiFi performance.
- Go to Power & Sleep Settings: Search for "Power & sleep settings" in the Windows search bar.
- Click "Additional power settings":
- Click "Change plan settings" next to your selected power plan.
- Select "Change advanced power settings":
- Expand "Wireless Adapter Settings" then "Power Saving Mode": Make sure the setting is set
Windows Mobility Center Disable and Enable in Windows 7 2015

By Dlshad Aziz Windows Mobility Center Disable and Enable in Windows 7 2015 by Dlshad Aziz
Tutorial Lengkap Cara Menggunakan Windows Mobility Center di Windows 10

By Harry Shares Tutorial Lengkap Cara Menggunakan Windows Mobility Center di Windows 10 by Harry Shares
HP WiFi switch location
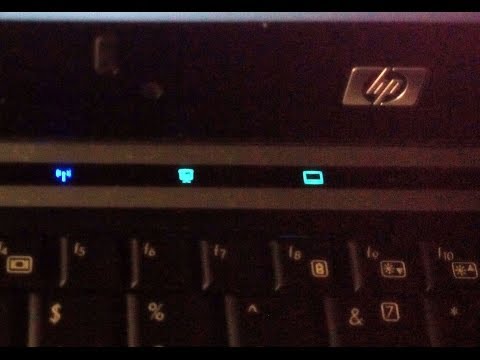
By Izzy Laif HP WiFi switch location by Izzy Laif

Title: Cara Mengatasi Wifi Laptop tidak Muncul
Channel: OTOTECH TV
Cara Mengatasi Wifi Laptop tidak Muncul by OTOTECH TV
Laptop Working
HP Laptop WiFi Nightmare? FIX It NOW!
We understand the frustration. You're in the middle of something important – a crucial online meeting, a vital download, or simply enjoying some downtime – and your HP laptop's Wi-Fi decides to stage a revolt. The dreaded "no internet connection" message, the constant buffering, the disappearing signal… it can feel like your digital world is crumbling. But before you hurl your laptop across the room (we've all been tempted!), know that solutions exist. This isn't a problem you have to endure. Let's get your HP laptop back online, swiftly and effectively.
Is It Truly a WiFi Issue? Pinpointing the Problem.
Before diving into fixes, let's make sure the issue is the Wi-Fi, and not something else entirely. Sometimes, the culprit hides in plain sight, masking as a network problem.
- Check the Obvious: Are other devices in your home, like your phone, tablet, or another computer, experiencing the same connectivity issues? If so, the problem likely lies with your internet service provider (ISP), your router, or your modem. Contact your ISP to report an outage or restart your modem and router.
- Laptop Specifics: If only your HP laptop is struggling, the focus shifts to its Wi-Fi adapter. Make sure the Wi-Fi switch on your laptop (if it has one) is turned on. Check the physical placement of your laptop. Walls, metal objects, and other electronic devices can interfere with the Wi-Fi signal. Try moving the laptop closer to the router.
- The Troubleshooter Tool: Windows has a built-in troubleshooter. Type "troubleshoot settings" in the Windows search bar and select "Troubleshoot" in the results. Then, under the "Find and fix other problems" section, select "Internet Connections" or "Network Adapter" and run the troubleshooter. This tool sometimes identifies and automatically fixes common issues.
Restarting the Fundamentals: Your Router, Your Laptop, and Your Wireless Adapter
Often, the simplest solutions prove the most effective. Think of this as a digital reset button.
- Restart Your Router and Modem: Unplug your router and modem from the power outlet. Wait a full 60 seconds. Plug the modem back in, wait for it to fully power up (usually indicated by solid lights), and then plug in the router. Allow the router to restart completely. This refreshes the network connection and often resolves temporary glitches.
- Restart Your Laptop: A simple restart can clear out temporary files and software conflicts that might be interfering with your Wi-Fi. Save any open work and shut down programs before restarting.
- Restart the Wireless Adapter: In Windows, type "Device Manager" in the search bar and open it. Expand “Network Adapters.” Locate your wireless adapter (it will likely be named something like "Intel Wi-Fi 6 AX200" or "Realtek RTL8822CE Wireless LAN 802.11ac PCI-E NIC"). Right-click on the adapter and select "Disable device." Wait a few seconds, then right-click again and select "Enable device." This resets the adapter and forces it to reconnect to the network.
Driver Dilemmas: Ensuring Optimal Performance
Outdated or corrupted drivers are a frequent cause of Wi-Fi woes. Think of drivers as the software translators that allow your laptop's hardware (the Wi-Fi adapter) to communicate with your operating system.
- Updating Drivers Through Device Manager: Open Device Manager (as described above). Right-click on your wireless adapter. Select "Update driver." Choose "Search automatically for drivers." Windows will search for the latest drivers online and install them.
- Manually Downloading Drivers: If the automatic update fails, visit the HP support website. Enter your laptop's model number (you can find this on a sticker on the bottom of your laptop or in the BIOS). Navigate to the "Drivers and Software" section. Search for the Wi-Fi adapter drivers and download the latest version specifically for your operating system (e.g., Windows 10 or Windows 11). Run the downloaded installer. Follow the on-screen instructions.
- Uninstalling and Reinstalling Drivers: In Device Manager. Right-click on your wireless adapter and select "Uninstall device." In the confirmation dialog box, check the box that says "Delete the driver software for this device" before clicking "Uninstall." Restart your laptop. Windows should automatically reinstall basic drivers. If not, use the drivers you downloaded from the HP Support website.
Network Connection Settings: A Deeper Dive
Occasionally, incorrect network settings can hobble your Wi-Fi. It's time to delve into these settings.
- Forget and Reconnect to the Network: Click the Wi-Fi icon in the system tray (usually in the bottom-right corner of your screen). Right-click on your Wi-Fi network name and select "Forget." Then, click the network name again, enter your Wi-Fi password, and reconnect. This forces your laptop to re-establish the connection from scratch, which can resolve configuration errors.
- IP Configuration Reset: Open the Command Prompt as an administrator (search "cmd" in the Windows search bar, right-click "Command Prompt," and select "Run as administrator"). Type the following commands, pressing Enter after each:
ipconfig /release
ipconfig /renew
ipconfig /flushdns
This releases your current IP address, obtains a new one, and clears the DNS cache, which can resolve website loading issues. - Checking Your Network Adapter Properties: In Device Manager, right-click your wireless adapter. Select "Properties." Go to the "Advanced" tab. Experiment with these settings. You can research the most common settings associated with your wifi adapter. For example, disabling "802.11n/ac/ax mode" can sometimes improve compatibility with less advanced routers.
Windows Updates: The Silent Fixers
The Windows Update system often includes fixes for known issues with hardware, including Wi-Fi adapters.
- Run Windows Update: Go to Settings > Update & Security > Windows Update. Click "Check for updates." Install any available updates, including optional driver updates. Restart your laptop after installing updates.
- Consider Optional Updates: In some cases, Windows Update might have optional driver updates. Check for these and install any that are related to your Wi-Fi adapter.
Router Configuration: Ensuring Optimal Signal Strength
Your router itself can play a role in Wi-Fi performance.
- Router Placement: Ensure your router is centrally located in your home, away from walls, metal objects, and other electronic devices. Elevate the router if possible.
- Channel Interference: Routers broadcast Wi-Fi signals on different channels. Nearby routers can interfere with each other, leading to slower speeds. Log into your router's settings (usually by typing the router's IP address, like 192.168.1.1, into your web browser; you'll need your router's username and password). Look for the Wi-Fi channel settings and try changing the channel. Some routers have an "Auto" setting that automatically selects the least congested channel.
- Router Firmware Updates: Check your router manufacturer's website for firmware updates. Outdated firmware can cause performance issues. Download and install the latest firmware version following the manufacturer's instructions.
Hardware Checks: Assessing the Physical Connection
Sometimes, the issue might be with the physical connection of the Wi-Fi adapter within the laptop. Important Note: This step involves opening your laptop, which can void your warranty. If you are not comfortable working with computer hardware, consider seeking professional help.
- Internal Inspection: If you are comfortable with it, carefully open your laptop (consult your laptop’s manual for instructions). Physically inspect the Wi-Fi adapter card (usually a small card near the battery). Ensure that it is securely seated in its slot. Check the antenna wires (thin wires that run from the adapter to the laptop's screen) and ensure they are properly connected.
- Professional Assistance: If you're not comfortable performing this inspection, take your laptop to a qualified repair technician. They can diagnose and fix hardware issues.
Malware and Software Conflicts: The Digital Saboteurs
Malware or conflicting software can sometimes interfere with your Wi-Fi connection.
- Run a Malware Scan: Perform a full scan using your preferred antivirus software (e.g., Windows Security, Norton, McAfee). Remove any detected malware.
- Check for Conflicting Software: Occasionally, other installed software can interfere with the Wi-Fi adapter. If you recently installed a new program, try uninstalling it to see if it resolves the issue. Consider running your laptop in a "clean boot" state to identify software conflicts (search for "clean boot" in the Windows search bar for instructions).
Contacting HP Support: When to Seek Assistance
If you've tried all the above steps and your HP laptop still struggles with Wi-Fi, it's time to contact HP support.
- Gather Information: Before contacting support, have your laptop's model number, serial number, and a detailed description of the problem ready. Also make a list of the troubleshooting steps you've already attempted.
- HP Support Channels: Visit the HP website and locate the support section. You can often find online chat support, phone support, or email support options. Describe the problem and the
