how to connect wifi to pc windows 8 laptop

Title: How to Connect to WiFi on Windows 8
Channel: HOWTECH
How to Connect to WiFi on Windows 8 by HOWTECH
Windows 8 WiFi Nightmare? Solved in 60 Seconds!
Windows 8 WiFi Woes: Conquer Connectivity Chaos in Record Time!
Have you ever stared at a flickering WiFi icon, your frustration mounting with each passing second? Windows 8 users, you’re not alone. Countless individuals have battled the beast of unreliable wireless connections. However, the good news is, that a solution exists, and it's faster than you might think. This isn't some complex technical jargon fest. Instead, it’s a straightforward guide. Prepare to reclaim your internet freedom, pronto!
(H2) The WiFi Witch Hunt: Identifying the Culprit
Before diving into immediate fixes, let's quickly assess the situation. Maybe your connection intermittently drops. Or perhaps, it refuses to connect altogether. Before jumping to conclusions, rule out the obvious. Is your router functioning correctly? Try rebooting it. Furthermore, ensure your other devices connect to the internet. This preliminary check helps pinpoint the issue's source. It saves you from unnecessary troubleshooting. If other devices work fine, focus on your Windows 8 machine. That suggests the problem resides within.
(H2) The Speedy Solution Suite: Quick Fixes for WiFi Woes
Right, let's tackle this internet predicament. We won't waste time with lengthy explanations. We're aiming for rapid results. Here are several tried-and-true methods.
The Network Troubleshooter Tango: Windows 8 harbors a hidden weapon. It's the built-in Network Troubleshooter. Access it through the Control Panel. Then, select "Network and Internet," followed by "Network and Sharing Center". Finally, choose "Troubleshoot problems." Let it work its magic. It might automatically detect and repair the culprit. It is a fantastic first step.
Driver Drama Demystified: Outdated or corrupted network drivers often trigger connection issues. Navigating the device manager is the key. Right-click the Start button. Then, select "Device Manager." Now, expand "Network adapters." Right-click your WiFi adapter. Select "Update driver software." Choose the "Search automatically for updated driver software" option. Hopefully, that resolves the issue!
Power Management Power Play (Sometimes it Helps): Windows often throttles network adapter power. Ironically, this can disrupt the connection. In "Device Manager," find your WiFi adapter. Right-click it and select "Properties." Then, navigate to the "Power Management" tab. Uncheck the "Allow the computer to turn off this device to save power" box. It can be a lifesaver.
Restarting the WLAN AutoConfig Service: Sometimes, a simple service restart works wonders. Press the Windows key + R. This action opens the Run dialog box. Type "services.msc" and press Enter. Locate the "WLAN AutoConfig" service. Right-click it and select "Restart." This quick fix often resolves connectivity issues.
(H2) Diving Deeper: Advanced Troubleshooting Techniques (If Needed)
If the above steps fail, do not panic. We have a few more tricks up our sleeve.
Flush the DNS Resolver Cache: Sometimes, cached DNS entries cause connection hiccups. Open the Command Prompt as an administrator. Type "ipconfig /flushdns" and press Enter. Then, restart your computer. This action can resolve website loading problems.
Check IP Configuration: Incorrect IP settings can cripple your connection. In the Command Prompt (as administrator), type "ipconfig /all." Examine your IP address, subnet mask, and default gateway settings. Ensure they match what your router expects. Otherwise, consult your router's manual for more information.
Update your Wireless Router's Firmware: Outdated router firmware can cause compatibility issues. Check your router manufacturer's website for updates. Upgrading the firmware can frequently resolve wireless connectivity problems. This is a long term solution.
(H2) Prevention is Key: Staying Connected in the Long Run
Now that we've fixed your WiFi, here’s how to prevent future headaches, going forward.
- Regular Driver Checks: Periodically check for driver updates. Check the Windows Update tool. Or simply, visit your device manufacturer's website.
- Router Maintenance: Reboot your router regularly. This resets the connection. Keep your router firmware up-to-date.
- Secure Your Network: Use a strong password for your WiFi. Also, enable WPA2 or WPA3 encryption. These steps will protect your WiFi.
- Monitor Your Connection: Use network monitoring tools. This can identify potential issues. They're great for early detection.
(H2) Wrapping it Up: WiFi Freedom Achieved!
Congratulations! You've successfully tackled the Windows 8 WiFi nightmare. You’ve done it in record time, too. Remember these tips, and stay connected. The internet is now yours to explore. So go ahead and enjoy your newly restored, blissful connection. You deserve it. However, should problems persist, consider contacting a tech support professional, but the steps outlined above should cover most issues. Happy surfing!
Laptop Won't Connect to Wi-Fi? This SHOCKING Fix Works Every Time!Windows 8 WiFi Nightmare? Solved in 60 Seconds!
Hey tech enthusiasts! Remember the days of Windows 8? It's like that quirky uncle at Thanksgiving – full of good intentions, but sometimes… well, let's just say the Wi-Fi connection was a bit of a drama queen. We've all been there, staring blankly at the "limited connectivity" notification, feeling our productivity – and our sanity – slowly drain away. If you're still wrestling with a Windows 8 machine, or just curious about this relic of operating systems, you're in the right place. We're going to conquer that Wi-Fi dragon and get you back online in, you guessed it, about a minute flat!
Why Windows 8 Wi-Fi Could Feel Like Rocket Science (But Isn't)
Let’s face it, Windows 8 had its quirks. The interface was a polar vortex for some, and the Wi-Fi… well, it was often a bottleneck. Think of it like trying to pour honey – sometimes it flows perfectly, and other times it’s a sticky, frustrating mess. The core issue often boiled down to drivers, network settings, or simply a glitch in the matrix. But don't worry, we're here to untangle that sticky mess!
1. Check Your Wi-Fi's Vital Signs: The Initial Diagnostic Check
Before we dive in and start fiddling with settings, let's do a quick health check. Is your router actually working? Are other devices connected? Sometimes the problem isn't Windows 8 at all; it's your internet provider or a router hiccup. Think of it like checking the patient's pulse before administering medicine.
- Restart the Router: This is step one for a reason! Unplug your router, wait 30 seconds, and plug it back in. It's the digital equivalent of a good night's sleep.
- Check Other Devices: Are your phone, tablet, or other laptops connected? If not, the issue likely lies with your internet service.
- Run the Windows Troubleshooter: Right-click the Wi-Fi icon in the system tray (that little connection symbol near the clock) and select "Troubleshoot problems." Windows 8 has a built-in troubleshooter that can sometimes work miracles.
2. The Driver's Seat: Updating Your Wi-Fi Adapter Driver
Drivers are the unsung heroes (or villains) of your computer. They tell your hardware how to behave. An outdated or corrupt driver can be the villain causing our Wi-Fi woes. Thankfully, updating them is usually pretty painless.
- Open Device Manager: Press the Windows key + X and select "Device Manager" from the menu. It's like the control panel for all your hardware.
- Find Your Network Adapter: Expand the "Network adapters" section. You'll see your Wi-Fi adapter listed (e.g., "Realtek Wireless LAN Adapter").
- Update the Driver: Right-click your Wi-Fi adapter and select "Update driver software." Choose "Search automatically for updated driver software." Windows will search for and install the latest drivers. It's like upgrading your car's engine!
3. Reinstalling Drivers: A Fresh Start for Your Wi-Fi
Sometimes, updating isn't enough. If your Wi-Fi is still acting up, try reinstalling the driver. Think of it as a complete reboot of your wireless connection.
- Uninstall the Driver: In Device Manager, right-click your Wi-Fi adapter and select "Uninstall." Be sure to check the box that says delete the driver.
- Restart Your Computer: Windows will automatically try to reinstall the driver upon reboot.
- If No Luck, Download and Install: Go to the manufacturer's website (e.g., Realtek, Intel, Broadcom) and download the latest driver for your specific Wi-Fi adapter and for Windows 8. Install it manually.
4. The Network Reset: Clearing the Cobwebs
Sometimes your network settings get a bit… cluttered, like a messy desk. A network reset will clear out the cobwebs and restore your network configuration to a clean slate.
- Open Network Connections: From the Start menu, search for "View Network Connections".
- Disable and Re-Enable: Right-click each connection listed and select "Disable." Then, right-click again and select "Enable." It’s similar to turning off and on your washing machine.
5. The Static IP Fix: A More Permanent Route
If the previous steps didn’t work, we might need a more hands-on approach. Setting a static IP address can sometimes stabilize the connection.
- Access Network and Sharing Center: Search "View Network Status and Tasks" in the start menu.
- Go to Adapter Settings: Click the "Change adapter settings"
- Go to Properties: Right-click on your wifi connection and select properties.
- Select IPV4 and modify the IP address, subnet mask, default gateway, and DNS servers. You'll usually find this information on your router or in your internet provider's documentation.
6. Compatibility Mode: Time Traveling for Your Apps
Some older software might need a jumpstart to function correctly. If the issues persist, you might be missing your software's network compatibility.
- Right-click the relevant program icon.
- Choose "Properties."
- Switch over to the "Compatibility" tab.
- Select "Run this program in compatibility mode for:"
- Choose Windows 7 or Windows XP: The exact setting depends on the program.
7. Firewall Interference: A Potential Roadblock
Your firewall, designed to protect you, can sometimes block legitimate network traffic.
- Open "Windows Firewall with Advanced Security."
- Look for "Inbound Rules"
- Ensure that your programs are allowed
- Or try temporarily disabling the firewall
8. Antivirus Antics: The Unseen Culprit
Sometimes, your antivirus software can interfere with the Wi-Fi connection. Temporarily disabling it, and then doing a test, is a good way to determine if it is responsible for the problem.
9. Check for Physical Obstacles: The Obvious (But Often Overlooked)
It's easy to get lost in the digital world, but sometimes the solution lies in the physical. Are there walls, metal objects, or other devices interfering with the signal? Try moving your laptop closer to the router.
10. Channel Congestion: A Crowded Airspace
Routers use channels to transmit Wi-Fi signals. If your channel is overcrowded with other Wi-Fi networks, your connection can suffer.
- Access Your Router's Settings: You'll need to log in to your router's configuration page (usually by typing its IP address into your web browser, e.g., 192.168.1.1 or 192.168.0.1).
- Change the Wireless Channel: Look for the "Wireless" or "Wi-Fi" settings and find the channel setting. Experiment with different channels (1, 6, or 11 are often good starting points) to find one that's less congested.
11. WPA/WPA2 Security: Staying Secure and Connected
Make sure that you are running the recommended Security settings, which is WPA2.
12. Power Saving Mode: The Subtle Energy Saver
Sometimes your Wi-Fi adapter gets a little too eager to save energy, leading to dropped connections.
- Access Device Manager
- Find your Wifi adapter
- Open properties
- In the "Power Management" tab, uncheck "Allow the computer to turn off this device to save power."
13. The Nuclear Option: System Restore as a Last Resort
If nothing else works, system restore can bring your computer back to a time before the Wi-Fi woes began.
- Open System Restore: Search for "Create a restore point" in the start menu.
- Choose a Restore Point: Select a date when your Wi-Fi was working correctly (before the issues started).
- Follow the prompts: Your system will revert to that state.
14. Resetting Windows 8: The Extreme Makeover
As a last resort, you can reset Windows 8 to its factory settings. This will erase everything, which is a good reason as to why we save it as a last resort. You will need to back up all of your important files.
- Open Windows Settings: Click the gear icon in the Start menu.
- Go to "Update and Recovery".
- Choose "Recovery".
- Click "Get Started" under "Reset this PC."
15. When to Call for Backup: Seeking Professional Help
If you've tried everything, it might be time to call in the professionals. Contact your internet service provider or a computer repair technician. Sometimes, you simply need a fresh pair of eyes.
Wrapping Up and Getting Connected!
There you have it! A roadmap to conquering the Windows 8 Wi-Fi nightmare. We've covered everything from the simple reboot to the more advanced troubleshooting techniques. Remember, tech problems are like puzzles. Don't be discouraged if
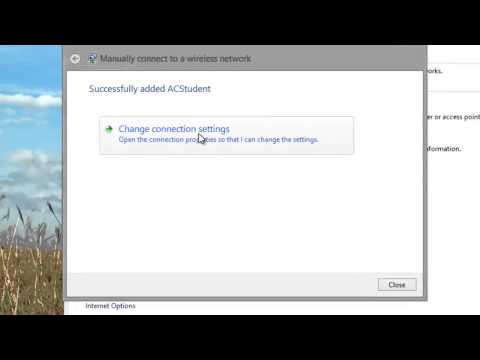
HP Laptop Ignoring 5GHz WiFi? This SHOCKING Fix Works!Connecting Manually to a Wireless Network in Windows 8 HP Computers HP Support

By HP Support Connecting Manually to a Wireless Network in Windows 8 HP Computers HP Support by HP Support
Windows 8 How to Connect to a Wireless Network
By Acer Support Windows 8 How to Connect to a Wireless Network by Acer Support
How To Connect To Wifi Wireless on Windows 8 Laptop or Desktop

By LuisTutorialTV How To Connect To Wifi Wireless on Windows 8 Laptop or Desktop by LuisTutorialTV
Title: Connecting to Wifi Windows 8
Channel: Academic Algonquin
Connecting to Wifi Windows 8 by Academic Algonquin
Laptop Wifi Connect
Windows 8 WiFi Woes: A Swift Resolution in Under a Minute!
Navigating the digital landscape can often feel like charting unknown waters, especially when seemingly simple tasks, like connecting to WiFi, become a source of frustration. For users of Windows 8, the struggle to establish and maintain a stable wireless connection was, unfortunately, a common complaint. We understand your pain, and we’re here to provide a definitive, actionable solution – one that will have you back online in the blink of an eye. Forget endless troubleshooting guides and convoluted technical jargon; we're focusing on results.
Identifying the Culprit: Common WiFi Issues in Windows 8
Before diving into solutions, identifying the source of your WiFi woes is paramount. Windows 8 users frequently experienced a range of connectivity problems. These ranged from the inability to detect available networks, to frequent drops in connection, and painfully slow internet speeds. Understanding the underlying causes allows for a more focused and efficient resolution. These are typically the common pain points:
- Incorrect Network Configuration: Misconfigured network settings, often stemming from incorrect password entry or outdated network protocols, were a significant hurdle.
- Driver-Related Problems: Outdated, corrupted, or incompatible network adapter drivers could render your wireless adapter practically useless. This is a situation that is usually easy to fix.
- Radio Interference: The presence of other electronic devices, such as microwaves, cordless phones, or other WiFi-enabled devices, could significantly disrupt the wireless signal.
- Power Management Conflicts: Aggressive power management settings within Windows 8 could intermittently disable the wireless adapter to conserve battery life, leading to connection instability.
- Service Issues: Certain background services responsible for network management might be disabled or malfunctioning.
The 60-Second Solution: A Step-by-Step Guide
Regardless of the specific issue you're facing, the following steps provide a streamlined method for diagnosing and resolving WiFi problems in Windows 8. We are focusing on efficiency, aiming for swift results. Prepare to execute these steps rapidly, as they are designed to get you back online fast.
Step 1: Restart Your Computer (and Router)
This may seem elementary, but it's often the most effective first step. A simple reboot of your computer and your router can clear temporary glitches, refresh connections, and resolve minor software conflicts. Unplug your router for about 30 seconds before plugging it back in to ensure a full restart. Then, restart your computer.
Step 2: Update Your Network Adapter Driver
Outdated drivers are often the root cause of WiFi issues. This solution is easily executed. Here’s how to update your network adapter driver:
- Access Device Manager: Press the
Windows key+Xsimultaneously, or right-click the Start button in the lower left corner of the screen. Select "Device Manager" from the menu. - Locate Network Adapters: In the Device Manager window, expand the "Network adapters" section. You should see a list of your network adapters (e.g., "Wireless Network Adapter," "Wi-Fi Adapter").
- Update Driver: Right-click on your wireless network adapter and select "Update driver." Choose "Search automatically for updated driver software." Windows will search for and install the latest driver.
- Restart Your Computer: After the driver installation is complete, Windows will prompt you to restart your computer. Do so immediately.
Step 3: Troubleshoot Network Connections
If the driver update doesn't resolve the issue, Windows 8 has a built-in troubleshooter that can automatically diagnose and fix common network problems.
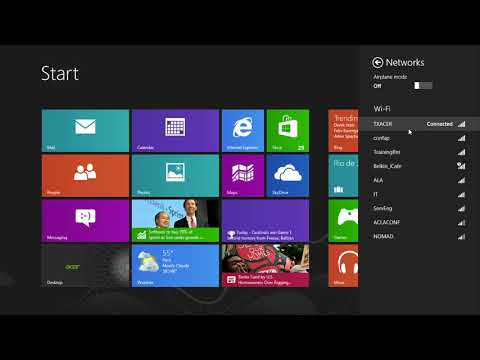
- Access Network and Sharing Center: Right-click on the WiFi or network icon in the system tray (lower right corner of the screen). Select "Open Network and Sharing Center."
- Run the Troubleshooter: In the Network and Sharing Center, click "Troubleshoot problems." Windows will scan for and attempt to resolve any network-related issues.
- Follow the Prompts: The troubleshooter will guide you through the resolution process. Follow the onscreen instructions.
Step 4: Check Power Management Settings
Sometimes, Windows 8's power management settings can inadvertently disable your wireless adapter to conserve battery life. To address this:
- Access Device Manager: As in Step 2, access the Device Manager.
- Go to Network Adapters: Expand the "Network adapters" section.
- Access Properties: Right-click on your wireless network adapter and select "Properties."
- Power Management Tab: In the properties window, go to the "Power Management" tab.
- Disable Power Saving: Uncheck the box that says "Allow the computer to turn off this device to save power." Click "OK."
Step 5: Verify Network Services
Certain services are essential for network functionality. Make sure these services are running.
- Open the Services App: Press
Windows key+Rto open the Run dialog box. Typeservices.mscand press Enter. - Locate Relevant Services: Find the following services in the list:
- "WLAN AutoConfig"
- "DHCP Client"
- "Network Connections"
- Check Service Status: Right-click on each service and select "Properties." In the "General" tab, verify that the "Startup type" is not "Disabled" and that the "Service status" is "Running." If not, set the "Startup type" to "Automatic" and click the "Start" button.
- Apply changes: Click apply and ok, then restart the computer, to make sure your computer takes the suggested changes.
Advanced Troubleshooting: Diving Deeper for Persistent Problems
While the above steps typically resolve the majority of WiFi issues, more complex problems may require a deeper dive. These advanced techniques are designed to tackle persistent connectivity problems and restore stable internet access.
1. Reinstalling the Network Adapter
In rare cases, the network adapter itself might be corrupted. Reinstalling it can often fix this.
- Uninstall the Adapter: In Device Manager, right-click on your wireless network adapter and select "Uninstall device."
- Restart Your Computer: Restart your computer. Windows will automatically attempt to reinstall the network adapter using the default drivers.
- Install Latest Drivers: If this doesn't work, download the latest drivers from the manufacturer's website and install them manually.
2. Resetting TCP/IP Stack
The TCP/IP stack is crucial for network communication. Resetting it can resolve conflicts that might be causing connectivity problems.
- Open Command Prompt as Administrator: In the Windows search bar, type "cmd." Right-click on "Command Prompt" and select "Run as administrator."
- Execute Commands: Type the following commands one at a time and press Enter after each:
netsh winsock resetnetsh int ip reset
- Restart Your Computer: Restart your computer after executing these commands.
3. Flushing DNS Cache
The DNS cache stores website addresses. If the cache contains outdated information, it can lead to connectivity problems. Flushing the cache solves this.
- Open Command Prompt as Administrator: As in Step 2, open Command Prompt as an administrator.
- Execute the Command: Type
ipconfig /flushdnsand press Enter. - Restart Your Computer: Restart your computer.
4. Checking for Radio Interference
As mentioned earlier, interference from other devices can disrupt the WiFi signal.
- Assess Your Environment: Identify potential sources of interference, such as microwaves, Bluetooth devices, and cordless phones.
- Change Your WiFi Channel: Log into your router's settings and change the WiFi channel. Experiment with different channels to find the one that offers the best performance.
- Relocate Your Router: Move your router away from other electronic devices to minimize interference.
5. Checking the Router Firmware
In some cases, the router's firmware itself may be out of date, causing connectivity issues.
- Check your router's manual: Identify the steps to update your router's firmware. You can find it in your router's manual.
- Download the Latest Firmware: Visit your router manufacturer's website to download the latest firmware for your specific router model.
- Update the Firmware: Follow the instructions provided by the manufacturer to update the firmware on your router.
Conclusion: WiFi Independence for Windows 8 Users!
WiFi problems can be incredibly frustrating. The solutions outlined above, especially the 60-second steps, provide a comprehensive, practical guide to resolve common WiFi issues in Windows 8. By diligently following these steps, you can quickly diagnose and fix the problems, re-establishing a reliable and stable wireless connection. Remember to be patient and systematic in your troubleshooting. In most cases, these steps will resolve your issues once and for all. Have confidence; you're now equipped to conquer your Windows 8 WiFi nightmare.
