acer laptop wifi antenna replacement step

Title: Replace the Wireless Antenna Cables HP Pavilion Gaming Notebook HP Support
Channel: HP Support
Replace the Wireless Antenna Cables HP Pavilion Gaming Notebook HP Support by HP Support
Acer Laptop WiFi Fix: Antenna Replacement SHOCKINGLY Easy!
Acer Laptop WiFi Woes? Antenna Replacement Demystified!
Let's face it, a flaky Wi-Fi connection is the bane of our digital existence. It can turn a productive workday into a frustrating exercise in patience. If you’re reading this, chances are your Acer laptop is suffering the same digital ailment. Fortunately, a weak Wi-Fi signal doesn't always mean a complete laptop overhaul. In fact, the fix might be surprisingly simple: antenna replacement. Prepare to be amazed at how easy it can be!
Spotting the Signal Saboteur: Identifying the Symptoms
Before you grab your screwdriver, let's diagnose the problem. What exactly indicates a faulty Wi-Fi antenna? Well, there are several telltale signs. Do you experience frequent disconnects? Is your signal strength often weak, even when close to the router? Does your connection speed crawl at a glacial pace? These are all red flags. Moreover, if other devices connect flawlessly to your Wi-Fi, yet your Acer struggles, the internal antenna is a prime suspect. Consequently, it's time to investigate. Generally, these problems point directly to the antenna. Therefore, be prepared to proceed.
Gathering Your Arsenal: Tools of the Trade
Good news! You won't need a degree in rocket science. Or expensive, specialized tools. You'll probably have everything you need already. First, you’ll need a small Phillips head screwdriver. A set of precision screwdrivers is helpful. Similarly, a plastic pry tool or guitar pick will be invaluable. These tools safely separate the plastic components. Additionally, consider an anti-static wrist strap. This protects your laptop's delicate electronics. Consequently, it's a wise investment. You'll also need a replacement Wi-Fi antenna. However, before you purchase, confirm the model number of your Acer laptop. Then, you can search online for the correct replacement. This ensures compatibility.
Operation: Antenna Overhaul - Step-by-Step
Okay, let’s get down to business. First, power off your laptop and unplug it. Next, remove the battery. This is a critical safety measure. Likewise, gather your tools and prepare your workspace. Ensure you're working in a well-lit area. Subsequently, find your laptop's service manual online. A model-specific guide provides valuable information. Now, locate the access panel for your Wi-Fi card. It's usually on the bottom of the laptop. It will be secured by a few screws. After, you must carefully remove these screws. Afterward, gently pry open the access panel. If you've never done this before, it can be an intimidating experience. However, the process is usually straightforward.
Unveiling the Wi-Fi Card: The Internal Inspection
Once you have access to the inside, find the Wi-Fi card. It will be a small card with two antenna wires attached. These wires are thin and delicate. Handle them with care. Then, disconnect the antenna wires. These typically snap off. Afterwards, remove the screw securing the Wi-Fi card to the motherboard. As soon as you detach the screw the Wi-Fi card can now be removed. Gently slide the Wi-Fi card out of its slot. Then, carefully align the new antenna wires of your antenna. Thus, you can now put the new antenna into the slot.
Reassembly and Reboot: Victory is in Sight!
Now, it's time for the reassembly. Firstly, place the new Wi-Fi card into its slot. Secure the screw that holds it in place. Then, reconnect the antenna wires to the Wi-Fi card. Make sure they snap securely. Next, replace the access panel. Subsequently, screw the access panel back into place. Therefore, your hardware replacement is complete! Reinsert the battery and plug in the power adapter. Power on your Acer laptop. Then, connect to your Wi-Fi network. Test your internet speed and connection stability. If everything is working well, you’ve successfully fixed your Wi-Fi! If it is not working, double-check your connections and ensure you’ve completed each step.
Troubleshooting Troubles: When Things Go Wrong
Not working? Don't panic! Occasionally, even the most careful DIY projects can encounter hiccups. For instance, try restarting your laptop. Sometimes, a simple reboot does the trick. Otherwise, check your Wi-Fi card drivers. Outdated drivers can cause problems. Furthermore, ensure your router is functioning correctly. Moreover, if you still can't connect, revisit the steps. Confirm everything is properly connected. Ultimately, if you're still struggling, consider professional help. A local computer repair shop can diagnose the problem quickly.
Beyond the Antenna: Other Potential Culprits
While antenna replacement is a common fix, other factors can affect Wi-Fi performance. For example, the router's distance and position can be a factor. Also, interference from other electronics can cause problems. Consider upgrading your router, you might have outdated hardware. Besides, ensure your laptop's drivers are up-to-date. Finally, keep your software updated. You can usually resolve most Wi-Fi problems yourself. But, sometimes, it requires a deeper dive.
Conclusion: Celebrate Your Success
You did it! You successfully replaced your Acer laptop's Wi-Fi antenna. You navigated the repair process with confidence and skill. You've saved time and money by tackling this task yourself. Now, enjoy a stable and fast Wi-Fi connection. Embrace the freedom of a reliable online experience. Remember, a little patience and a few simple tools can work wonders. Congratulations on your tech triumph!
Laptop Refuses 5GHz Wi-Fi? This SHOCKING Fix Works!Acer Laptop WiFi Fix: Antenna Replacement SHOCKINGLY Easy!
Hey everyone! Ever felt like your Acer laptop's WiFi is playing a cruel game of hide-and-seek? You're in a crucial online meeting, ready to binge-watch your favorite show, or simply trying to get some work done, and bam – the connection drops. We've all been there. The dreaded WiFi woes! But, after wrestling with endless troubleshooting steps, we stumbled upon a fix that’s… well, shockingly easy. And trust me, even if you're not a tech whiz, you can do this. It's about Acer Laptop WiFi and how to get it fixed.
1. The WiFi Woes: Understanding the Struggle
Let's be honest, a flaky WiFi connection is like a leaky faucet – constantly dripping and slowly driving you insane. We're talking about dropped connections, frustratingly slow download speeds, and the overall feeling that your laptop is actively sabotaging your digital life. We've all experienced it— that moment of panic when the little WiFi symbol in the corner turns into a sad, disconnected icon. It's a digital heartbreak! Before you even think about throwing your laptop out the window (we've all been tempted, right?), understand that the problem might just be a loose or failing WiFi antenna.
2. Identifying the Culprit: Is it Really the Antenna?
Before diving into the fix, let’s make sure the antenna is the problem. Think of it like a detective investigating a crime scene. First, rule out the obvious suspects: is your router working? Are other devices connected? If those are fine, then it's time to suspect the antenna. Here's a quick checklist:
- Weak Signal Strength: Are you constantly getting low bars, even when close to your router?
- Intermittent Connectivity: Does your connection drop in and out randomly?
- Slow Speeds: Are your download and upload speeds significantly slower than usual?
- Error Messages: Have you seen any specific error messages related to WiFi connectivity?
If you answered "yes" to a couple of these, chances are the antenna is indeed the culprit.
3. The Surprisingly Simple Solution: Antenna Replacement
Now for the good news! Replacing an Acer laptop's WiFi antenna is far easier than you might imagine. Seriously. It's not some complicated process involving wires and soldering (unless we're REALLY unlucky). It's more like a Lego set for adults.
4. Gathering Your Tools: The Essentials
Before you start, you’ll need a few things:
- A Replacement Antenna: These are readily available online (Amazon, eBay, etc.). Just make sure it's compatible with your specific Acer laptop model. Seriously, double-check. It’s like buying the right size shoe!
- A Small Phillips Head Screwdriver: The right size is crucial! We don’t want to strip any screws.
- A Plastic Spudger or Pry Tool (Optional): This helps you safely separate the laptop's components without causing damage. A thin credit card can sometimes work in a pinch.
- Anti-Static Wrist Strap (Recommended): This will protect your laptop's sensitive components from static electricity. Think of it as a tiny superhero for your electronics.
5. Finding Your Laptop's Model Number: The Key to Success
Okay, before we do anything else, you need your laptop's model number. This is like the DNA of your Acer. It's usually found on a sticker on the bottom of your laptop or sometimes inside the battery compartment. This is vital for ordering the correct antenna!
6. Step-by-Step Antenna Replacement: The Lego Metaphor Realized
Alright, time to crack open that laptop! Don't worry, we'll guide you through it.
- Power Down and Unplug: This is non-negotiable. Safety first!
- Remove the Battery (if possible): This adds an extra layer of safety.
- Locate the Antenna: The WiFi antenna is usually a small, delicate-looking component near the screen hinge or the edges of the laptop. There are often two or three thin wires that connect to the WiFi card.
- Remove the Back Panel: Depending on your Acer model, you'll need to remove the back panel that houses the WiFi card. This usually involves removing screws. Carefully unscrew and set aside.
- Disconnect the Wires: Gently disconnect the antenna wires from the WiFi card. They may be clipped or simply plugged in. Note the point where the wires were connected! This is vital for reassembling the laptop later. You can even take a picture for reference.
- Remove the Old Antenna: Gently peel off the old antenna from its mounting location inside the laptop case.
- Install the New Antenna: Attach the new antenna in the same location as the old one, making sure it’s properly secured.
- Connect the Wires: Reconnect the antenna wires to the WiFi card, ensuring they're in the same positions as before. Double-check your photo!
- Replace the Back Panel: Carefully replace the back panel and screw it back in.
- Reinstall the Battery: If you removed it.
- Power Up and Test: Turn on your laptop and see if your WiFi is back to its glory days!
7. Troubleshooting Tips: When Things Don't Go Smoothly
Even the best-laid plans can go slightly sideways. If you're still having trouble:
- Double-Check the Connections: Make sure all the antenna wires are securely connected to the WiFi card.
- Restart Your Router: Sometimes, a simple router reboot can work wonders.
- Check the Drivers: Ensure your WiFi drivers are up-to-date. Update them with windows update.
- Consult Online Resources: Search for specific tutorials for your Acer laptop model. There are tons of videos on YouTube!
8. The Cost Savings: Ditching the Repair Shop
Replacing an antenna yourself can save you a significant amount of money. Repair shop fees can be exorbitant, while the cost of a replacement antenna is usually just a few dollars. Plus, you get the satisfaction of fixing it yourself! That feeling of accomplishment? Priceless.
9. The Time Saved: Getting Back Online Faster
Waiting for a repair shop can take days, even weeks. By tackling the problem yourself, you can often have your laptop back up and running in an hour or less. That means less downtime and more time spent doing what you love online.
10. Avoiding Common Pitfalls: Mistakes to Steer Clear Of
- Forgetting the Model Number: Seriously, don't skip this step!
- Forcing Connections: Be gentle when disconnecting and reconnecting wires.
- Losing Small Screws: Keep a dedicated container to store screws. You don't want to lose the tiny screws that are scattered everywhere.
- Ignoring Static Electricity: Use that anti-static wrist strap!
- Not Backing Up Your Data: While this fix shouldn't erase anything, it's always smart to have a backup.
11. The Feeling of Empowerment: Becoming Your Own Tech Hero
Fixing your own laptop is incredibly empowering. You're learning new skills, saving money, and conquering a problem that once seemed insurmountable. Who needs a tech guru when you have yourself?
12. Beyond the Antenna: Other Potential WiFi Fixes
While the antenna is a common culprit, there are other things that can affect your WiFi:
- Router Placement: Ensure your router is in a central location, away from obstructions.
- Interference: Other electronic devices can interfere with your WiFi signal.
- Driver Issues: Outdated WiFi drivers can cause problems.
13. The Future of WiFi: Staying Connected
WiFi technology is constantly evolving. As speeds increase and our reliance on wireless connectivity grows, staying informed about WiFi best practices will keep you online and connected.
14. The Final Goodbye: The WiFi is fixed!
Well done! You did it! We hope this guide has helped you fix your Acer laptop's WiFi and regain your online freedom. Remember, if we can do it, you can do it too! Embrace the DIY spirit, and don't be afraid to get your hands dirty.
15. Celebrate the Victory: What's Next?
Now that your WiFi is fixed, it's time to celebrate! Maybe catch up on that show you've been meaning to watch, join that important meeting, or simply browse the web without the frustration of a lagging connection. Enjoy it!
Frequently Asked Questions
- Is replacing the WiFi antenna difficult? Not at all! It's surprisingly easy, even for beginners. We're here to help.
- Where can I buy a replacement antenna? Online retailers like Amazon and eBay are your best bets. Just make sure it's compatible with your Acer laptop model.
- What if the antenna replacement doesn't work? Double-check all connections, troubleshoot your router, and ensure your drivers are up-to-date. If all else fails, it might be a different hardware issue you need to consult with an expert.
- Do I need any special tools? A small Phillips head
How to remove and reattach WiFi antenna cables
By James Has Answers How to remove and reattach WiFi antenna cables by James Has Answers
Ganti wifi adaptor Acer Aspire 3 A314-14 dengan mudah cukup pasang adaptor ke shocked nya

By Solusi Komputer Ganti wifi adaptor Acer Aspire 3 A314-14 dengan mudah cukup pasang adaptor ke shocked nya by Solusi Komputer
How to repair WiFi antenna connector

By CRM How to repair WiFi antenna connector by CRM

Title: Laptop wifi antenna repair Perth
Channel: cirrus Link Repair
Laptop wifi antenna repair Perth by cirrus Link Repair
Wifi On Laptop Phone
Acer Laptop WiFi Fix: Antenna Replacement – A Simple, Step-by-Step Guide
Are you experiencing frustratingly slow or unreliable Wi-Fi connectivity on your Acer laptop? Dropped connections, weak signal strength, and intermittent browsing can cripple your productivity and enjoyment. Before you resign yourself to the limitations of your current setup or, worse, consider replacing your entire machine, understand that the solution might be far simpler than you imagine. Often, the culprit lies not in complex software issues or motherboard failures, but in a readily accessible and surprisingly straightforward component: the Wi-Fi antenna. This guide delves into the process of replacing your Acer laptop's Wi-Fi antenna, offering a detailed, step-by-step walkthrough designed to empower you to restore your wireless performance with minimal technical expertise.
Diagnosing the Problem: Is Your Antenna the Culprit?
Before you grab your screwdriver, it’s crucial to determine if the antenna is indeed the source of your Wi-Fi woes. Several tell-tale signs can point to a failing or damaged antenna:
- Weak Signal Strength: Notice consistently low signal bars, even when in close proximity to your router.
- Intermittent Connectivity: Frequent disconnections from your Wi-Fi network, requiring you to repeatedly reconnect.
- Slow Download and Upload Speeds: Significantly reduced data transfer rates compared to what you typically experience.
- Inability to Connect: Complete inability to detect or connect to any Wi-Fi networks, despite other devices functioning normally.
- Physical Damage: Obvious signs of wear and tear, such as a broken antenna wire or damage to the antenna itself (though this is less common internally).
If you’re experiencing one or more of these symptoms, the Wi-Fi antenna is a prime suspect. However, it’s essential to rule out other potential causes, such as outdated drivers (update these first!), router issues (reboot!), or interference from other electronic devices. A thorough diagnostic can save you time and effort.
Gathering Your Arsenal: Tools and Materials You'll Need
Successfully replacing your Acer laptop's Wi-Fi antenna requires a few essential tools and materials. Having these prepared before you begin will streamline the process and minimize any potential frustration.
- Replacement Wi-Fi Antenna: This is your primary component. Ensure you purchase a replacement specifically designed for your Acer laptop model. Check your laptop’s service manual, the printed part number, or the model information to ensure compatibility. Researching the original specifications and selecting an upgrade (if compatible) can also improve your wireless performance.
- Small Phillips Head Screwdriver: This is the workhorse tool for disassembling your laptop. A set of precision screwdrivers often includes a good range of sizes; this is helpful to have at your disposal.
- Plastic Opening Tools (Optional but Recommended): These thin, non-marring tools help pry open the laptop's casing without scratching the plastic. Credit cards or guitar picks can also serve a similar purpose.
- Anti-Static Wrist Strap: Protects sensitive electronic components from electrostatic discharge, which can damage them. This is a vital accessory.
- Small Container or Magnetic Tray: To keep the screws organized and prevent them from rolling away. Labeling the containers provides for easy reassembly.
- Tweezers (Optional): Helpful for handling small screws, antenna connectors, and other minute components.
- Flashlight (Optional): Can be necessary for illuminating details inside the laptop's chassis.
- Cleaning Cloth and Isopropyl Alcohol (Optional): For cleaning grime.
Step-by-Step Antenna Replacement Procedure
Now, let’s dive into the actual replacement process. Follow these steps precisely, and you’ll be back online in no time.
- Power Down and Disconnect: Completely shut down your Acer laptop and disconnect the power adapter. Remove the battery if it's easily accessible (consult your laptop’s user manual for instructions). Disconnecting the power source is an absolute must.
- Locate the Access Panel: The Wi-Fi antenna is positioned. This is dependent on the model in your Acer laptop, however it's typically located at the bottom of the laptop. Oftentimes, it's behind a small access panel secured by one or two screws. Consult your laptop's service manual to determine the exact location and how to remove the access panel, which may involve sliding a thin tool to release it.
- Unscrew and Remove the Access Panel: Using your screwdriver, carefully unscrew the access panel securing screw(s). Gently remove the access panel (it might need to be slid, pried, or lifted, depending on the model).
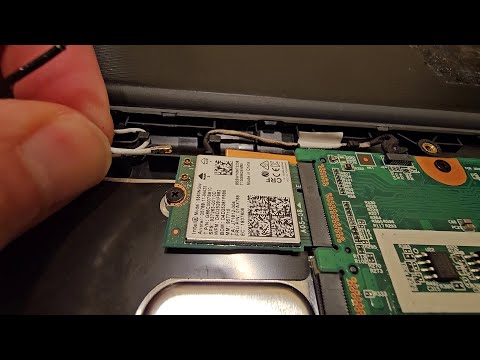
- Identify the Wi-Fi Card: Inside the access panel, you’ll find the Wi-Fi card. It’s a small circuit board, usually rectangular or square, with a connector at the end. The Wi-Fi antenna wires are connected to the Wi-Fi card.
- Disconnect the Antenna Wires: Carefully detach the antenna wires from the Wi-Fi card. These wires are often secured by a snap or clip. Be gentle; excessive force could damage the connector. Many systems employ tiny spring-loaded connectors that are unattached by applying pressure. Using tweezers can be helpful here. Take care to note the color coding of each antenna wire. If there is any, mark the wires to facilitate reassembly.
- Remove the Wi-Fi Card: Unscrew the screw securing the Wi-Fi card. Then, gently pull the Wi-Fi card out of its slot. Usually, it’s secured by a clip, so be careful not to exert too much force.
- Position the Antenna Wires: Take note of where the Wi-Fi antenna wires connect to the internal frame of the laptop. You can usually trace them back, or note which cable goes where. Often, these wires are routed along the edges of the internal plastic frame.
- Install the New Antenna: Carefully connect the new antenna wires to the correct connector(s) on the Wi-Fi card. Ensure they snap securely. If applicable, properly insert the Wi-Fi card into its slot and secure it with the screw. It is imperative that the wires are connected for the Wi-Fi card to connect.
- Route the Antenna Wires: Carefully route the antenna wires in the exact same way, adhering them to the same plastic frame.
- Reassemble and Test: Replace the access panel and secure it with the screw(s). Reinsert the battery (if removed) and reconnect the power adapter. Power on your Acer laptop and test your Wi-Fi connection. Ideally, you should recognize the improved signal strength and connectivity.
- Driver Issues: Should your antenna replacement fail to show any change, return to your desktop and check for driver issues or update the drivers.
Troubleshooting Common Issues
Even with meticulous execution, a few issues may arise. Here’s how to troubleshoot them:
- No Wi-Fi Connection: Double-check all wire connections, ensuring they are firmly seated. Verify that the Wi-Fi card is correctly installed in its slot. Check your router.
- Weak Signal: Ensure the antenna wires are routed correctly and aren't pinched or damaged. Position your laptop closer to the router for an initial test.
- Incompatible Antenna: If the replacement antenna is not compatible with your laptop model, it may not function correctly. Double-check the specifications.
- Driver Problems: Although unlikely with an antenna replacement, ensure your Wi-Fi drivers are up to date.
Beyond the Basics: Optimizing Your Wi-Fi Performance
While the new antenna provides a fresh start, several additional steps can further enhance your Wi-Fi performance.
- Router Placement: Position your router in a central, elevated location, away from obstructions like walls and metal objects.
- Router Firmware Updates: Regularly update your router's firmware to benefit from bug fixes and performance improvements.
- Channel Selection: Experiment with different Wi-Fi channels on your router to minimize interference from other wireless networks in your area.
- Upgrade Your Router: If you're using an older router, consider upgrading to a newer model that supports the latest Wi-Fi standards (e.g., 802.11ax or Wi-Fi 6).
Conclusion: Reclaiming Your Wireless Freedom
Replacing your Acer laptop's Wi-Fi antenna is a straightforward repair that can dramatically improve your wireless experience. By following these simple steps, you can troubleshoot and resolve connectivity issues, regain faster speeds, and avoid costly device replacements. Remember that practice ensures perfection, so take your time, be patient, and don’t hesitate to consult your Acer laptop’s service manual for model-specific instructions. With a few simple tools and a little bit of effort, you can confidently restore your wireless connectivity and re-establish your productivity.
