apple laptop wifi not working

Title: How To Fix MacBook Not Connecting to Wi-Fi or Wi-Fi Not WorkingSOLVED
Channel: Tricknology
How To Fix MacBook Not Connecting to Wi-Fi or Wi-Fi Not WorkingSOLVED by Tricknology
apple laptop wifi not working, why is the wifi on my mac not working
Apple Laptop WiFi Dead? FIX THIS NOW!
Apple Laptop WiFi Woes? Don't Panic! Here's How to Reconnect
Is your Apple laptop refusing to connect to the internet? Is the Wi-Fi icon stubbornly displaying a disconnect symbol? Before you launch your laptop across the room in a fit of technological frustration, take a deep breath. Believe me, you're not alone. Many Apple users encounter this infuriating issue. But thankfully, fixing a dead Wi-Fi connection on your beloved MacBook or MacBook Pro isn't typically rocket science. Let's get you back online, swiftly and efficiently.
Troubleshooting 101: The Obvious Checks First
First things first. Let's tackle the fundamentals. Often, the simplest solutions are the most effective. Therefore, we'll start with these basic yet crucial checks. Consequently, rule out the obvious culprits before diving into more complex troubleshooting.
- Is Wi-Fi Enabled? This sounds incredibly basic, I know. However, let’s not overlook it. Click the Wi-Fi icon in the menu bar. Is Wi-Fi turned on? If not, click it to enable it.
- Network Visibility: Does your laptop even see your available Wi-Fi networks? Scroll through the available networks list. If your network isn’t showing up, that’s a problem.
- Airplane Mode Debacle: Have you accidentally engaged Airplane Mode? Look for the little airplane icon in the menu bar. If it's on, disable it. This usually is a simple fix.
- Router Reboot: Your router is the unsung hero of your home network. Usually, the issue rests there. Unplug your router and modem for about 30 seconds. Plug them back in and wait for them to fully restart. After this, connect your Apple laptop and see if it connects.
- Password Verification: Double-check your Wi-Fi password. Ensure you're entering the correct password carefully. Obviously, a typo can cause connection failures.
Digging Deeper: Software Solutions for Wi-Fi Issues
If the basic checks fail, let's explore some software-focused solutions. Remember, we aim for a quick resolution.
- Restart Your Apple Laptop: A basic restart often works wonders. It can clear any glitches that may interrupt the Wi-Fi connection. In fact, restarting clears temporary files.
- Network Service Order: Sometimes, your laptop prioritizes the wrong network connection. Go to System Settings > Network. In the left-hand pane, you'll see a list of network connections. Click the gear icon at the bottom and choose "Set Service Order." Drag your Wi-Fi connection to the top, above any other connections.
- Forget and Reconnect: Your laptop might have a corrupted profile of your Wi-Fi network. Go to System Settings > Wi-Fi. Click the "…" icon next to your network in the list. Then, choose "Forget This Network." Reconnect to your Wi-Fi. Enter your password when prompted.
- Update Your Software: Make sure your macOS is up-to-date. Go to System Settings > General > Software Update. Outdated software can certainly cause compatibility issues. Similarly, updated drivers can solve networking bugs.
- Network Diagnostics: macOS has built-in network diagnostic tools. You can run them to help identify the problem. Go to Spotlight (the magnifying glass icon in the menu bar). Type "Network Utility" and open the app. Follow the diagnostic tests.
Advanced Troubleshooting: When Things Get Tricky
When the aforementioned steps don't work, let's delve into more advanced solutions. These methods can address complex problems.
- Check Your Router's Settings: Sometimes, the problem isn't with your laptop. Check your router's settings. Specifically, verify that your router isn't blocking your Mac's MAC address. Also, ensure it is broadcasting the Wi-Fi signal correctly.
- Reset Your Network Settings: This resets your network settings to their default values. Go to System Settings > Network. Click the gear icon at the bottom and choose "Remove Service." Then, add a new Wi-Fi connection. This can resolve stubborn connection errors. As a result, this removes any corrupted network configurations.
- Create a New Network Location: This is a great way to isolate network issues. Go to System Settings > Network. Click the "…" icon near the top right. Choose "Manage Virtual Locations." Create a new location. This helps to bypass a problematic configuration.
- Reinstall macOS (Last Resort): This is a drastic measure. If all else fails, consider reinstalling macOS. However, back up your data before this step. This will reset your system to its original settings. Nonetheless, it's a powerful solution for severe software problems.
Hardware Considerations: Is Your Wi-Fi Card the Culprit?
While rare, hardware issues can cause Wi-Fi problems.
- Internal Damage: Has your laptop suffered any physical damage? Dropping or hitting the laptop can harm the Wi-Fi antennas.
- External Interference: Position your laptop away from potential sources of interference. This could include other electronic devices. These devices might affect your Wi-Fi signal.
- Professional Help: If you suspect a hardware issue, seek professional repair. Contact Apple Support or an authorized service provider. They can diagnose and fix hardware problems. Ultimately, this is a safe and reliable option.
Final Thoughts: Getting Back Online
Don't despair. Wi-Fi issues are common. By systematically working through these steps, you should be able to get your Apple laptop connected again. Persistence and logical troubleshooting are key. So, don’t give up. With a little patience and effort, you'll soon be back online. Enjoy your browsing and working! Now, go fix that Wi-Fi!
HP Laptop WiFi 6 Upgrade: Blazing-Fast Internet, Guaranteed!Apple Laptop WiFi Dead? FIX THIS NOW!
Okay, let's be honest, there's nothing quite as infuriating as your trusty Apple laptop suddenly deciding it hates the internet. One minute you're cruising, getting things done, maybe binge-watching a show, and the next, BAM! The dreaded "no internet connection" message appears. It's like your digital lifeline has been severed, and you're marooned on a deserted island of productivity. We've all been there, right? Don't worry; we're going to dive deep and figure out how to bring that Wi-Fi back to life. Think of this as your rescue kit.
1. The Silent Scream: Recognizing the Wi-Fi Problem
First things first, let's make sure we're dealing with a real problem and not just a temporary hiccup. Is your Wi-Fi signal icon in the top-right corner of your screen showing a sad little Wi-Fi symbol, or perhaps a cross through it? Does your laptop show “No Internet Connection”? Or is it just…slow? These are the first signs of trouble. It's like spotting storm clouds on the horizon before the downpour hits. Let's troubleshoot the issues before they cause further interruption.
2. The Obvious Checks: Don't Skip the Basics!
Before we start tinkering with things, let's cover the fundamentals. It's like checking the fuel gauge before assuming your car has a major engine problem. We've all done these things, but it's important to make sure!
- Is Wi-Fi turned on? Seriously. Look for the Wi-Fi symbol in your menu bar (top right). Click it. Is Wi-Fi "off"? Turn it on. Sometimes the simplest solutions surprise us.
- Is the Router, Routering? Check your router. Is it powered on? Are the lights flashing like a rave, or are they a dull red? Try unplugging it, waiting thirty seconds, and plugging it back in. This is the tech equivalent of a reset button for the internet.
- Airplane Mode: Arch-Nemesis: Double-check that Airplane Mode isn’t enabled. It’s a sneaky culprit. Click the Wi-Fi icon and ensure Airplane Mode isn't activated. If it is, just disable it!
3. Restarting: A Digital Therapy Session
Sometimes, your laptop just needs a little "me time." A simple restart can work wonders, clearing out any temporary glitches that might be messing with your Wi-Fi. Think of your laptop like a tired human. Sleep cures most of the problems. To restart, click the Apple menu (top left), and select "Restart."
4. Diving Deeper: Troubleshooting the Network Preferences
If the easy fixes didn't work, we'll move into more intricate territory. Your network preferences are like the secret control panel for your Wi-Fi connection.
- Opening Network Preferences: Click the Apple menu, then go to "System Preferences" (or "System Settings" on newer macOS versions). Check the "Network" settings.
- Checking for Connections: Do you see your Wi-Fi network listed under "WiFi"? If not, something is drastically wrong here.
- Preferred Networks: Ensure your Wi-Fi network is listed and that "Remember networks this computer has joined" is checked.
- Forget and Rejoin the Network: Click the "Advanced…” button in the Network preferences of the Wi-Fi section, select your network under the "Preferred Networks" box, and click the “-“ button to remove the preference. This is like performing a computer exorcism! Now close this window and rejoin your network using your password.
- DNS Servers: The Internet's Phonebook: Sometimes, the issue lies with your DNS servers (Domain Name System). These are like the phonebook of the internet, translating website names into IP addresses. In the same Advanced settings window, click on the "DNS" tab. Consider swapping those numbers with a free public DNS service from Google (8.8.8.8 and 8.8.4.4) or Cloudflare (1.1.1.1 and 1.0.0.1) to see if it solves the issue.
5. Driver Issues: Keeping Your Mac's Software Healthy
Your Wi-Fi adapter needs specific software (drivers) to communicate with your network. Outdated or corrupted drivers can cause issues. While macOS handles driver updates automatically most of the time, sometimes things slip through the cracks. However, a MacBook’s software updates typically cover network drivers. Still, it’s worth checking for general software updates. Go to System Settings, search for "Software Updates," then update any pending installations.
6. The Firewall: Is It Blocking You?
Your firewall, like a digital security guard, might accidentally be blocking your Wi-Fi access. Head back into System Preferences (or System Settings) and find the "Security & Privacy" section. Click on the "Firewall" tab. Make sure the firewall isn't overly restrictive. You can try temporarily turning it off to see if it resolves the issue. If it does, you may need to adjust your firewall settings to allow Wi-Fi. You may even need to troubleshoot this.
7. Interference: Digital Noise Pollution
Your Wi-Fi signal, like any radio wave, can be affected by interference from other devices, such as microwaves, Bluetooth devices, and even other Wi-Fi networks. Try these steps:
- Relocate: Move your laptop closer to the router, if possible.
- Channel Surfing: If you know how to access your router's settings, try switching to a less crowded Wi-Fi channel. A Wi-Fi analyzer app (available on the App Store) can help find the least congested channel.
- 5 GHz vs. 2.4 GHz: Most modern routers support both 2.4 GHz and 5 GHz bands. The 5 GHz band is generally faster, but the 2.4 GHz band travels farther and penetrates walls better. Try switching between the two on your laptop.
8. Resetting the SMC (System Management Controller)
The SMC controls many of your Mac's hardware functions, including Wi-Fi. Resetting it can sometimes resolve connectivity problems. The procedure for resetting the SMC varies depending on your Mac model. For models with a removable battery, you can take it out and put it back after a few seconds. For others, search online for a correct procedure, tailored to your model.
9. Resetting NVRAM/PRAM
NVRAM (Non-Volatile Random-Access Memory) and PRAM (Parameter Random Access Memory) store certain settings, including network and volume settings. Resetting them can sometimes help resolve Wi-Fi issues. Turn off your Mac. Turn it back on, and immediately press and hold the Option + Command + P + R keys. Keep holding them until you hear the startup chime a second time (or see the Apple logo appear and disappear twice).
10. Network Diagnostics: macOS's Built-In Detective
macOS has built-in diagnostic tools can help identify potential problems. Hold down the Option key and click on the Wi-Fi icon in the menu bar. Select "Open Wireless Diagnostics…" Follow the on-screen prompts, and it will try to identify and suggest solutions.
11. Hardware Failure: The Ultimate Diagnosis
If you've tried everything and your Wi-Fi still won't connect, you might have a hardware problem. This is like a car with a broken engine, requiring assistance.
- External Wi-Fi Adapters: As a temporary workaround, you can try using an external USB Wi-Fi adapter. This will at least let you get back online and buy some time.
- The Genius Bar: The most definitive solution is to take your MacBook to an Apple Store or an authorized service provider. They can run diagnostic tests and repair or replace any faulty hardware.
12. Consider a Complete Reinstall of macOS
If all else fails, a clean install of macOS might be what you need. Warning, this will erase the content of your computer. In this case, save your files and media on an external hard drive.
13. Using a Hotspot: The Instant Internet Connection
If you need something immediate, you can use a hotspot from your mobile device as a backup connection. This will quickly provide you with the internet connection you need should you have a mobile data plan.
14. Updating Your Router Firmware
Just as you update your device, your router also has firmware that needs to be current. Check your router's manufacture website to determine if your router's firmware needs to be updated.
15. Prevention is Key: Keeping Your Wi-Fi Happy
Once your Wi-Fi is back in action, let's prevent future headaches.
- Regular Updates: Keep your macOS and router firmware updated.
- Security Practices: Use a strong password for your Wi-Fi network and enable WPA3 encryption.
- Strategic Placement: Place your router in a central location, away from obstacles and interference sources.
Conclusion: Back to the Digital World!
There you have it – a comprehensive guide to troubleshooting your Apple laptop's Wi-Fi woes. It might be a simple fix, or it might require a deeper dive. But armed with these steps, you're well-equipped to diagnose and (hopefully) resolve the issue. Getting your Wi-Fi back
Laptop's Secret WiFi Trick: Blazing-Fast Internet Anywhere!how to fix wifi & network problems macbook

By My iphone support how to fix wifi & network problems macbook by My iphone support
How To Fix MacBook WiFi Not Working - Full Guide

By GuideRealm How To Fix MacBook WiFi Not Working - Full Guide by GuideRealm
Unable To Connect to WiFi On Mac The WiFi Network Could Not Be Join On Mac.
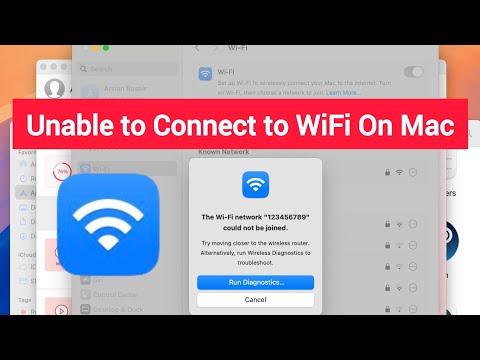
By My iphone support Unable To Connect to WiFi On Mac The WiFi Network Could Not Be Join On Mac. by My iphone support

Title: MacBook Air A1466 WIFI not working Repairs Even with wifi card replaced
Channel: Reset Lab
MacBook Air A1466 WIFI not working Repairs Even with wifi card replaced by Reset Lab
Wifi On Laptop
Apple Laptop WiFi Woes: A Comprehensive Troubleshooting Guide to Get You Back Online Instantly
Is your Apple laptop stubbornly refusing to connect to the internet? Are you staring at that dreaded WiFi icon with its crossed-out symbol, feeling increasingly isolated from the digital world? We understand the frustration. The modern world runs on connectivity, and a dead WiFi connection can grind your productivity to a halt, sever essential communication lines, and disrupt your access to everything from work files to streaming entertainment. But don’t despair! We’re here to guide you, step-by-step, through a comprehensive troubleshooting process designed to revive your Apple laptop's wireless capabilities and get you back online in no time.
1. Initial Diagnostics: Pinpointing the Source of the Problem
Before diving into complex solutions, let’s conduct a preliminary assessment to understand the root cause of your WiFi issues. This initial diagnostic process will help us narrow down the possibilities and focus our efforts where they’re most needed.
The Obvious Checks: Start with the fundamentals. Is your WiFi switch (often a dedicated key on your keyboard or accessible through the menu bar) turned on? This might seem overly simple, but it's surprisingly easy to overlook. Also, confirm that the WiFi network you're attempting to connect to is actually broadcasting a signal. Other devices in your home, like your smartphone or another laptop, should be able to detect the same network. If they can't, the issue likely lies with your router or internet service.
Restart and Refresh: A classic but often effective solution: restart your Apple laptop. This simple action can clear temporary glitches and force your system to re-establish its network connections. After the reboot, also restart your router and modem. Allow a few minutes for these devices to fully initialize before attempting to reconnect. Power cycling your hardware can resolve several network connectivity problems.
Airplane Mode Examination: Make sure Airplane Mode is disabled. Sometimes by accident, this setting is turned on which will disable the WiFi connection. Check in System Preferences or in the Menu Bar to turn this off.
2. Software Solutions: Addressing System-Related WiFi Conflicts
If the basic checks yield no results, it's time to investigate software-related conflicts that could be hindering your WiFi connectivity.
Operating System Updates: Ensure your Apple laptop's operating system (macOS) is up-to-date. Apple frequently releases updates that include crucial bug fixes and performance improvements, some of which can address known WiFi issues. Navigate to System Preferences > Software Update to check for and install any available updates.
Driver Verification and Reinstallation: Although macOS generally handles driver management seamlessly, issues can occasionally arise. While there is not a singular dedicated driver for WiFi cards, the correct functionality is usually built into the OS. A corrupt or outdated driver can lead to connectivity problems. While you can't uninstall a specific driver, you can try resetting your network settings.
Network Preference Reset: Resetting your network preferences can wipe out corrupted settings and force your system to re-establish its network connections from scratch. Access this setting from System Preferences > Network. In the Network settings, select the Wi-Fi tab, and then click "Advanced." In the "Advanced" tab, remove all preferred networks and click OK, and then “Apply.”
DNS Server Configuration: Your Domain Name System (DNS) servers translate website addresses into numerical IP addresses, enabling your laptop to locate and connect to the internet. Incorrect DNS settings can cause connection problems. Try manually configuring your DNS servers to use a public DNS provider. In the Network settings, select the Wi-Fi connection and click "Advanced." In the DNS tab, click the "+" button and enter a known public DNS server address, such as 8.8.8.8 (Google) or 1.1.1.1 (Cloudflare). Click "OK" and then "Apply.” This ensures your computer is resolving website addresses correctly. You can also set a secondary DNS server to provide redundancy, such as 8.8.4.4 or 1.0.0.1.
3. Hardware Troubleshooting: Examining Physical Connectivity
If software solutions fail to resolve the issue, the problem may reside in the hardware components of your laptop.
Physical Inspection: Examine the exterior of your laptop for any signs of physical damage, particularly around the antenna housings and the internal components if you're comfortable opening the device.
Antenna Placement: Wi-Fi signal strength can sometimes be improved by adjusting the physical location of your laptop. Make sure your laptop is not blocked by walls, metal objects, or other electronics that could interfere with the wireless signal. Even moving a few feet can sometimes make a significant difference in receiving a stronger signal.
Internal Component Check (Advanced): If you're comfortable with hardware and have the necessary tools, you may consider opening your Apple laptop. However, do this with caution and refer to the manufacturer's guidelines/manual as it may void any warranty. Look for any loose connections or visible damage to the wireless card or antenna cables. If you notice any issues, it might be time to seek professional repair.
External USB WiFi Adapters: As a temporary or permanent solution, you can purchase an external USB WiFi adapter. These adapters can often bypass the internal WiFi card, offering a practical workaround if the internal card is faulty.
4. Router-Side Considerations: Validating Your Home Network Setup
It's crucial to remember that the problem isn't always with your laptop. Your router or internet service may be the source of instability.
Router Firmware Updates: Similar to your laptop's operating system, your router's firmware should be kept current. Check your router's manufacturer's website for firmware updates and apply them to the device. This can improve performance and security.
Channel Interference: WiFi signals can be affected by interference from other devices operating on the same frequency. Access your router's configuration to change the WiFi channel. Many routers can automatically select the least congested channel, but manually selecting a channel (like 1, 6, or 11 on the 2.4 GHz band) can sometimes improve performance. Perform a WiFi network scan to see what channels other networks in the area are using and try to choose a channel that is less crowded.
Router Reset: Resetting your router to its factory settings can resolve configuration conflicts that might be causing connectivity problems. Note that this will erase any customized settings, so you'll need to reconfigure your network name, password, and other settings.
Internet Service Provider (ISP) Check: If the problem persists, it's possible there's an outage or issue with your internet service provider. Contact your ISP to check for any known problems in your area.
5. Advanced Troubleshooting: Delving Deeper into Complex Problems
If you've gone through the above steps without success, you may need to explore more advanced troubleshooting methods.
Network Diagnostics Utility: macOS includes a built-in Network Diagnostics utility that can help identify specific network issues. You can access this utility by holding down the Option key and clicking the Wi-Fi icon in your menu bar, then selecting "Open Wireless Diagnostics." This program can perform detailed network scans.
Console Log Analysis: The console log provides detailed system information and error messages that can help pinpoint the source of a hardware or software problem. While this may seem complex, console logs can give clues about what's happening on the device.
Safe Mode Boot: Booting your Apple laptop in Safe Mode disables many non-essential system extensions and third-party software, helping you determine if a conflicting application is causing the WiFi issues. To start in Safe Mode, shut down your laptop, press the power button, and immediately hold down the Shift key until you see the login window. Test the WiFi connection in Safe Mode to see if it resolves the issue.
6. Professional Assistance: When to Seek Expert Help
If all else fails, it's time to consider professional assistance.
Apple Support: Contact Apple Support for further troubleshooting and potential repair options. Provide them with all the details of your troubleshooting efforts so they can help.
Authorized Service Provider: Take your laptop to an Apple-authorized service provider. These professionals can diagnose and repair the issue with genuine parts.
Third-Party Repair Shops: There are many reputable third-party repair shops that specialize in Apple products. Be sure to check their reviews and experience to find a qualified technician.
Conclusion: Reclaiming Your Wireless Freedom
Dealing with WiFi connectivity issues on your Apple laptop can be frustrating. By following this comprehensive guide, you can systematically diagnose and troubleshoot the problem, exploring solutions ranging from simple restarts to advanced system diagnostics. While not every solution will work for every situation, these steps represent a thorough approach to resolving your WiFi woes and getting you back online. Remember to be patient, persist in your efforts, and don't hesitate to seek professional help if you reach a point where you're unsure of the next steps. You'll be back to surfing the web, streaming videos, and staying connected in no time.
