how to connect wifi on laptop windows 8.1

Title: How to Connect to WiFi on Windows 8
Channel: HOWTECH
How to Connect to WiFi on Windows 8 by HOWTECH
how to connect wifi on laptop windows 8, how to connect wifi in laptop windows 8.1, how to fix wifi connection on laptop windows 8.1, how to connect wifi to laptop windows 8.1 pro, how to connect wifi in hp laptop windows 8.1, how to fix wifi connection on laptop windows 8, how to connect wifi in toshiba laptop windows 8, how to connect wifi to hp laptop windows 8, how to connect hidden wifi in laptop windows 8, how do i connect my windows 8.1 laptop to wifi
Windows 8.1 WiFi Nightmare? FIX It NOW! (Easy Steps)
Windows 8.1 WiFi Woes? Conquer Connectivity Chaos!
Remember those days? You eagerly sat down, laptop in hand, ready to dive into the digital world. Then… nothing. The dreaded Wi-Fi icon, stubbornly refusing to connect. Windows 8.1, in its own peculiar way, sometimes decided your internet just wasn’t its priority. Frustration promptly set in. Sound familiar? You are not alone. Many users encountered this frustrating hurdle. This article will guide you toward a swift and effective resolution.
Unmasking the Wireless Wanderer: Identifying the Culprit
Before we begin, consider this: many things could be at play. Wi-Fi issues are often multifaceted. The problem isn't always Windows itself. It might be your router. Perhaps the network drivers are outdated. Occasionally, it’s a simple setting that requires tweaking. Therefore, we need to perform a little digital detective work. First, eliminate the obvious suspects. Restart your router and modem. Often, this refreshes the connection. After this, try connecting to your Wi-Fi. Did it work? Great. Continue if the internet is still a no-show.
The Driver Dilemma: Your First Line of Defense
Drivers are fundamental. Simply put, they are the translators between your computer and its hardware. Therefore, corrupted or outdated network drivers can cause major hiccups. Now, let’s check if your drivers are causing the trouble.
Here’s how:
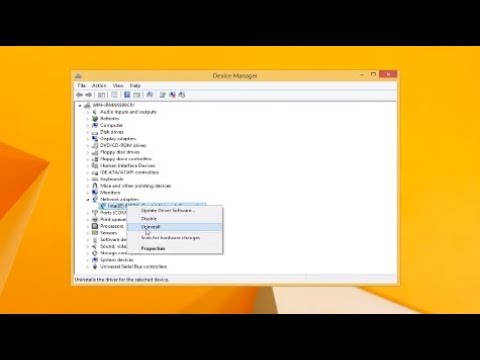
- Go to the Windows Search bar. Type “Device Manager” and open it.
- Expand the "Network adapters" section.
- Locate your Wi-Fi adapter. It will likely be labeled something like "Wireless Network Adapter."
- Right-click on the adapter. Then, select "Update driver."
- Choose "Search automatically for drivers." Windows will search for any available updates.
In other words, this automates the entire process. If Windows finds an update, install it immediately. However, if it says the best drivers are already installed, don't despair. Furthermore, it is best to explore other options.
Manual Driver Maneuvers: Taking Charge
Sometimes Windows struggles to find the most recent drivers. Therefore, we need to take control.
- Visit your computer or Wi-Fi adapter manufacturer's website.
- Search for drivers specific to your model and Windows 8.1.
- Download and install the latest driver version.
It’s important to install the appropriate driver for this to work. Make sure to select the exact model number. This will ensure seamless integration with your system.
Network Troubleshooter: A Digital Doctor
Windows 8.1 includes a built-in network troubleshooter. It is surprisingly effective. It can diagnose and fix common connectivity problems.
Here's how to use it:
- Right-click on the Wi-Fi icon in your system tray.
- Select "Troubleshoot problems."
- Windows will scan for issues and offer solutions.
Moreover, this is often the quickest solution. Consequently, this often resolves simple issues. After running the troubleshooter, test your Wi-Fi connection again.
Power Management Pitfalls: Preventing Sleep Mode Snoozes
Windows 8.1 has a unique power management feature. This can sometimes interfere with your Wi-Fi connection. Thus, the system might shut down your Wi-Fi adapter to save power. Let's make certain this isn't the issue.
- Open Device Manager (from earlier steps).
- Expand "Network adapters."
- Right-click on your Wi-Fi adapter. Select "Properties."
- Go to the "Power Management" tab.
- Uncheck the box labeled "Allow the computer to turn off this device to save power."
- Click "OK."
Consequently, you stop the device from being shut down. In effect, your Wi-Fi will stay active.
Network Reset: Giving Your Connection a Fresh Start
If all else fails, consider resetting your network settings. This is a more drastic step. However, it can often resolve stubborn issues.
- Open the charms bar.
- Click "Settings".
- Select "Change PC settings".
- Click "Network".
- Choose "Connections".
- Under your Wi-Fi connection, click "Remove".
- Restart your computer.
- Reconnect to your Wi-Fi network, re-entering your password.
This effectively clears the existing settings. Then, it forces your system to re-establish the connection.
Security Settings: Navigating Wireless Webways
Sometimes, security settings conflict with your Wi-Fi. This can lead to connection problems. It’s important to verify a few settings. Check your router’s security protocol. Ensure it supports your device's capabilities. Also, explore your firewall settings. Make sure it isn’t blocking your Wi-Fi connection.
Beyond the Basics: Advanced Troubleshooting Tactics
If problems persist, consider these further steps. Firstly, check for interference. Other electronic devices can interfere with Wi-Fi signals. Consequently, ensure your router is in an open location. Also, update your router's firmware. Manufacturers release updates to fix bugs and improve performance. Furthermore, investigate your internet service provider (ISP). The issue might stem from their end.
Final Thoughts: Reclaiming Your Digital Life
Dealing with Wi-Fi troubles in Windows 8.1 can be frustrating. However, armed with these steps, you can overcome the challenges. These measures are designed to guide you to success. Don’t give up! You are not alone in your endeavors. You can reclaim seamless access to the online world. So, roll up your sleeves. Follow these guides. And, promptly say goodbye to those pesky Wi-Fi woes. Happy surfing!
Wifi Dead? Your ASUS Laptop's SHOCKING Secret!Windows 8.1 WiFi Nightmare? FIX It NOW! (Easy Steps)
Hey there, fellow tech travelers! Ever felt like your Windows 8.1 machine was deliberately sabotaging your ability to connect to the internet? You’re not alone. We've all been there, staring blankly at the little WiFi icon, the dreaded "no internet access" message mocking us. It's like your computer is throwing a digital tantrum, leaving you stranded in a sea of buffering videos and broken online games. Well, breathe easy, because we're about to dive headfirst into this WiFi chaos and emerge victorious. Consider this your survival guide to the Windows 8.1 WiFi apocalypse.
1. The WiFi Woes: Why is My Windows 8.1 Acting Up?
Before we start wielding digital screwdrivers and rebooting everything in sight, let's understand why your Windows 8.1 is giving you grief. Think of your WiFi connection like a highway. Sometimes there's traffic (too many devices), potholes (driver issues), or even a full-blown accident (hardware failures). Pinpointing the root cause is vital. Is it your router, your adapter, or just a glitchy software gremlin? Let's try to figure this out together, shall we?
2. First Things First: Restarting the Obvious (And Why It Works)
Okay, I know, I know. Restarting your computer is like the tech equivalent of "have you tried turning it off and on again?" But honestly, it works more often than you think. Imagine your computer's operating system as a busy city. Sometimes, things get clogged up, and a simple reset clears the system, wiping away temporary files and processes that might be causing problems. It's the equivalent of hitting a reset button in a video game: a fresh start. Do you believe me? Give it a try, now.
3. The Router Rundown: Is Your Router the Culprit?
Your router, the unsung hero of your digital life, might be the real villain here. Like a grumpy old man, it can sometimes get overloaded or simply need a good nap. Try restarting your router. Unplug it from the power outlet, wait about 30 seconds, and plug it back in. This allows the router to reset its settings and hopefully clear any communication errors it might be experiencing. Also, consider if the router's firmware is updated. Outdated firmware is like driving a car with an old engine; you'll encounter issues, for sure.
4. Driver Drama: Updating Your Network Adapter Driver
Drivers are the translators between your hardware and your software. Imagine your network adapter as a translator trying to decipher a complex language. If the translator is old or out of order, miscommunication happens. Here's how to update your network adapter driver:
- Step 1: Open Device Manager. You can find this by searching for it in the Start menu.
- Step 2: Expand "Network adapters". This will show you all the network devices on your computer.
- Step 3: Right-click on your Wi-Fi adapter (it'll likely be something like "Wireless Network Adapter").
- Step 4: Select "Update driver." Choose to search automatically for updated driver software and follow the on-screen instructions.
If the automatic update fails, you might have to visit the manufacturer's website (like Intel or Realtek) to download the latest driver directly.
5. The Troubleshooter's Triumph: Letting Windows Help You
Windows 8.1 has a built-in troubleshooter that's surprisingly effective. It's like having a digital mechanic at your disposal. To use it:
- Step 1: Right-click on the WiFi icon in the system tray (the bottom-right corner of your screen).
- Step 2: Select "Troubleshoot problems."
- Step 3: Follow the on-screen instructions.
The troubleshooter will scan for common problems and attempt to fix them automatically.
6. Power Saving Pains: Disabling Power Saving for Your Wi-Fi Adapter
Windows 8.1, in its infinite wisdom, may be trying to conserve power by shutting down your WiFi adapter. This is a well-intentioned but annoying feature. To disable it:
- Step 1: Go to Device Manager (as described in step 4).
- Step 2: Right-click on your Wi-Fi adapter and select "Properties."
- Step 3: Click the "Power Management" tab.
- Step 4: Uncheck "Allow the computer to turn off this device to save power."
- Step 5: Click "OK."
This step ensures your adapter stays active even when you’re not actively using it.
7. The SSID Shenanigans: Checking Your Network Name and Password
It sounds silly, but double-checking your network name (SSID) and password can save you a lot of headache. Make sure you're connecting to the right network and that you're typing the password correctly (case matters, after all). Think of it like this: you wouldn’t walk into the wrong house with the wrong key, right? The same principle applies here.
8. Wireless Mode Mayhem: Understanding Your Router's Settings
Modern routers support multiple wireless modes (like 802.11n or 802.11ac). Sometimes, compatibility issues can arise. You may want access to your router's settings and experiment with different wireless modes and channels. Often, changing the channel on your router can improve your connection.
9. Radio Interference Rundown: Avoiding Wireless Obstacles
WiFi signals, like those of the air, are susceptible to interference. Microwaves, cordless phones, and even Bluetooth devices can create disruptions. Make sure that your router is not blocked by solid objects like concrete walls or metal objects, and keep these potential sources of interference away from your router.
10. Firewall Frustrations: Ensuring Your Firewall Isn't Blocking WiFi
Your firewall is like a guard that protects your computer from unauthorized access. Sometimes, it can accidentally block your WiFi connection. Double-check your firewall settings to ensure that your WiFi is allowed. You might need to create an exception for your network adapter.
11. DNS Dilemma: Changing Your DNS Server
Think of DNS servers as the phone books of the internet. Sometimes, the default DNS servers provided by your internet service provider (ISP) can be unreliable. To fix this, consider changing your DNS server to the Google Public DNS server, which is known for its speed and reliability:
- Step 1: Open Network and Sharing Center. You can find this by right-clicking on the WiFi icon in the system tray and selecting "Open Network and Sharing Center."
- Step 2: Click on your Wi-Fi connection.
- Step 3: Click "Properties."
- Step 4: Select "Internet Protocol Version 4 (TCP/IPv4)" and click "Properties."
- Step 5: Choose "Use the following DNS server addresses."
- Step 6: Enter 8.8.8.8 (Preferred DNS server) and 8.8.4.4 (Alternative DNS server).
- Step 7: Click "OK."
12. Airplane Mode Angst: Is Airplane Mode Accidentally On?
It may sound basic, but sometimes we overlook the obvious. Ensure that Airplane Mode is turned off. You can easily check this in the system tray or the Settings panel.
13. Hardware Hurdles: Checking Your Network Adapter's Physical Condition
If you've tried everything else, it's time to consider more serious possibilities. Is your network adapter physically damaged? Try removing and re-seating the adapter if you feel confident. Sometimes, dust or a loose connection can cause problems. If it's a USB adapter, try plugging it into a different USB port.
14. Resetting Network Settings: A Last Resort Solution
As a last resort, you can reset your network settings to their defaults. It's like hitting the reset button on all your network configurations. Here's how to do it:
- Step 1: Open the Command Prompt as an administrator. Search for "cmd" in the Start menu, right-click on it, and select "Run as administrator."
- Step 2: Type
netsh winsock resetand press Enter. - Step 3: Type
netsh int ip resetand press Enter. - Step 4: Restart your computer.
15. When All Else Fails: Considering a Fresh Start (or a New Adapter)
If you've gone through all the steps and still have issues, you might consider a system restore to a point before the problems started. Or, as a last resort, a complete system reset. If the problem persists after that, the network adapter itself might be faulty, and you may need to replace it. Remember, sometimes technology just gives up on us.
Closing Thoughts: From WiFi Woes to Wonderful Web Surfing
And there you have it—a comprehensive guide to conquering your Windows 8.1 WiFi woes! By systematically working through these steps, you should be able to diagnose and fix most common connectivity
HP Laptop WiFi Nightmare? This FIX Will SHOCK You!Connecting Manually to a Wireless Network in Windows 8 HP Computers HP Support

By HP Support Connecting Manually to a Wireless Network in Windows 8 HP Computers HP Support by HP Support
Cara Download & Install Driver WIFI & ETHERNET Manual untuk Windows 781011

By inprez id Cara Download & Install Driver WIFI & ETHERNET Manual untuk Windows 781011 by inprez id
Windows 8.1 - No Internet Connection Available
By MDTechVideos Windows 8.1 - No Internet Connection Available by MDTechVideos

Title: How To Download And Install WIFI Driver In Windows 8.1
Channel: AjTechSolution
How To Download And Install WIFI Driver In Windows 8.1 by AjTechSolution
Wifi On Laptop Phone
Windows 8.1 WiFi Nightmare? FIX It NOW! (Easy Steps)
If you're wrestling with a Windows 8.1 WiFi connection that’s more of a digital gremlin than a reliable link, you’re not alone. We’ve all been there. The frustration of disappearing signals, agonizingly slow speeds, and outright connection failures can derail productivity, entertainment, and everything in between. But fear not! Through a series of practical, meticulously detailed steps, we'll navigate you through the troubleshooting process, transforming your unreliable WiFi into a smooth, dependable connection, using the power of Windows 8.1.
Diagnosis: Identifying the Root Cause of Your WiFi Woes
Before we implement any fixes, understanding the source of the problem is paramount. We’ll address common culprits, from driver conflicts to network settings, so you can precisely target the most effective solution.
1. The Dreaded "Limited Connectivity" Issue
One of the most frequent symptoms of WiFi trouble is the dreaded “Limited connectivity” status. This error message usually crops up when your computer can connect to the WiFi network, but cannot access the internet. Several factors might cause this, and understanding each of them is crucial for a swift, effective resolution.
IP Address Conflicts: Imagine two people trying to use the same street address. That’s essentially what happens when two devices on your network try to use the same IP address. To rectify this, consider renewing your IP address. To do this, open the command prompt (search for "cmd" in the search bar and select "Command Prompt"). In the command prompt, type
ipconfig /releaseand press enter. Then, typeipconfig /renewand press enter again. This action will force your computer to request a new IP address from your router.DNS Server Problems: The Domain Name System (DNS) acts like the internet's phone book, translating website names (like google.com) into IP addresses (like 172.217.160.142). If your computer can't reach a valid DNS server, it can't find the websites you want to visit. You can resolve this by setting up public DNS servers. Go to "Network and Sharing Center" (right-click the WiFi icon in the notification area and select "Open Network and Sharing Center"). Click on your active WiFi connection. Then, click "Properties." In the list, select "Internet Protocol Version 4 (TCP/IPv4)" and then click "Properties". In the window that opens, select "Use the following DNS server addresses" and enter the Google DNS servers: 8.8.8.8 and 8.8.4.4.
Router Issues: While less common, the router itself might be the root of the issues. Try power-cycling your router - turning it off, waiting about 30 seconds, and turning it back on. This simple action can often resolve many connectivity problems.
2. Slow Connection Speeds and Intermittent Dropouts
Slow speeds and dropouts can quickly turn online activities into an exercise in frustration. Numerous factor might be responsible.
Distance and Obstructions: WiFi signals weaken over distance and can be severely hampered by physical obstructions like walls, especially those made of concrete or brick. Evaluate the placement of your router and the location of your computer. Try moving the router to a more central, open location, or moving your computer closer to the router.
Network Congestion: If numerous devices are using your WiFi simultaneously, it can lead to slower speeds for everyone. Try limiting the number of devices connected during periods of heavy usage, thus increasing the available bandwidth for your computer.
Channel Interference: Your WiFi router transmits on a specific channel. If neighboring routers are also using the same channel, it can cause interference and slow down your connection. To remedy this, log into your router's configuration page (the specific method varies depending on the router model, but usually involves entering your router's IP address into your browser) and change the channel to a less congested one. Tools like WiFi Analyzer can help you determine the least congested channels in your area.
Step-by-Step Solutions: Troubleshooting Your WiFi Problems
We’ve identified the most probable causes. Now let’s dive into the practical fixes.
1. Driver Updates: Keeping Your Network Adapter Up-to-Date
Outdated or corrupted network adapter drivers are a primary cause of WiFi issues. Thankfully, updating them is usually a quick and straightforward process.
Using Device Manager: Press
Win + Xsimultaneously and select "Device Manager". Expand "Network adapters." Right-click on your WiFi adapter (it will likely have a name like "Wireless Network Adapter" or "Intel(R) Dual Band Wireless-AC"). Choose "Update driver." Select "Search automatically for updated driver software." Windows will search for and install the latest drivers from the internet. If successful, reboot your computer.Manufacturer's Website: Alternatively, you can download the latest drivers directly from your computer manufacturer's or your network adapter manufacturer's website (e.g., Intel, Broadcom, etc.). Find the support section, search for your specific model, and download the correct driver. Once downloaded, double-click the driver file to install it. After the installation, restart your computer.
2. Network Adapter Troubleshooting: Windows 8.1's Built-In Tools
Windows 8.1 includes built-in troubleshooting tools that can automatically detect and fix many WiFi problems.
Running the Network Troubleshooter: Right-click the WiFi icon in the notification area and select "Troubleshoot problems." Windows will diagnose your network adapter and attempt to fix any issues it finds. Follow the on-screen instructions.
Network Reset (Advanced Solution): If other solutions fail, you can reset your network settings. This is a more drastic step that will remove and reinstall all network adapters and related software, resetting them to their default configurations. To do this, open "Settings" (press
Win + I), go to "Network and Internet," and then click "Network reset." Follow the on-screen instructions and restart your computer. Remember that you'll need to re-enter your WiFi password after the reset.
3. Router Configuration and Optimization
Your router settings play a critical role in your WiFi's performance. We will explore some quick methods that can help boost performance.
Router Firmware Updates: Outdated router firmware can lead to numerous performance and security problems. Check your router's online documentation to determine instructions on how to update the firmware manually. Log into your router's configuration page (usually enter your router's model IP address and click enter in the browser). Look for a firmware update section and follow the on-screen instructions.
Wireless Security Settings: Ensure your WiFi network is secured with a strong password and WPA2 or WPA3 encryption. This prevents unauthorized access, which can slow down your connection. Log into your router's configuration interface and check the wireless security settings.
Channel Optimization: As previously mentioned, choosing the least congested WiFi channel is vital for optimal performance. Use a WiFi analyzer app or website to identify the best channel for your area and configure your router accordingly. 4. Power Management Settings
Sometimes your computer's power management settings can interfere with your WiFi connection.
- Disabling Power Saving for the Network Adapter: Go back to Device Manager, and find your WiFi adapter. Right-click on the adapter and select "Properties." In the Properties window, go to the "Power Management" tab. Uncheck the option that allows the computer to turn off the device to save power. Click "OK."
These steps and solutions will help you diagnose, troubleshoot, and fix the most common WiFi issues in Windows 8.1. By methodically working through these practical techniques, you will be able to regain a stable, reliable wireless connection.
