cara setting ip address wifi laptop windows 10

Title: Cara Setting IP Address Komputer agar Dapat Terhubung dengan Internet
Channel: DSID
Cara Setting IP Address Komputer agar Dapat Terhubung dengan Internet by DSID
cara setting ip address wifi laptop windows 10, windows 10 pc wifi settings
**Windows 10 WiFi: The SHOCKINGLY Easy IP Address Fix!**
Windows 10 WiFi: Conquer the IP Address Conundrum (It's Easier Than You Think!)
Ever found yourself staring blankly at your laptop, frustrated by a WiFi connection that simply refuses to cooperate? You're not alone. This scenario is a familiar one for many Windows 10 users. After all, a malfunctioning WiFi can truly throw a wrench into your day. But, before you launch your computer out the window, take a deep breath. Often, the culprit is something surprisingly simple: your IP address.
Understanding the Elusive IP Address: A Quick Primer
Think of your IP address as your home address online. It's the unique identifier that allows your computer to communicate with other devices and websites. Consequently, when your IP address isn't configured correctly, your WiFi connection can become a ghost. Furthermore, it’s essential to get it right for your computer to access the internet correctly.
Decoding the Symptoms: Is Your IP the Bad Guy?
So, how do you know if an IP address issue is the root of your WiFi woes? There are a few telltale signs to watch out for. Firstly, you might see a "limited connection" error message. Secondly, your computer could simply fail to connect to the internet. Moreover, you might have trouble accessing specific websites. Therefore, these are strong indicators that your IP settings might need a little tweaking.
The SHOCKINGLY Simple Fix: Diving into the Settings
Now, for the good news. Fixing an IP address problem in Windows 10 is surprisingly easy. It doesn't require a degree in computer science. In fact, it's a task that anyone can tackle. So, let's dive in.
1. Accessing the Network Settings: Your First Step
First of all, you need to access your network settings. Start by clicking on the WiFi icon in your system tray (usually located in the bottom right corner of your screen). Next, right-click on your current WiFi connection. Then, choose "Open Network & Internet settings."
2. Navigating to Adapter Options: The Gateway to IP Configuration
Within the Network & Internet settings window, you'll find a variety of options. However, ignore those for now. Instead, scroll down and click on "Change adapter options." This will open a new window displaying your network adapters.
3. Identifying Your Connection: The WiFi Detective Work
Here, you'll see a list of your network adapters, including your Ethernet and WiFi connections. So, identify your active WiFi connection. It will likely be labelled with your network name.
4. Accessing the Properties: The Key to the Kingdom
Right-click on your WiFi connection and select "Properties." This will open a new window with a list of different protocols and settings.
5. The IP Address Magic: Unveiling the Secrets
In the Properties window, locate "Internet Protocol Version 4 (TCP/IPv4)." Select it. Then, click the "Properties" button. Finally, this is where the real magic happens.
6. Automatic or Manual: Choosing Your Destiny
In the Internet Protocol Version 4 (TCP/IPv4) Properties window, you'll see two main options: "Obtain an IP address automatically" and "Use the following IP address." Therefore, the preferred method is the former. However, if this doesn't work, you may want to try the latter.
7. The Automatic Route: The Easiest Path
Often, the easiest solution is to ensure that "Obtain an IP address automatically" is selected. This setting allows your computer to automatically get an IP address from your router. If this option is already selected, it doesn't hurt to try resetting it. Just select "Obtain an IP address automatically" again, and click "OK."
8. The Manual Labor Option: For the Tech-Savvy
If the automatic option doesn't work, you can try entering the IP address manually. You'll need to get this information from your router. However, this approach is a bit more involved, therefore, it's usually best to start with the automatic setting. Otherwise, contact your ISP.
Troubleshooting Tips: When Things Get Tricky
Even with these steps, you might still encounter problems. First, try restarting your computer and your router. Next, ensure your router is functioning correctly. In contrast, there might be a temporary glitch. Therefore, a simple reboot can often resolve this.
Final Thoughts: Reclaiming Your WiFi Freedom
Dealing with WiFi issues can be frustrating. However, with these easy steps, you can often fix IP address problems. Now, go forth and enjoy a seamless internet experience. Because you deserve it!
Unleash Your Laptop's Freedom: Free Portable WiFi!Windows 10 WiFi: The SHOCKINGLY Easy IP Address Fix!
Alright, folks, let's talk WiFi woes! We've all been there, staring blankly at our screens, the dreaded "no internet" notification mocking us with its digital taunt. And often, the culprit isn't a faulty router or a grumpy internet provider; it's a wonky IP address on your Windows 10 machine. But fear not, because the solution? Well, it's surprisingly… easy. Welcome to the world of IP address troubleshooting, where we'll tame the digital beast and ensure your Windows 10 WiFi is purring like a kitten.
The Premise: Why Your WiFi is Acting Up
Before we dive into the fix, let's understand why this problem even exists. Think of your IP address as your digital postal code. It tells the internet where to send the information you're requesting. Sometimes, your computer – in its infinite digital wisdom (or lack thereof) – grabs the wrong address, causing a communication breakdown. Imagine trying to deliver a package to the wrong street! It's frustrating, right? This is precisely what is happening with your WiFi.
Decoding the IP Address Mystery: What's Really Happening?
The core of the issue often boils down to your computer's ability (or, again, inability) to properly acquire an IP address. This can be caused by many things, from a simple glitch to more complex network configurations. Think of it like a traffic jam on the information superhighway. Sometimes, a car (your computer) gets stuck, and everything slows down.
The Shockingly Easy Fix: Releasing and Renewing
Here’s the good news: the fix is almost always a simple two-step process. We're not talking about complex coding or wrestling with cryptic settings. We’re talking about a digital reset button, a swift kickstart to your WiFi connection.
Step 1: Releasing the Old IP Address
Imagine you're freeing up a parking spot. First, you need to clear it. We're going to do the same with your IP address using the Command Prompt, a powerful tool cleverly disguised as a black box.
- First, access the Command Prompt: Type "cmd" in the Windows search bar (that little magnifying glass near the Start button) and select “Command Prompt.”
- Type and Execute: In the Command Prompt window, type
ipconfig /releaseand hit Enter. This command tells your computer to "release" its current IP address. Think of it as saying, “Thanks, I’m done with this address!” - Observe: You'll see some text whizzing by. Don't worry; it's just your computer doing its digital housekeeping.
Step 2: Renewing and Claiming a New Address
Now that the old address is gone, it’s time to grab a fresh one. This is like finding a new parking spot.
- Back to the Command Prompt: Still in the Command Prompt, type
ipconfig /renewand press Enter. - Witness the Magic: Your computer will now go out and request a new IP address from your router. It's like saying, "Hey, can I have a new address, please?"
- Success (Hopefully!): If all goes well, you'll see some more text, and your WiFi should be back up and running. Give it a few seconds, and then try browsing the web.
Troubleshooting Tango: What If the Fix Didn’t Work?
Sometimes, the "release and renew" method doesn't work like a charm. Don't fret! Let's explore other avenues, just in case. Think of it as having a few extra tools in your digital toolbox.
The Router Reboot: The Old Reliable
Sometimes, the problem isn't your computer; it's your router. A simple reboot can often solve many network issues. Unplug your router (and modem, if separate) for 30 seconds and plug them back in. Let everything power up and try the ipconfig /release and ipconfig /renew commands again.
Static vs. Dynamic IP Addresses: The Configuration Conundrum
Your computer can either get an IP address automatically (dynamic) or you can assign one manually (static). In most home networks, you want the dynamic option. Let's make sure your settings are correctly configured.
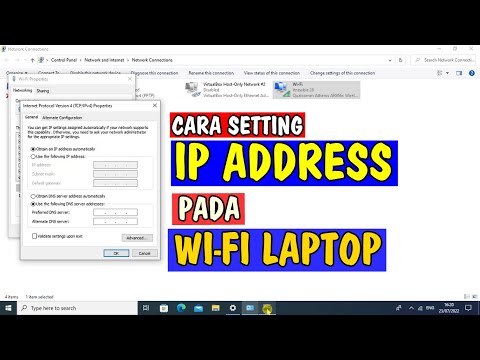
- Network and Sharing Center: Right-click the WiFi icon in your system tray (bottom right corner of your screen) and select “Open Network & Internet settings.”
- Change Adapter Options: Click on “Change adapter options.”
- Properties: Right-click on your WiFi adapter and select “Properties.”
- Internet Protocol Version 4 (TCP/IPv4): Double-click on “Internet Protocol Version 4 (TCP/IPv4).”
- Obtain automatically: Make sure "Obtain an IP address automatically" and "Obtain DNS server address automatically" are selected. If they aren't, select them, click "OK," and then try the release/renew commands again.
Disabling and Re-enabling Your WiFi Adapter: A Digital Restart Button
Sometimes, a simple adapter reset does the trick. It’s like turning your computer off and on again but for your WiFi.
- Go back to Network Connections: Open "Change adapter options" (as described above)
- Disable: Right-click on your WiFi adapter and select "Disable."
- Wait: Wait a few seconds.
- Enable: Right-click on the adapter again and select "Enable."
Diving Deeper: Advanced Solutions (If the Basics Fail)
If the above steps still haven’t resolved your WiFi woes, we might need to venture into slightly more advanced territory. Don't worry; we'll keep it straightforward.
Flushing the DNS Cache: Clearing the Digital Clutter
Think of your DNS cache as your computer's memory of website addresses. Sometimes, this memory gets corrupted, causing connection issues.
- Command Prompt is your Friend: Open Command Prompt (as described above).
- Flush the Cache: Type
ipconfig /flushdnsand press Enter. This command clears the cache. - Renew Again: Try your trusty
ipconfig /renewcommand now.
Resetting Network Settings: A Digital Refresh
As a last resort, you can reset your network settings. This resets the network connections to their default configuration.
- Open Network Settings: Go to "Open Network & Internet settings" (as described above).
- Network Reset: Click on "Network reset" (usually found near the bottom of the window).
- Confirm: Follow the prompts. Your computer will restart.
Avoiding Future IP Address Headaches
Now that we've fixed the problem, let's talk about preventing it from happening again.
Keeping Your System Updated: The Digital Shield
Make sure your Windows 10 is up-to-date. Updates often include fixes for network issues. Go to Settings > Update & Security > Windows Update and check for updates.
Router Firmware: The Router’s Brain
Check for firmware updates for your router. These updates improve performance and reliability. The process varies depending on your router model, but usually involves logging into your router's settings (often by typing its IP address into your browser).
Network Drivers: Ensuring They're Current
Outdated network drivers can cause problems. Go to Device Manager (search for it in the Windows search bar), expand "Network adapters," right-click your WiFi adapter, and select "Update driver."
The Beauty Of Easy Solutions
You’ll find that the simplicity of these fixes is actually quite elegant. There’s a certain satisfaction in wrestling a technical issue and winning, right? It's like being a digital detective, using your knowledge to solve the mystery of “no internet.”
Success! You've Tamed the WiFi Beast!
Congratulations! You've successfully navigated the treacherous waters of IP address issues and emerged victorious. Hopefully, your Windows 10 WiFi is now happily humming along. Remember these steps, and the next time you encounter a WiFi problem, you’ll be ready to tackle it like a seasoned pro. Keep exploring, keep learning, and keep those connections strong!
FAQs: Your Burning Questions Answered!
Here are some common questions we often hear about Windows 10 WiFi and IP addresses.
1. What is an IP address, and why is it important?
As explained earlier, it's your digital postal code, guiding data to and from your computer. Without a valid IP, you can't connect to the internet.
2. Why does my IP address change?
Most home networks use dynamic IP addresses, assigned by your router. The DHCP server on your router regularly assigns new addresses to devices.
3. When should I use a static IP address?
Static IP addresses are usually only necessary for specific situations, such as connecting a printer or server, or when you need a consistent IP address for remote access. Generally, unless you have a specialized need, stick with dynamic IPs.
4. What does "DHCP" stand for?
DHCP stands for Dynamic Host Configuration Protocol – the network protocol that automatically assigns IP addresses.
5. What if nothing is working?
Laptop WiFi Dead? This SHOCKING Trick Will Fix It INSTANTLY!If all else fails, you might want to contact your internet service provider (ISP). They can check for problems on their end.
CARA SETTING JARINGAN LAN DAN WIFI PADA WINDOWS 10

By IT Newbie CARA SETTING JARINGAN LAN DAN WIFI PADA WINDOWS 10 by IT Newbie
Cara Setting Ip Address di Windows 10

By Ilmu Komputer dan Pendidikan Cara Setting Ip Address di Windows 10 by Ilmu Komputer dan Pendidikan
CARA SETTING IP ADDRESS PADA WIFI LAPTOP WINDOWS 10
By IT Newbie CARA SETTING IP ADDRESS PADA WIFI LAPTOP WINDOWS 10 by IT Newbie
Title: Cara Mengubah Alamat IP di Windows 1087 100 Bermanfaat Ubah Alamat IP Windows 10 Mudah
Channel: How to Fix Your Computer
Cara Mengubah Alamat IP di Windows 1087 100 Bermanfaat Ubah Alamat IP Windows 10 Mudah by How to Fix Your Computer
Working With Laptop
Windows 10 WiFi: The SHOCKINGLY Easy IP Address Fix!
Navigating the digital landscape can often feel like traversing a labyrinth, especially when encountering network connectivity issues. One of the most frustrating problems users face is dealing with WiFi connectivity problems, specifically those rooted in IP address configurations. When your Windows 10 device stubbornly refuses to connect to your wireless network, the culprit often lies within this crucial network identifier. Fortunately, resolving many WiFi-related IP address problems is surprisingly straightforward, and we are here to guide you through the process.
Understanding the Role of the IP Address
Before diving into solutions, let's establish a firm understanding of the IP address's role within your network. Think of your IP address as your device's unique postal address in the vast digital world. It’s how your device communicates with other devices on your network, as well as with the internet. Your router assigns this address to your device, making it possible to send and receive data packets. There are two primary types of IP addresses: dynamic and static. Most home networks use dynamic IP addresses, which are automatically assigned by the router. However, sometimes, this automatic assignment can falter, leading to connectivity issues.
Diagnosing the Problem: Identifying the IP Address Issue
Before attempting any fixes, it's essential to determine whether an IP address is, in fact, the root cause of your WiFi woes. Symptoms indicating an IP address conflict or problem might include:
- Limited Connectivity: Your device connects to the WiFi network, but the internet access is severely restricted or completely absent. You may see a "Limited" status in your network settings.
- "No Internet Access" Error: Your device connects to the WiFi but displays an error message indicating no internet access.
- Unable to Obtain an IP Address: Your device struggles to obtain an IP address from the router, often resulting in a "Connecting" or "Identifying" message that persists indefinitely.
- IP Address Conflict: Your device might display a warning about an IP address conflict, which occurs when two or more devices on the same network are attempting to use the same IP address.
The Ultimate Fix: Step-by-Step Solutions to Resolve IP Address Errors
Now, let's explore several effective methods for resolving IP address-related problems on your Windows 10 device. These solutions range from simple troubleshooting steps to more in-depth configurations.
1. The Power of the Restart: Router and Device Reboot
This is often the first and most effective step in resolving many network issues. A simple reboot can clear temporary glitches and reset the communication between your devices.
- Restart Your Router: Unplug your router from the power outlet, wait for at least 30 seconds, and then plug it back in. Allow the router to fully boot up – this might take a few minutes, as indicated by the status lights on the router. This process will make sure your router will be able to assign new IP Addresses again.
- Restart Your Windows 10 Device: Simultaneously, restart your Windows 10 computer or device. This will clear any cached network settings and establish a fresh connection.
2. The IP Address Configuration: Checking and Renewing Your IP Address
Windows 10 provides a built-in method to automatically attempt to get an IP Address. If your device is not able to automatically obtain an IP address, you can try to renew the IP configuration through the Command Prompt.
Open Command Prompt as an Administrator: Search for "cmd" in the Windows search bar, right-click on "Command Prompt," and select "Run as administrator."
Release and Renew: Type the following commands and press Enter after each:
ipconfig /release– This command releases your current IP configuration.ipconfig /renew– This command requests a new IP address from your router.
Verify Connection: After the commands, attempt to access the internet to see whether the issue is resolved.
3. The IP Address Configuration: Setting Up a Static IP Address (Advanced)
In some cases, particularly if you have specific network requirements or a persistent IP address conflict, setting up a static IP address can be helpful. This configuration assigns a fixed IP address to your device.
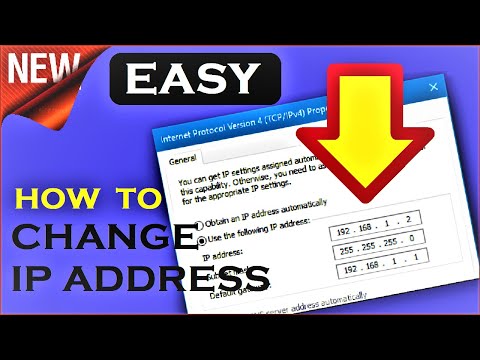
Access Network Connections: Right-click on the WiFi icon in your system tray (bottom-right corner) and select "Open Network & Internet settings." Then click on "Change adapter options."
Select Your WiFi Adapter: Right-click on your WiFi adapter (usually named "Wi-Fi") and select "Properties."
Configure IPv4 Properties: In the Properties window, select "Internet Protocol Version 4 (TCP/IPv4)" and click "Properties."
Use the following IP address box: In this section, check the box next to "Use the following IP address." Here's where you'll enter your static IP address.
- IP address: Choose an IP address that is outside the DHCP range of your router. To discover the DHCP range, consult your router's documentation or configuration interface. If you have a class C network, you will usually see the IP address range on your router from 192.168.1.100 to 192.168.1.199. In that case, you can choose 192.168.1.110; otherwise, you may choose a number outside the DHCP range.
- Subnet mask: Enter the subnet mask, this is usually, 255.255.255.0 for most home networks.
- Default gateway: Enter your router's IP address as the default gateway. This is usually 192.168.1.1 or 192.168.0.1, it may vary based on your router's manufacturer and model.
- DNS Servers: Enter your preferred DNS server addresses. You may use your internet service provider's DNS servers or public DNS servers such as Google's DNS (8.8.8.8 and 8.8.4.4) or Cloudflare DNS (1.1.1.1 and 1.0.0.1)
Validate Settings: Click "OK" on all open windows to save your changes. Now, attempt to connect to the internet.
4. The Network Troubleshooter: Windows 10's Built-In Diagnostic Tool
Windows 10 includes a built-in network troubleshooter that can automatically diagnose and fix common network problems, including IP address issues.
- Access the Troubleshooter: Right-click on the WiFi icon in your system tray and choose "Troubleshoot problems." Alternatively, go to "Settings" > "Network & Internet" > "Status" and click on "Network troubleshooter."
- Follow the Prompts: The troubleshooter will automatically scan your network configuration, identify any problems, and attempt to fix them. Follow any on-screen instructions.
5. The Driver Update: Ensuring Your Network Adapter is Up-to-Date
Outdated or corrupted network adapter drivers can sometimes cause IP address-related problems. Updating your network adapter drivers may resolve the issue.
- Open Device Manager: Type "Device Manager" in the Windows search bar and select it.
- Expand Network Adapters: In Device Manager, expand the "Network adapters" section.
- Update Your WiFi Adapter: Right-click on your WiFi adapter (usually named something like "Wireless Network Adapter" or similar) and select "Update driver." You can either choose "Search automatically for drivers" to let Windows search for updated drivers, or "Browse my computer for drivers" if you have downloaded drivers from the manufacturer's website.
- Restart Your Computer: After updating the drivers, restart your computer to apply the changes.
Troubleshooting the Troubleshooters: Additional Considerations for Complex Scenarios
While these solutions often resolve common IP address issues, some more complex scenarios may require additional investigation.
- Check for Router Firmware Updates: Outdated router firmware can sometimes cause incompatibility issues. Access your router's configuration interface (usually through a web browser and using the router's IP address) and check for any available firmware updates.
- Examine your Firewall Settings: Sometimes, your firewall settings may be blocking internet access. Ensure that your firewall allows network traffic over the required ports. Check both the Windows Firewall and any third-party firewall software you might have installed.
- Consider Malware Infections: In some rare cases, malware infections can interfere with network settings. Run a full system scan using a reputable antivirus program.
Conclusion: Restoring Seamless Wireless Connectivity
By methodically applying these troubleshooting steps, you can efficiently diagnose and fix many IP address-related issues on your Windows 10 device. Remember to start with the simplest solutions, such as restarting your devices, and gradually progress to more advanced configurations as needed. In most cases, you’ll find that resolving these connectivity problems is a relatively straightforward process, allowing you to swiftly restore seamless wireless connectivity and regain access to the online world. If you continue to experience problems after attempting these fixes, consider seeking assistance from an IT professional for more complex network configurations or hardware issues. By taking these steps, you can be confident in your ability to troubleshoot and resolve the most common WiFi problems, ensuring a smooth and uninterrupted online experience.
