how to broadcast wifi from laptop windows 8

Title: How to Connect to WiFi on Windows 8
Channel: HOWTECH
How to Connect to WiFi on Windows 8 by HOWTECH
**Windows 8 WiFi Hotspot: The Secret Trick Nobody Told You!**
Unleash Your Inner Tech Wizard: Windows 8's Hidden WiFi Hotspot Power!
Ever wished you could share your internet connection on the go? You are not alone. It's a common desire. We all crave that seamless connectivity. But what if I told you Windows 8 held a secret? A secret that could transform your laptop into a powerful WiFi hotspot? Prepare to be amazed!
The Unexpected Revelation: Windows 8's Built-In Magic
Forget those clunky third-party apps. They are often unnecessary, right? Windows 8, in its often-misunderstood glory, actually packs this fantastic feature. The best part? You don't need to be a tech guru. This is a simple trick, yet surprisingly effective. However, most users remain unaware. In fact, most people overlook this incredibly handy tool.
Why Was This Secret Kept? Digging Deeper into the Mystery
Why the secrecy? Honestly, I'm not entirely sure. Perhaps Microsoft assumed everyone knew. Or maybe it was simply overshadowed by flashier features. Furthermore, it remains a mystery to many. Nonetheless, it's time to unveil this hidden gem. We will unlock your hidden Wi-Fi superpower.
Step-by-Step Guide to Your Personal WiFi Fortress
Ready to turn your laptop into a WiFi hotspot? Good! This process is straightforward, so follow these steps.
- Access the Command Prompt (Admin Mode): First, you will want to tap the Windows key. Then, type "cmd" into the search bar. Right-click on "Command Prompt" and select "Run as administrator." Admin privileges are a must.
- The Magic Code: Unveiling the Command: Next, you must enter a specific command. This is the code that unlocks the hotspot feature. Type this carefully:
netsh wlan set hostednetwork mode=allow ssid="YourHotspotName" key="YourPassword". Replace "YourHotspotName" with your desired network name. Choose a strong password for "YourPassword". The command initiates the setup. - Activate the Network: After that, activate the hosted network. Type
netsh wlan start hostednetwork. See the activation come to life! - Sharing Your Connection: The Final Touch: Now comes the sharing part. Go to "Network Connections" (search for it in the Control Panel). Locate your primary internet connection. Right-click and choose "Properties.” Select the "Sharing" tab. Check the box that says "Allow other network users to connect through this computer's Internet connection." Choose your newly created hotspot from the dropdown menu.
- Testing the Connection: After that, connect your other devices. Search for your new hotspot name. Enter your password. If all goes well, you are connected!
Troubleshooting: When Things Don't Go According to Plan
Sometimes, things don't work immediately. Don't panic; it's fixable. Firstly, double-check your commands. Ensure you entered them correctly. Secondly, check your network adapter drivers. Outdated drivers can cause issues. Thirdly, restart your computer. It's the classic solution. Finally, ensure your internet connection is active.
Beyond the Basics: Advanced Customization Options
Want even more control? You can customize your hotspot further. You can change the SSID (network name) and password. You can also limit the number of connected devices. These tweaks can greatly enhance your experience.
The Benefits: Why Bother with a Windows 8 Hotspot?
Why would you want a Windows 8 hotspot? The benefits are numerous. You can share your internet with multiple devices. It is perfect for travel or emergencies. Furthermore, it is incredibly convenient. It eliminates the need for separate mobile hotspots. Also, you can save money on additional data plans.
Security Precautions: Staying Safe Online
Security is critical, right? Always use a strong password. Keep your software updated. Also, enable your firewall. Consider using a VPN. These steps will protect your data. They keep your connection secure.
Windows 8 Hotspot: A Game Changer for Everyday Life
So, there you have it! You now know the Windows 8 WiFi hotspot secret. In conclusion, embrace your newfound knowledge. Share your internet with ease. From now on, you will enjoy seamless connectivity. You will be equipped with this incredible trick.
Laptop WiFi Nightmare? Solved!Windows 8 WiFi Hotspot: The Secret Trick Nobody Told You!
Ever felt the frustration of needing to share your internet connection but staring down the barrel of a complicated setup? We've all been there! Especially if you're still clinging to your trusty Windows 8 machine (no judgment here – I’ve got one lurking in a drawer somewhere myself!). The built-in WiFi hotspot feature in Windows 8, like a shy dragon, can seem a bit… well, hidden. But fear not, because we're about to unearth the secret trick that’ll have you sharing your internet connection like a pro, quicker than you can say "wireless web!"
1. The Windows 8 WiFi Hotspot Conundrum: Why Is This So Difficult?
Let's face it, Windows 8's interface wasn't exactly known for its user-friendliness, was it? Navigating the settings was like trying to find your way through a maze blindfolded. The WiFi hotspot feature, tucked away like a precious gem, was often overlooked. We've tried to make it easy to access and utilize the hotspot feature.
2. Understanding the Basics: What Exactly Is a WiFi Hotspot?
Think of your computer as a tiny internet-spreading lighthouse. A WiFi hotspot, in essence, allows you to share your computer’s internet connection (whether it's wired or wireless) with other devices, like phones, tablets, and even other computers. It's your personal Wi-Fi bubble! It's like having a miniature cellular tower in your home, broadcasting your internet signal for all your devices to enjoy.
3. The Hidden Treasure: Unveiling the Windows 8 WiFi Hotspot Feature
Okay, here's the juicy part. We're going to unlock the magic. The secret trick isn't some complicated software download; it's right there, hiding in plain sight. You'll be surprised by how simple this is.
4. Setting the Stage: Preparing Your Windows 8 Machine
First things first. Make sure your Windows 8 machine is connected to the internet. This could be through an Ethernet cable (wired connection) or via a pre-existing WiFi connection. Without an internet connection, you're broadcasting… well, nothing. Think of this step as prepping the ingredients before you start to bake a cake.
5. The Command Prompt: Your Secret Weapon
Now, here’s where the magic happens. We're going to use the command prompt, a powerful tool that, in this case, is as easy to use as following a recipe.
- Step 1: Opening the Command Prompt: Press the Windows key + R to open the "Run" dialog box. Type "cmd" and press Enter. This opens the command prompt window.
6. Creating Your Virtual WiFi Network: The Command Line Codes
We're going to use a few simple commands here. Don't worry; it's not rocket science. Think of them as secret incantations.
Step 1: Enabling the Hosted Network: Type the following command and press Enter:
netsh wlan set hostednetwork mode=allow ssid="YourNetworkName" key="YourPassword"Replace "YourNetworkName" with the desired name for your WiFi network (e.g., "MyAwesomeWiFi"). Replace "YourPassword" with a strong password (at least eight characters).Step 2: Starting the Hosted Network: Type the following command and press Enter:
netsh wlan start hostednetwork
7. Sharing Your Internet Connection: The Crucial Step
This is essential, or your devices will connect to the hotspot but get nada internet.
Step 1: Open Network Connections: Right-click on the network icon in your system tray (bottom right corner of your screen) and select "Open Network and Sharing Center".
Step 2: Access Adapter Settings: Click on "Change adapter settings" in the left-hand menu.
Step 3: Find Your Primary Connection: Identify the network connection that's actually connected to the internet (Ethernet or your existing WiFi).
Step 4: Share the Connection: Right-click on this connection and select "Properties". Go to the "Sharing" tab. Check the box that says "Allow other network users to connect through this computer's Internet connection." In the "Home networking connection" dropdown, select the "Microsoft Hosted Network Virtual Adapter" or a similarly named adapter. It should have been created in step 6. Click "OK".
8. Connecting Your Devices: The Moment of Truth!
Now the fun begins. On your other devices (phone, tablet, etc.), scan for available WiFi networks. You should see the network name you created in step 6. Enter the password you chose, and boom! You should be connected and surfing the web.
9. Troubleshooting Common Issues: When Things Go Sideways
Sometimes, things don’t go as planned. Don't worry, troubleshooting is part of the fun! Here are a few common culprits and how to fix them:
- “The hosted network couldn’t be started” error: This could be a driver issue. Try updating your wireless network adapter drivers.
- Devices connecting but no internet: Double-check step 7. That's often the missing link.
10. Securing Your Hotspot: Your Digital Fortress
Never underestimate the importance of security! Always use a strong, unique password. Consider using WPA2 encryption for the best security. This is where the "key" comes in from step 6.
11. Customizing Your Hotspot: Beyond the Basics
While Windows 8's hotspot functionality is pretty basic, you can customize settings for your hotspot. You can't completely control advanced settings like bandwidth allocation.
12. Turning Off Your Hotspot: Shutting Down the Lighthouse
When you're done sharing your internet, it's important to turn off the hotspot to save battery life and prevent unwanted connections..
Step 1: Open the command prompt (again): Press Windows key + R, type "cmd," and press Enter.
Step 2: Stop the Hosted Network: Type the following command and press Enter:
netsh wlan stop hostednetwork
It's like turning off a switch. Easy peasy!
13. The Benefits: Why Use a Windows 8 Hotspot?
Why bother with all this? Well, the advantages are great!
- Share Internet on the Go: Perfect for sharing a wired connection from a hotel room or sharing your mobile data.
- Troubleshooting: Useful for testing your wifi connection or network configuration.
14. Windows 8 vs. Modern Hotspot Solutions: Is It Still Relevant?
Yes! While modern operating systems offer simpler hotspot solutions, Windows 8's method still works perfectly. It’s a great alternative, especially if you want to conserve mobile data or bypass potential restrictions.
15. Beyond the Basics: Exploring Advanced Hotspot Techniques
For more advanced users, you can delve into more complex configurations, but the core method outlined above is what you need to get started.
Conclusion: Your Windows 8 WiFi Hotspot Secret Revealed!
There you have it! The secret is out. Sharing internet via a Windows 8 WiFi hotspot is no longer a daunting chore. It's a relatively simple process, now you’re armed with the knowledge and ready to share your internet connection like a seasoned pro. Go forth and connect! Think of it this way: you have unlocked a hidden superpower. Enjoy the freedom!
FAQs:
1. Can I use this on any Windows 8 device?
Yes, as long as your Windows 8 device has a wireless network adapter.
2. Is this secure?
Yes, as long as you create a strong password and consider the security standards of your particular setup.
3. How do I know if the hotspot is working?
Check by trying to connect another device and running a basic web search. If you can access the internet, it’s working!
4. Does this use a lot of battery life?
Yes, enabling a hotspot usually drains the battery faster than simply using your regular internet connection.
5. Can I change the network name and password later?
Yes, the first command you used in the method lets you adjust the network name (SSID) and password (Key). You'll need to stop and restart hostednetwork for the changes to take effect.
1) Principal Keywords: Windows 8 Hotspot Secret Trick
2) SEO Headline: Windows 8 WiFi Hotspot: The Secret Trick Unveiled!
3) Pathway: Windows 8 Hotspot
4) Meta Summary: Unlock your Windows 8 WiFi hotspot! Discover the secret trick to share your internet & bypass restrictions. Easy setup, secure, & fast connection tips!
5) Image Alt Text: A Windows 8 laptop displaying a WiFi hotspot connection to a smartphone.
Connecting Manually to a Wireless Network in Windows 8 HP Computers HP Support

By HP Support Connecting Manually to a Wireless Network in Windows 8 HP Computers HP Support by HP Support
Turn Windows 8 Laptop into WiFi HotSpot How To

By TechEmpty Turn Windows 8 Laptop into WiFi HotSpot How To by TechEmpty
Windows 8 - How to turn on WiFi

By HowTo Windows 8 - How to turn on WiFi by HowTo
Title: How to connect to a Wireless Network on Windows 8
Channel: Best Video Tutorials and Help from HowTech
How to connect to a Wireless Network on Windows 8 by Best Video Tutorials and Help from HowTech
My Laptop Work
Windows 8 WiFi Hotspot: The Secret Trick Nobody Told You!
We've all been there. You're on the go, relying on the precious, often unreliable, data connection of your mobile device. Then, disaster strikes: your tablet runs out of battery, your friend needs to check an email, or, heaven forbid, you require a connection for your laptop to finish a crucial project. Enter the humble Windows 8 WiFi hotspot functionality – a feature often overlooked, yet offering a powerful solution to these connectivity conundrums. This isn’t just about sharing your internet; it's about understanding the intricacies of creating a robust, secure, and easily manageable personal network. We’ll delve into the secret techniques, beyond the basic setup, to unlock the full potential of your Windows 8 device as a powerful WiFi hotspot.
Unveiling the Core: Activating the Built-In Hostspot
The foundation of our secret lies in the operating system itself. Windows 8, despite its historical quirks, boasts a surprisingly capable built-in WiFi hotspot feature. Unlike the clunky third-party applications, the native approach is often the most stable, optimized, and resource-efficient. Getting started is simpler than many realize, yet many users miss the initial configuration steps.
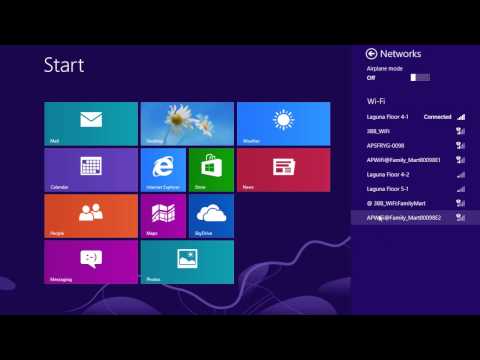
Navigating the Settings: Begin by accessing the charm bar – swipe from the right edge of your screen or move your cursor to the top-right corner. Select "Settings" (represented by a gear icon). Then, click on "Change PC settings." Navigate to "Network" and then "Mobile hotspot."
Enabling the Basic Hotspot: The first crucial step is the toggle switch. Simply switch it to "On," and your Windows 8 device begins its transformation into a portable wireless access point. Before proceeding, ensure your device has a working internet connection through either Ethernet or a WiFi connection to another available network. This is the fundamental requirement; if your primary internet access is failing, the hotspot function will not work.
Configuration Essentials: Once enabled, we need to customize the hotspot. We’re not aiming for the default settings; we are striving for peak efficiency. Selecting “Edit” allows for the configuration of the most essential parameters.
Network Name (SSID): This is the name that will identify your hotspot on other devices. Choose something memorable, but crucially, also unique. Avoid using generic names that could blend with other hotspots in populated areas. A unique SSID is the first line of defense against accidental connections to the wrong network.
Network Password: This is your primary layer of security. Opt for a strong password. Avoid easily guessable words, dates, or personal information. A combination of uppercase and lowercase letters, numbers, and special characters is ideal.
Choose Your Band (If Applicable): Depending on your network adapter, you might have the option to select a frequency band for your hotspot, usually 2.4 GHz or 5 GHz. The 5 GHz band offers faster speeds and is less prone to interference from other devices, but it has a shorter range. If you are working in a crowded environment, always aim at the 5 GHz band to avoid interruptions.
The Unseen Advantage: Advanced Hotspot Customization
The real secret lies in the advanced configurations often ignored. While the basic settings get you up and running, understanding these deeper options allows for more control, security, and optimal performance, particularly in crowded environments.
Connection Sharing: This is one of the most overlooked aspects. Make sure you have correctly shared the internet connection with the device that is acting as a hotspot. In the Network and Sharing Center, find your internet connection and share it properly so that it serves as the primary connection for your new hotspot.
Monitor Client Connections: Not all operating systems provide a visual display of the number of clients connected. Regularly check the connected devices. This allows you to identify unauthorized users and manage bandwidth allocation, particularly if your internet speed is limited. A sudden spike in connected devices, especially if you don’t recognize them, could indicate a security breach, which requires immediate action.
Prioritize Bandwidth: Some Windows 8 devices, depending on their hardware and drivers, may offer the option to prioritize bandwidth. This is an invaluable feature when juggling multiple tasks or client connections. Allocate more bandwidth to the devices or applications requiring higher speeds.
Fortifying Your Fortress: Security Protocols Beyond the Password
A strong password is the first line of defense, but it's not the only protection. We must delve into additional layers of security to make your hotspot truly secure.
Network Encryption Type: This is crucial. Always choose WPA2-PSK (AES) for the highest level of security. Avoid using older encryption methods such as WEP, which is easily compromised. While WPA/WPA2-TKIP is supported, it is less secure than AES and may impact the speed of your connection; it should be considered only if absolutely necessary.
Regular Password Changes: Periodically change your WiFi hotspot password. This proactive measure helps to prevent unauthorized access, especially if the hotspot is used in public spaces or shared with multiple individuals.
MAC Address Filtering (If Supported by Your Hardware): This advanced feature allows you to permit or deny access based on the unique Media Access Control (MAC) address of a device. While not universally available, MAC address filtering can add an extra layer of security. Only allow known devices to connect.
Monitor Network Traffic: Although Windows 8 doesn't have robust built-in traffic monitoring tools, consider using third-party software to monitor network activity for suspicious patterns. This advanced observation can help to swiftly identify and respond to potential security threats.
Optimizing Performance: Maximize Speeds and Stability
A slow or unstable hotspot defeats the purpose. We need to ensure that our Windows 8 hotspot operates at peak performance.
Driver Updates: Ensure your network adapter drivers are up-to-date. Outdated drivers can lead to performance bottlenecks and stability issues. Visit the manufacturer's website or use the Device Manager tool for the latest drivers.
Channel Selection: Understand that WiFi operates on channels. In crowded areas, hotspots may interfere with each other. Many WiFi tools allow you to analyze the environment and choose the least congested channel. By manually selecting an uncongested channel, you can optimize the performance of your hotspot.
Placement Matters: The physical location of your Windows 8 device plays a crucial role. Place your device in an elevated, central location to maximize signal coverage and minimize obstructions. Avoid placing it near walls or metal objects that can interfere with the signal.
Limit Connected Devices: While the Windows 8 hotspot can handle multiple devices, the more devices connected, the slower the connection speeds for each device. If your internet connection is slow, limit the number of connected devices to improve performance for the essential applications.
Troubleshooting Common Issues: The Pro's Guide
Even with careful configuration, issues can arise. Knowing how to troubleshoot quickly is crucial.
Connectivity Problems: If devices cannot connect, double-check the network name and password for accuracy. Ensure that the hotspot is enabled and broadcasting. Try rebooting both the hotspot device and the client devices.
Slow Speeds: If speeds are slow, check your internet connection speed on the main device. Then, try changing the WiFi channel. Limit the number of connected devices.
Intermittent Disconnections: Verify your drivers are up-to-date. Check for interference from other electronic devices. If possible, move the hotspot to a different location.
Hotspot Not Appearing: Ensure the network adapter is enabled. Check that the service responsible for the hotspot is running. Review the sharing settings for the primary internet connection.
Beyond the Basics: Advanced Scenarios
The Windows 8 WiFi hotspot functionality offers solutions that can address more specialized needs.
Sharing a Wired Connection: Even if your Windows 8 device has only a wired Ethernet connection, you can still use the hotspot feature. Simply connect the Ethernet cable and the device will share its internet connection wirelessly.
Extending a WiFi Network: While not its primary function, the Windows 8 hotspot can, in a pinch, extend the range of an existing WiFi network. It effectively acts as a makeshift repeater, although performance will be degraded.
Bridging Internet Connections (Advanced): If your Windows 8 device has multiple network interfaces, you can bridge them to share a connection. This is an advanced technique, but it can be used to combine multiple internet connections to boost bandwidth.
Mastering the Windows 8 WiFi hotspot takes a bit more than just turning it on. By implementing these advanced techniques, we transform a simple feature into a powerful tool for reliable and secure connectivity. With the right knowledge and a proactive approach, you'll be prepared to outmaneuver the connectivity challenges, ensuring seamless access to the internet wherever you go.
