laptop wifi no internet access 169 ip address
Title: How do you fix a 169 IP address so you can get online
Channel: Arvin Haurab
How do you fix a 169 IP address so you can get online by Arvin Haurab
Laptop WiFi Nightmare: 169.254.x.x IP? FIX IT NOW!
Laptop WiFi Hell: The 169.254.x.x IP Address – Escape the Black Hole!
Have you ever stared at your laptop screen, willing the Wi-Fi to just work? Suddenly, your internet access vanishes like a magician’s rabbit. Your laptop stubbornly displays a 169.254.x.x IP address. But, don't panic! It seems you’ve stumbled upon a common, yet often frustrating, networking woe.
The Mystery of the Self-Assigned IP
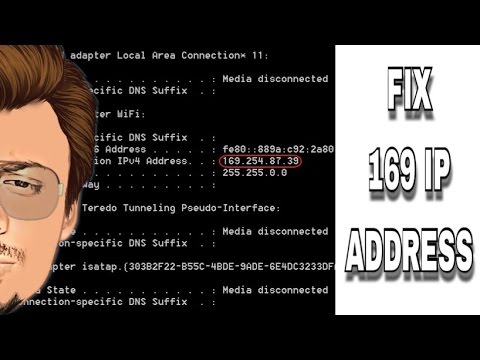
Essentially, the 169.254.x.x IP address signifies something important. Your laptop is failing to connect to your router. It’s a self-assigned IP. In this situation, the device is trying to find an IP address. Unfortunately, it's unable to obtain an IP from your router's DHCP server. Consequently, the laptop assigns itself this unique address range.
Understanding the Root Causes Behind the Problem
Several factors contribute to this frustrating scenario. First, your router might be experiencing issues. It might be temporarily down. Then, the connection itself could be weak. Also, your network cable might be malfunctioning. Besides, your laptop’s network adapter could be the culprit. Furthermore, software glitches or outdated drivers could cause problems. Therefore, we need to dive deeper.
Troubleshooting Steps: Your Wi-Fi Rescue Mission
So, you're eager to fix this? Let's launch a rescue mission! Here's how to reclaim your lost internet.
Restarting Your Tech Troops
First, commence with the basics. Power cycle everything. Unplug your router and modem. Turn off your laptop. Wait a minute or two. Then, plug the modem and router back in. Allow them to fully boot up. Afterward, power on your laptop. Check your Wi-Fi connection. Often, this simple solution works wonders.
Examining the Network Adapter
Next, assess your laptop’s network adapter. Go to your device manager. Search for "Network adapters." See any yellow exclamation marks? Therefore, a driver update might be in order. Right-click on the adapter. Choose "Update driver." This refreshes your connection.
The IP Address Tango: Release the Static
Also, consider your IP address settings. Sometimes, a static IP can cause conflicts. Here’s how to reset them. Open your network settings. Navigate to your Wi-Fi connection properties. Look for "Internet Protocol Version 4 (TCP/IPv4)." Select it. Click "Properties." Ensure "Obtain an IP address automatically" is selected. Then, choose "Obtain DNS server address automatically." Save the changes.
Firewall Frolics: Are They Blocking You?
Furthermore, your firewall could be the villain. It sometimes blocks network traffic. Temporarily disable your firewall. See if this resolves the issue. If so, reconfigure your firewall settings. Allow your network connection. Make sure it is not blocking your internet access.
Checking Router's Configuration Settings
In addition, examine your router’s configuration. Access your router’s settings page. This typically involves typing the router's IP address (often 192.168.1.1 or 192.168.0.1) into your web browser. Log in with your credentials. Check the DHCP server settings. Ensure it's enabled. Verify the IP address range. Make sure it's not exhausted.
Software Conflicts: The Silent Saboteurs
Moreover, software conflicts can breed problems. Recent software installations might clash with your network adapter. Test this by temporarily disabling any recently installed programs. Uninstall them. Reboot your laptop. Test your Wi-Fi connection again.
Hardware Hurdles: Checking the Connections
Additionally, inspect the physical connections. Ensure your Ethernet cable (if applicable) is securely plugged into both your laptop and the router. If using Wi-Fi, ensure you're within range of your router. Consider moving closer to the router.
When In Doubt, Call for Backup
Despite taking all these steps, the problem persists? Do not fret! You might need expert help. Contact your internet service provider (ISP). Their technicians can troubleshoot the issue. They can remotely diagnose your network. You might need professional assistance.
The Bottom Line: Returning Online
In conclusion, facing the 169.254.x.x IP is a common hurdle. However, with these troubleshooting steps, you can fix it. Restart your devices. Check your settings. Investigate potential conflicts. Take these actions. You’ll swiftly regain your internet access. You'll soon be back online. Your digital life will resume without interruption. Consequently, you should experience a smoother, more reliable Wi-Fi connection. Now, go forth and conquer that 169.254.x.x IP!
Laptop WiFi Hotspot: The SHOCKING Truth You NEED To Know!Laptop WiFi Nightmare: 169.254.x.x IP? FIX IT NOW!
We’ve all been there. You settle in, coffee brewing, ready to binge-watch your favorite show (or, you know, actually work), and… nothing. Your laptop’s stubbornly refusing to connect to the internet. The dreaded WiFi bars are there, promising connectivity, but the reality is a big, fat “No.” And then you see it: that pesky 169.254.x.x IP address. It's the digital equivalent of a locked door, a brick wall in your online experience. But don’t fret, friend! We're going to crack this code together. Think of this article as your digital WiFi rescue team, ready to diagnose and dispatch that frustrating 169.254.x.x problem once and for all.
The Mysterious 169.254.x.x: What’s the Deal?
First things first: what is this IP address, anyway? 169.254.x.x is a self-assigned IP address. Your laptop, like a lost puppy, is trying to find its way home (the internet) but can't get directions from the router (the owner of the house). It's essentially saying, "Hey, I don't have an IP address, so I'll just pick one at random!" This usually means your laptop isn't getting a valid IP address from your router, which is the equivalent of being unable to find the town on a map. The most common culprit? Issues with DHCP.
DHCP: The Silent Superhero of Network Connections
DHCP (Dynamic Host Configuration Protocol) is the unsung hero of your network. It’s responsible for assigning IP addresses automatically to devices. Think of it as the helpful postman delivering your mail (internet access) to your door (your laptop). When DHCP fails, that helpful postman goes on vacation, and your laptop is left stranded.
Troubleshooting Your WiFi Woes: A Step-by-Step Guide
Alright, let's roll up our sleeves and troubleshoot this. We're going to approach this systematically, like a detective solving a case. Remember, persistence is key!
Step 1: The Simple Reboot (Always a Good Place to Start!)
Okay, I know, it sounds ridiculously basic, but rebooting your laptop and your router is frequently the miracle cure. Think of it as hitting the "reset" button. Turn off both devices. Wait 30 seconds. Turn the router back on first, allowing it to fully boot up. Then, turn your laptop back on. Fingers crossed!
Step 2: Check Your Router’s Connection
Is your router actually connected to the internet? Look for the internet light indicator. Is it solid, blinking, or off? If it’s not on, your internet service might be down. Contact your internet service provider (ISP). This is like checking the postal service's hours before you expect mail.
Step 3: Isolate the Issue: Other Devices?
Do other devices in your house, like your phone or tablet, have internet access? If they do, the problem is likely with your laptop. If no devices can connect, the issue is probably with your router or your internet service itself. This is like checking if other neighbors got mail.
Step 4: Renew Your IP Address (Windows)
This is like ringing the doorbell to let the postman know you’re ready.
- Open the Command Prompt (search for "cmd" in the Windows search bar).
- Type
ipconfig /releaseand press Enter. This releases your current IP address. - Type
ipconfig /renewand press Enter. This requests a new IP address from the router. - If it's successful, you should now have a valid IP address.
Step 5: Renew Your IP Address (macOS)
Similar to Windows, but the steps differ.
- Go to System Preferences > Network.
- Select your Wi-Fi connection.
- Click “Advanced”.
- In the TCP/IP tab, click "Renew DHCP Lease".
- Apply the settings.
Step 6: Check Your Network Adapter Settings
Sometimes, the settings for your network adapter are incorrect.
- Open the Network Connections or Network and Sharing Center (search for it).
- Right-click your Wi-Fi adapter and select "Properties."
- Make sure "Internet Protocol Version 4 (TCP/IPv4)" is checked.
- Double-click on "Internet Protocol Version 4 (TCP/IPv4)."
- Ensure "Obtain an IP address automatically" and "Obtain DNS server address automatically" are selected.
Step 7: Check for Driver Updates
Outdated or corrupted network adapter drivers can cause issues.
- Open Device Manager (search for it).
- Expand "Network adapters."
- Right-click your Wi-Fi adapter and select "Update driver."
Router Configuration: A Deeper Dive
If the above steps don't work, it's time to tweak the router settings. Don’t panic! It’s not as scary as it sounds.
Accessing Your Router's Interface
You'll need to access your router's configuration page. Usually, this can be accessed by typing the router's IP address into your web browser. (This can be found in the router's manual or sometimes on a sticker on the router itself. Common addresses are 192.168.1.1 or 192.168.0.1). You’ll need the router’s username and password (again, check the manual or the router itself).
Verifying DHCP is Enabled
Once in the router settings, find the DHCP settings. Make sure DHCP is enabled. This is often under "LAN settings” or “Network settings”.
Checking the IP Address Range
Your router assigns IP addresses within a specific range. Make sure this range isn’t conflicting with other devices. For example, the range can be [192.168.1.100-192.168.1.200].
Advanced Troubleshooting: When Things Get Tricky
Okay, feeling like a seasoned WiFi warrior? Sometimes, the problem runs deeper.
Factory Resetting Your Router (Use with Caution!)
This is like hitting the nuclear option. It resets your router to its factory defaults. This will erase your settings, so be prepared to reconfigure them. There’s usually a small reset button on the back of the router; use a paperclip to press and hold it for about 10-15 seconds, and wait.
Checking for Interference
Other devices can interfere with your WiFi signal. Try moving your router away from microwave ovens, cordless phones, and other electronic devices.
Contacting Your ISP (The Final Frontier!)
If all else fails, it's time to call in the cavalry – your internet service provider. They can check your service and help troubleshoot the issue.
Preventing Future WiFi Headaches
Wouldn't it be great to avoid this whole mess in the future? Here are some preventative measures:
- Keep Your Router Firmware Updated: Regularly update your router's firmware to patch security vulnerabilities and improve performance.
- Secure Your WiFi Network: Use a strong password and enable WPA3 encryption.
- Monitor Your Network: Use network monitoring tools to track your network's performance and identify potential issues.
Laptop WiFi: Troubleshooting Tips To Try
Here are some additional, often-overlooked tips:
- Airplane Mode: Turn off Airplane Mode on your laptop. This disables all wireless connections.
- Firewall: Your firewall might be blocking the connection. Temporarily disable your firewall to test and see if that's the problem.
- DNS Issues: Try using public DNS servers like Google DNS (8.8.8.8 and 8.8.4.4) or Cloudflare DNS (1.1.1.1 and 1.0.0.1).
- Network Reset (Windows): In Windows, go to Settings > Network & Internet > Advanced network settings > Network reset to reset your network settings.
Final Thoughts: Conquering the WiFi Conquerors
Congratulations! You've journeyed through the dark forest of the 169.254.x.x IP, and you're now armed with the knowledge to banish it from your laptop. Remember, sometimes the solution is simple, and sometimes it takes a little digging. Whatever the case, don't give up! Your internet connection is waiting for you on the other side. Now, go forth and stream (or work!) with confidence!
FAQs: Your Burning Questions Answered
Q1: My computer says "No internet access" even after following these steps. What else can I do?
A: If you've tried all the steps, the problem may be with your internet service. Contact your ISP.
**Q2:
Why Your Laptop WON'T Connect to Public Wi-Fi (And How to Fix It NOW!)How To Disable The APIPA Autoconfiguration IPv4 Address 169.254.X.X
By Technical Spark How To Disable The APIPA Autoconfiguration IPv4 Address 169.254.X.X by Technical Spark
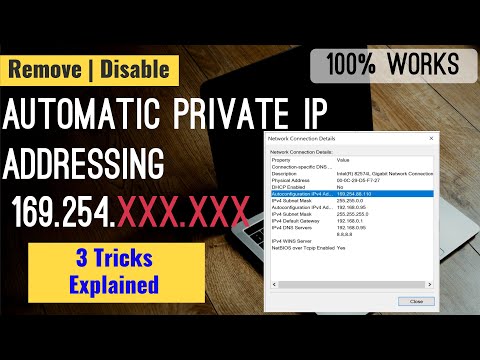
Wi-Fi status IPv4 Connectivity No network access. DHCP Enabled but Autoconfiguration IPv4 address
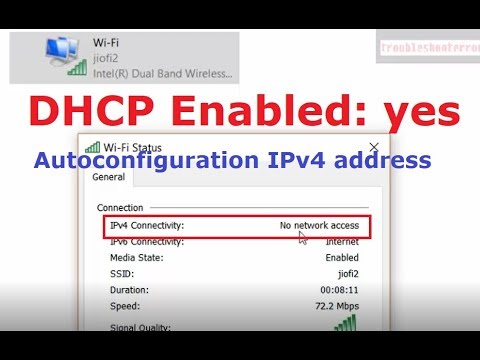
By troubleshooterrors Wi-Fi status IPv4 Connectivity No network access. DHCP Enabled but Autoconfiguration IPv4 address by troubleshooterrors
Fix ethernet doesn't have a valid ip configuration issue in windows 10 Windows 11
By IT Magics Fix ethernet doesn't have a valid ip configuration issue in windows 10 Windows 11 by IT Magics

Title: Autoconfiguration IPv4 Address 169.254.55.152 'Automatic Private IP Addressing APIPA' Windows 10
Channel: troubleshooterrors
Autoconfiguration IPv4 Address 169.254.55.152 'Automatic Private IP Addressing APIPA' Windows 10 by troubleshooterrors
Laptop Wifi Connect
Laptop WiFi Nightmare: 169.254.x.x IP? FIX IT NOW!
Have you ever stared at your laptop, desperate for a WiFi connection, only to be met with the dreaded 169.254.x.x IP address staring back at you? It's the digital equivalent of being stranded on a deserted island, disconnected from the world and relegated to the technological wilderness. This cryptic address signals a frustrating truth: your laptop is failing to communicate with your router, and thus, is unable to connect to the internet. But fear not, fellow digital traveler! This article is your compass, guiding you through the troubleshooting maze and helping you reclaim your rightful place online. We'll unravel the mystery of the 169.254.x.x IP and provide you with clear, actionable steps to banish this WiFi woe.
Understanding the 169.254.x.x IP: The Self-Assigned Address
Think of your laptop as a person arriving at a party, eager to mingle. To join the digital festivities (i.e., access the internet), it needs an address. Ordinarily, your router, acting as the party host, assigns a unique address, known as a DHCP (Dynamic Host Configuration Protocol) address. This allows your laptop to communicate seamlessly within your network and beyond.
However, when a laptop can't reach the router to request an address, it resorts to a self-assigned address within the 169.254.x.x range. This is a fallback mechanism, a digital sigh of defeat. It’s the equivalent of shouting into the void, "I need an address, is anyone out there?" Unfortunately, the answer is usually silence, meaning no internet access. This self-assigned address effectively isolates your laptop, preventing it from connecting to your home network and, of course, the wider internet.
Troubleshooting the 169.254.x.x IP: A Step-by-Step Guide
Now, let's roll up our sleeves and tackle this frustrating issue. We'll proceed through a series of methodical steps, starting with the simplest solutions and escalating to more advanced techniques. Think of this as a digital detective story, where we are searching for the root cause of your laptop’s network woes.
1. The Reboot Routine: Restart Your Devices
The simplest remedy is often the most effective. Let's begin with a full reboot of your devices. This involves:
- Restart Your Laptop: A simple restart can resolve temporary software glitches that might be interfering with your network connection. Close all applications and restart your laptop. Once it's back up, check your WiFi connection again.
- Restart Your Router and Modem: Power down your router and modem. Unplug both devices from their power sources. Wait for a full minute. This allows the devices to fully reset. Plug the modem back in first and wait for it to fully initialize (usually indicated by solid lights). Then, plug in your router and wait for it to power up and connect to the internet. Once both devices are back online, test your laptop's WiFi connection.
2. Verify Network Settings: Confirm Connection Profiles
Next, confirm that your laptop is attempting to connect to the correct network and that the settings haven't been inadvertently altered. These steps vary slightly depending on your operating system, but the principles remain the same.
- Windows:
- Click the WiFi icon in the system tray (usually in the bottom-right corner of your screen).
- Ensure you are connected to the correct WiFi network.
- If you're prompted for a password, double-check that it's correct.
- Right-click on the WiFi network and select "Properties."
- Verify that "IP assignment" is set to "Automatic (DHCP)."
- macOS:
- Click the WiFi icon in the menu bar (top-right corner).
- Select the correct WiFi network.
- If prompted, enter your network password.
- Go to "System Preferences" and then "Network."
- Select your WiFi connection from the left-hand panel.
- Click "Advanced."
- In the "TCP/IP" tab, ensure "Configure IPv4" is set to "Using DHCP."
3. Troubleshoot the Network Adapter: Diagnose Hardware
Sometimes, the problem rests with your laptop’s network adapter, the hardware responsible for connecting to a WiFi network. We must investigate this.
- Windows:
- Open "Device Manager" (search for it in the Windows search bar).
- Expand the "Network adapters" section.
- Locate your WiFi adapter (e.g., "Wi-Fi" or "Wireless Network Adapter").
- Look for any warning icons (e.g., a yellow exclamation mark) next to the adapter. If present, right-click on the adapter and select "Troubleshoot problems." Windows will attempt to diagnose and fix the issue.
- If troubleshooting doesn't help, try right-clicking on the adapter and selecting "Update driver." Choose "Search automatically for drivers." If that doesn't work, consider downloading the latest drivers from your laptop manufacturer's website.
- If the adapter seems fine consider disabling and enabling the adapter can sometimes force a refresh. Right-click on the adapter within Device Manager and select "Disable device." Then, right-click again and select "Enable device."
- macOS:
- Open "System Information" (search for it in Spotlight, or under "Utilities" in "Applications").
- In the left-hand panel, under "Hardware," select "Network."
- Examine the information for your WiFi adapter.
- Look for any error messages or indications of problems.
- If problems are evident, consider restarting your Mac in Safe Mode (hold down the Shift key while restarting) and checking your network connection again. This loads only essential system software and can help isolate software conflicts.
- Update your driver from your laptop manufacturer's website
4. Renew Your IP Address: Force a Connection
A corrupted IP address lease or a conflict with another device may be the culprit. You can attempt to force your computer to request a new IP address. This will remove the invalid IP address and request a new one.
- Windows:
- Open the Command Prompt as an administrator (search for "cmd," right-click, and select "Run as administrator").
- Type the following commands, pressing Enter after each one:
ipconfig /releaseipconfig /renewipconfig /flushdns
- Restart your laptop.
- macOS:
- Open "Terminal" (search for it in Spotlight, or under "Utilities" in "Applications").
- Type the following commands, pressing Enter after each one:
sudo ipconfig set en0 DHCP(if your WiFi is using en0 – this may vary based on your network interface, check Network preferences)sudo ipconfig renewsudo killall -HUP mDNSResponder(this flushes the DNS cache)
- Enter your administrator password when prompted.
- Restart your laptop.
5. Check Your Router's DHCP Settings: Verify Address Allocation
Your router's configuration is vital. We will ensure that it is configured to assign IP addresses to devices on your network. Accessing your router's settings usually involves entering its IP address into your web browser. The standard IP addresses are 192.168.1.1 or 192.168.0.1, which is generally printed on the router itself. If you can't find it, it is time to refer to the router's manual.
- Log in to your router's administration panel (using its IP address in your web browser). You'll typically need to enter a username and password.
- Navigate to the DHCP settings. This area should be labeled similarly to "DHCP Server," "LAN Setup," or "Network Settings."
- Ensure that the DHCP server is enabled.
- Verify that the IP address range is suitable (e.g., 192.168.1.2 to 192.168.1.254) and that there are enough available addresses for your devices.
- If the DHCP server is already enabled, try disabling and re-enabling it to clear any potential glitches. Save your changes and restart your modem.
6. Consider Interference: Battle Signal Obstacles
WiFi signals are susceptible to interference from other devices. It is a good idea to make sure that you're not battling signals from nearby devices.
- Physical Obstacles: Walls, metal objects, and other electronic devices can impede WiFi signals. Place your router in an open, central location, away from obstructions.
- Channel Congestion: Your router uses radio channels to transmit data. If multiple networks are using the same channel, interference can occur. Access your router's settings and try changing the WiFi channel to one that’s less congested. Most routers offer an "Auto" setting that automatically selects the best channel.
- Other Devices: Microwaves, Bluetooth devices, and even older
