how to transfer files from desktop to laptop using wifi

Title: How to transfer files from PC to PC using WiFi Windows 10 7 8
Channel: IT Magics
How to transfer files from PC to PC using WiFi Windows 10 7 8 by IT Magics
how to transfer files from desktop to laptop using wifi, how to transfer files from pc to laptop using wifi, how to transfer files from pc to laptop using wifi windows 11, how to share files from pc to laptop using wifi, how to send files from pc to laptop via wifi, how to share files from laptop to desktop using wifi, how to transfer files from pc to laptop without internet, how to transfer photos or files from phone to pc or laptop using wifi, how can i transfer files from pc to laptop wirelessly, how to transfer files from pc to pc using wifi
Desktop to Laptop Wireless Transfer: The SHOCKINGLY Easy Method!
Desktop to Laptop Wireless Transfer: The SHOCKINGLY Easy Method!
Unveiling the Digital Bridge: Effortless File Transfers Between Your Devices
Imagine this: You're juggling projects. You need files from your desktop on your laptop. Suddenly, the cumbersome dance of USB drives or cloud uploads seems archaic. You crave a seamless solution, a way to bridge the gap without the tech-induced headaches. Fortunately, there is an incredibly easy method. It allows instant transfers!
The Wireless Revolution: Cutting the Cables, Boosting the Convenience
Gone are the days of tangled cords. We live in a wireless world. Therefore, it’s time to embrace the ease of wireless file sharing. It is like a digital teleportation system. It will revolutionize how you work and play. This method hinges on a principle. It is simplicity itself. We're talking about bypassing the usual obstacles.
Setting the Stage: Prepping Your Arsenal for Wireless Victory
Before you dive in, ensure both your desktop and laptop are ready. First, confirm they are on the same Wi-Fi network. See, it is critical for communication. Second, ensure both devices are powered on. Also, you possess a shared network. This is important!
Introducing the Players: The Software Superstars
Certain programs make wireless transfers a breeze. Many options exist, each with its own charm. These are your digital allies. They are essential for this process. One such contender is a built-in Windows feature. This solution is straightforward. It is frequently overlooked.
Cracking the Code: Step-by-Step to Wireless Nirvana
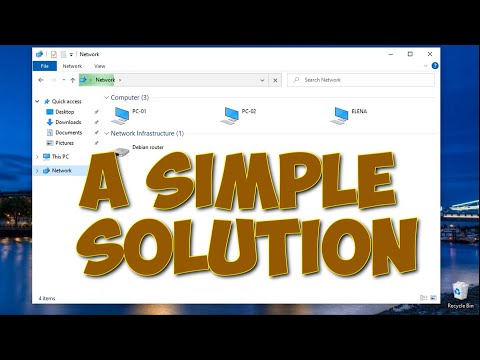
Let's explore the Windows built-in option. First, open File Explorer on your desktop. Then, right-click the folder. Click "Give access to." You will then want to select "Specific people." Choose the user account on your laptop. Click "Share."
Now, on your laptop, open File Explorer again. Navigate to "Network." Your desktop should appear. Double-click on it. You must have the necessary permissions. Now, browse the shared folder. After that, you will observe your files. From there, copy and paste them. That is, if you need.
Beyond Boundaries: Exploring Alternative Transfer Methods
Though the Windows approach is convenient, there are alternatives. Consider cloud storage services like Google Drive or Dropbox. Of course, they offer easy access. They are great choices. A great benefit is accessibility from anywhere. Another option is using dedicated file-sharing programs. These simplify the process even further.
Troubleshooting Time: Common Pitfalls and Quick Fixes
Sometimes, things go sideways. Don't worry, though. You can resolve most issues. First, double-check that both devices are on the same network. Ensure your firewall isn't blocking the connection. Restarting both computers can often work.
The Verdict: Seamless Transfers, Maximum Efficiency
In conclusion, wireless file transfer is an absolute game-changer. It transforms your workflow. It eliminates unnecessary steps. Embrace this simple, effective method. You will save time and frustration. So, why tether yourself? Freedom awaits.
Elevating Your Workflow: The Benefits of Wireless Freedom
The advantages are numerous. Consider the time savings. This lets you focus on what matters. Mobility is enhanced. Work from any location. You also eliminate physical clutter. This boosts productivity.
Embracing the Future: Staying Ahead of the Curve
The digital landscape evolves constantly. Wireless transfer is not just a convenience. It is the future of data management. Adopt these seamless methods today. You will thank yourself later. It helps you remain technologically advanced.
Final Thoughts: Embrace the Ease, Enjoy the Flow
You're now equipped with knowledge. You can transfer files wirelessly with ease. Take advantage of this technology. Experience a new level of productivity. Wireless transfer simplifies your digital life. Take control of your data today.
Unlock Blazing-Fast WiFi Hotspot on Your Windows 8.1 Laptop!Desktop to Laptop Wireless Transfer: The SHOCKINGLY Easy Method!
Hey there, fellow tech enthusiasts! Ever stared at your clunky desktop, dreaming of the freedom a laptop offers, but dreading the tedious chore of transferring all your precious files? We've all been there. Picture this: you're ready to work from the comfy couch, maybe sipping a latte, but then reality hits. You've got gigs of data, photos, videos, and documents trapped on your desktop, and the thought of plugging in a bulky external hard drive or battling with USB sticks makes you want to throw your hands up in despair. But wait! What if I told you there's a ridiculously easy way to wirelessly transfer everything from your desktop to your laptop, saving you time, frustration, and maybe even a few gray hairs? Buckle up, because we're about to dive into the magic of wireless transfer!
1. The Great Desktop Escape: Why You Need Wireless Transfer Now!
Let's face it, desktops are fantastic workhorses. They pack power, offer expandable storage, and can handle pretty much anything you throw at them. But they're also immobile beasts, tethered to a desk, a power outlet, and a whole lot of wires. Laptops, on the other hand, represent freedom. Imagine the possibilities! Working from the park, collaborating with colleagues at a coffee shop, or simply enjoying the flexibility of moving your workspace around the house. The ability to seamlessly transfer your data is the crucial bridge between these two worlds. It’s like unlocking a secret level in a video game – a level of convenience and productivity you never knew existed!
2. What You'll Need: Your Arsenal for Wireless Data Conquest
Before we get into the nitty-gritty, let's gather our supplies. Think of this as assembling your digital toolkit. You won't need much, thankfully! We're talking a streamlined operation here.
- Both Devices: Your desktop and laptop, of course! Make sure they're both powered on and connected to the same Wi-Fi network. This is absolutely essential; this is the digital highway on which all your data will travel.
- Software (The Hero Tool): There are several software options available; we'll explore a few of the most user-friendly ones later. Don't worry; you likely already have the right software pre-installed or easily downloadable.
- Patience (and a little Wi-Fi Juice): Depending on the volume of data, the transfer process might take a little while. Grab a cup of coffee, catch up on some emails, or just relax. Think of it as a digital "chill" session while your machines do the heavy lifting. Make sure your laptop is plugged in to avoid running out of charge mid-transfer.
3. Picking Your Weapon: Choosing the Right Transfer Method
Now, for the fun part: choosing your weapon of choice! Several methods make this wireless transfer process remarkably straightforward.
3.1. Cloud Storage: Your Digital Backpack
Cloud storage services like Google Drive, Dropbox, OneDrive, and iCloud are fantastic options. Think of them as your digital backpack where you can stash your key files.
- Pros: Super simple to set up; easily accessible from any device; perfect for smaller files or syncing specific folders. You can access your stuff from anywhere with an internet connection.
- Cons: Depending on your free storage limits, you might need a paid subscription for larger files. Transfer speeds can be affected by your internet speed.
3.2. Shared Folders: The Neighborhood Watch Approach
Windows and macOS have integrated features allowing you to share folders between devices on the same network.
- Pros: No need to install additional software; ideal for regularly accessing files from both devices.
- Cons: Can be slightly more involved to set up (though still pretty easy); requires both devices to be turned on and connected to the network to access the files.
3.3. Dedicated Transfer Software: The Fast Lane
Several dedicated transfer software options specialize in transferring files between devices. These typically offer speed and additional features.
- Pros: Often faster transfer speeds due to optimized protocols; can handle large files and entire folder structures; typically offer a user-friendly interface.
- Cons: Might require a one-time purchase or have a free trial with limited features.
4. The Step-by-Step Guide: Making the Magic Happen
Now, let's get our hands dirty – or, rather, our fingers ready to click. The steps will vary slightly depending on the method you choose, but the general process is remarkably similar.
4.1. Cloud Storage Walkthrough: Upload, Sync, Done!
- Sign In: On your desktop, sign into your chosen cloud storage service (e.g., Google Drive, Dropbox).
- Upload: Select the files or folders you wish to transfer and upload them to the cloud. This might take some time, particularly for large files.
- Sign In (Again): On your laptop, sign in to the same cloud storage service.
- Download/Sync: Select the files or folders you uploaded on your desktop, and download or sync them to your laptop. That's it!
4.2. Shared Folder Adventure: Sharing is Caring!
- Enable Sharing (Desktop): On your desktop, right-click the folder you want to share. Select "Properties," then "Sharing." Enable sharing and optionally set permissions.
- Find the Network Path (Desktop): Note the network path (usually something like
\\\\DESKTOPNAME\\SharedFolder). - Access the Folder (Laptop): On your laptop, open File Explorer (Windows) or Finder (macOS).
- Type in the Network Path: Type the network path into the address bar to access the shared folder on your desktop. Now you can copy the files over.
4.3. Dedicated Transfer Software: The Turbocharged Option
- Install the Software: Install the chosen transfer software on both your desktop and laptop.
- Connect Devices: Most software will automatically detect devices on the same network.
- Select Files/Folders: Select the items you want to transfer.
- Initiate the Transfer: Click the "Transfer" or "Send" button and let the software handle the rest!
5. Turbocharge Your Transfer: Tips and Tricks for Speed and Efficiency
Want to make your transfer even smoother and faster? Here are a few pro tips:
- Optimize your Wi-Fi: Ensure both devices are connected to a strong Wi-Fi signal. Consider restarting your router for an extra boost.
- Close Unnecessary Applications: Shut down any programs that consume a lot of network bandwidth.
- Organize Before Transfer: Before you initiate the transfer, take some time to cull and organize your files. This will save you time and hassle in the long run.
- Don't Interrupt: Avoid disrupting the transfer process. Let the software do its job.
- Backup Before You Begin: Always be prudent and create a backup of your important data! This is just good practice, regardless of the transfer method.
6. Troubleshooting Troubles: What To Do If Things Go Wrong
Sometimes, things don't go according to plan. Don't panic! Here are a few common issues and how to fix them:
- Connectivity Problems: Double-check that both devices are connected to the same Wi-Fi network. Ensure your firewall is not blocking the transfer (you might need to allow access).
- Slow Transfer Speeds: This is usually due to a weak Wi-Fi signal or a large amount of data being transferred. Try moving the devices closer to the router or restarting your router.
- Software Glitches: If you're using transfer software, try restarting both the programs and the devices. If problems persist, consult the software's help documents.
7. The Joy of Wireless Freedom: What You'll Gain
Once you've successfully transferred your files, you'll experience the true meaning of laptop freedom. Imagine curling up on the couch to watch videos, effortlessly collaborating with colleagues, or bringing your work with you on holiday.
8. Beyond the Basics: Advanced Wireless Transfer Techniques
While the methods we've discussed are simple, you can tweak your approach for maximum efficiency. For instance, consider:
- Network-Attached Storage (NAS): For larger data and greater control, a NAS device can act as a central storage hub, simplifying transfers.
- Wireless Routers with USB Ports: If you have an older USB hard drive, you can attach it to your router and access it from your laptop.
9. The Future is Wireless: Embracing the Seamlessness Revolution
Wireless technology is constantly evolving. Soon, we may see even faster and more intuitive transfer methods. Keep an eye on emerging standards and technologies!
10. Preparing for the Unexpected: Data Security and Protection
Data security is always crucial, especially when transferring sensitive information.
- Use Strong Passwords: Always use complex and unique passwords on your devices and cloud storage accounts.
- Enable Two-Factor Authentication (2FA): This adds an extra layer of security by requiring a second verification method (like a text message code) when you sign in.
- Keep Your Software Updated: Regularly update your operating systems and transfer software to patch security vulnerabilities
Transfer Files Between Two Laptops over Wi-Fi

By Techy Druid Transfer Files Between Two Laptops over Wi-Fi by Techy Druid
How to transfer files from PC to PC using WiFi Windows Sharing Files Between Computers Wirelessly

By Each and Everything How to transfer files from PC to PC using WiFi Windows Sharing Files Between Computers Wirelessly by Each and Everything
Sharing Files Between Computers Wirelessly Solution for sharing folders on WIFI network

By FIXsage Sharing Files Between Computers Wirelessly Solution for sharing folders on WIFI network by FIXsage
Title: How to set up network sharing in Windows 10 and share files, folders between computers.Easily
Channel: ipMalik
How to set up network sharing in Windows 10 and share files, folders between computers.Easily by ipMalik
Laptop Wifi Connect
Desktop to Laptop Wireless Transfer: The Surprisingly Effortless Guide
We've all been there: staring at a mountain of files on our desktop, yearning to effortlessly migrate them to our sleek laptop. The thought of cables, complicated software, and potential data loss can make the process seem daunting. But what if we told you the reality is far simpler than you imagine? Forget the headaches; embrace the ease. This isn't just about transferring files; it's about reclaiming your time and streamlining your workflow. We'll guide you through the most direct, efficient, and surprisingly easy methods to wirelessly transfer your files, ensuring a seamless transition from desktop to laptop.
Understanding the Wireless Transfer Landscape: Options at Your Fingertips
Before we dive into specific methods, it's crucial to understand the underlying technologies at play. Wireless file transfer primarily hinges on two fundamental concepts: your local network (usually your home Wi-Fi) and cloud storage. Your local network allows devices connected to the same router to "see" each other, enabling direct transfer. Cloud storage acts as a middleman, allowing you to upload files from your desktop and download them on your laptop from anywhere with an internet connection. Each method has its strengths and weaknesses. We’ll examine both, equipping you with the knowledge to choose the best approach for your specific needs.
Method 1: Leveraging Cloud Storage Services for Effortless File Migration
Cloud storage services, such as Dropbox, Google Drive, and OneDrive, have become indispensable tools for modern life. They offer a remarkably simple and versatile way to transfer files wirelessly between your desktop and laptop. The beauty of this method lies in its platform-agnostic nature. Whether you're using Windows, macOS, or a combination, cloud storage offers a consistent and hassle-free solution.
Setting Up Your Cloud Account & Installing the Software:
- Choose Your Provider: Select a cloud storage service that aligns with your needs. Consider factors like storage capacity, pricing, file size limits, and user-friendliness. Popular choices include Dropbox (easy to use), Google Drive (integrated with Google services), and OneDrive (integrated with Windows).
- Create an Account: Sign up for an account with your chosen provider. Most services offer free tiers with a limited amount of storage, which can be sufficient for transferring smaller amounts of data.
- Download & Install the Desktop Application: Install the desktop application for your chosen cloud storage service on both your desktop and laptop. This application creates a dedicated folder on your computer that automatically syncs with the cloud.
Initiating the Transfer:
- Upload Files from Your Desktop: Drag and drop files or folders from your desktop into the cloud storage folder on your desktop. The application will automatically begin uploading these files to the cloud.
- Wait for Synchronization: The upload process depends on the size of your files and your internet connection speed. Larger files will take longer. Monitor the sync progress within the cloud application.
- Download Files on Your Laptop: Once the files are uploaded to the cloud, open the cloud storage folder on your laptop. The files will automatically download and become available.
Advantages of Cloud Storage:
- Accessibility: Access your files from anywhere with an internet connection.
- Backup: Cloud storage services often provide automatic backup, protecting your data from loss due to hardware failure or other issues.
- Cross-Platform Compatibility: Works seamlessly across various operating systems.
- Simplicity: Very easy to set up and use.
Potential Downsides:
- Internet Dependency: Requires a stable internet connection for both uploading and downloading.
- Storage Limits: Free tiers have limited storage capacity.
- Cost: Additional storage may require a paid subscription.
Method 2: Utilizing Your Home Network with Shared Folders
If you prefer to keep your data within your local network and want a faster transfer speed, shared folders offer a direct and efficient solution. This method utilizes the built-in file-sharing capabilities of your operating systems, allowing your desktop and laptop to communicate directly. It's perfect for transferring large files or entire directories without relying on the internet.
Enabling File Sharing on Your Desktop (Windows):
- Network Discovery: Ensure that network discovery is enabled on your desktop. Go to Control Panel > Network and Internet > Network and Sharing Center. Click "Change advanced sharing settings" in the left pane. Under "Private," turn on "Network discovery" and "File and printer sharing."
- Select Folders to Share: Right-click on the folder you want to share and select "Properties." Go to the "Sharing" tab. Click the "Share…" button.
- Configure Sharing Permissions: In the Network access window, add "Everyone" and grant "Read/Write" permissions (or "Read" if you only want to view the files). Click "Share."
- Note the Network Path: In the sharing properties window, note the network path (e.g.,
\\DESKTOP-XXXXXXXX\SharedFolder). This is the address you'll use to access the shared folder from your laptop.
Connecting to Shared Folders from Your Laptop (Windows):
- Open File Explorer: Open File Explorer on your laptop.
- Access the Network: In the left-hand pane of File Explorer, click "Network." Your desktop should appear as a device.
- Enter Credentials (if prompted): If prompted for credentials, enter your desktop username and password.
- Access the Shared Folder: Double-click on your desktop's name to access the shared folders. You can then copy and paste files from the shared folder to your laptop's storage.
Enabling File Sharing on Your Desktop (macOS):
- System Preferences: Open System Preferences from the Apple menu.
- Sharing: Click "Sharing."
- File Sharing: Select "File Sharing" from the list on the left.
- Add Shared Folders: Click the "+" button under "Shared Folders" and select the folder you want to share.
- Assign Permissions: In the "Users" section, select "Everyone" or specific users and set permissions (Read & Write or Read Only).
- Note the Network Address: Make a note of the "smb://" address displayed below "Shared Folders". This is the network path to access the shared folder from your laptop.
Connecting to Shared Folders from Your Laptop (macOS):
- Finder: Open Finder.
- Connect to Server: Go to "Go" > "Connect to Server" (or press Command + K).
- Enter the Network Address: Type the "smb://" address you noted earlier and click "Connect."
- Enter Credentials (if prompted): Enter your desktop's username and password if prompted.
- Access the Shared Folder: You should now see the shared folder from your desktop in Finder. Copy and paste files from the shared folder to your laptop.
Advantages of Shared Folders:
- Speed: Faster transfer speeds than cloud storage (especially for large files) when on a local network.
- Direct Transfer: No need to upload to and download from the cloud.
- Security: Control over who can access your files.
Potential Downsides:
- Requires Setup: More complex initial setup compared to cloud storage.
- Network Dependency: Relies on a working local network.
- Security Concerns: Improperly configured sharing settings can create security vulnerabilities. You must ensure proper password protection is in place.
Method 3: The Versatile Approach of Utilizing a USB Flash Drive (For Specific Situations)
While not strictly wireless, a USB flash drive remains a viable option for smaller transfers or in situations where a network connection is unreliable or unavailable. This method offers a direct and straightforward approach.
Steps for USB Transfer:
- Format the USB Drive (If Necessary): Ensure your USB drive is formatted with a compatible file system (e.g., FAT32 or exFAT) that your desktop and laptop can read.
- Connect to Desktop: Plug the USB drive into a USB port on your desktop.
- Copy Files: Drag and drop the files you want to transfer from your desktop to the USB drive.
- Safely Eject the Drive: Right-click on the USB drive icon in the system tray (Windows) or Finder (macOS) and select "Eject" before physically removing the drive.
- Connect to Laptop: Plug the USB drive into a USB port on your laptop.
- Copy Files to Laptop: Drag and drop the files from the USB drive to the desired location on your laptop.
Advantages of USB Flash Drive:
- Simplicity: Extremely easy to use.
- No Network Required: Operates independently of a network connection.
- Portability: A great way to transfer small files.
Potential Downsides:
- Slower Speeds: Transfer speeds may be slower compared to network-based methods.
- Physical Handling: Requires physical interaction with a device.
- Capacity Limits: Limited by the storage capacity of the USB drive.
Ensuring a Smooth and Secure Transfer: Best Practices and Tips
Regardless of which method you choose, here are some best practices:
- Back Up Your Data: Before transferring any
